

Redis master-slave replication working principle and common problems

I believe that many friends have already configured master-slave replication, but they do not have an in-depth understanding of the workflow and common problems of redis master-slave replication. Kaka spent two days this time to compile all the knowledge points about redis master-slave replication.
The environment required to implement this article
centos7.0
redis4.0
1. What is Redis master-slave replication?
Master-slave replication means that there are two redis servers now, and the data of one redis is synchronized to the other redis database. The former is called the master node, and the latter is the slave node. Data can only be synchronized in one direction from the master to the slave.
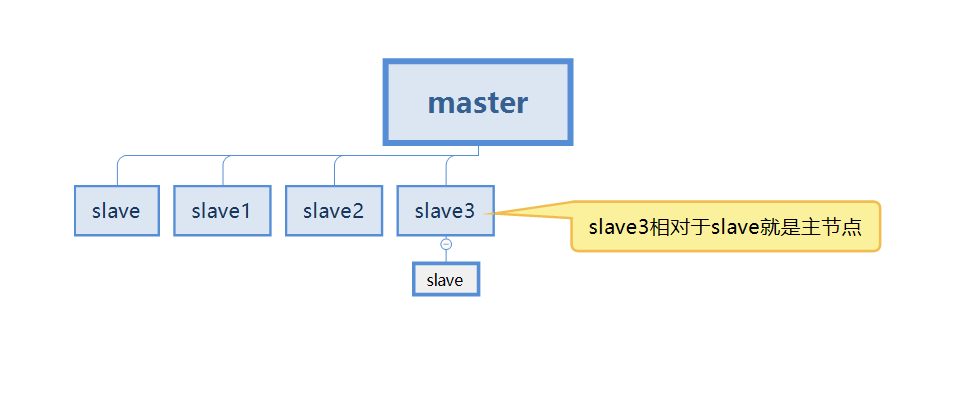
But in the actual process, it is impossible to have only two redis servers for master-slave replication, which means that each redis server may be called the master Node (master)
#In the case below, our slave3 is both the slave node of the master and the master node of the slave.
First understand this concept, and continue to read below for more detailed explanations.
2. Why is Redis master-slave replication needed?
Assume that we have a redis server now, which is a stand-alone state.
The first problem that will arise in this case is server downtime, which directly leads to data loss. If the project is related to RMB, the consequences can be imagined.
The second situation is the memory problem. When there is only one server, the memory will definitely reach the peak. It is impossible to upgrade one server infinitely.

So in response to the above two problems, we will prepare a few more servers and configure master-slave replication. Store data on multiple servers. And ensure that the data of each server is synchronized. Even if a server goes down, it will not affect users' use. Redis can continue to achieve high availability and redundant backup of data.
There should be many questions at this time. How to connect master and slave? How to synchronize data? What if the master server goes down? Don't worry, solve your problems bit by bit.
- We continue to use this diagram to talk about
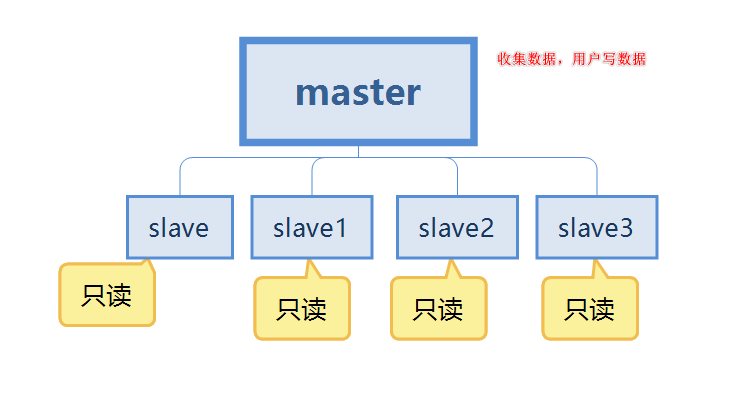
- The first point is data redundancy, which realizes hot backup of data and is persistence Another way.
- The second point is about single machine failure. When there is a problem with the master node, the service can be provided by the slave node, which is the slave, achieving rapid recovery from failures, which is service redundancy.
- The third point is the separation of reading and writing. The master server is mainly used for writing, and the slave is mainly used for reading data, which can improve the load capacity of the server. At the same time, the number of slave nodes can be added according to changes in demand.
- The fourth point is load balancing. In conjunction with the separation of reading and writing, the master node provides writing services and the slave nodes provide reading services to share the server load. Especially in the case of less writing and more reading, through multiple slave nodes Sharing the read load can greatly increase the concurrency and load of the redis server.
- The fifth point is the cornerstone of high availability. Master-slave replication is the basis for the implementation of sentinels and clusters. Therefore, we can say that master-slave replication is the cornerstone of high availability.
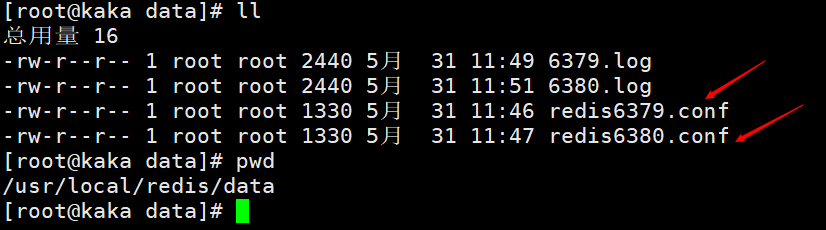
Modify the configuration file, mainly to modify the port. For the convenience of viewing, the names of log files and persistent files are identified with their respective ports.
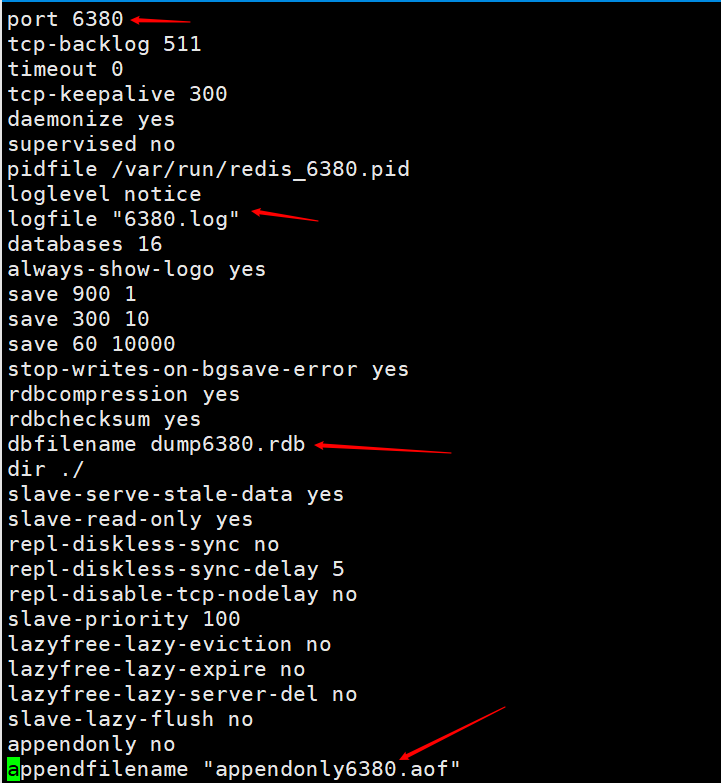
Then open two redis services, one with port 6379 and one with port 6380. Execute the command redis-server redis6380.conf, and then use redis-cli -p 6380 to connect. Because the default port of redis is 6379, we start another redis server and use it directly redis-server redis6379.conf Then use redis-cli to connect directly.

At this time we have successfully configured two redis services, one for 6380 and one for 6379. This is just for demonstration. In actual work, it needs to be configured on two different servers.
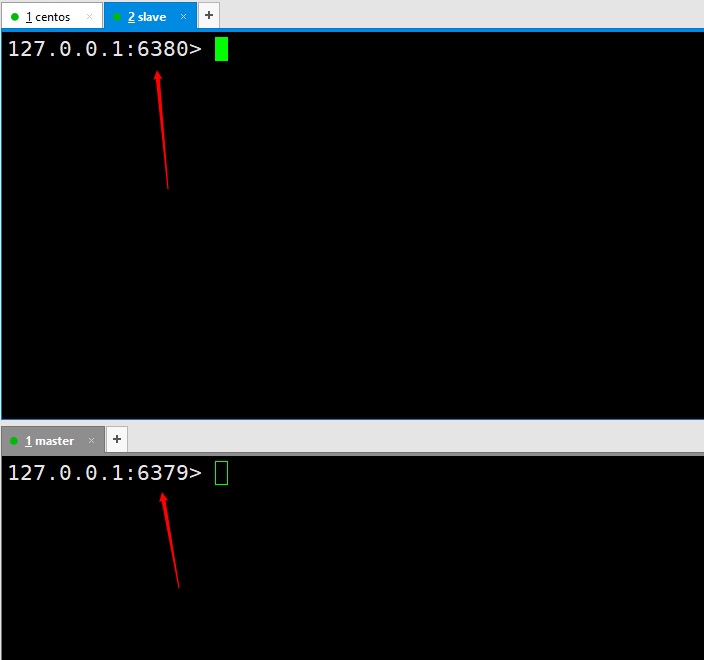
1. Start using the client command line
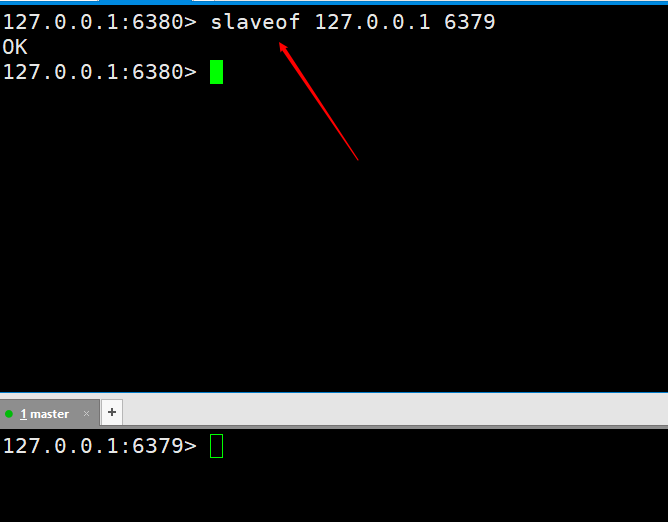
We must first have a concept, that is, when configuring master-slave replication, all operations are performed on the slave node, that is, slave.
Then we execute a command on the slave node as slaveof 127.0.0.1 6379. After execution, it means we are connected.
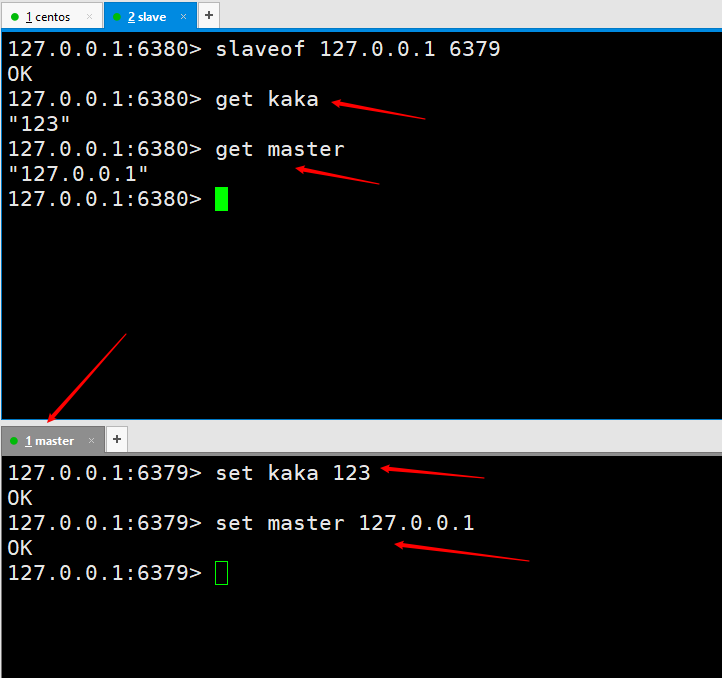
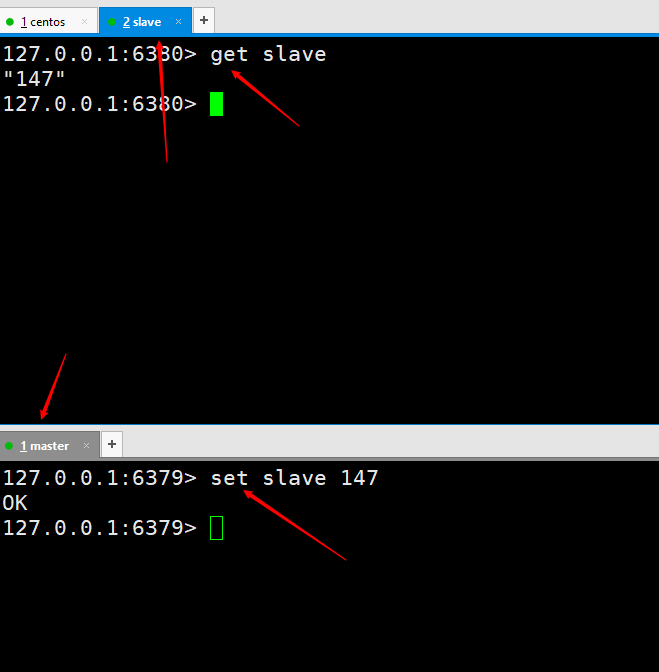
# Let’s test first to see if master-slave replication is achieved. Execute two set kaka 123 and set master 127.0.0.1 on the master server, and then the slave6380 port can be successfully obtained, which means that our master-slave replication has been configured. However, the implementation of the production environment is not the end of the world. Later, the master-slave replication will be further optimized until high availability is achieved.
slaveof no one on the slave host to disconnect the master-slave replication.

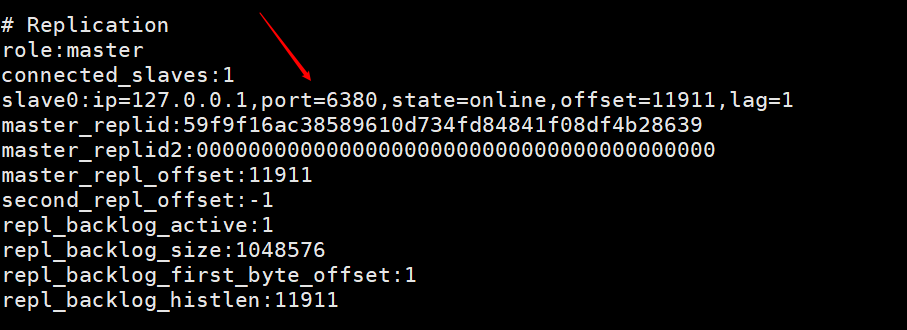
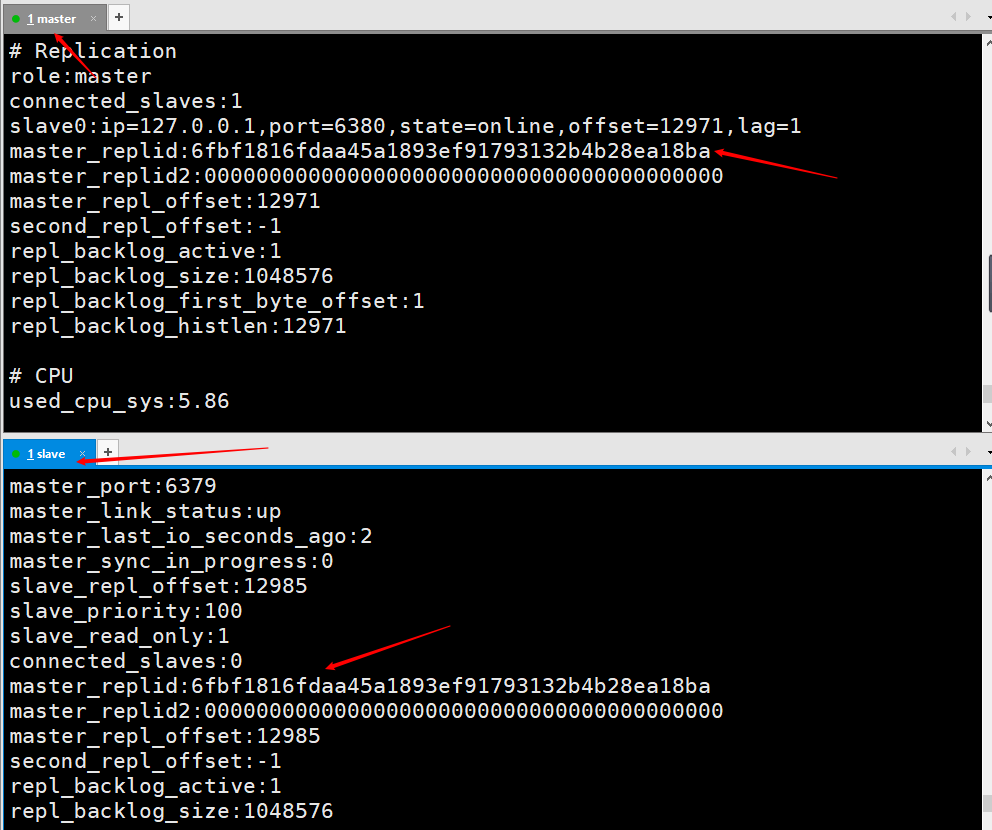
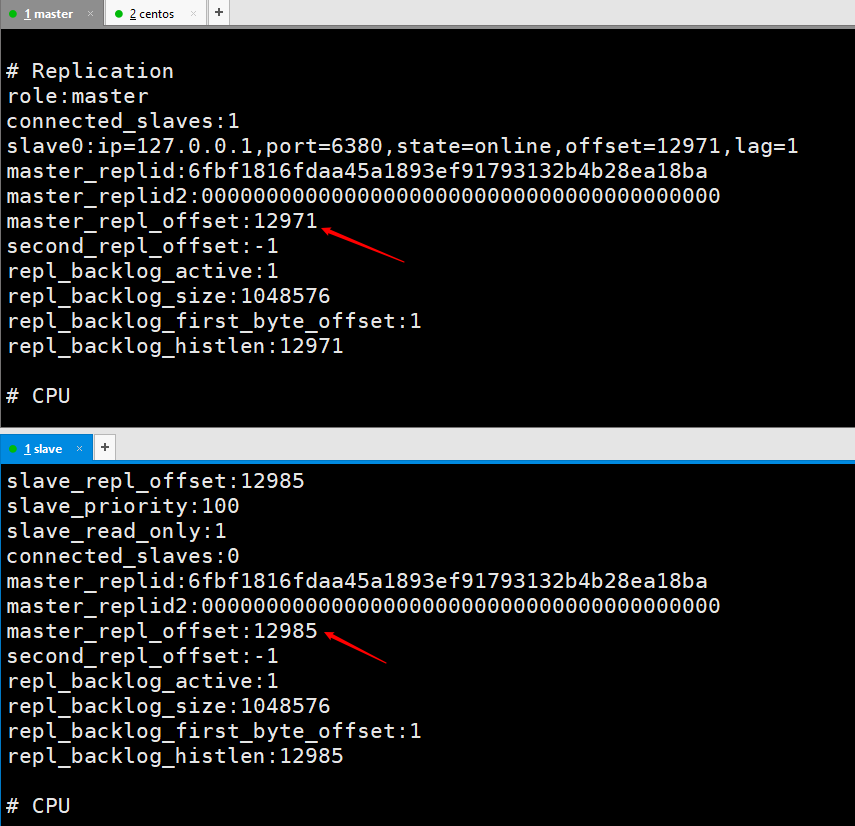
info on the client of the master node to view
This picture is the information printed by entering info on the client of the master node after using the slave node to connect to the master node using the client command line. You can see that there is a piece of information about slave0.
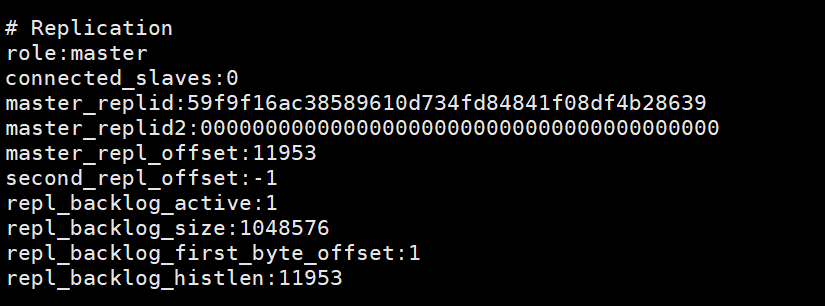
This picture is printed on the master node after the slave node executes slaveof no one info, indicating that the slave node has been disconnected from the master node.
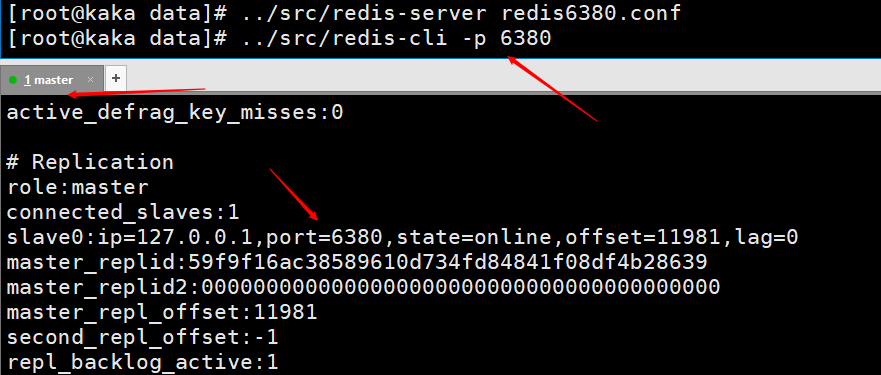
Start the redis service according to the configuration file, redis-server redis6380.conf
After the slave node is restarted, you can directly view the connection information of the slave node on the master node.
# Test data, things written by the master node will still be automatically synchronized by the slave node.
3. Start when starting the redis server
This method of configuration is also very simple. When starting the redis server, start the master-slave replication directly and execute the command: redis-server --slaveof host port.
4. View the log information after the master-slave replication is started
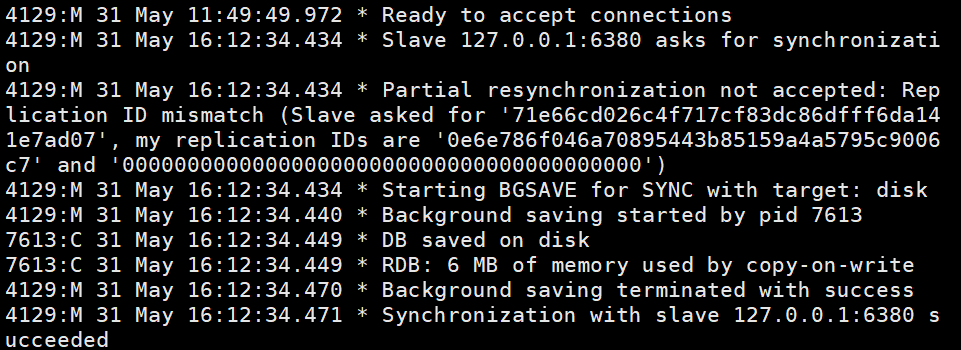
This is the log information of the master node
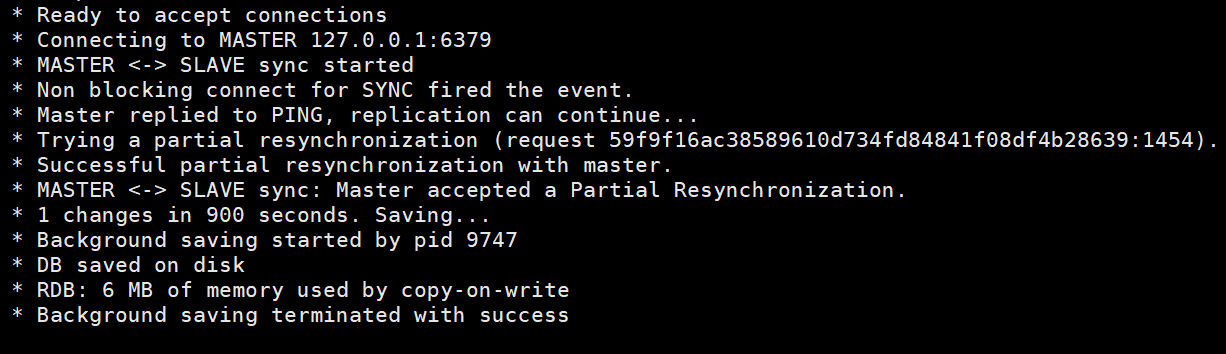
This is the information of the slave node, which includes the connection information of the master node and RDB snapshot storage.
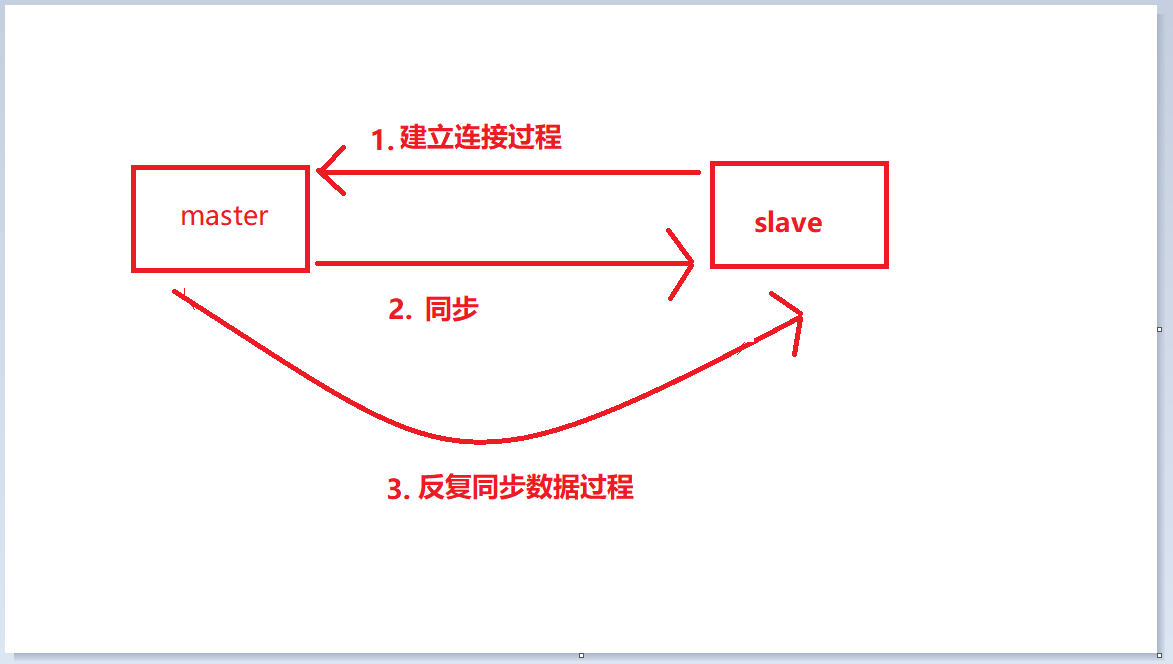
- Connection establishment process: This process is the process of connecting slave to master
- Data synchronization process: It is the process of master synchronizing data to slave
- Command propagation process: It is repeated synchronization Data

2. Phase 1: Connection establishment process
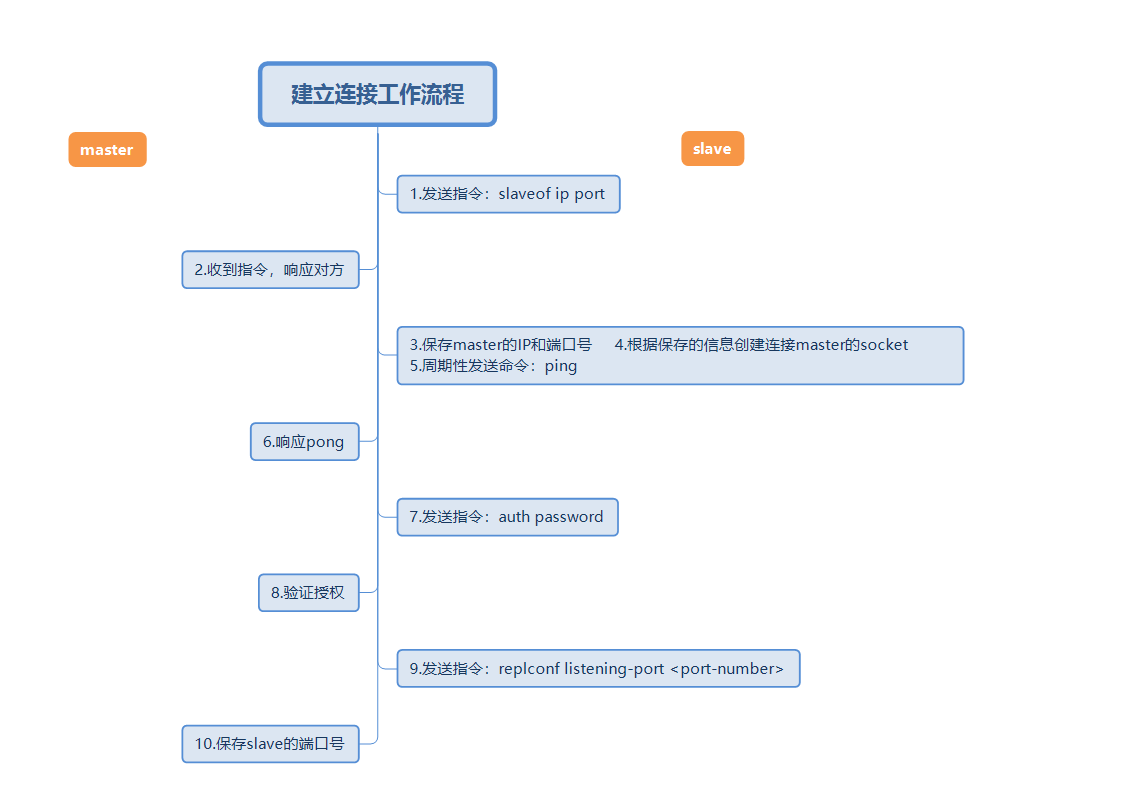
#The above picture is a complete master-slave replication connection establishment workflow. Then use short words to describe the above workflow.
- Set the master's address and port, save the master's information
- Establish a socket connection (what this connection does will be described below)
- Continue to send ping command
- Authentication
- Send slave port information
During the process of establishing a connection, the slave node will save the address and port of the master, and the master node master will save the port of the slave node slave.
3. Phase 2: Data synchronization phase process
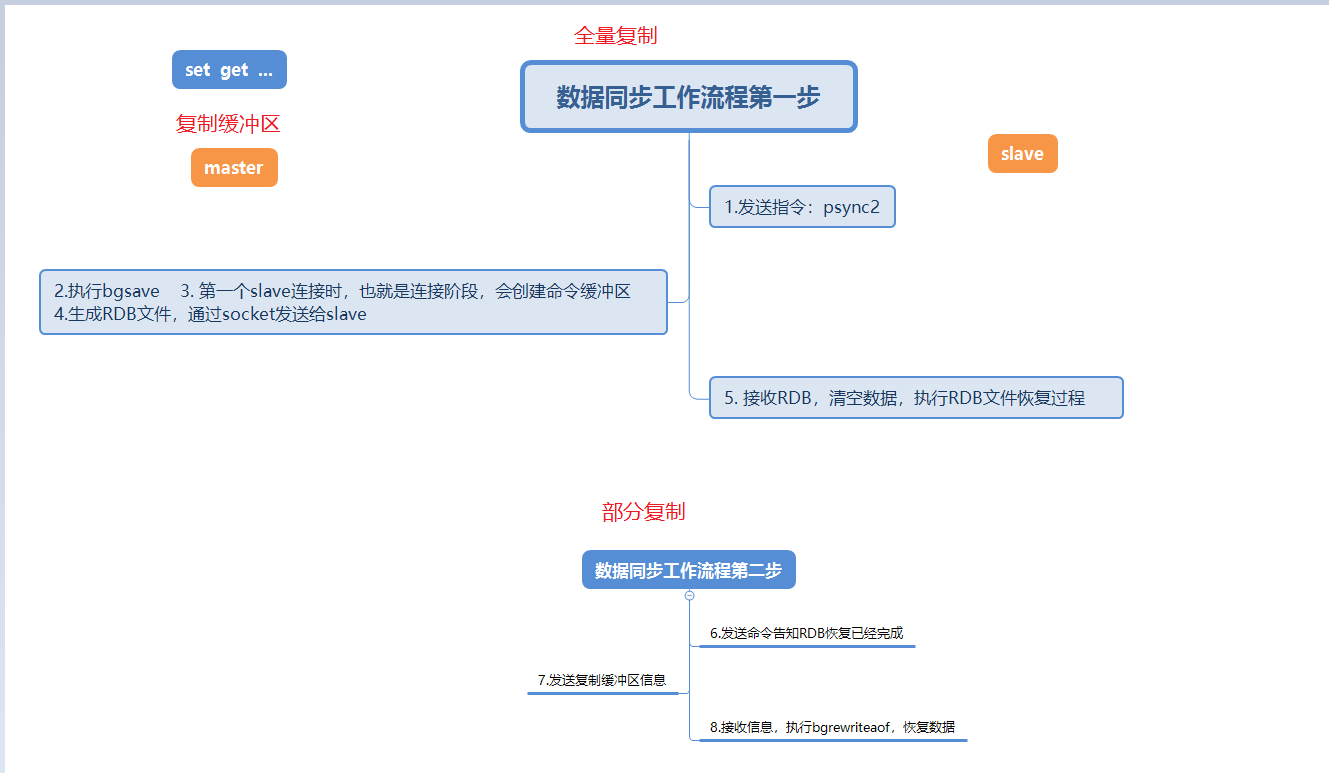
This picture describes in detail the data synchronization process when the slave node connects to the master node for the first time.
When the slave node connects to the master node for the first time, it will first perform a full copy. This full copy is unavoidable.
After the full replication is completed, the master node will send the data in the replication backlog buffer, and then the slave node will execute bgrewriteaof to restore the data, which is also partial replication.
Three new points are mentioned at this stage, full copy, partial copy, and copy buffer backlog. These points will be explained in detail in the FAQ below.
4. The third stage: command propagation stage
When the master database is modified and the data of the master and slave servers are inconsistent, the master and slave data will be synchronized to be consistent. This process is called command propagation.
#The master will send the received data change command to the slave, and the slave will execute the command after receiving the command to make the master-slave data consistent.
Partial replication during the command propagation phase
- Occurs during the command propagation phase If the network is disconnected or the network jitters, the connection will be lost (connection lost)
- At this time, the master node master will continue to write data to the replbackbuffer (replication buffer backlog area)
- Slave node Will continue to try to connect to the master
- When the slave node sends its runid and replication offset to the master node, and executes the pysnc command to synchronize
- If the master determines the offset is within the copy buffer range, the continue command will be returned. And send the data in the copy buffer to the slave node.
- Receive data from the slave node and execute bgrewriteaof to restore the data
6. Detailed introduction to the principle of master-slave replication (full replication and partial replication)
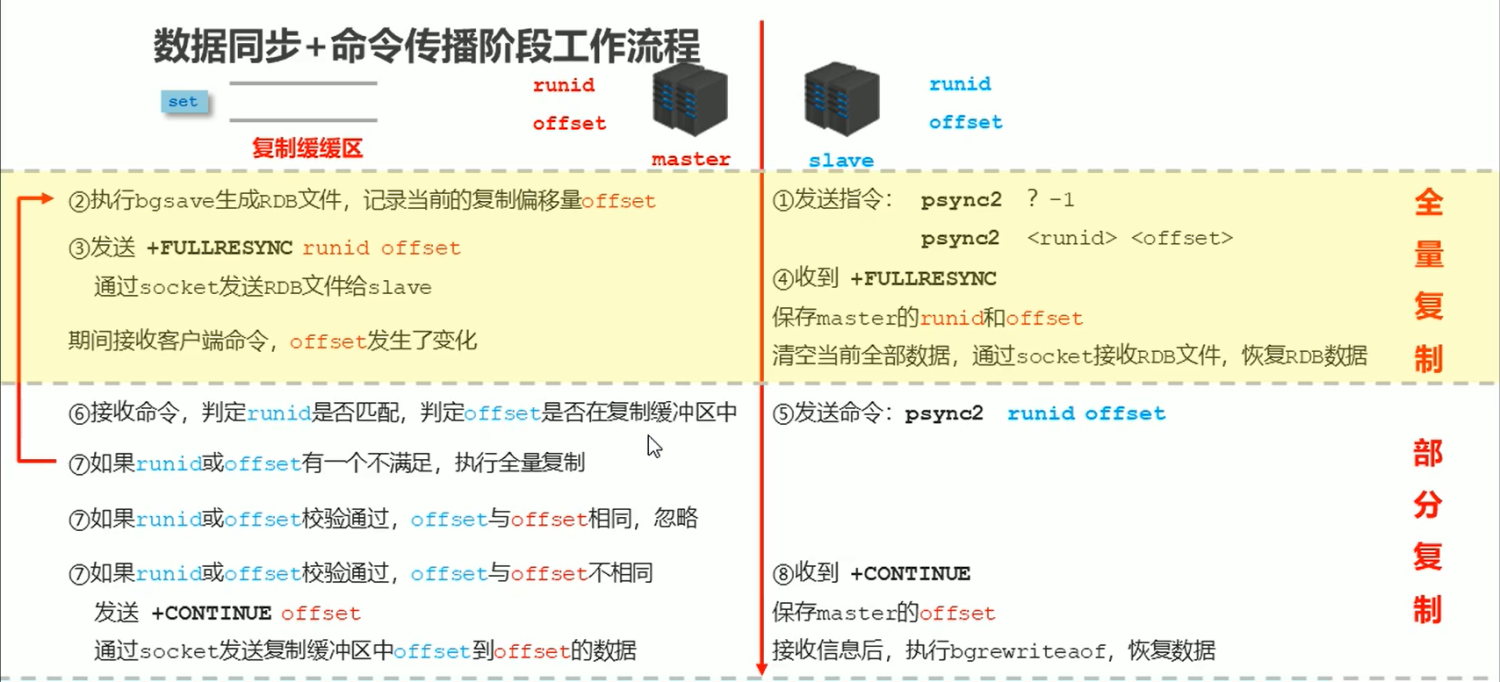
This process is the most complete process explanation of master-slave replication. So let’s briefly introduce each step of the process
- Send instructions from the node
psync ? 1 pync runid offsetFind the correspondingrunidto request data. But here you can consider that when the slave node connects for the first time, it does not know therunid and offsetof the master node at all. So the first command sent ispsync? 1means that I want all the data of the master node. - The master node starts to execute bgsave to generate the RDB file and record the current replication offset offset
- At this time, the master node will send its own runid and offset through the FULLRESYNC runid offset command to send the RDB file through the socket. to the slave node.
- The slave node receives FULLRESYNC, saves the runid and offset of the master node, then clears all current data, receives the RDB file through the socket, and starts to restore the RDB data.
- After full replication, the slave node has obtained the runid and offset of the master node and begins to send instructions
psync runid offset - The master node receives the instruction and determines whether the runid matches. , determine whether offset is in the copy buffer.
- The master node determines that one of the runid and offset is not satisfied, and will return to step
2to continue performing full replication. The runid mismatch here may only be caused by restarting the slave node. This problem will be solved later. The offset (offset) mismatch is caused by the replication backlog buffer overflow. If the runid or offset check passes, if the offset of the slave node is the same as the offset of the master node, it will be ignored. If the runid or offset check passes and the offset of the slave node is different from the offset, CONTINUE offset (this offset belongs to the master node) will be sent, and the data from the slave node offset to the master node offset in the replication buffer will be sent through the socket. - Receive CONTINUE from the node and save the master's offset. After receiving the information through the socket, execute bgrewriteaof to restore the data.
##1-4 is full copy 5-8 is partial copy
7. Heartbeat mechanism
In the command propagation stage, the master node and the slave node always need to exchange information. Switch and use the heartbeat mechanism for maintenance to keep the connection between the master node and the slave node online.
- master heartbeat
- Command: ping
- Default is once every 10 seconds. It is determined by the parameter repl-ping-slave-period
- The main thing it does is to determine whether the slave node is online
- You can use info replication to check the interval of connection time after the slave node is rented. If lag is 0 or 1, it is a normal state.
- slave heartbeat task
- Command: replconf ack {offset}
- Execute once per second
- The main thing it does is to send its own replication offset to the master node, obtain the latest data change command from the master node, and also determine whether the master node is online.
Notes on the heartbeat phase
In order to ensure data stability, the master node will When the number of drops or the delay is too high. All information synchronization will be refused.
There are two parameters for configuration adjustment:
min-slaves-to-write 2
min-slaves-max-lag 8
This The two parameters indicate that there are only 2 slave nodes left, or when the delay of the slave node is greater than 8 seconds, the master node will forcibly turn off the master function and stop data synchronization.
#So what if the master node knows the data and delay time of the slave node hanging up! In the heartbeat mechanism, the slave will send the perlconf ack command every second. This command can carry the offset, the delay time of the slave node, and the number of slave nodes.
8. Three core elements of partial replication
1. Server’s running id (run id)
Let’s first take a look at what this run id is. You can see it by executing the info command. We can also see this when we look at the startup log information above.
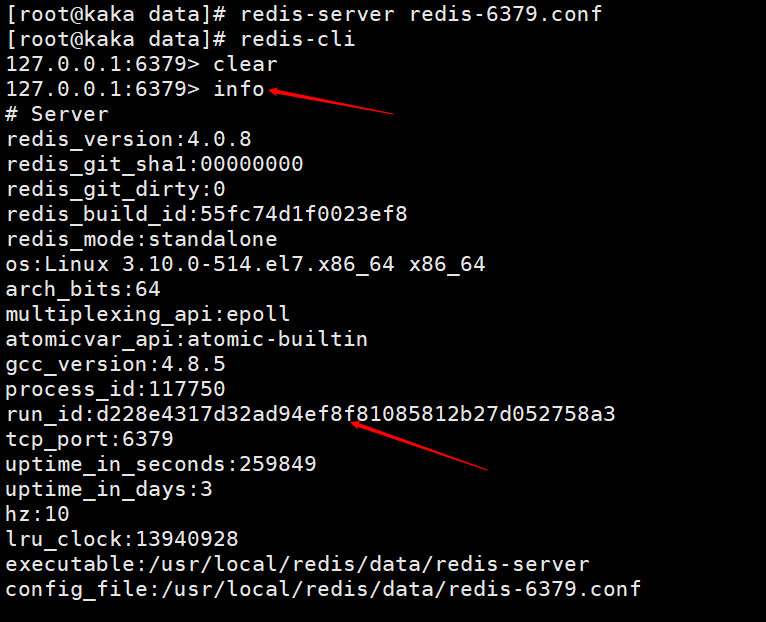
Redis will automatically generate a random id when it is started (it should be noted here that the id will be different every time it is started), which is composed of 40 random hexadecimal strings and is used to uniquely identify a redis node.
When the master-slave replication is first started, the master will send its runid to the slave, and the slave will save the master's id. We can use the info command to view it
When disconnected and reconnected, the slave sends this id to the master , if the runid saved by the slave is the same as the current runid of the master, the master will try to use partial replication (another factor in whether this block can be copied successfully is the offset). If the runid saved by the slave is different from the current runid of the master, full copy will be performed directly.
2. Copy backlog buffer
The copy buffer backlog is a first-in-first-out queue, user storage Master command records for collecting data. The default storage space of the copy buffer is 1M.
You can modify repl-backlog-size 1mb in the configuration file to control the buffer size. This ratio can be modified according to your own server memory. Click About 30% is reserved here.
What exactly is stored in the copy buffer?
When executing a command as set name kaka, we can view the persistence file to view
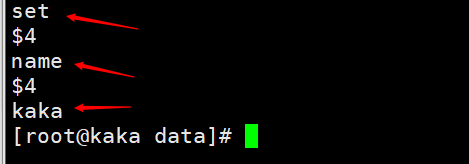
Then the copy backlog buffer is the stored aof persistent data, separated by bytes, and each byte has its own offset. This offset is also the copy offset (offset)

Then why is it said that the copy buffer backlog may cause the full amount Copy it
In the command propagation phase, the master node will store the collected data in the replication buffer and then send it to the slave node. This is where the problem arises. When the amount of data on the master node is extremely large in an instant, and exceeds the memory of the replication buffer, some data will be squeezed out, resulting in data inconsistency between the master node and the slave node. To make a full copy. If the buffer size is not set appropriately, it may cause an infinite loop. The slave node will always copy in full, clear the data, and copy in full.
3. Copy offset
The master node replication offset is to send a record once to the slave node, and the slave node is to receive a record once.
is used to synchronize information, compare the differences between the master node and the slave node, and restore data usage when the slave is disconnected.
#This value is the offset from the copy buffer backlog.
9. Common problems with master-slave replication
When the master node restarts, the value of runid will change, which will cause all slave nodes to perform full replication.
We don’t need to consider this issue, we just need to know how the system is optimized.
After the master-slave replication is established, the master node will create the master-replid variable. The generated strategy is the same as the runid, with a length of 41 bits and a runid length of 40 bits. Then sent to the slave node.
When the shutdown save command is executed on the master node, an RDB persistence will be performed and the runid and offset will be saved to the RDB file. You can use the command redis-check-rdb to view this information.

Load the RDB file after the master node restarts, and load the repl-id and repl-offset in the file into memory. Even if all slave nodes are considered to be the previous master nodes.
2. The slave node network interrupt offset crosses the boundary, causing full replication
Due to poor network environment, the slave node Node network outage. The replication backlog buffer memory is too small, causing data overflow. Along with the slave node offset crossing the boundary, full replication occurs. This may result in repeated full copies.
Solution: Modify the size of the replication backlog buffer: repl-backlog-size
Setup recommendation: Test the master node connection The time of the slave node, obtains the average total number of commands generated by the master node per second write_size_per_second
Copy buffer space setting = 2 Master-slave connection time Master The total amount of data generated by the node per second
3. Frequent network interruption
Due to the CPU of the main node The occupancy is too high, or the slave node is frequently connected. The result of this situation is that various resources of the master node are seriously occupied, including but not limited to buffers, bandwidth, connections, etc.
Why are the master node resources severely occupied?
#In the heartbeat mechanism, the slave node will send a command replconf ack command to the master node every second.
The slave node executed a slow query, occupying a large amount of CPU
The master node called the replication timing function replicationCron every second, and then the slave node did not respond for a long time.
solution:
Set slave node timeout release
Set parameters: repl-timeout
This parameter defaults to 60 seconds . After 60 seconds, release the slave.
4. Data inconsistency problem
Due to network factors, the data of multiple slave nodes will be inconsistent. There is no way to avoid this factor.
There are two solutions to this problem:
The first data needs to be configured with a high degree of consistency The redis server uses one server for both reading and writing. This method is limited to a small amount of data, and the data needs to be highly consistent.
The second monitors the offset of the master-slave node. If the delay of the slave node is too large, the client's access to the slave node is temporarily blocked. Set the parameter to slave-serve-stale-data yes|no. Once this parameter is set, it can only respond to a few commands such as info slaveof.
10. Summary
This article mainly explains what is master-slave replication and the three major aspects of master-slave replication. Stages, workflows, and the three core components of partial replication. Heartbeat mechanism during the command propagation phase. Finally, common problems with master-slave replication are explained.
The above is the detailed content of Redis master-slave replication working principle and common problems. For more information, please follow other related articles on the PHP Chinese website!

Hot AI Tools

Undresser.AI Undress
AI-powered app for creating realistic nude photos

AI Clothes Remover
Online AI tool for removing clothes from photos.

Undress AI Tool
Undress images for free

Clothoff.io
AI clothes remover

Video Face Swap
Swap faces in any video effortlessly with our completely free AI face swap tool!

Hot Article
Hot Tools

Notepad++7.3.1
Easy-to-use and free code editor

SublimeText3 Chinese version
Chinese version, very easy to use

Zend Studio 13.0.1
Powerful PHP integrated development environment

Dreamweaver CS6
Visual web development tools

SublimeText3 Mac version
God-level code editing software (SublimeText3)
Hot Topics
 1663
1663
 14
1419
52
1313
25
1264
29
1237
24
14
1419
52
1313
25
1264
29
1237
24

 How to build the redis cluster mode
Apr 10, 2025 pm 10:15 PM
How to build the redis cluster mode
Apr 10, 2025 pm 10:15 PM
Redis cluster mode deploys Redis instances to multiple servers through sharding, improving scalability and availability. The construction steps are as follows: Create odd Redis instances with different ports; Create 3 sentinel instances, monitor Redis instances and failover; configure sentinel configuration files, add monitoring Redis instance information and failover settings; configure Redis instance configuration files, enable cluster mode and specify the cluster information file path; create nodes.conf file, containing information of each Redis instance; start the cluster, execute the create command to create a cluster and specify the number of replicas; log in to the cluster to execute the CLUSTER INFO command to verify the cluster status; make
 How to clear redis data
Apr 10, 2025 pm 10:06 PM
How to clear redis data
Apr 10, 2025 pm 10:06 PM
How to clear Redis data: Use the FLUSHALL command to clear all key values. Use the FLUSHDB command to clear the key value of the currently selected database. Use SELECT to switch databases, and then use FLUSHDB to clear multiple databases. Use the DEL command to delete a specific key. Use the redis-cli tool to clear the data.
 How to read redis queue
Apr 10, 2025 pm 10:12 PM
How to read redis queue
Apr 10, 2025 pm 10:12 PM
To read a queue from Redis, you need to get the queue name, read the elements using the LPOP command, and process the empty queue. The specific steps are as follows: Get the queue name: name it with the prefix of "queue:" such as "queue:my-queue". Use the LPOP command: Eject the element from the head of the queue and return its value, such as LPOP queue:my-queue. Processing empty queues: If the queue is empty, LPOP returns nil, and you can check whether the queue exists before reading the element.
 How to configure Lua script execution time in centos redis
Apr 14, 2025 pm 02:12 PM
How to configure Lua script execution time in centos redis
Apr 14, 2025 pm 02:12 PM
On CentOS systems, you can limit the execution time of Lua scripts by modifying Redis configuration files or using Redis commands to prevent malicious scripts from consuming too much resources. Method 1: Modify the Redis configuration file and locate the Redis configuration file: The Redis configuration file is usually located in /etc/redis/redis.conf. Edit configuration file: Open the configuration file using a text editor (such as vi or nano): sudovi/etc/redis/redis.conf Set the Lua script execution time limit: Add or modify the following lines in the configuration file to set the maximum execution time of the Lua script (unit: milliseconds)
 How to use the redis command line
Apr 10, 2025 pm 10:18 PM
How to use the redis command line
Apr 10, 2025 pm 10:18 PM
Use the Redis command line tool (redis-cli) to manage and operate Redis through the following steps: Connect to the server, specify the address and port. Send commands to the server using the command name and parameters. Use the HELP command to view help information for a specific command. Use the QUIT command to exit the command line tool.
 How to implement redis counter
Apr 10, 2025 pm 10:21 PM
How to implement redis counter
Apr 10, 2025 pm 10:21 PM
Redis counter is a mechanism that uses Redis key-value pair storage to implement counting operations, including the following steps: creating counter keys, increasing counts, decreasing counts, resetting counts, and obtaining counts. The advantages of Redis counters include fast speed, high concurrency, durability and simplicity and ease of use. It can be used in scenarios such as user access counting, real-time metric tracking, game scores and rankings, and order processing counting.
 How to set the redis expiration policy
Apr 10, 2025 pm 10:03 PM
How to set the redis expiration policy
Apr 10, 2025 pm 10:03 PM
There are two types of Redis data expiration strategies: periodic deletion: periodic scan to delete the expired key, which can be set through expired-time-cap-remove-count and expired-time-cap-remove-delay parameters. Lazy Deletion: Check for deletion expired keys only when keys are read or written. They can be set through lazyfree-lazy-eviction, lazyfree-lazy-expire, lazyfree-lazy-user-del parameters.
 How to optimize the performance of debian readdir
Apr 13, 2025 am 08:48 AM
How to optimize the performance of debian readdir
Apr 13, 2025 am 08:48 AM
In Debian systems, readdir system calls are used to read directory contents. If its performance is not good, try the following optimization strategy: Simplify the number of directory files: Split large directories into multiple small directories as much as possible, reducing the number of items processed per readdir call. Enable directory content caching: build a cache mechanism, update the cache regularly or when directory content changes, and reduce frequent calls to readdir. Memory caches (such as Memcached or Redis) or local caches (such as files or databases) can be considered. Adopt efficient data structure: If you implement directory traversal by yourself, select more efficient data structures (such as hash tables instead of linear search) to store and access directory information
