

How to enter Chinese cabbage after booting


How to enter Chinese cabbage after booting?
First, open the Chinese cabbage program on the computer and follow the instructions to insert the USB flash drive to create a boot disk.

#Plug it into the USB interface, turn on the computer, and press the shortcut keys according to your computer motherboard.

Boot up ~DEL/F2 to enter the BIOS and set the startup item to usb~zip (when formatting the U disk, be sure to select usb~zip as the installation method).

After saving, you can enter the startup page of Chinese cabbage.

Another method is to set the first boot sequence to USB in the BIOS and restart the computer to enter.

The above is the detailed content of How to enter Chinese cabbage after booting. For more information, please follow other related articles on the PHP Chinese website!

Hot AI Tools

Undresser.AI Undress
AI-powered app for creating realistic nude photos

AI Clothes Remover
Online AI tool for removing clothes from photos.

Undress AI Tool
Undress images for free

Clothoff.io
AI clothes remover

Video Face Swap
Swap faces in any video effortlessly with our completely free AI face swap tool!

Hot Article
Hot Tools

Notepad++7.3.1
Easy-to-use and free code editor

SublimeText3 Chinese version
Chinese version, very easy to use

Zend Studio 13.0.1
Powerful PHP integrated development environment

Dreamweaver CS6
Visual web development tools

SublimeText3 Mac version
God-level code editing software (SublimeText3)
Hot Topics
 1671
1671
 14
1428
52
1331
25
1276
29
1256
24
14
1428
52
1331
25
1276
29
1256
24

 How to set up the keyboard boot function on a GIGABYTE motherboard (enable keyboard boot mode on GIGABYTE motherboard)
Dec 31, 2023 pm 05:15 PM
How to set up the keyboard boot function on a GIGABYTE motherboard (enable keyboard boot mode on GIGABYTE motherboard)
Dec 31, 2023 pm 05:15 PM
How to set up keyboard startup on Gigabyte's motherboard. First, if it needs to support keyboard startup, it must be a PS2 keyboard! ! The setting steps are as follows: Step 1: Press Del or F2 to enter the BIOS after booting, and go to the Advanced (Advanced) mode of the BIOS. Ordinary motherboards enter the EZ (Easy) mode of the motherboard by default. You need to press F7 to switch to the Advanced mode. ROG series motherboards enter the BIOS by default. Advanced mode (we use Simplified Chinese to demonstrate) Step 2: Select to - [Advanced] - [Advanced Power Management (APM)] Step 3: Find the option [Wake up by PS2 keyboard] Step 4: This option The default is Disabled. After pulling down, you can see three different setting options, namely press [space bar] to turn on the computer, press group
 What should I do if wallpaperengine does not start when I turn on the computer?
Mar 19, 2024 am 11:52 AM
What should I do if wallpaperengine does not start when I turn on the computer?
Mar 19, 2024 am 11:52 AM
When users download WallpaperEngine for use, some users have a problem that it does not start at startup. This is because the user has not set startup at startup. Users need to find the "Start at startup" option in the "General" tab and turn it on. What should I do if wallpaperengine does not start at startup? Answer: Set startup through the settings menu 1. Open the wallpaperengine wallpaper engine program. 2. Click the menu button in the upper left corner and select the "Settings" option. 3. In the settings menu, find the "General" tab. 4. In the "General" tab, find the "Startup" option. 5. Turn on the "Startup" option so that when your computer starts, wallpapereng
 What should I do if my Black Shark phone cannot be turned on? Teach you how to save yourself!
Mar 23, 2024 pm 04:06 PM
What should I do if my Black Shark phone cannot be turned on? Teach you how to save yourself!
Mar 23, 2024 pm 04:06 PM
What should I do if my Black Shark phone cannot be turned on? Teach you how to save yourself! In our daily lives, mobile phones have become an indispensable part of us. For many people, the Black Shark mobile phone is a beloved gaming phone. But it is inevitable that you will encounter various problems, one of which is that the phone cannot be turned on. When you encounter such a situation, don't panic. Here are some solutions that I hope will help you. First of all, when the Black Shark phone cannot be turned on, first check whether the phone has enough power. It may be that the phone cannot be turned on due to exhausted battery.
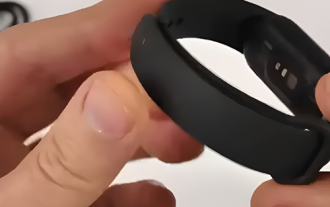 How to turn on Xiaomi Mi Band 5
Feb 05, 2024 am 10:03 AM
How to turn on Xiaomi Mi Band 5
Feb 05, 2024 am 10:03 AM
When using Xiaomi Mi Band 5 for the first time, many users don’t know how to turn it on and use it. We only need to put the band on our hands first, and then swipe the screen with the phone to turn it on. How to turn on Xiaomi Mi Band 5: 1. First, take out the band and open the strap. 2. Then wear it on your hand. 3. Finally, gently slide the screen with your finger to open it.
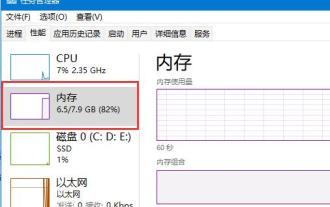 What is the initial memory usage of Win11 system?
Jan 09, 2024 pm 12:45 PM
What is the initial memory usage of Win11 system?
Jan 09, 2024 pm 12:45 PM
The memory usage of a system at startup will affect its startup speed and software running. Therefore, many friends want to know how much memory the latest win11 occupies is normal. In fact, this has a lot to do with our actual memory. How much memory does win11 occupy? Answer: The memory occupied by win11 is about 3GB. 1. However, the specific memory usage also needs to consider the computer memory size. 2. According to user tests, low-memory win11 takes up about 20% of the memory when booting. 3. If we have 8GB of memory, we will need about 1.6GB, and if we have 16GB of memory, we will need about 3.2GB. 4. However, when our memory reaches 32GB, the boot usage of win11 is reduced to 3.6GB, which is only 11%. 5. By analogy, if the memory reaches 32
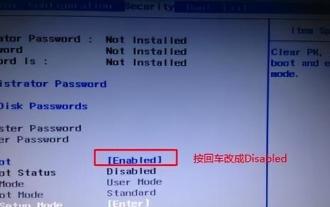 How to boot Lenovo from USB disk
Feb 12, 2024 pm 01:03 PM
How to boot Lenovo from USB disk
Feb 12, 2024 pm 01:03 PM
When reinstalling the computer system, many users use a USB flash drive to reinstall the computer. If you want to use a USB flash drive to boot the system, you must set up the USB flash drive startup items on the computer, so that you The boot disk must be plugged into the computer to be recognized. Here I will share with you how to set the USB disk boot option in the Lenovo motherboard bios. First, after inserting the prepared boot disk, restart the computer and continue to press the corresponding BIOS shortcut key (such as F2, suitable for Lenovo motherboards) to enter the BIOS interface. Then, select the Security option and press Enter to enter SecureBoot settings. Then we move the cursor to the Exit option and set OSOptimizedDefaults to
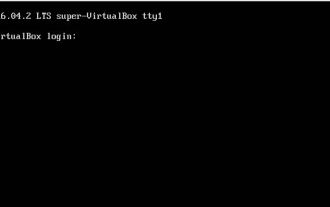 How to enter the character interface when booting Ubuntu 16.04
Dec 29, 2023 pm 03:58 PM
How to enter the character interface when booting Ubuntu 16.04
Dec 29, 2023 pm 03:58 PM
I need to boot my own ubuntu system directly and enter the character interface to log in. I find that the previous method of modifying grub is not easy to use. What should I do? The editor below will show you how to start the character interface when booting Ubuntu 16.04. Let’s go and see it together! Method: 1. First, we modify the grub file, add GRUB_CMDLINE_LINUX_DEFAULT="text" and cancel the comment # before GRUB_TERMINAL=console. $sudogedit/etc/default/grub2, and then update our grub. $sudoupdate-grub3, set the boot entry character
 Tutorial on using the Dabaicai one-click installation tool
Jul 17, 2023 pm 08:49 PM
Tutorial on using the Dabaicai one-click installation tool
Jul 17, 2023 pm 08:49 PM
I believe that friends who are familiar with computer systems must be familiar with the Dabaicai one-click installation tool. Many people have used this software because it is fast and convenient to operate with one click. The system installation files are automatically recognized, automatically mounted, automatically extracted, and automatically detected. After the installation is completed, it automatically performs startup boot repair for the Windows version. The editor below will teach you how to use the Dabaicai one-click installation tool. Let’s take a look below! Tutorial on using the Dabaicai one-click installation tool: 1. Open the software, we can click More to search for images. 2. Select the system image and disk partition location that needs to be restored or installed. Just click the OK button. 3. After the installation is completed, select Restart to continue the subsequent installation. 4. Select the image path