
 Operation and Maintenance
CentOS
What is the difference between centos7 system and previous versions?
Operation and Maintenance
CentOS
What is the difference between centos7 system and previous versions?
What is the difference between centos7 system and previous versions?


The following is a brief example to illustrate the major changes:
1. Installation
When installing, all previous Centos packages can be selected. Yes, but now you can only select one item, and there are duplicate sub-options; when installing to the selected partition, the partition recommended by Centos 7 is xfs instead of the previous ext4.
2. Initial startup
After installing the computer, the interface for booting into the system has changed. At first glance, I thought there were two kernels. Turns out one of them is the rescue selection, and after pressing e, You will find that all the grub.conf information is out. Finally, you find the place where the kernel is started, write a 1 (the purpose is to enter single-user mode), and then enter the rescue mode.
(Recommended tutorial: centos tutorial)
3. Startup sequence
After entering the system, it is a graphical interface. If you want to enter the character interface, modify / etc/inittab, it is found to be an empty file, all of which are comments. If you want to change the runlevel, you can soft-link /lib/systemd/system/runlevel*.target to /etc/systemd/system/default.target. (Of course, if you pass the exam, overwriting will work). I tried it and it worked, and I can change it to character interface 3.
Originally, from Centos7 onwards, the target concept was used to define the run level, which was divided into level 3 and level 5. The meaning is as follows:
The third run level uses multi-user. target is replaced, and the fifth run level is replaced by graphical.target. runlevel3.target and runlevel5.target are symbolic links pointing to multi-user.target and graphical.target respectively.
Use the following command to switch to "Run Level 3":
systemctl isolate multi-user.target或systemctl isolate runlevel3.target
Use the following command to switch to "Run Level 5":
systemctl isolate graphical.target或systemctl isolate runlevel5.target
(1) View the current running level
runlevel
(2) View the default boot run level:
systemctl get-default
(3) Modify the boot default run level command
systemctl set-default multi-user.target(或graphical.target)
Or use the following command:
Default startup run level 3:
ln -sf /lib/systemd/system/multi-user.target /etc/systemd/system/default.target
Default startup run level 5:
ln -sf /lib/systemd/system/graphical.target /etc/systemd/system/default.target
4 , Configure the network and host name
Configure the network, go to /etc/sysconfig/network-script/ and see that the network card has been renamed enp1s5, which is interesting. After configuring the network, change the host name, go to /etc/ I went to sysconfig/network to change the name and found that this file was also empty. I tried to modify it according to the original version 6. After restarting, it had no effect. I checked the hostname and found that to change the name in 7, I had to go to /etc/hostname to change the name.
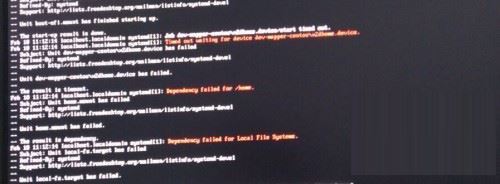
5. LVM and I was thinking about zooming in and out, but something went wrong. When executing resize2fs, why did it keep reporting superblock errors? Then I ran man resize2fs and found that this command only supports the ext file system!
(Recommended related video tutorials:
linux video tutorialCentos’ service uses systemd instead of sysvinit management. Systemd's service management program, systemctl is the main tool, which integrates the functions of the previous service and chkconfig. You can use it to enable/disable services permanently or only for the current session.
(1) Start a service:
systemctl start postfix.service
(2) Close a service:
systemctl stop postfix.service
(3) Restart a service:
systemctl restartpostfix.service
(4 ) Display service status:
systemctl statuspostfix.service
(5) Enable a service when booting:
systemctl enable postfix.service
(6) Disable a service when booting:
systemctl disable postfix.service
(7) Check whether the service is Start at boot:
systemctl is-enabled postfix.service
(8) View the list of started services:
systemctl list-unit-files|grep enabled
The above is the detailed content of What is the difference between centos7 system and previous versions?. For more information, please follow other related articles on the PHP Chinese website!

Hot AI Tools

Undresser.AI Undress
AI-powered app for creating realistic nude photos

AI Clothes Remover
Online AI tool for removing clothes from photos.

Undress AI Tool
Undress images for free

Clothoff.io
AI clothes remover

Video Face Swap
Swap faces in any video effortlessly with our completely free AI face swap tool!

Hot Article
Hot Tools

Notepad++7.3.1
Easy-to-use and free code editor

SublimeText3 Chinese version
Chinese version, very easy to use

Zend Studio 13.0.1
Powerful PHP integrated development environment

Dreamweaver CS6
Visual web development tools

SublimeText3 Mac version
God-level code editing software (SublimeText3)
Hot Topics
 1664
1664
 14
1422
52
1316
25
1268
29
1240
24
14
1422
52
1316
25
1268
29
1240
24

 CentOS7 various version image download addresses and version descriptions (including Everything version)
Feb 29, 2024 am 09:20 AM
CentOS7 various version image download addresses and version descriptions (including Everything version)
Feb 29, 2024 am 09:20 AM
When loading CentOS-7.0-1406, there are many optional versions. For ordinary users, they don’t know which one to choose. Here is a brief introduction: (1) CentOS-xxxx-LiveCD.ios and CentOS-xxxx- What is the difference between bin-DVD.iso? The former only has 700M, and the latter has 3.8G. The difference is not only in size, but the more essential difference is that CentOS-xxxx-LiveCD.ios can only be loaded into the memory and run, and cannot be installed. Only CentOS-xxx-bin-DVD1.iso can be installed on the hard disk. (2) CentOS-xxx-bin-DVD1.iso, Ce
 Steps to enter CentOS 7 emergency repair mode
Jan 13, 2024 am 09:36 AM
Steps to enter CentOS 7 emergency repair mode
Jan 13, 2024 am 09:36 AM
Open the centos7 page and appear: welcome to emergency mode! afterloggingin, type "journalctl -xb" to viewsystemlogs, "systemctlreboot" toreboot, "systemctldefault" to tryagaintobootintodefaultmode. giverootpasswordformaintenance(??Control-D???): Solution: execute r
 How to access and clean junk files in /tmp directory in CentOS 7?
Dec 27, 2023 pm 09:10 PM
How to access and clean junk files in /tmp directory in CentOS 7?
Dec 27, 2023 pm 09:10 PM
There is a lot of garbage in the tmp directory in the centos7 system. If you want to clear the garbage, how should you do it? Let’s take a look at the detailed tutorial below. To view the list of files in the tmp file directory, execute the command cdtmp/ to switch to the current file directory of tmp, and execute the ll command to view the list of files in the current directory. As shown below. Use the rm command to delete files. It should be noted that the rm command deletes files from the system forever. Therefore, it is recommended that when using the rm command, it is best to give a prompt before deleting the file. Use the command rm-i file name, wait for the user to confirm deletion (y) or skip deletion (n), and the system will perform corresponding operations. As shown below.
 How to set password rules in centos7? How to set password rules in centos7
Jan 07, 2024 pm 01:17 PM
How to set password rules in centos7? How to set password rules in centos7
Jan 07, 2024 pm 01:17 PM
Set password rules for security reasons Set the number of days after which passwords expire. User must change password within days. This setting only affects created users, not existing users. If setting to an existing user, run the command "chage -M (days) (user)". PASS_MAX_DAYS60#Password expiration time PASS_MIN_DAYS3#Initial password change time PASS_MIN_LEN8#Minimum password length PASS_WARN_AGE7#Password expiration prompt time Repeat password restriction use [root@linuxprobe~]#vi/etc/pam.d/system-auth#nearline15:
 Detailed explanation of decompression file command (zip) under centos7
Jan 07, 2024 pm 06:30 PM
Detailed explanation of decompression file command (zip) under centos7
Jan 07, 2024 pm 06:30 PM
1. The compressed folder is a zip file [root@cgls]#zip-rmydata.zipmydata2. Unzip mydata.zip into the mydatabak directory [root@cgls]#unzipmydata.zip-dmydatabak3.mydata01 folder and mydata02.txt are compressed into mydata.zip[root@cgls]#zipmydata.zipmydata01mydata02.txt4. Decompress the mydata.zip file directly [root@cgls]#unzipmydata.zip5. View myd
 How to install mbstring extension under CENTOS7?
Jan 06, 2024 pm 09:59 PM
How to install mbstring extension under CENTOS7?
Jan 06, 2024 pm 09:59 PM
1.UncaughtError:Calltoundefinedfunctionmb_strlen(); When the above error occurs, it means that we have not installed the mbstring extension; 2. Enter the PHP installation directory cd/temp001/php-7.1.0/ext/mbstring 3. Start phpize(/usr/local/bin /phpize or /usr/local/php7-abel001/bin/phpize) command to install php extension 4../configure--with-php-config=/usr/local/php7-abel
 How to install Mysql in CentOS7 and set it to start automatically at boot
Jun 02, 2023 pm 08:36 PM
How to install Mysql in CentOS7 and set it to start automatically at boot
Jun 02, 2023 pm 08:36 PM
Centos7 does not have a mysql database. The default database is mariadb (a branch of mysql). You can install the mysql database manually by following the steps below. 1. Download the rpm installation file wgethttp://repo.mysql.com/mysql-community-release-el7.rpm 2. Execute rpm to install rpm-ivhmysql-community-release-el7.rpm. After the dependency resolution is completed, the following options appear: dependenciesresolved =================================
 How to install Nginx and configure automatic startup on CentOS7
May 14, 2023 pm 03:01 PM
How to install Nginx and configure automatic startup on CentOS7
May 14, 2023 pm 03:01 PM
1. Download the installation package from the official website and select the version suitable for Linux. Select the latest version here, download it locally and then upload it to the server or download it directly with the wget command under centos. Switch to the /usr/local directory and download the software package #cd/usr/local#wgethttp://nginx.org/download/nginx-1.11.5.tar.gz2. To install nginx, first execute the following command to install the nginx dependent library. If dependent libraries are missing, the installation may fail. For details, please refer to the error message at the end of the article. #yuminstallgcc-c++#yuminstallpcre#yumins
