

How to deal with unclear edges of PS cutouts


First open PS, open a picture, and press "Ctrl left mouse button" to load the selection.

Alt plus S, M, E shortcut keys are expanded.

When expanding, we select 6 pixels and then click OK.

Press "shift F6", set the feather value to 2, and click "OK".

Next, delete the excess.

#After deleting it, if you look at this picture again, there will be no white edges at the edges.

PHP Chinese website has a large number of free PS tutorials, everyone is welcome to learn!
The above is the detailed content of How to deal with unclear edges of PS cutouts. For more information, please follow other related articles on the PHP Chinese website!

Hot AI Tools

Undresser.AI Undress
AI-powered app for creating realistic nude photos

AI Clothes Remover
Online AI tool for removing clothes from photos.

Undress AI Tool
Undress images for free

Clothoff.io
AI clothes remover

Video Face Swap
Swap faces in any video effortlessly with our completely free AI face swap tool!

Hot Article
Hot Tools

Notepad++7.3.1
Easy-to-use and free code editor

SublimeText3 Chinese version
Chinese version, very easy to use

Zend Studio 13.0.1
Powerful PHP integrated development environment

Dreamweaver CS6
Visual web development tools

SublimeText3 Mac version
God-level code editing software (SublimeText3)
Hot Topics
 1658
1658
 14
1415
52
1309
25
1257
29
1231
24
14
1415
52
1309
25
1257
29
1231
24

 How do you cut out a picture and put it in another picture in Meitu Xiuxiu? Meitu Xiu Xiu's tutorial on placing the cut picture on another picture!
Mar 15, 2024 pm 11:00 PM
How do you cut out a picture and put it in another picture in Meitu Xiuxiu? Meitu Xiu Xiu's tutorial on placing the cut picture on another picture!
Mar 15, 2024 pm 11:00 PM
1. How to cut out the beautiful picture Xiu Xiu and put it in another picture? Meitu Xiu Xiu’s tutorial on placing the cut picture on another picture! 1. Open the MeituXiuXiu app and click on the picture beautification function. 2. Open the photo album and select the picture you want to cut out. 3. Click the cutout button in the bottom navigation bar. 4. Select the area to cut out. 5. After cutting out the image, click the replace background icon. 6. Finally, click to import another picture, and the cut out picture can be placed on another picture.
 The operation process of WIN10 service host occupying too much CPU
Mar 27, 2024 pm 02:41 PM
The operation process of WIN10 service host occupying too much CPU
Mar 27, 2024 pm 02:41 PM
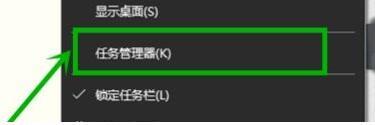
1. First, we right-click the blank space of the taskbar and select the [Task Manager] option, or right-click the start logo, and then select the [Task Manager] option. 2. In the opened Task Manager interface, we click the [Services] tab on the far right. 3. In the opened [Service] tab, click the [Open Service] option below. 4. In the [Services] window that opens, right-click the [InternetConnectionSharing(ICS)] service, and then select the [Properties] option. 5. In the properties window that opens, change [Open with] to [Disabled], click [Apply] and then click [OK]. 6. Click the start logo, then click the shutdown button, select [Restart], and complete the computer restart.
 How to put the cut out picture onto another picture in Xingtu? How to put the cut out picture on another picture!
Mar 15, 2024 pm 06:52 PM
How to put the cut out picture onto another picture in Xingtu? How to put the cut out picture on another picture!
Mar 15, 2024 pm 06:52 PM
1. How to put the cut out picture on another picture? How to put the cut out picture on another picture! 1. Open the Xingtu app, click Import, and import the picture you want to change. 2. Then click Import Picture under the picture and select the picture you want to cut out. 3. Then you can select an area to cut out, and you can also choose smart cutout for characters. 4. Adjust the size and position of the cut out picture. 5. Finally, click Merge Layers in the upper right corner to put the cut out picture on another picture.
 Learn how to handle special characters and convert single quotes in PHP
Mar 27, 2024 pm 12:39 PM
Learn how to handle special characters and convert single quotes in PHP
Mar 27, 2024 pm 12:39 PM
In the process of PHP development, dealing with special characters is a common problem, especially in string processing, special characters are often escaped. Among them, converting special characters into single quotes is a relatively common requirement, because in PHP, single quotes are a common way to wrap strings. In this article, we will explain how to handle special character conversion single quotes in PHP and provide specific code examples. In PHP, special characters include but are not limited to single quotes ('), double quotes ("), backslash (), etc. In strings
 Introduction to the process of extracting line drawings in PS
Apr 01, 2024 pm 12:51 PM
Introduction to the process of extracting line drawings in PS
Apr 01, 2024 pm 12:51 PM
1. Open the software and import a piece of material, as shown in the picture below. 2. Then ctrl+shift+u to remove color. 3. Then press ctrl+J to copy the layer. 4. Then reverse ctrl+I, and then set the layer blending mode to Color Dodge. 5. Click Filter--Others--Minimum. 6. In the pop-up dialog box, set the radius to 2 and click OK. 7. Finally, you can see the line draft extracted.
 How to automate tasks using PowerShell
Feb 20, 2024 pm 01:51 PM
How to automate tasks using PowerShell
Feb 20, 2024 pm 01:51 PM
If you are an IT administrator or technology expert, you must be aware of the importance of automation. Especially for Windows users, Microsoft PowerShell is one of the best automation tools. Microsoft offers a variety of tools for your automation needs, without the need to install third-party applications. This guide will detail how to leverage PowerShell to automate tasks. What is a PowerShell script? If you have experience using PowerShell, you may have used commands to configure your operating system. A script is a collection of these commands in a .ps1 file. .ps1 files contain scripts executed by PowerShell, such as basic Get-Help
 Complete list of ps shortcut keys
Mar 11, 2024 pm 04:31 PM
Complete list of ps shortcut keys
Mar 11, 2024 pm 04:31 PM
1. Ctrl + N: Create a new document. 2. Ctrl + O: Open a file. 3. Ctrl + S: Save the current file. 4. Ctrl + Shift + S: Save as. 5. Ctrl + W: Close the current document. 6. Ctrl + Q: Exit Photoshop. 7. Ctrl + Z: Undo. 8. Ctrl + Y: Redo. 9. Ctrl + X: Cut the selected content. 10. Ctrl + C: Copy the selected content.
 PS copy layer shortcut key
Feb 23, 2024 pm 02:34 PM
PS copy layer shortcut key
Feb 23, 2024 pm 02:34 PM
In the PS copy layer shortcut keys, we can know that if you want to copy a layer when using PS, you can use the shortcut key [Ctrl+J] for quick copying. This introduction to the shortcut keys for copying layers can tell you the specific operation method. The following is the detailed content, so take a look. PS copy layer shortcut key answer: [Ctrl+J] Specific method: 1. Open the image in PS and select the layer that needs to be copied. 2. Press [Ctrl+J] on the keyboard at the same time to complete the copy of the layer. Other copying methods: 1. After opening the image, press and hold the layer and move the [New Layer] icon downwards. 2. After moving to the icon, let go. 3. The layer copy is completed.
