 Operation and Maintenance
 Windows Operation and Maintenance
 Several methods to connect projector in xp
Several methods to connect projector in xp

The method of connecting the projector to the XP system is as follows:
Method 1:
1. Right-click the blank space of the desktop screen of the laptop XP system , click the "Properties" option in the menu that appears;
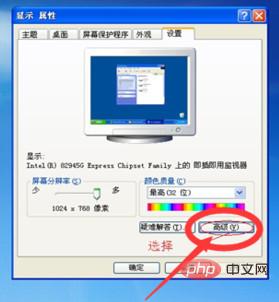
2. Switch to the "Settings" tab in the opened display properties interface, and select the "Advanced" button in the lower right corner;

3. Switch to the "Adapter" tab in the dialog box that appears;

4. Click "List all modes" below button;

#5. In the "List all modes" window that opens, select the valid mode list; (The resolution of general projectors currently on the market is 1024*768 and 800*600, so in order to get the best display effect of the projector, these two resolutions are generally selected here)
Method 2:
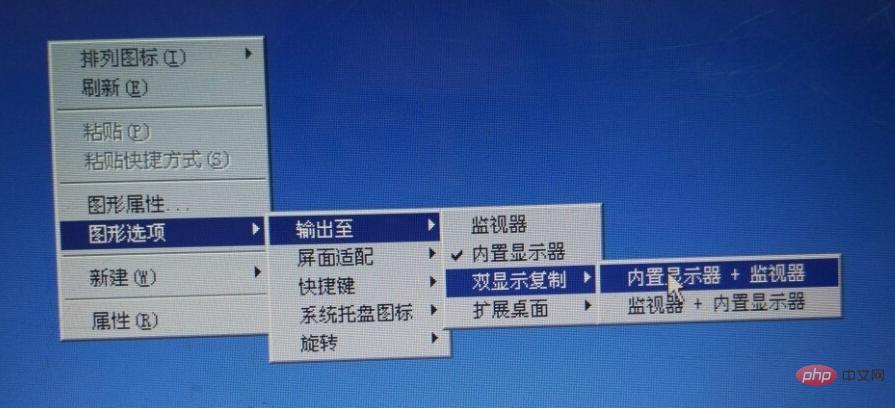
Right-click the computer with the mouse, and the graph Options---Output to---Dual Display Copy--Built-in Display Monitor

The above is the detailed content of Several methods to connect projector in xp. For more information, please follow other related articles on the PHP Chinese website!

Hot AI Tools

Undresser.AI Undress
AI-powered app for creating realistic nude photos

AI Clothes Remover
Online AI tool for removing clothes from photos.

Undress AI Tool
Undress images for free

Clothoff.io
AI clothes remover

Video Face Swap
Swap faces in any video effortlessly with our completely free AI face swap tool!

Hot Article

Hot Tools

Notepad++7.3.1
Easy-to-use and free code editor

SublimeText3 Chinese version
Chinese version, very easy to use

Zend Studio 13.0.1
Powerful PHP integrated development environment

Dreamweaver CS6
Visual web development tools

SublimeText3 Mac version
God-level code editing software (SublimeText3)

Hot Topics
 Win10 and xp shared folder solution
Jan 27, 2024 pm 02:33 PM
In Windows XP and Windows 10 systems, sharing folders is not an extremely complicated task. It can be easily completed by simply following the detailed steps provided in this article. Step 1 of sharing folders between win10 home version and . 3. Enter "Permissions", click Add, and enter the user name you want to add when selecting "User or Group". 4. Set the corresponding permissions, such as full control or read-only, etc. 5. Then save the settings and close the folder. Step 2: Configure win10 computer 1. Open the resource manager.
 How to change BIOS settings to install XP system on Win7
Jan 05, 2024 am 08:42 AM
When we were using the win7 operating system, some friends wanted to change their system to the xp operating system due to some needs. Then some friends may have encountered some problems during this process. Regarding how to set up the BIOS of Windows 7 to XP system, the editor thinks that we should first enter the BIOS of our computer through the shortcut keys, and then find the relevant options and follow the editor to set them. Let’s take a look at the specific steps~ How to set up the BIOS in win7 to xp system 1. To enter the BIOS for ThinkPad and Lenovo VBKEM series notebooks, press the F1 key on the keyboard (some models press the keyboard combination key Fn+F1, and press the Fn key Hold it down and press the F1 key repeatedly). 2.Select the Restart icon
 Exquisite light and shadow art in spring, Haqu H2 is the cost-effective choice
Apr 17, 2024 pm 05:07 PM
With the arrival of spring, everything revives and everything is full of vitality and vitality. In this beautiful season, how to add a touch of color to your home life? Haqu H2 projector, with its exquisite design and super cost-effectiveness, has become an indispensable beauty in this spring. This H2 projector is compact yet stylish. Whether placed on the TV cabinet in the living room or next to the bedside table in the bedroom, it can become a beautiful landscape. Its body is made of milky white matte texture. This design not only makes the projector look more advanced, but also increases the comfort of the touch. The beige leather-like material adds a touch of warmth and elegance to the overall appearance. This combination of colors and materials not only conforms to the aesthetic trend of modern homes, but also can be integrated into
 Haqu K2 projector brings Olympic passion and dreams within reach
Jul 24, 2024 pm 01:34 PM
In the just-concluded European Cup final, did you cheer crazily for the team you supported? In the upcoming Paris Olympics, are you also looking forward to perfectly capturing the highlight moments of each event? Among them, having a high-quality viewing equipment is crucial. The Haqu K2 projector is well-deserved to be a good choice for watching games due to its high cost performance and excellent performance. It not only has high brightness and clear picture quality, but also provides an immersive viewing experience, making every exciting moment of the game feel as if it is close at hand. Are you already attracted by such a device? It will definitely allow you to enjoy the passion and dreams of the Olympic Games at home. The most intimate highlight of Haqu K2 is its 210° super angle adjustment, which makes it convenient to watch movies whether on the ceiling or on the wall.
 Projector sales are expected to exceed 20 million units in 2024, with China accounting for the largest market share in the world
Mar 25, 2024 pm 09:20 PM
According to news from this site on March 25, RUNTO data shows that in 2023, the global projector market shipments will be 18.752 million units, a year-on-year increase of 5.2%. The report shows that the global projector market's 2024 scale growth forecast is raised to 9.7%. Overall shipments will exceed 20 million units, reaching 20.57 million units. It is estimated that by 2027, the global projector market is expected to reach 30 million units. ▲Picture source Luotu Technology (RUNTO), the same below. This site learned from the report that in 2023, mainland China’s projector market shipments will be 7.114 million units, a year-on-year decrease of 6.9%; its share in the global market will increase from 2022 to 2022. 42.8% dropped to 37.9%. But mainland China remains the world’s largest
 Projector DIY (make your own projector in a simple way)
Jul 26, 2024 pm 07:05 PM
With the continuous development of technology, projectors have become an indispensable part of our lives. However, projectors on the market are expensive and not affordable for many people. In this article, we will introduce some simple and economical ways to help you DIY your own projector and enjoy a high-quality movie experience. 1. Use the projection function of the mobile phone - Use the projection function of the mobile phone to project the mobile phone screen onto a white wall or screen. -Adjust the mobile phone and projection position to ensure the picture is clear and bright. -Turn off ambient light sources to improve viewing effects. 2. Make a simple projection screen - use white sheets or curtain fabric as the projection screen. Cut the fabric to size and hang it on the wall. Keep the projection screen flat and clean for the best picture results.
 Solution to projector return button failure (how to repair the return button function of projector remote control)
Feb 15, 2024 pm 04:57 PM
Projectors are increasingly used in daily life and work with the development of technology. Sometimes we may encounter the problem that the return button of the projector remote control fails. However, this brings inconvenience to our operation. To help everyone use the projector better, this article will introduce how to solve the problem of the projector's return key not working. 1. Confirm whether the return key is really invalid. First, you need to confirm whether the return key is really invalid before solving the problem. Or use another remote control to test whether it can return. You can press other buttons to see if they are normal. Then you can proceed to the next step of troubleshooting. If you confirm that the return key is invalid. 2. Replace the remote control battery. Sometimes, the failure of the return button on the projector remote control is caused by insufficient battery power. Reinstall the battery,
 Detailed tutorial on how to fill the full screen with win10 projector
Dec 23, 2023 am 09:21 AM
When we use the win10 projector, we can handle some meetings very easily. However, when using the projector, some users also said that the projection cannot cover the full screen. How to solve this problem? Come on. Take a look at the detailed tutorial ~ How to fill the full screen with a win10 projector: 1. Press "Win+P" to open the projection settings and select the "Extended" option. 2. If the screen is still not full, we enter settings from the start menu and select system. 3. Then we can find "Display Adapter Properties" at the bottom of the display options and click to enter. 4. Then in the pop-up properties window, we select this item "List all modes". 5. Then we can debug one by one. After debugging is completed, select


