vscode configures go language development environment

Golang 环境配置
1) 首先下载适合你系统的安装包
2)下载完成安装到指定目录即可。我这里是(D:\Go)。
3)配置Glang环境变量
进入我的电脑->高级设置->环境变量查看下,GOROOT变量是否存在,以及Path变量中是否也设置了GOROOT。没有的话,新增一个GOROOT变量,路径则输入你刚刚安装完成后Go的根目录,如我的是:D:\Go\。
然后编辑Path变量,在最后面新增";%GOROOT%\bin"。
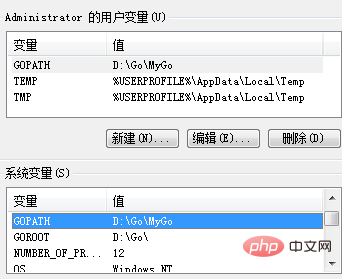
提示:上图是以前配置的环境,GOPATH="D:\GO\MyGO",这里根据自己环境变通即可;
go命令依赖一个环境变量:GOPATH,这不是Go的安装目录,而是你的工作(工程)目录(你的代码都会在该目录下)。GOPATH可以有多个,windows以分号(;)进行区分,Linux系统是冒号(:),当有多个GOPATH时,默认会将go get的内容放在第一个目录下。
这里我们新建一个GOPATH变量,以我的为例:D:\Go\MyGolang,并创建相关目录如下:
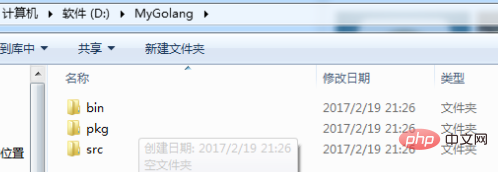
然后编辑Path变量,在最后面新增";%GOPATH%\bin"。
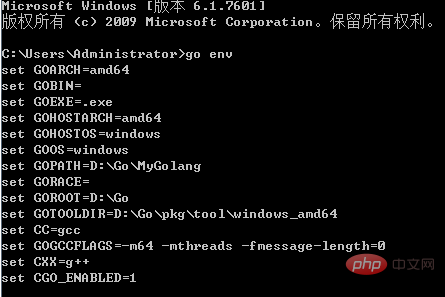
4) 重启操作系统,并通过命令验证
安装配置 VSCode
选择自己系统对应的版本就可以。
安装 golang 插件
进入Visual Studio Code,使用快捷键F1,打开命令面板
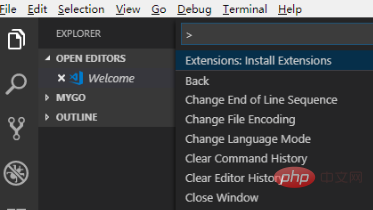
在上图光标处·输入 exten ,然后选择“Extensions:Install Extension”,如下图
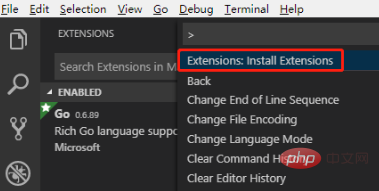
查询并安装 Go 插件
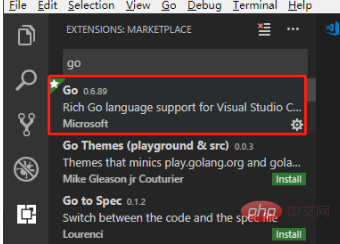
提示:在插件列表中,选择 Go,进行安装,安装之后,系统会提示重启Visual Studio Code。由于我这里已经安装过了,所以不会出现 "Install" 选项。
开启自动保存功能
打开Visual Studio Code,找到菜单File -> Preferences -> Settings,如下图:

选中 "User Settings" 配置如下内容

{
    "files.autoSave": "onFocusChange",
    "editor.fontSize": 18,
    "go.goroot": "D:\\Go",
    "go.gopath": "D:\\Golang\\MyGO"
}其他保持默认配置即可;
执行相关命令(自行安装好git)
1)安装gocode
打开命令提示符(以管理员身份打开),输入:
go get -u -v github.com/nsf/gocode
2)安装godef
go get -u -v github.com/rogpeppe/godef
3)安装golint
# 创建 $GOPATH/src/golang.org/x
cd $GOPATH/src/golang.org/x
git clone https://github.com/golang/tools.gitgit clone https://github.com/golang/lint.git# 完成以上步骤后,执行
go get golang.org/x/lint/golint
如果你遇到了类似如下错误,就可以通过 git clone 的方式把包下载到本地,再进行安装即可解决问题;

4)安装go-find-references
go get -u -v github.com/lukehoban/go-find-references
5)安装go-outline
go get -u -v github.com/lukehoban/go-outline
6)安装goreturns
go get -u -v sourcegraph.com/sqs/goreturns
7)安装gorename
go get -u -v golang.org/x/tools/cmd/gorename
提示:如果还提示报错,因为前面已经git clone 下来了,可以执行执行"go install golang.org/x/tools/cmd/gorename";
8)安装gopkgs
go get -u -v github.com/tpng/gopkgs
9)安装go-symbols
go get -u -v github.com/newhook/go-symbols
写一个程序进行测试
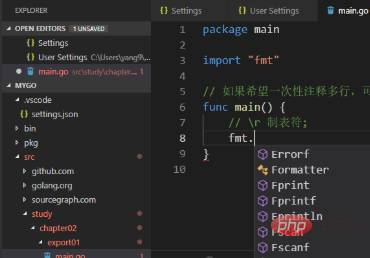
可以看到能够进行相关提示。这里我们执行完整程序测试一下,程序是否正常。
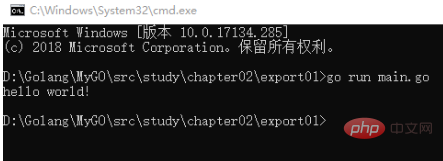
完成!
相关文章教程推荐:vscode教程
The above is the detailed content of vscode configures go language development environment. For more information, please follow other related articles on the PHP Chinese website!

Hot AI Tools

Undresser.AI Undress
AI-powered app for creating realistic nude photos

AI Clothes Remover
Online AI tool for removing clothes from photos.

Undress AI Tool
Undress images for free

Clothoff.io
AI clothes remover

Video Face Swap
Swap faces in any video effortlessly with our completely free AI face swap tool!

Hot Article

Hot Tools

Notepad++7.3.1
Easy-to-use and free code editor

SublimeText3 Chinese version
Chinese version, very easy to use

Zend Studio 13.0.1
Powerful PHP integrated development environment

Dreamweaver CS6
Visual web development tools

SublimeText3 Mac version
God-level code editing software (SublimeText3)

Hot Topics
 What computer configuration is required for vscode
Apr 15, 2025 pm 09:48 PM
VS Code system requirements: Operating system: Windows 10 and above, macOS 10.12 and above, Linux distribution processor: minimum 1.6 GHz, recommended 2.0 GHz and above memory: minimum 512 MB, recommended 4 GB and above storage space: minimum 250 MB, recommended 1 GB and above other requirements: stable network connection, Xorg/Wayland (Linux)
 vscode terminal usage tutorial
Apr 15, 2025 pm 10:09 PM
vscode built-in terminal is a development tool that allows running commands and scripts within the editor to simplify the development process. How to use vscode terminal: Open the terminal with the shortcut key (Ctrl/Cmd). Enter a command or run the script. Use hotkeys (such as Ctrl L to clear the terminal). Change the working directory (such as the cd command). Advanced features include debug mode, automatic code snippet completion, and interactive command history.
 How to solve the problem of vscode Chinese annotations becoming question marks
Apr 15, 2025 pm 11:36 PM
How to solve the problem that Chinese comments in Visual Studio Code become question marks: Check the file encoding and make sure it is "UTF-8 without BOM". Change the font to a font that supports Chinese characters, such as "Song Style" or "Microsoft Yahei". Reinstall the font. Enable Unicode support. Upgrade VSCode, restart the computer, and recreate the source file.
 Where to write code in vscode
Apr 15, 2025 pm 09:54 PM
Writing code in Visual Studio Code (VSCode) is simple and easy to use. Just install VSCode, create a project, select a language, create a file, write code, save and run it. The advantages of VSCode include cross-platform, free and open source, powerful features, rich extensions, and lightweight and fast.
 Common commands for vscode terminal
Apr 15, 2025 pm 10:06 PM
Common commands for VS Code terminals include: Clear the terminal screen (clear), list the current directory file (ls), change the current working directory (cd), print the current working directory path (pwd), create a new directory (mkdir), delete empty directory (rmdir), create a new file (touch) delete a file or directory (rm), copy a file or directory (cp), move or rename a file or directory (mv) display file content (cat) view file content and scroll (less) view file content only scroll down (more) display the first few lines of the file (head)
 vscode terminal command cannot be used
Apr 15, 2025 pm 10:03 PM
Causes and solutions for the VS Code terminal commands not available: The necessary tools are not installed (Windows: WSL; macOS: Xcode command line tools) Path configuration is wrong (add executable files to PATH environment variables) Permission issues (run VS Code as administrator) Firewall or proxy restrictions (check settings, unrestrictions) Terminal settings are incorrect (enable use of external terminals) VS Code installation is corrupt (reinstall or update) Terminal configuration is incompatible (try different terminal types or commands) Specific environment variables are missing (set necessary environment variables)
 How to use VSCode
Apr 15, 2025 pm 11:21 PM
Visual Studio Code (VSCode) is a cross-platform, open source and free code editor developed by Microsoft. It is known for its lightweight, scalability and support for a wide range of programming languages. To install VSCode, please visit the official website to download and run the installer. When using VSCode, you can create new projects, edit code, debug code, navigate projects, expand VSCode, and manage settings. VSCode is available for Windows, macOS, and Linux, supports multiple programming languages and provides various extensions through Marketplace. Its advantages include lightweight, scalability, extensive language support, rich features and version
 vscode Previous Next Shortcut Key
Apr 15, 2025 pm 10:51 PM
VS Code One-step/Next step shortcut key usage: One-step (backward): Windows/Linux: Ctrl ←; macOS: Cmd ←Next step (forward): Windows/Linux: Ctrl →; macOS: Cmd →


