

教你用ps给自己头像p圣诞帽

圣诞节快到了,看到身边朋友都给自己头像p上圣诞帽,是不是自己也想试试呢,给自己的头像p个圣诞帽,操作过程跟结果都非常有意思,今天小编就为大家详细介绍用ps给自己头像p圣诞帽方法,不会的朋友可以参考一下哦!
方法/步骤
1、第一步先在百度图片找到自己想要的头像照片,这里我找了这个萌萌哒的头像,鼠标右键,选择将图像保存到自己的电脑,可以选择放在桌面备用。要注意是尽量选择高清大图,不然处理后像素会不高。

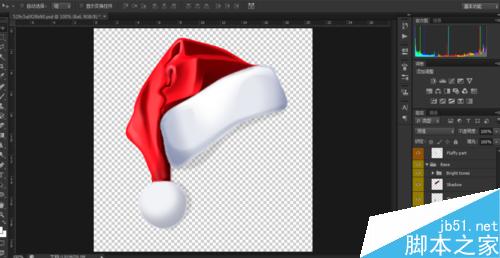
2、第二步,可以自己制作圣诞帽,不过对于新手来说还是有点难度的,这里比较现成的就是在网上找现成的素材,我就简单的来,在千图网找到圣诞帽素材,选择psd格式,准备好素材下载到电脑里。


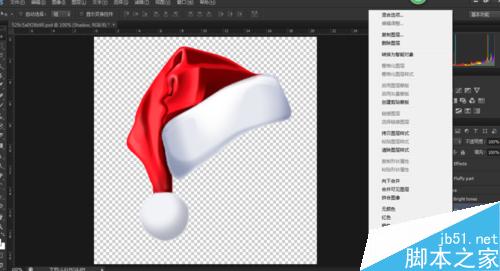
3、下载后将文件解压,如何选中圣诞帽psd格式的图标鼠标右键,选中打开方式,用ps打开后,可以看到圣诞帽素材,在ps界面右下角,先隐藏起背景色,然后把三个组打开,可以看到每个组件里面有很多图层,然后随意选中一个图层,右键选择合并可见图层。
4、然后在电脑在桌面找到那个头像,可以将头像图片直接拖到ps里,这样就可以合成图像了;或者通过其他方式,点击左上角文件点击打开桌面的图,之后将图层两个素材移动到一起。
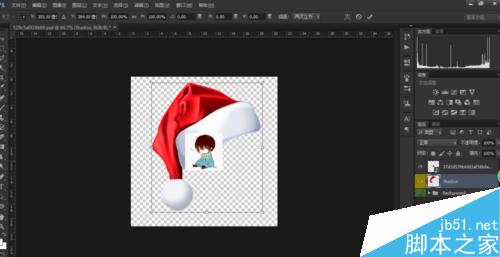
5、选择圣诞帽图层,同时按键盘Ctrl+T选中圣诞帽,此时可以变化圣诞帽大小,这时一定要按住shit键等比例放大缩小图片,滚动鼠标调整圣诞帽合适大小,也可以在选择图片某个角落调整圣诞帽的角度。
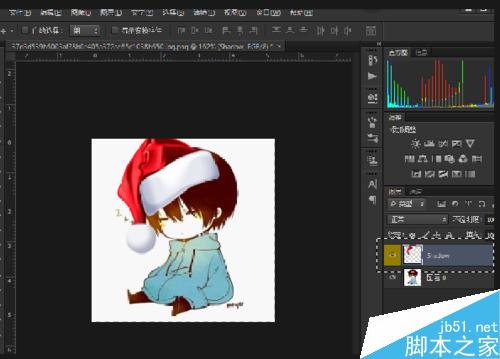
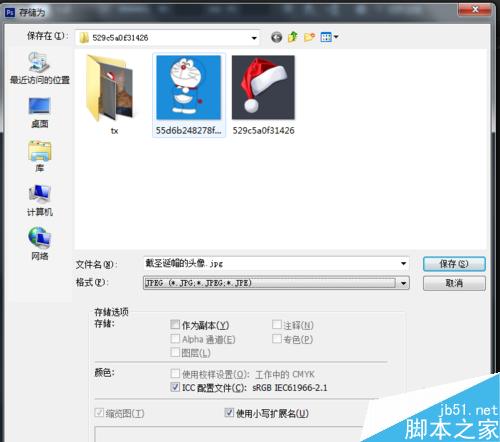
6、按Enter键完成调整,然后移动圣诞帽,放在头像头上,假如还是不合适,可继续调整,重复第五步骤,放大缩小圣诞帽,以及选择圣诞帽的角度,调整到合适的位置后,按enter,完成细条,之后选择文件保存,格式选择成JPG格式,就可以了。
注意事项
简单操作ps还可以给自己p其它小装饰哦
以上就是用ps给自己头像p圣诞帽方法介绍,操作很简单的,大家学会了吗?希望这篇文章能对大家有所帮助!

Hot AI Tools

Undresser.AI Undress
AI-powered app for creating realistic nude photos

AI Clothes Remover
Online AI tool for removing clothes from photos.

Undress AI Tool
Undress images for free

Clothoff.io
AI clothes remover

Video Face Swap
Swap faces in any video effortlessly with our completely free AI face swap tool!

Hot Article
Hot Tools

Notepad++7.3.1
Easy-to-use and free code editor

SublimeText3 Chinese version
Chinese version, very easy to use

Zend Studio 13.0.1
Powerful PHP integrated development environment

Dreamweaver CS6
Visual web development tools

SublimeText3 Mac version
God-level code editing software (SublimeText3)
Hot Topics
 1664
1664
 14
1423
52
1318
25
1268
29
1248
24
14
1423
52
1318
25
1268
29
1248
24

 Use Python to convert photos into anime-style avatars.
Apr 22, 2023 pm 10:22 PM
Use Python to convert photos into anime-style avatars.
Apr 22, 2023 pm 10:22 PM
Recently, I encountered a problem. I needed to transform my avatar into an anime style. My first thought was to find ready-made wheels. ▲Convert pictures to pixel style to convert avatars into anime style, hoping to convert real photos into anime/cartoon style non-realistic images while maintaining the original image information and texture details. At present, in addition to Baidu API, there are many open source libraries on Github that we can use directly. Among them, AnimeGAN is a study from Wuhan University and Hubei University of Technology. It uses a combination of neural style transfer + generative adversarial network (GAN), and the effect is very consistent with our needs. AnimeGAN first used the Tensorflow framework, but after querying the information, it was found that the project already supports PyTorch.
 ps serial number cs5 permanently free 2020
Jul 13, 2023 am 10:06 AM
ps serial number cs5 permanently free 2020
Jul 13, 2023 am 10:06 AM
PS serial numbers cs5 permanent free 2020 include: 1. 1330-1384-7388-4265-2355-8589 (Chinese); 2. 1330-1409-7892-5799-0412-7680 (Chinese); 3. 1330-1616-1993 -8375-9492-6951 (Chinese); 4. 1330-1971-2669-5043-0398-7801 (Chinese), etc.
 Tutorial to restore win11 default avatar
Jan 02, 2024 pm 12:43 PM
Tutorial to restore win11 default avatar
Jan 02, 2024 pm 12:43 PM
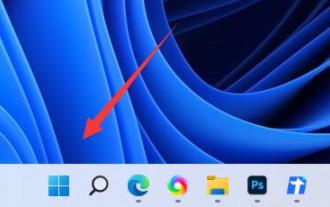
If we change our system account avatar but don’t want it anymore, we can’t find how to change the default avatar in win11. In fact, we only need to find the folder of the default avatar to restore it. Restore the default avatar in win11 1. First click on the "Windows Logo" on the bottom taskbar 2. Then find and open "Settings" 3. Then enter "Account" on the left column 4. Then click on "Account Information" on the right 5. After opening, click "Browse Files" in the selected photo. 6. Finally, enter the "C:\ProgramData\Microsoft\UserAccountPictures" path to find the system default avatar picture.
 What to do if ps installation cannot write registry value error 160
Mar 22, 2023 pm 02:33 PM
What to do if ps installation cannot write registry value error 160
Mar 22, 2023 pm 02:33 PM
Solution to error 160 when ps installation cannot write registry value: 1. Check whether there is 2345 software on the computer, and if so, uninstall the software; 2. Press "Win+R" and enter "Regedit" to open the system registry, and then Find "Photoshop.exe" and delete the Photoshop item.
 What should I do if the PS interface font is too small?
Dec 01, 2022 am 11:31 AM
What should I do if the PS interface font is too small?
Dec 01, 2022 am 11:31 AM
How to fix the PS interface font that is too small: 1. Open PS, click the "Edit" button on the top menu bar of PS to expand the editing menu; 2. Click the "Preferences" button in the expanded editing menu, and then click "Interface. .." button; 3. In the interface settings, set the user interface font size to "Large", set the UI scaling to "200%" and save the settings, then restart PS to take effect.
 How to delete selected area in ps
Aug 07, 2023 pm 01:46 PM
How to delete selected area in ps
Aug 07, 2023 pm 01:46 PM
Steps to delete the selected area in PS: 1. Open the picture you want to edit; 2. Use the appropriate tool to create a selection; 3. You can use a variety of methods to delete the content in the selection, use the "Delete" key, use the "Healing Brush Tool" , use "Content-Aware Fill", use the "Stamp Tool", etc.; 4. Use tools to repair any obvious traces or defects to make the picture look more natural; 5. After completing editing, click "File" > in the menu bar "Save" to save the editing results.
 Introduction to the process of extracting line drawings in PS
Apr 01, 2024 pm 12:51 PM
Introduction to the process of extracting line drawings in PS
Apr 01, 2024 pm 12:51 PM
1. Open the software and import a piece of material, as shown in the picture below. 2. Then ctrl+shift+u to remove color. 3. Then press ctrl+J to copy the layer. 4. Then reverse ctrl+I, and then set the layer blending mode to Color Dodge. 5. Click Filter--Others--Minimum. 6. In the pop-up dialog box, set the radius to 2 and click OK. 7. Finally, you can see the line draft extracted.
 How to change account name and avatar in Win10 - Detailed step-by-step guide
Jan 14, 2024 pm 01:45 PM
How to change account name and avatar in Win10 - Detailed step-by-step guide
Jan 14, 2024 pm 01:45 PM
After registering a win10 account, many friends feel that their default avatars are not very good-looking. For this reason, they want to change their avatars. Here is a tutorial on how to change their avatars. If you want to know, you can come and take a look. . How to change the win10 account name and avatar: 1. First click on the lower left corner to start. 2. Then click the avatar above in the pop-up menu. 3. After entering, click "Change Account Settings". 4. Then click "Browse" under the avatar. 5. Find the photo you want to use as your avatar and select it. 6. Finally, the modification is completed successfully.
