 Development Tools
 composer
 What should I do if there is no response after entering the composer installation command?
What should I do if there is no response after entering the composer installation command?

What should I do if there is no response after entering the composer installation command?
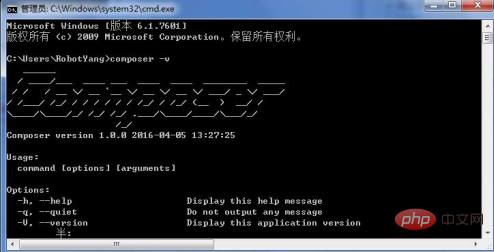
Problem description 1: After the installation through the Composer-Setup.exe installation program is completed, the command is invalid, as shown below:

Solution:
Check whether the system environment is automatically configured. If not, please add the Path variable: C:\ProgramData\ComposerSetup\bin
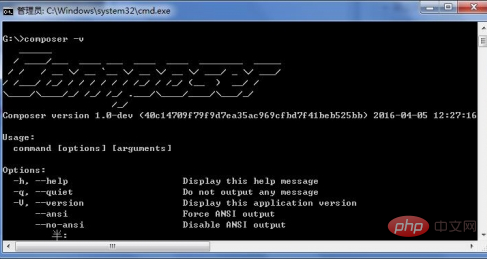
Open cmd and enter composer - v. If the following is displayed, the installation is successful and can be accessed globally.

Switch to any directory and test composer -v again. The installation is successful as shown below.

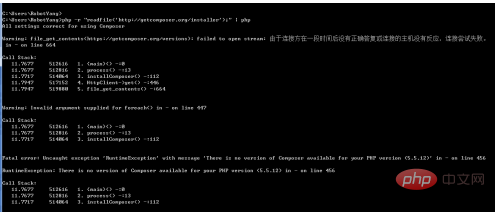
Problem Description 2: Manual installation through the installation command failed, as shown below:

##Solution:
The error prompts that there is no Composer that supports PHP5.5.12. Update PHP version 5.6 and above.Reinstall through the command. Before installation, please cd to the directory you want to install. Directory (can be created and specified by yourself), for example: C:\Users\username>cd D: Switch to D driveC:\Users\username>cd D:\Composer Switch to Composer folder (the installation directory you created) D:\Composer>php -r "readfile('https://getcomposer.org/installer');" | php execute the installation command from this step The beginning and subsequent steps are the same as the tutorials in the official documentation, please refer to them by yourself to complete the subsequent operations. The file path after the installation is completed. At this time, the composer -v command can only be executed in this directory, that is, it can only be accessed locally.
composer usage tutorial column!
The above is the detailed content of What should I do if there is no response after entering the composer installation command?. For more information, please follow other related articles on the PHP Chinese website!

Hot AI Tools

Undresser.AI Undress
AI-powered app for creating realistic nude photos

AI Clothes Remover
Online AI tool for removing clothes from photos.

Undress AI Tool
Undress images for free

Clothoff.io
AI clothes remover

Video Face Swap
Swap faces in any video effortlessly with our completely free AI face swap tool!

Hot Article

Hot Tools

Notepad++7.3.1
Easy-to-use and free code editor

SublimeText3 Chinese version
Chinese version, very easy to use

Zend Studio 13.0.1
Powerful PHP integrated development environment

Dreamweaver CS6
Visual web development tools

SublimeText3 Mac version
God-level code editing software (SublimeText3)

Hot Topics
 Use Composer to solve the dilemma of recommendation systems: andres-montanez/recommendations-bundle
Apr 18, 2025 am 11:48 AM
When developing an e-commerce website, I encountered a difficult problem: how to provide users with personalized product recommendations. Initially, I tried some simple recommendation algorithms, but the results were not ideal, and user satisfaction was also affected. In order to improve the accuracy and efficiency of the recommendation system, I decided to adopt a more professional solution. Finally, I installed andres-montanez/recommendations-bundle through Composer, which not only solved my problem, but also greatly improved the performance of the recommendation system. You can learn composer through the following address:
 Laravel Introduction Example
Apr 18, 2025 pm 12:45 PM
Laravel is a PHP framework for easy building of web applications. It provides a range of powerful features including: Installation: Install the Laravel CLI globally with Composer and create applications in the project directory. Routing: Define the relationship between the URL and the handler in routes/web.php. View: Create a view in resources/views to render the application's interface. Database Integration: Provides out-of-the-box integration with databases such as MySQL and uses migration to create and modify tables. Model and Controller: The model represents the database entity and the controller processes HTTP requests.
 Solve caching issues in Craft CMS: Using wiejeben/craft-laravel-mix plug-in
Apr 18, 2025 am 09:24 AM
When developing websites using CraftCMS, you often encounter resource file caching problems, especially when you frequently update CSS and JavaScript files, old versions of files may still be cached by the browser, causing users to not see the latest changes in time. This problem not only affects the user experience, but also increases the difficulty of development and debugging. Recently, I encountered similar troubles in my project, and after some exploration, I found the plugin wiejeben/craft-laravel-mix, which perfectly solved my caching problem.
 Laravel framework installation method
Apr 18, 2025 pm 12:54 PM
Article summary: This article provides detailed step-by-step instructions to guide readers on how to easily install the Laravel framework. Laravel is a powerful PHP framework that speeds up the development process of web applications. This tutorial covers the installation process from system requirements to configuring databases and setting up routing. By following these steps, readers can quickly and efficiently lay a solid foundation for their Laravel project.
 How to view the version number of laravel? How to view the version number of laravel
Apr 18, 2025 pm 01:00 PM
The Laravel framework has built-in methods to easily view its version number to meet the different needs of developers. This article will explore these methods, including using the Composer command line tool, accessing .env files, or obtaining version information through PHP code. These methods are essential for maintaining and managing versioning of Laravel applications.
 Using Dicr/Yii2-Google to integrate Google API in YII2
Apr 18, 2025 am 11:54 AM
VprocesserazrabotkiveB-enclosed, Мнепришлостольностьсясзадачейтерациигооглапидляпапакробоглесхетсigootrive. LEAVALLYSUMBALLANCEFRIABLANCEFAUMDOPTOMATIFICATION, ČtookazaLovnetakProsto, Kakaožidal.Posenesko
 How to simplify email marketing with Composer: DUWA.io's application practices
Apr 18, 2025 am 11:27 AM
I'm having a tricky problem when doing a mail marketing campaign: how to efficiently create and send mail in HTML format. The traditional approach is to write code manually and send emails using an SMTP server, but this is not only time consuming, but also error-prone. After trying multiple solutions, I discovered DUWA.io, a simple and easy-to-use RESTAPI that helps me create and send HTML mail quickly. To further simplify the development process, I decided to use Composer to install and manage DUWA.io's PHP library - captaindoe/duwa.
 laravel installation code
Apr 18, 2025 pm 12:30 PM
To install Laravel, follow these steps in sequence: Install Composer (for macOS/Linux and Windows) Install Laravel Installer Create a new project Start Service Access Application (URL: http://127.0.0.1:8000) Set up the database connection (if required)


