 Web Front-end
 Bootstrap Tutorial
 Bootstrap-table implements dynamic merging of the same rows (merging tables with the same name)
Bootstrap-table implements dynamic merging of the same rows (merging tables with the same name)

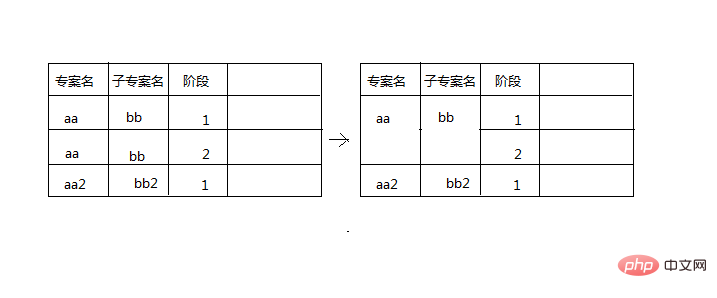
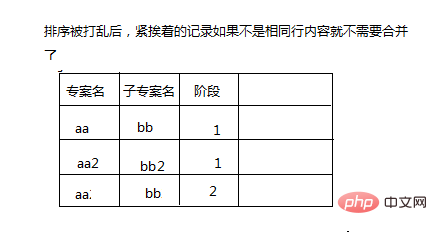
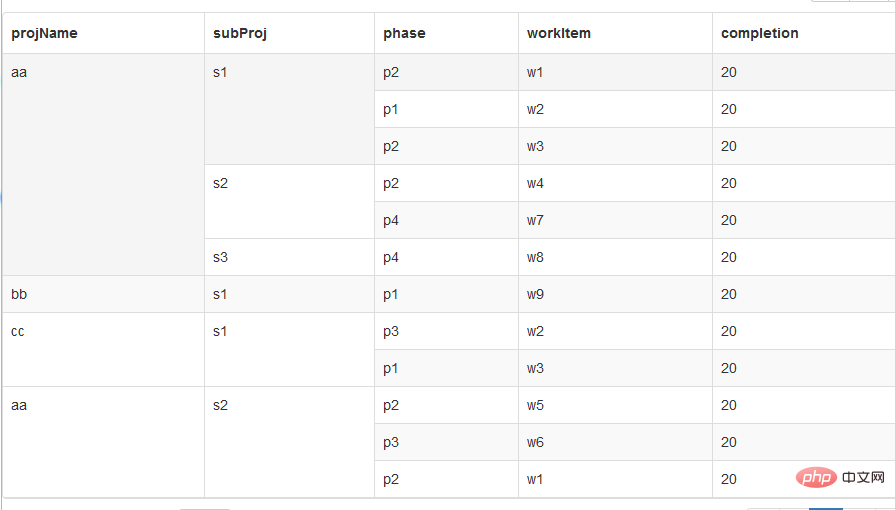
Sometimes the requirements for a table are strange. The table I was working on recently needed to merge the row elements of adjacent records in a certain column when they have the same content. If they are not the same, they will not be merged. If the order of the table data does not need to be changed, this can be done very simply (just count the number of times all the same elements appear, no need to consider whether they are next to each other), but when the sorting can be changed, There is a bit of a problem at this time. Maybe the expression is a bit unclear, let’s look at the picture below to describe the problem.
Recommended tutorial: Bootstrap introductory tutorial
## Specific requirements, assuming there are three records now, the background follows the order x After being arranged, it is passed to the front page for display.

<%--
Created by IntelliJ IDEA.
User: Administrator
Date: 2018/6/20
Time: 14:21
To change this template use File | Settings | File Templates.
--%>
<%@ page contentType="text/html;charset=UTF-8" language="java" %>
<%
String scheme = request.getScheme();
String serverName = request.getServerName();
String contextPath = request.getContextPath();
int port = request.getServerPort();
//网站的访问跟路径
String baseURL = scheme + "://" + serverName + ":" + port
+ contextPath;
request.setAttribute("baseURL", baseURL);
%>
<!DOCTYPE html>
<html>
<head>
<meta charset="utf-8" />
<meta name="viewport" content="width=device-width, initial-scale=1">
<%--设置IE渲染方式(文档)默认为最高(这部分可以选择添加也可以不添加)--%>
<meta http-equiv="Content-Type" content="text/html;charset=utf-8"/>
<title>实现表格同名合并</title>
<!--图标样式-->
<link rel="stylesheet" type="text/css" href="${baseURL}/Bootstrap/bootstrap/css/bootstrap.min.css" />
<link href="${baseURL}/Bootstrap/bootstrap-table/bootstrap-table.css" rel="stylesheet" />
<script src="${baseURL}/Bootstrap/bootstrap/assets/js/jquery-1.10.2.min.js"></script>
<script src="${baseURL}/Bootstrap/bootstrap/assets/js/bootstrap.min.js"></script>
<script src="${baseURL}/Bootstrap/bootstrap-table/bootstrap-table.js"></script>
<!-- HTML5 shim and Respond.js IE8 support of HTML5 elements and media queries -->
<!--[if lt IE 9]>
<script src="${baseURL}/Bootstrap/bootstrap/assets/js/html5shiv.js"></script>
<script src="${baseURL}/Bootstrap/bootstrap/assets/js/respond.min.js"></script>
<![endif]-->
<style type="text/css">
</style>
</head>
<body>
<div>
<table id="table"></table>
</div>
</body>
<script type="text/javascript">
$(function () {
//初始化Table
$('#table').bootstrapTable({
url: '${baseURL}/Views/cc.json',//请求后台的URL(*) 这里我用的是一个json文件
method: 'get',//请求方式(*)
toolbar: '#toolbar',//工具按钮用哪个容器
striped: true,//是否显示行间隔色
cache: false,//是否使用缓存,默认为true,所以一般情况下需要设置一下这个属性(*)
pagination: true,//是否显示分页(*)
sortable: false,//是否启用排序
sortOrder: "asc",//排序方式
//queryParams: queryParams,//传递参数(*)
sidePagination: "server",//分页方式:client客户端分页,server服务端分页(*)
pageNumber: 1,//初始化加载第一页,默认第一页
pageSize: 10,//每页的记录行数(*)
pageList: [10, 25, 50, 100],//可供选择的每页的行数(*)
// search: true,//是否显示表格搜索,此搜索是客户端搜索,不会进服务端
contentType: "application/x-www-form-urlencoded",
strictSearch: true,
showColumns: true,//是否显示内容列下拉框
showRefresh: true,//是否显示刷新按钮
minimumCountColumns: 2,//最少允许的列数
clickToSelect: true,//是否启用点击选中行
//这里如果要固定表头的话 就把height开启
//height: 700,//行高,如果没有设置height属性,表格自动根据记录条数觉得表格高度
width:'50%',
uniqueId: "id",//每一行的唯一标识,一般为主键列
showToggle: true,//是否显示详细视图和列表视图的切换按钮
cardView: false,//是否显示详细视图
detailView: false,//是否显示父子表
onLoadSuccess: function (data) {
//数据加载成功后 进行合并 这里我只是同名合并projName subProj phase 如果需要合并更多的字段 仿照添加对应的代码就可以了
mergeTable(data,"table");
},
columns: [
{
field: 'projName',
title: 'projName',
}, {
field: 'subProj',
title: 'subProj'
}, {
field: 'phase',
title: 'phase'
}, {
field: 'workItem',
title: 'workItem',
},
{
field: 'completion',
title: 'completion',
},
],
});
});
//全局变量 ***如果每次只是发送ajax请求对table进行局部更新,则每次要合并前前都应该清空这三个变量 不然全局变量会一值追加结果
var projNameCount="";
var subProjNameCount="";
var phaseCount="";
//合并表格
function mergeTable(data,tableId){
//每次合并表格前 都要将全局变量清空
projNameCount="";
subProjNameCount="";
phaseCount="";
mergeCells(data.rows,0,data.rows.length,"projName",$('#'+tableId));
//对projName,subProjName,phase的次数进行分割
//去掉末尾的逗号 有时候也可以不用去掉 还是去掉了我这里
projNameCount = projNameCount.substring(0,projNameCount.length-1);
subProjNameCount = subProjNameCount.substring(0,subProjNameCount.length-1);
phaseCount = phaseCount.substring(0,phaseCount.length-1);
//console.log(projNameCount+"+"+subProjNameCount+"+"+phaseCount);
var strArr1 = projNameCount.split(",");
var strArr2 = subProjNameCount.split(",");
var strArr3 = phaseCount.split(",");
//根据次数进行表格合并
//合并projName
var index = 0;
for(var i=0;i<strArr1.length;i++){
var count = strArr1[i] * 1;
$('#'+tableId).bootstrapTable('mergeCells',{index:index, field:"projName", colspan: 1, rowspan: count});
index += count;
}
//合并subProjName
var index = 0;
for(var i=0;i<strArr2.length;i++){
var count = strArr2[i] * 1;
$('#'+tableId).bootstrapTable('mergeCells',{index:index, field:"subProjName", colspan: 1, rowspan: count});
index += count;
}
//合并phaseName
var index = 0;
for(var i=0;i<strArr3.length;i++){
var count = strArr3[i] * 1;
$('#'+tableId).bootstrapTable('mergeCells',{index:index, field:"phaseName", colspan: 1, rowspan: count});
index += count;
}
}
//排序后紧挨在一起 进行同名合并
/**
* 对于表格合并,首先要进行排序,即将同名的属性的记录排序紧挨在一起,这样才能最好的显示出合并想要的效果。
* 因为此方法是拿第一个数据与后面的数据依次比较,
* 例如,第一条记录的projName与第二条记录的projName来进行比较,两者相同,则继续第一条记录的projName与第三条记录的projName来进行比较,
* 当不相同时,记录下此projName对应的值出现的次数,然后再开始从第三条记录的projName与第四条记录的projName来进行比较,依次循环下去,记
* 录下相同内容的值出现的次数,到时候,再根据这些次数来进行合并
*
* 此方法主要是先拿到每个同名属性的值的相等次数,把次数利用全局变量存下来
*
* @param datas --表格数据,一般为表格的rows数据
* @param startIndex --开始下标
* @param size --从开始下标起,到size结束,遍历合并多少个
* @param fieldName --计算算哪个列
* @param target --table表格对象
*/
function mergeCells(datas,startIndex,size,fieldName,target) {
//console.log("startIndex:"+startIndex+"size:"+size+"---合并列:"+fieldName)
//声明一个数组计算相同属性值在data对象出现的次数和
//这里不能使用map,因为如果涉及到排序后,相同的属性并不是紧挨在一起,那么后面的次数会覆盖前面的次数,故这里用数组
var sortArr = new Array();
for (var i = startIndex; i < size ; i++) {
for (var j = i + 1; j < size; j++) {
if (datas[i][fieldName] != datas[j][fieldName]){
//相同属性值不同
if (j - i > 1) {
sortArr.push(j - i);
i = j - 1;
//如果是最后一个元素 把最后一个元素的次数也装进去
if(i == size-1-1){
sortArr.push(1);
}
}else{
sortArr.push(j - i);
//如果j是最后一个元素 把最后一个元素的次数装进去
if(j == size - 1){
sortArr.push(1);
}
}
break;
}else {
//相同属性值相同 直到最后一次的时候才会装 否则在他们的值不同时再装进去
if (j == size - 1) {
sortArr.push(j - i+1);
//这里的赋值感觉有点多余 算了现就这个样子吧 不影响功能
i = j;
}
}
}
}
//遍历数组,将值装追加到对应的字符串后面
for(var prop in sortArr){
/*这里在ie8上运行的时候 出现坑 最好遍历数组不要用for in 这里我用了就懒得换了
下面加上如果prop是indexOf就停止 就解决了ie8出现的问题*/
if(prop == "indexOf"){
continue;
}
if(fieldName == "projName"){
var count = sortArr[prop] * 1;
projNameCount += count +",";
}
if(fieldName == "subProjName"){
var count = sortArr[prop] * 1;
subProjNameCount += count +",";
}
if(fieldName == "phaseName"){
var count = sortArr[prop] * 1;
phaseCount += count +",";
}
}
for(var prop in sortArr){
if(prop == "indexOf"){
continue;
}
if(fieldName == "projName"){
//console.log("进入projName--此时开始index-"+startIndex+"--结束index--"+(startIndex+sortArr[prop])*1);
startIndex = 0;
//subProjName每次进去的startIndex为前面次数的和
if(subProjNameCount.length>0){
//console.log("subProjNameCount-"+subProjNameCount);
var temp = subProjNameCount.substring(0,subProjNameCount.length-1);
var strArr1 = temp.split(",");
for(var i=0;i<strArr1.length;i++){
var count = strArr1[i] * 1;
startIndex += count;
}
}
if(sortArr[prop] >1){
mergeCells(datas,startIndex,startIndex+sortArr[prop],"subProjName",target);
}else{
//当projName的次数为1就不进入循环
subProjNameCount +=1+",";
phaseCount +=1+",";
}
}
if(fieldName == "subProjName"){
startIndex = 0;
if(phaseCount.length>0){
//console.log("phaseCount-"+phaseCount);
var temp = phaseCount.substring(0,phaseCount.length-1);
//phaseCount = phaseCount + ",";
var strArr1 = temp.split(",");
for(var i=0;i<strArr1.length;i++){
var count = strArr1[i] * 1;
startIndex += count;
}
}
if(sortArr[prop] >1){
//console.log("进入subProj--此时开始index-"+startIndex+"--结束index--"+(startIndex+sortArr[prop])*1);
mergeCells(datas,startIndex,startIndex+sortArr[prop],"phaseName",target)
}else{
phaseCount +=1+",";
}
}
}
}
</script>
</html>
$('#table').bootstrapTable('mergeCells',{index:index, field:"projName", colspan: 1, rowspan: count});The above is the detailed content of Bootstrap-table implements dynamic merging of the same rows (merging tables with the same name). For more information, please follow other related articles on the PHP Chinese website!

Hot AI Tools

Undresser.AI Undress
AI-powered app for creating realistic nude photos

AI Clothes Remover
Online AI tool for removing clothes from photos.

Undress AI Tool
Undress images for free

Clothoff.io
AI clothes remover

Video Face Swap
Swap faces in any video effortlessly with our completely free AI face swap tool!

Hot Article

Hot Tools

Notepad++7.3.1
Easy-to-use and free code editor

SublimeText3 Chinese version
Chinese version, very easy to use

Zend Studio 13.0.1
Powerful PHP integrated development environment

Dreamweaver CS6
Visual web development tools

SublimeText3 Mac version
God-level code editing software (SublimeText3)

Hot Topics
 1662
1662
 14
14
 1418
1418
 52
52
 1311
1311
 25
25
 1261
1261
 29
29
 1234
1234
 24
24
 How to get the bootstrap search bar
Apr 07, 2025 pm 03:33 PM
How to use Bootstrap to get the value of the search bar: Determines the ID or name of the search bar. Use JavaScript to get DOM elements. Gets the value of the element. Perform the required actions.
 How to do vertical centering of bootstrap
Apr 07, 2025 pm 03:21 PM
Use Bootstrap to implement vertical centering: flexbox method: Use the d-flex, justify-content-center, and align-items-center classes to place elements in the flexbox container. align-items-center class method: For browsers that do not support flexbox, use the align-items-center class, provided that the parent element has a defined height.
 How to insert pictures on bootstrap
Apr 07, 2025 pm 03:30 PM
There are several ways to insert images in Bootstrap: insert images directly, using the HTML img tag. With the Bootstrap image component, you can provide responsive images and more styles. Set the image size, use the img-fluid class to make the image adaptable. Set the border, using the img-bordered class. Set the rounded corners and use the img-rounded class. Set the shadow, use the shadow class. Resize and position the image, using CSS style. Using the background image, use the background-image CSS property.
 How to write split lines on bootstrap
Apr 07, 2025 pm 03:12 PM
There are two ways to create a Bootstrap split line: using the tag, which creates a horizontal split line. Use the CSS border property to create custom style split lines.
 Bootstrap Accessibility: Building Inclusive and User-Friendly Websites
Apr 07, 2025 am 12:04 AM
Building an inclusive and user-friendly website with Bootstrap can be achieved through the following steps: 1. Enhance screen reader support with ARIA tags; 2. Adjust color contrast to comply with WCAG standards; 3. Ensure keyboard navigation is friendly. These measures ensure that the website is friendly and accessible to all users, including those with barriers.
 Do I need to use flexbox in the center of the Bootstrap picture?
Apr 07, 2025 am 09:06 AM
There are many ways to center Bootstrap pictures, and you don’t have to use Flexbox. If you only need to center horizontally, the text-center class is enough; if you need to center vertically or multiple elements, Flexbox or Grid is more suitable. Flexbox is less compatible and may increase complexity, while Grid is more powerful and has a higher learning cost. When choosing a method, you should weigh the pros and cons and choose the most suitable method according to your needs and preferences.
 How to set up the framework for bootstrap
Apr 07, 2025 pm 03:27 PM
To set up the Bootstrap framework, you need to follow these steps: 1. Reference the Bootstrap file via CDN; 2. Download and host the file on your own server; 3. Include the Bootstrap file in HTML; 4. Compile Sass/Less as needed; 5. Import a custom file (optional). Once setup is complete, you can use Bootstrap's grid systems, components, and styles to create responsive websites and applications.
 How to resize bootstrap
Apr 07, 2025 pm 03:18 PM
To adjust the size of elements in Bootstrap, you can use the dimension class, which includes: adjusting width: .col-, .w-, .mw-adjust height: .h-, .min-h-, .max-h-


