

Detailed introduction to ajax cross-domain


AJAX cross-domain
Note: Part of the content of this article comes from MOOC.com. @MOOC.com: https://www.imooc.com
Course Introduction
●What is AJAX cross-domain problem
●The reasons for AJAX cross-domain problem
●Thinking and methods of solving AJAX cross-domain problems
What is AJAX cross-domain problem
●Simply put, when the front end calls the back-end service interface
●If the service interface is not in the same domain, cross-domain problems will occur
AJAX cross-domain scenario
●The front-end and back-end separation, service-oriented development model
● The front-end and back-end development are independent, and the front-end needs to call a large number of back-end interfaces
●As long as the back-end interfaces are not in the same domain, cross-domain problems will occur
●Cross-domain problems are very common and need to be solved Cross-domain issues are also very important
AJAX cross-domain reasons
●Browser restrictions: Browser security verification restrictions
●Cross-domain (protocol, domain name, port any one Different will be considered as cross-domain)
●XHR (XMLHttpRequest) request
AJAX cross-domain problem solving ideas
●Browser: The browser removes cross-domain verification , of little actual value
●XHR: Do not use XHR, use JSONP, which has many disadvantages and cannot meet current development requirements
●Cross-domain: The callee modification supports cross-domain calls ( Specify parameters); the caller modifies the hidden cross-domain (based on proxy)
Write test code
●Called party back-end code writing: Spring Boot
●Caller front-end Code writing: Jquery
●Introducing the front-end Jasmine testing framework
Why do cross-domain problems occur?
The above picture is also very clear, because the browser itself has restrictions for security (same origin).
●When we send an XMLHttpRequest request, if the requested domain (host domain name, port) is different, then a cross-domain problem will occur (the client cannot obtain the data returned by the server)
It is worth noting that cross-domain problems occur in XMLHttpRequest requests, that is to say, there will be no cross-domain problems if it is not an XMLHttpRequest request
●A very simple example: When writing a web page, 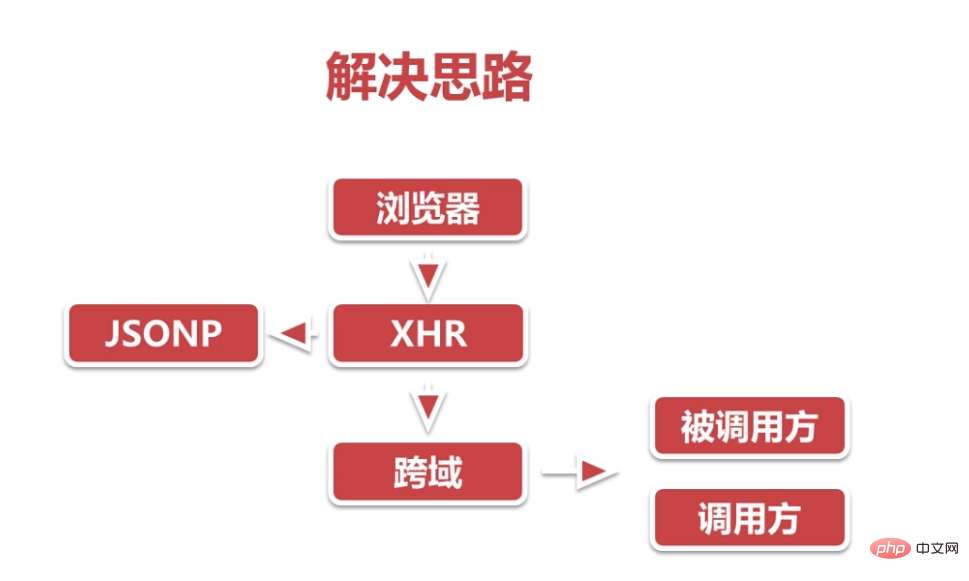 , if the URL is not in this domain, the image can still be obtained normally.
Ideas for solving cross-domain problems
Environment setup
2-1 Back-end project
Code writing
1. Create a maven project pom named ajax-server as follows
<?xml version="1.0" encoding="UTF-8"?>
<project xmlns="http://maven.apache.org/POM/4.0.0" xmlns:xsi="http://www.w3.org/2001/XMLSchema-instance"
    xsi:schemaLocation="http://maven.apache.org/POM/4.0.0 http://maven.apache.org/xsd/maven-4.0.0.xsd">
    <modelVersion>4.0.0</modelVersion>
    <groupId>com.myimooc</groupId>
    <artifactId>ajax-server</artifactId>
    <version>0.0.1-SNAPSHOT</version>
    <packaging>jar</packaging>
    <name>ajax-server</name>
    <description>Demo project for Spring Boot</description>
    <parent>
        <groupId>org.springframework.boot</groupId>
        <artifactId>spring-boot-starter-parent</artifactId>
        <version>2.0.1.RELEASE</version>
        <relativePath/> <!-- lookup parent from repository -->
    </parent>
    <properties>
        <project.build.sourceEncoding>UTF-8</project.build.sourceEncoding>
        <project.reporting.outputEncoding>UTF-8</project.reporting.outputEncoding>
        <java.version>1.8</java.version>
    </properties>
    <dependencies>
        <dependency>
            <groupId>org.springframework.boot</groupId>
            <artifactId>spring-boot-starter-web</artifactId>
        </dependency>
        <dependency>
            <groupId>org.springframework.boot</groupId>
            <artifactId>spring-boot-starter-test</artifactId>
            <scope>test</scope>
        </dependency>
    </dependencies>
    <build>
        <plugins>
            <plugin>
                <groupId>org.springframework.boot</groupId>
                <artifactId>spring-boot-maven-plugin</artifactId>
            </plugin>
        </plugins>
    </build>
</project>2. Write the AjaxServerStart class
package com.myimooc.ajax.server;
import org.springframework.boot.SpringApplication;
import org.springframework.boot.autoconfigure.SpringBootApplication;
/**
 * <br>
 * 标题: 启动类<br>
 * 描述: AJAX跨域讲解后端项目<br>
 *
 * @author zc
 * @date 2018/04/18
 */
@SpringBootApplication
public class AjaxServerStart {
    public static void main(String[] args) {
        SpringApplication.run(AjaxServerStart.class, args);
    }
}3. Write a ResultBean Class
package com.myimooc.ajax.server.vo;
import java.io.Serializable;
/**
 * <br>
 * 标题: REST请求响应POJO类<br>
 * 描述: 封装请求响应结果<br>
 *
 * @author zc
 * @date 2018/04/18
 */
public class ResultBean implements Serializable{
    private static final long serialVersionUID = 7867107433319736719L;
    private String data;
    public ResultBean(String data) {
        this.data = data;
    }
    public String getData() {
        return data;
    }
    public void setData(String data) {
        this.data = data;
    }
}4. Write TestController class
package com.myimooc.ajax.server.controller;
import com.myimooc.ajax.server.vo.ResultBean;
import com.myimooc.ajax.server.vo.User;
import org.springframework.web.bind.annotation.*;
/**
 * <br>
 * 标题: 测试控制器<br>
 * 描述: 提供REST服务<br>
 * 使用 @CrossOrigin 注解支持跨域,可以放到类或方法上面
 * @author zc
 * @date 2018/04/18
 */
@RestController
@RequestMapping("/test")
//@CrossOrigin
public class TestController {
    @GetMapping("/get1")
    public ResultBean get1() {
        System.out.println("TestController.get1");
        return new ResultBean("get1ok");
    }
    @PostMapping("/postJson")
    public ResultBean postJson(@RequestBody User user) {
        System.out.println("TestController.postJson");
        return new ResultBean("postJson" + user.getName());
    }
    @GetMapping("/getCookie")
    public ResultBean getCookie(@CookieValue(value = "cookie1") String cookie1) {
        System.out.println("TestController.getCookie");
        return new ResultBean("getCookie" + cookie1);
    }
    @GetMapping("/getHeader")
    public ResultBean getHeader(
            @RequestHeader("x-header1") String header1,
            @RequestHeader("x-header2") String header2) {
        System.out.println("TestController.getHeader");
        return new ResultBean("getHeader" + header1+header2);
    }
}2-2 Front-end project
Code writing
1. Create a maven project pom named ajax-client as follows
<?xml version="1.0" encoding="UTF-8"?>
<project xmlns="http://maven.apache.org/POM/4.0.0" xmlns:xsi="http://www.w3.org/2001/XMLSchema-instance"
    xsi:schemaLocation="http://maven.apache.org/POM/4.0.0 http://maven.apache.org/xsd/maven-4.0.0.xsd">
    <modelVersion>4.0.0</modelVersion>
    <groupId>com.myimooc</groupId>
    <artifactId>ajax-client</artifactId>
    <version>0.0.1-SNAPSHOT</version>
    <packaging>jar</packaging>
    <name>ajax-client</name>
    <description>Demo project for Spring Boot</description>
    <parent>
        <groupId>org.springframework.boot</groupId>
        <artifactId>spring-boot-starter-parent</artifactId>
        <version>2.0.1.RELEASE</version>
        <relativePath/> <!-- lookup parent from repository -->
    </parent>
    <properties>
        <project.build.sourceEncoding>UTF-8</project.build.sourceEncoding>
        <project.reporting.outputEncoding>UTF-8</project.reporting.outputEncoding>
        <java.version>1.8</java.version>
    </properties>
    <dependencies>
        <dependency>
            <groupId>org.springframework.boot</groupId>
            <artifactId>spring-boot-starter-web</artifactId>
        </dependency>
        <dependency>
            <groupId>org.webjars</groupId>
            <artifactId>jquery</artifactId>
            <version>3.3.0</version>
        </dependency>
        <dependency>
            <groupId>org.webjars</groupId>
            <artifactId>jasmine</artifactId>
            <version>2.5.0</version>
        </dependency>
    </dependencies>
    <build>
        <plugins>
            <plugin>
                <groupId>org.springframework.boot</groupId>
                <artifactId>spring-boot-maven-plugin</artifactId>
            </plugin>
        </plugins>
    </build>
</project>2. Write index.html
<!DOCTYPE html>
<html>
<head>
    <meta charset="UTF-8">
    <title>Index</title>
    <link rel="stylesheet" type="text/css" href="/webjars/jasmine/2.5.0/jasmine.css">
    <script src="/webjars/jquery/3.3.0/jquery.min.js"></script>
    <script src="/webjars/jasmine/2.5.0/jasmine.js"></script>
    <script src="/webjars/jasmine/2.5.0/jasmine-html.js"></script>
    <script src="/webjars/jasmine/2.5.0/boot.js"></script>
</head>
<body>
<a href="#" onclick="get1()">发生get1请求</a>
<script>
    function get1() {
        $.getJSON("http://localhost:8080/test/get1").then(
            function (res) {
                console.log(res);
            }
        )
    }
    // 每一个测试用例的超时时间
    jasmine.DEFAULT_TIMEOUT_INTERVAL = 1000;
    // 请求的接口地址前缀
    var base = "http://localhost:8080/test";
    // 测试模块
    describe("AJAX讲解", function () {
        // 测试方法
        it("get1请求", function (done) {
            // 服务器返回的结果
            var result;
            $.getJSON(base + "/get1").then(
                function (res) {
                    result = res;
                }
            );
            // 由于是异步请求,需要使用setTimeout来校验
            setTimeout(function () {
                expect(result).toEqual({
                    "data":"get1ok"
                });
                // 校验完成,通知jasmine框架
                done();
            },100);
        });
        // // 测试方法
        // it("jsonp请求", function (done) {
        //     // 服务器返回的结果
        //     var result;
        //     $.ajax({
        //         url: base + "/get1",
        //         dataType: "jsonp",
        //         jsonp:"callback2",
        //         success: function (res) {
        //             result = res;
        //         }
        //     });
        //
        //     // 由于是异步请求,需要使用setTimeout来校验
        //     setTimeout(function () {
        //         expect(result).toEqual({
        //             "data":"get1ok"
        //         });
        //
        //         // 校验完成,通知jasmine框架
        //         done();
        //     },100);
        // });
        // 测试方法
        it("postJson请求", function (done) {
            // 服务器返回的结果
            var result;
            $.ajax({
                url:base+"/postJson",
                type:"POST",
                contentType:"application/json;charset=utf-8",
                data:JSON.stringify({name:"testName"}),
                success:function(res){
                    result = res;
                }
            });
            // 由于是异步请求,需要使用setTimeout来校验
            setTimeout(function () {
                expect(result).toEqual({
                    "data":"postJsontestName"
                });
                // 校验完成,通知jasmine框架
                done();
            },100);
        });
        it("getCookie请求", function (done) {
            // 服务器返回的结果
            var result;
            $.ajax({
                url:base+"/getCookie",
                xhrFields:{
                    // 发送 AJAX 请求时带上 cookie
                    withCredentials:true
                },
                success:function(res){
                    result = res;
                }
            });
            // 由于是异步请求,需要使用setTimeout来校验
            setTimeout(function () {
                expect(result).toEqual({
                    "data":"getCookietestName"
                });
                // 校验完成,通知jasmine框架
                done();
            },100);
        });
        it("getHeader请求", function (done) {
            // 服务器返回的结果
            var result;
            $.ajax({
                url:base+"/getHeader",
                headers:{
                    "x-header1":"AAA"
                },
                beforeSend:function(xhr){
                   xhr.setRequestHeader("x-header2","BBB")
                },
                success:function(res){
                    result = res;
                }
            });
            // 由于是异步请求,需要使用setTimeout来校验
            setTimeout(function () {
                expect(result).toEqual({
                    "data":"getHeaderAAABBB"
                });
                // 校验完成,通知jasmine框架
                done();
            },100);
        });
    });
</script>
</body>
</html>3. Write application .properties
server.port=8081
4. Write the AjaxClientStart class
package com.myimooc.ajax.client;
import org.springframework.boot.SpringApplication;
import org.springframework.boot.autoconfigure.SpringBootApplication;
@SpringBootApplication
public class AjaxClientStart {
    public static void main(String[] args) {
        SpringApplication.run(AjaxClientStart.class, args);
    }
}5. Start AjaxServerStart and AjaxClientStart, and access http://localhost :8081, click to generate get1 request, resulting in cross-domain problems as follows
Solution to cross-domain
3-1 Prohibition of checking
Cross-domain settings of Chrome browser
●Windows method
Reference document: https://www.cnblogs.com/laden...
Instructions for use: Target input in the properties page Add in the box: --disable-web-security --user-data-dir=C:MyChromeDevUserData
●Mac OS method
Reference document: http://blog.csdn.net/justinji...
使用说明:用命令行打开 Google Chrome:open -a "Google Chrome" --args --disable-web-security
3-2 使用JSONP
代码编写
1.编写JsonpAdvice类
package com.myimooc.ajax.server.controller;
import org.springframework.web.bind.annotation.ControllerAdvice;
import org.springframework.web.servlet.mvc.method.annotation.AbstractJsonpResponseBodyAdvice;
/**
 * <br>
 * 标题: JSONP 全局处理<br>
 * 描述: 统一处理JSONP<br>
 *
 * @author zc
 * @date 2018/04/18
 */
@ControllerAdvice
public class JsonpAdvice extends AbstractJsonpResponseBodyAdvice{
    public JsonpAdvice() {
        // 与前端约定好回调方法名称,默认是callback
        super("callback2");
    }
}2.修改index.html
// 测试方法
        it("jsonp请求", function (done) {
            // 服务器返回的结果
            var result;
            $.ajax({
                url: base + "/get1",
                dataType: "jsonp",
                jsonp:"callback2",
                success: function (res) {
                    result = res;
                }
            });
            // 由于是异步请求,需要使用setTimeout来校验
            setTimeout(function () {
                expect(result).toEqual({
                    "data":"get1ok"
                });

                // 校验完成,通知jasmine框架
                done();
            },100);
});JSONP的弊端
服务器需要改动代码支持只支持GET发送的不是XHR请求
3-3 支持跨域
常见的JavaEE架构
跨域解决方向
●被调用方解决
●基于支持跨域的解决思路
●基于Http协议关于跨域的相关规定,在响应头里增加指定的字段告诉浏览器,允许调用
●跨域请求是直接从浏览器发送到被调用方
●修改被调用方的Http服务器
调用方解决
●基于隐藏跨域的解决思路
●跨域请求不会浏览器直接发送到被调用方
●而是从中间的Http服务器(Apache、Nginx)转发过去
●修改调用方的Http服务器
被调用方支持跨域
●【重点】Web应用服务器(Tomcat、Netty、WebLogic或应用程序)实现
●Http服务器(Nginx)配置实现
●Http服务器(Apache)配置实现
使用Filter解决
编写代码
1.编写CrosFilter类
package com.myimooc.ajax.server.config;
import org.springframework.util.StringUtils;
import javax.servlet.*;
import javax.servlet.FilterConfig;
import javax.servlet.http.HttpServletRequest;
import javax.servlet.http.HttpServletResponse;
import java.io.IOException;
/**
 * <br>
 * 标题: 服务端解决跨域<br>
 * 描述: 使用Filter<br>
 *
 * @author zc
 * @date 2018/04/18
 */
public class CrosFilter implements Filter {
    @Override
    public void init(FilterConfig filterConfig) throws ServletException {
    }
    @Override
    public void doFilter(ServletRequest request, ServletResponse response, FilterChain chain) throws IOException, ServletException {
        HttpServletResponse res = (HttpServletResponse)response;
        HttpServletRequest req = (HttpServletRequest)request;
        // 支持所有域
        String origin = req.getHeader("Origin");
        if (!StringUtils.isEmpty(origin)){
            // 支持任何域名的跨域调用 且 支持带cookie(是被调用方域名的cookie,而不是调用方的cookie)
            res.addHeader("Access-Control-Allow-Origin",origin);
        }
        // 指定允许的域,带cookie时,origin必须是全匹配,不能使用 *
//        res.addHeader("Access-Control-Allow-Origin","http://localhost:8081");
        // 允许所有域,但不能满足带 cookie 的跨域请求
//        res.addHeader("Access-Control-Allow-Origin","*");
        // 支持所有自定义头
        String headers = req.getHeader("Access-Control-Allow-Headers");
        if (!StringUtils.isEmpty(headers)){
            // 允许所有header
            res.addHeader("Access-Control-Allow-Headers",headers);
        }
        // 允许所有header
//        res.addHeader("Access-Control-Allow-Headers","*");
        // 指定允许的方法
//        res.addHeader("Access-Control-Allow-Methods","GET");
        // 允许所有方法
        res.addHeader("Access-Control-Allow-Methods","*");
        // 允许浏览器在一个小时内,缓存跨域访问信息(即上面三个信息)
        res.addHeader("Access-Control-Max-Age","3600");
        // 启用 cookie
        res.addHeader("Access-Control-Allow-Credentials","true");
        chain.doFilter(request,response);
    }
    @Override
    public void destroy() {
    }
}2.编写FilterConfig类
package com.myimooc.ajax.server.config;
import org.springframework.boot.web.servlet.FilterRegistrationBean;
import org.springframework.context.annotation.Bean;
import org.springframework.context.annotation.Configuration;
/**
 * <br>
 * 标题: 配置类<br>
 * 描述: 注册CrosFilter<br>
 *
 * @author zc
 * @date 2018/04/18
 */
@Configuration
public class FilterConfig {
    @Bean
    public FilterRegistrationBean registrationBean(){
        FilterRegistrationBean filter = new FilterRegistrationBean();
        filter.addUrlPatterns("/*");
        filter.setFilter(new CrosFilter());
        return filter;
    }
}3.启动AjaxServerStart和AjaxClientStart,并访问http://localhost:8081,跨域解决
简单请求与非简单请求
●简单请求:浏览器先发送真正的请求后检查
●请求方法:GET、HEAD、POST的一种
●请求header:无自定义header;Content-Type为:text/plain、multipart/form-data、application/x-www-form-urlencoded的一种
●非简单请求:浏览器先发预检命令,检查通过后,才发送真正的请求
●常见的有:PUT、DELETE
●其它条件:发送Json格式的请求、带自定义header的请求
●预检命令:浏览器检测到跨域请求, 会自动发出一个OPTIONS请求, 就是所谓的预检(preflight)请求。当预检请求通过的时候,才发送真正的请求。
Nginx配置
●修改主机hosts文件增加映射本地域名:127.0.0.1 b.com(表示被调用方的域名)
●在conf目录下创建vhost目录
●修改nginx.conf在最后面增加一行代码:include vhost/*.conf;
●在vhost目录下创建b.com.conf
●启动niginx,访问b.com/test/get1
编写b.com.conf
server{
    listen 80;
    server_name b.com;
    location /{
        proxy_pass http://localhost:8080/;
        add_header Access-Control-Allow-Methods *;
        add_header Access-Control-Max-Age 3600;
        add_header Access-Control-Allow-Credentials true;
        add_header Access-Control-Allow-Origin $http_origin;
        add_header Access-Control-Allow-Headers $http_access_control_allow_headers;
        if ($request_method = OPTIONS){
            return 200;
        }
    }
}Apache配置
●修改conf/httpd.conf找到LoadModule vhost_alias_module module/mod_vhost_alias.so取消注释
●修改conf/httpd.conf找到LoadModule proxy_module module/mod_ proxy.so取消注释
●修改conf/httpd.conf找到LoadModule proxy_http_module module/mod_ proxy_http.so取消注释
●修改conf/httpd.conf找到LoadModule headers_module module/mod_ headers.so取消注释
●修改conf/httpd.conf找到LoadModule rewrite_module module/mod_ rewrite.so取消注释
●修改conf/httpd.conf找到Include conf/extra/httpd-vhosts.conf取消注释
●修改conf/extra/httpd-vhosts.conf在最后面增加下面的内容即可
<VirtualHost *:80>
    ServerName b.com
    ErrorLog "logs/b.com-error.log"
    CustomLog "logs/b.com-access.log" common
    ProxyPass / http://localhost:8080/
    # 把请求头的origin值返回到Access-Control-Allow-Origin字段
    Header always set Access-Control-Allow-Origin "expr=%{req:origin}"
    # 把请求头的Access-Control-Allow-Headers值返回到Access-Control-Allow-Headers字段
    Header always Access-Control-Allow-Headers "expr=%{Access-Control-Allow-Headers}"
    Header always set Access-Control-Allow-Methods "*";
    Header always set Access-Control-Max-Age "3600";
    Header always set Access-Control-Allow-Credentials ""true";
    # 处理预检命令OPTIONS,直接返回204
    RewriteEngine On
    RewriteCond %{REQUEST_METHOD}OPTIONS
    RewriteRule ^(.*)$"/" [R=204,L]
</VirtualHost>Spring框架支持
在类或方法上使用注解@CrossOrigin即可支持跨域
3-4 隐藏跨域
●使用Nginx反向代理实现
●修改主机hosts文件增加映射本地域名:127.0.0.1 a.com
●在vhost目录下创建a.com.conf
●启动niginx,访问a.com/ajaxserver/get1
编写a.com.conf
server{
    listen 80;
    server_name a.com;
    location /{
         proxy_pass http://localhost:8081/;
    }
    location /ajaxserver{
         proxy_pass http://localhost:8080/test/;
    }
}使用Apache反向代理实现
修改conf/extra/httpd-vhosts.conf在最后面增加下面的内容即可
<VirtualHost *:80>
    ServerName a.com
    ErrorLog "logs/a.com-error.log"
    CustomLog "logs/a.com-access.log" common
    ProxyPass / http://localhost:8081/
    ProxyPass /ajaxserverapache http://localhost:8080/test
</VirtualHost>课程总结
4-1 课程总结
课程总结
●产生原因:主要是浏览器对Ajax请求的限制
●解决思路:JSONP、支持跨域、隐藏跨域
●核心原理:了解Http协议关于跨域方面的规定
●Solution: Use Filter, Nginx forward and reverse proxy, Apache forward and reverse proxy, Spring framework support

The above is the detailed content of Detailed introduction to ajax cross-domain. For more information, please follow other related articles on the PHP Chinese website!

Hot AI Tools

Undresser.AI Undress
AI-powered app for creating realistic nude photos

AI Clothes Remover
Online AI tool for removing clothes from photos.

Undress AI Tool
Undress images for free

Clothoff.io
AI clothes remover

Video Face Swap
Swap faces in any video effortlessly with our completely free AI face swap tool!

Hot Article
Hot Tools

Notepad++7.3.1
Easy-to-use and free code editor

SublimeText3 Chinese version
Chinese version, very easy to use

Zend Studio 13.0.1
Powerful PHP integrated development environment

Dreamweaver CS6
Visual web development tools

SublimeText3 Mac version
God-level code editing software (SublimeText3)
Hot Topics
 1666
1666
 14
1425
52
1328
25
1273
29
1253
24
14
1425
52
1328
25
1273
29
1253
24

 PHP and Ajax: Building an autocomplete suggestion engine
Jun 02, 2024 pm 08:39 PM
PHP and Ajax: Building an autocomplete suggestion engine
Jun 02, 2024 pm 08:39 PM
Build an autocomplete suggestion engine using PHP and Ajax: Server-side script: handles Ajax requests and returns suggestions (autocomplete.php). Client script: Send Ajax request and display suggestions (autocomplete.js). Practical case: Include script in HTML page and specify search-input element identifier.
 How to solve the 403 error encountered by jQuery AJAX request
Feb 20, 2024 am 10:07 AM
How to solve the 403 error encountered by jQuery AJAX request
Feb 20, 2024 am 10:07 AM
Title: Methods and code examples to resolve 403 errors in jQuery AJAX requests. The 403 error refers to a request that the server prohibits access to a resource. This error usually occurs because the request lacks permissions or is rejected by the server. When making jQueryAJAX requests, you sometimes encounter this situation. This article will introduce how to solve this problem and provide code examples. Solution: Check permissions: First ensure that the requested URL address is correct and verify that you have sufficient permissions to access the resource.
 How to solve jQuery AJAX request 403 error
Feb 19, 2024 pm 05:55 PM
How to solve jQuery AJAX request 403 error
Feb 19, 2024 pm 05:55 PM
jQuery is a popular JavaScript library used to simplify client-side development. AJAX is a technology that sends asynchronous requests and interacts with the server without reloading the entire web page. However, when using jQuery to make AJAX requests, you sometimes encounter 403 errors. 403 errors are usually server-denied access errors, possibly due to security policy or permission issues. In this article, we will discuss how to resolve jQueryAJAX request encountering 403 error
 How to solve the problem of jQuery AJAX error 403?
Feb 23, 2024 pm 04:27 PM
How to solve the problem of jQuery AJAX error 403?
Feb 23, 2024 pm 04:27 PM
How to solve the problem of jQueryAJAX error 403? When developing web applications, jQuery is often used to send asynchronous requests. However, sometimes you may encounter error code 403 when using jQueryAJAX, indicating that access is forbidden by the server. This is usually caused by server-side security settings, but there are ways to work around it. This article will introduce how to solve the problem of jQueryAJAX error 403 and provide specific code examples. 1. to make
 How to get variables from PHP method using Ajax?
Mar 09, 2024 pm 05:36 PM
How to get variables from PHP method using Ajax?
Mar 09, 2024 pm 05:36 PM
Using Ajax to obtain variables from PHP methods is a common scenario in web development. Through Ajax, the page can be dynamically obtained without refreshing the data. In this article, we will introduce how to use Ajax to get variables from PHP methods, and provide specific code examples. First, we need to write a PHP file to handle the Ajax request and return the required variables. Here is sample code for a simple PHP file getData.php:
 PHP vs. Ajax: Solutions for creating dynamically loaded content
Jun 06, 2024 pm 01:12 PM
PHP vs. Ajax: Solutions for creating dynamically loaded content
Jun 06, 2024 pm 01:12 PM
Ajax (Asynchronous JavaScript and XML) allows adding dynamic content without reloading the page. Using PHP and Ajax, you can dynamically load a product list: HTML creates a page with a container element, and the Ajax request adds the data to that element after loading it. JavaScript uses Ajax to send a request to the server through XMLHttpRequest to obtain product data in JSON format from the server. PHP uses MySQL to query product data from the database and encode it into JSON format. JavaScript parses the JSON data and displays it in the page container. Clicking the button triggers an Ajax request to load the product list.
 PHP and Ajax: Ways to Improve Ajax Security
Jun 01, 2024 am 09:34 AM
PHP and Ajax: Ways to Improve Ajax Security
Jun 01, 2024 am 09:34 AM
In order to improve Ajax security, there are several methods: CSRF protection: generate a token and send it to the client, add it to the server side in the request for verification. XSS protection: Use htmlspecialchars() to filter input to prevent malicious script injection. Content-Security-Policy header: Restrict the loading of malicious resources and specify the sources from which scripts and style sheets are allowed to be loaded. Validate server-side input: Validate input received from Ajax requests to prevent attackers from exploiting input vulnerabilities. Use secure Ajax libraries: Take advantage of automatic CSRF protection modules provided by libraries such as jQuery.
 What are the ajax versions?
Nov 22, 2023 pm 02:00 PM
What are the ajax versions?
Nov 22, 2023 pm 02:00 PM
Ajax is not a specific version, but a technology that uses a collection of technologies to asynchronously load and update web page content. Ajax does not have a specific version number, but there are some variations or extensions of ajax: 1. jQuery AJAX; 2. Axios; 3. Fetch API; 4. JSONP; 5. XMLHttpRequest Level 2; 6. WebSockets; 7. Server-Sent Events; 8, GraphQL, etc.
