What layout methods does bootstrap have?

What layout methods does bootstrap have?
bootstrap has fixed layout and fluid layout: fixed layout creates a web page or app based on a fixed number of pixels; fluid layout creates a non-fixed layout, that is, a percentage-based layout to make the layout more dynamic. flexible.
Related recommendations: "bootstrap Tutorial"
Bootstrap Fixed Layout
If you want to create a layout based on a fixed number of pixels Web page or app, please see the tutorial in this part.
Usage
<body>
  <div>
    ...
  </div>
</body>
Explanation
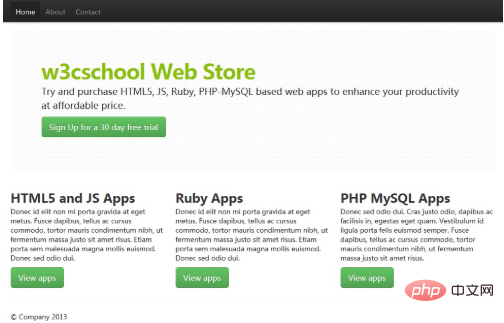
## line to create a main container rendering style, thereby creating a fixed layout. The purpose of a fixed layout is to create a 940 pixel (default) wide layout for a web page or app.
Example of Bootstrap fixed layout
body {
padding-top: 60px;
padding-bottom: 40px;
}
.nav li {
padding-top: 5px;
}
.leaderboard {
padding: 60px;
margin-bottom: 30px;
background-image: url('/twitter-bootstrap/images/gridbg.gif');
background-repeat:repeat;
-webkit-border-radius: 6px;
-moz-border-radius: 6px;
border-radius: 6px;
}
.leaderboard h1 {
font-size: 40px;
margin-bottom: 5px;
line-height: 1;
letter-spacing: -1px;
color:#FF6600;
}
.leaderboard p {
font-size: 18px;
font-weight: 200;
line-height: 27px;
}
HTML 代码
实例
<!DOCTYPE html>
<html>
<head>
<meta charset="utf-8">
<title>使用Bootstrap 版本 2.0 固定布局的实例</title>
<meta name="viewport" content="width=device-width, initial-scale=1.0">
<meta name="description" content="Example of Fixed Layout with Bootstrap version 2.0 from w3cschool.cc">
<meta name="author" content="">
<!-- Le styles -->
<link href="../bootstrap/twitter-bootstrap-v2/docs/assets/css/bootstrap.css" rel="stylesheet">
<link href="../bootstrap/twitter-bootstrap-v2/docs/assets/css/example-fixed-layout.css" rel="stylesheet">
<!-- Le HTML5 shim, for IE6-8 support of HTML5 elements -->
<!--[if lt IE 9]>
<script src="//html5shim.googlecode.com/svn/trunk/html5.js"></script>
<![endif]-->
<!-- Le fav and touch icons -->
<link rel="shortcut icon" href="../bootstrap/twitter-bootstrap-v2/docs/examples/images/favicon.ico">
<link rel="apple-touch-icon" href="../bootstrap/twitter-bootstrap-v2/docs/examples/images/apple-touch-icon.png">
<link rel="apple-touch-icon" sizes="72x72" href="../bootstrap/twitter-bootstrap-v2/docs/examples/images/apple-touch-icon-72x72.png">
<link rel="apple-touch-icon" sizes="114x114" href="../bootstrap/twitter-bootstrap-v2/docs/examples/images/apple-touch-icon-114x114.png">
</head>
<body>
<div class="navbar navbar-fixed-top">
<div>
<div>
<a class="btn btn-navbar" data-toggle="collapse" data-target=".nav-collapse">
<span></span>
<span></span>
<span></span>
</a>
<a href="#">
<img src="/static/imghw/default1.png" data-src="/images/w3r.png" class="lazy" style="max-width:90%" style="max-width:90%" alt="w3cschool logo" /></a>
<div>
<ul>
<li>
<a href="#">Home</a></li>
<li>
<a href="#about">About</a></li>
<li>
<a href="#contact">Contact</a></li>
</ul>
</div>
<!--/.nav-collapse --></div>
</div>
</div>
<div>
<!-- Main hero unit for a primary marketing message or call to action -->
<div>
<h1 id="w-cschool-nbsp-Web-nbsp-Store">w3cschool Web Store</h1>
<p>Try and purchase HTML5, JS, Ruby, PHP-MySQL based web apps to enhance your productivity at affordable price.</p>
<p>
<a class="btn btn-success btn-large">Sign Up for a 30 day free trial</a></p>
</div>
<!-- Example row of columns -->
<div>
<div>
<h2 id="HTML-nbsp-and-nbsp-JS-nbsp-Apps">HTML5 and JS Apps</h2>
<p>Donec id elit non mi porta gravida at eget metus. Fusce dapibus, tellus ac cursus commodo, tortor mauris condimentum nibh,ut fermentum massa justo sit amet risus. Etiam porta sem malesuada magna mollis euismod. Donec sed odio dui.</p>
<p>
<a class="btn btn-success btn-large" href="#">View apps</a></p>
</div>
<div>
<h2 id="Ruby-nbsp-Apps">Ruby Apps</h2>
<p>Donec id elit non mi porta gravida at eget metus. Fusce dapibus, tellus ac cursus commodo, tortor mauris condimentum nibh,ut fermentum massa justo sit amet risus. Etiam porta sem malesuada magna mollis euismod. Donec sed odio dui.</p>
<p>
<a class="btn btn-success btn-large" href="#">View apps</a></p>
</div>
<div>
<h2 id="PHP-nbsp-MySQL-nbsp-Apps">PHP MySQL Apps</h2>
<p>Donec sed odio dui. Cras justo odio, dapibus ac facilisis in, egestas eget quam. Vestibulum id ligula porta felis euismod semper. Fusce dapibus, tellus ac cursus commodo, tortor mauris condimentum nibh, ut fermentum massa justo sit amet risus.</p>
<p>
<a class="btn btn-success btn-large" href="#">View apps</a></p>
</div>
</div>
<hr>
<footer>
<p>© Company 2012</p>
</footer>
</div>
<!-- /container -->
<!-- Le javascript==================================================- ->
<!-- Placed at the end of the document so the pages load faster -->
<script src="../bootstrap/twitter-bootstrap-v2/docs/assets/js/jquery.js"></script>
<script src="../bootstrap/twitter-bootstrap-v2/docs/assets/js/bootstrap-transition.js"></script>
<script src="../bootstrap/twitter-bootstrap-v2/docs/assets/js/bootstrap-alert.js"></script>
<script src="../bootstrap/twitter-bootstrap-v2/docs/assets/js/bootstrap-modal.js"></script>
<script src="../bootstrap/twitter-bootstrap-v2/docs/assets/js/bootstrap-dropdown.js"></script>
<script src="../bootstrap/twitter-bootstrap-v2/docs/assets/js/bootstrap-scrollspy.js"></script>
<script src="../bootstrap/twitter-bootstrap-v2/docs/assets/js/bootstrap-tab.js"></script>
<script src="../bootstrap/twitter-bootstrap-v2/docs/assets/js/bootstrap-tooltip.js"></script>
<script src="../bootstrap/twitter-bootstrap-v2/docs/assets/js/bootstrap-popover.js"></script>
<script src="../bootstrap/twitter-bootstrap-v2/docs/assets/js/bootstrap-button.js"></script>
<script src="../bootstrap/twitter-bootstrap-v2/docs/assets/js/bootstrap-collapse.js"></script>
<script src="../bootstrap/twitter-bootstrap-v2/docs/assets/js/bootstrap-carousel.js"></script>
<script src="../bootstrap/twitter-bootstrap-v2/docs/assets/js/bootstrap-typeahead.js"></script>
</body>
</html>View the above example in a different browser window.
Bootstrap Fluid LayoutIf you want to create a non-fixed layout, that is, a percentage-based layout to make the layout more flexible, please read this part of the tutorial. Usage
<div>
  <div>
    <div>
      <!--Sidebar content-->
    </div>
    <div>
      <!--Body content-->
    </div>
  </div>
</div>Explanation
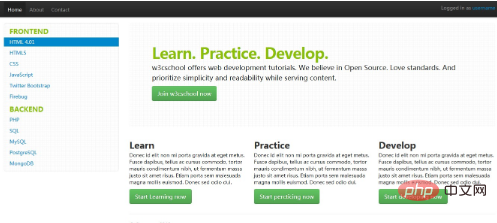
Lines 274 to 285 of bootstrap.css (located under docs\assets\css in bootstrap's main folder) create the main container Render styles to create a flowing layout. The purpose of fluid layout is to create a percentage-based layout (for example, width=20%) for a web page or app.
Bootstrap Fluid Layout Example
body {
padding-top: 60px;
padding-bottom: 40px;
}
.nav li {
padding-top: 5px;
}
.sidebar-nav {
padding: 9px 0;
}
.leaderboard {
padding: 60px;
margin-bottom: 30px;
background-image: url('/twitter-bootstrap/images/gridbg.gif');
background-repeat:repeat;
-webkit-border-radius: 6px;
-moz-border-radius: 6px;
border-radius: 6px;
}
.leaderboard h1 {
font-size: 40px;
margin-bottom: 5px;
line-height: 1;
letter-spacing: -1px;
color:#FF6600;
}
.leaderboard p {
font-size: 18px;
font-weight: 200;
line-height: 27px;
}
.well {
background-image: url('/twitter-bootstrap/images/gridbg.gif');
background-repeat:repeat;
-webkit-border-radius: 6px;
-moz-border-radius: 6px;
border-radius: 6px;
}
.nav .nav-header {
font-size: 18px;
color:#FF9900;
}
HTML 代码
实例
<!DOCTYPE html>
<html>
<head>
<meta charset="utf-8">
<title>使用Bootstrap 版本 2.0 固定布局的实例</title>
<meta name="viewport" content="width=device-width, initial-scale=1.0">
<meta name="description" content="Example of Fluid Layout with Bootstrap version 2.0 from w3cschool.cc">
<meta name="author" content="">
<!-- Le styles -->
<link href="../bootstrap/twitter-bootstrap-v2/docs/assets/css/bootstrap.css" rel="stylesheet">
<link href="../bootstrap/twitter-bootstrap-v2/docs/assets/css/example-fluid-layout.css" rel="stylesheet">
<!-- Le HTML5 shim, for IE6-8 support of HTML5 elements -->
<!--[if lt IE 9]>
<script src="//html5shim.googlecode.com/svn/trunk/html5.js"></script>
<![endif]-->
<!-- Le fav and touch icons -->
<link rel="shortcut icon" href="../bootstrap/twitter-bootstrap-v2/docs/examples/images/favicon.ico">
<link rel="apple-touch-icon" href="../bootstrap/twitter-bootstrap-v2/docs/examples/images/apple-touch-icon.png">
<link rel="apple-touch-icon" sizes="72x72" href="../bootstrap/twitter-bootstrap-v2/docs/examples/images/apple-touch-icon-72x72.png">
<link rel="apple-touch-icon" sizes="114x114" href="../bootstrap/twitter-bootstrap-v2/docs/examples/images/apple-touch-icon-114x114.png"></head>
<body>
<div class="navbar navbar-fixed-top">
<div>
<div>
<a class="btn btn-navbar" data-toggle="collapse" data-target=".nav-collapse">
<span></span>
<span></span>
<span></span>
</a>
<a href="#">
<img src="/static/imghw/default1.png" data-src="/images/w3r.png" class="lazy" style="max-width:90%" style="max-width:90%" alt="w3cschool logo" /></a>
<div>
<ul>
<li>
<a href="#">Home</a></li>
<li>
<a href="#about">About</a></li>
<li>
<a href="#contact">Contact</a></li>
</ul>
<p class="navbar-text pull-right">Logged in as
<a href="#">username</a></p>
</div>
<!--/.nav-collapse --></div>
</div>
</div>
<div>
<div>
<div>
<div class="well sidebar-nav">
<ul class="nav nav-list">
<li>Frontend</li>
<li>
<a href="#">HTML 4.01</a></li>
<li>
<a href="#">HTML5</a></li>
<li>
<a href="#">CSS</a></li>
<li>
<a href="#">JavaScript</a></li>
<li>
<a href="#">Twitter Bootstrap</a></li>
<li>
<a href="#">Firebug</a></li>
<li>Backend</li>
<li>
<a href="#">PHP</a></li>
<li>
<a href="#">SQL</a></li>
<li>
<a href="#">MySQL</a></li>
<li>
<a href="#">PostgreSQL</a></li>
<li>
<a href="#">MongoDB</a></li>
</ul>
</div><!--/.well -->
</div><!--/span-->
<div>
<div>
<h1 id="Learn-nbsp-Practice-nbsp-Develop">Learn. Practice. Develop.</h1>
<p>w3cschool offers web development tutorials. We believe in Open Source. Love standards. And prioritize simplicity and readability while serving content.</p>
<p>
<a class="btn btn-success btn-large">Join w3cschool now</a></p>
</div>
<div>
<div>
<h2 id="Learn">Learn</h2>
<p>Donec id elit non mi porta gravida at eget metus. Fusce dapibus, tellus ac cursus commodo, tortor mauris condimentum nibh, ut fermentum massa justo sit amet risus. Etiam porta sem malesuada magna mollis euismod. Donec sed odio dui.</p>
<p>
<a class="btn btn-success btn-large" href="#">Start Learning now</a></p>
</div><!--/span-->
<div>
<h2 id="Practice">Practice</h2>
<p>Donec id elit non mi porta gravida at eget metus. Fusce dapibus, tellus ac cursus commodo, tortor mauris condimentum nibh, ut fermentum massa justo sit amet risus. Etiam porta sem malesuada magna mollis euismod. Donec sed odio dui.</p>
<p>
<a class="btn btn-success btn-large" href="#">Start percticing now</a></p>
</div>
<!--/span-->
<div>
<h2 id="Develop">Develop</h2>
<p>Donec id elit non mi porta gravida at eget metus. Fusce dapibus, tellus ac cursus commodo, tortor mauris condimentum nibh, ut fermentum massa justo sit amet risus. Etiam porta sem malesuada magna mollis euismod. Donec sed odio dui.</p>
<p>
<a class="btn btn-success btn-large" href="#">Start developing now</a></p>
</div><!--/span-->
</div><!--/row-->
<hr>
<footer>
<p>© Company 2012</p>
</footer>
</div>
</div>
</div><!--/.fluid-container-->
<!-- Le javascript==================================================- ->
<!-- Placed at the end of the document so the pages load faster -->
<script src="../bootstrap/twitter-bootstrap-v2/docs/assets/js/jquery.js"></script>
<script src="../bootstrap/twitter-bootstrap-v2/docs/assets/js/bootstrap-transition.js"></script>
<script src="../bootstrap/twitter-bootstrap-v2/docs/assets/js/bootstrap-alert.js"></script>
<script src="../bootstrap/twitter-bootstrap-v2/docs/assets/js/bootstrap-modal.js"></script>
<script src="../bootstrap/twitter-bootstrap-v2/docs/assets/js/bootstrap-dropdown.js"></script>
<script src="../bootstrap/twitter-bootstrap-v2/docs/assets/js/bootstrap-scrollspy.js"></script>
<script src="../bootstrap/twitter-bootstrap-v2/docs/assets/js/bootstrap-tab.js"></script>
<script src="../bootstrap/twitter-bootstrap-v2/docs/assets/js/bootstrap-tooltip.js"></script>
<script src="../bootstrap/twitter-bootstrap-v2/docs/assets/js/bootstrap-popover.js"></script>
<script src="../bootstrap/twitter-bootstrap-v2/docs/assets/js/bootstrap-button.js"></script>
<script src="../bootstrap/twitter-bootstrap-v2/docs/assets/js/bootstrap-collapse.js"></script>
<script src="../bootstrap/twitter-bootstrap-v2/docs/assets/js/bootstrap-carousel.js"></script>
<script src="../bootstrap/twitter-bootstrap-v2/docs/assets/js/bootstrap-typeahead.js"></script>
</body>
</html>The above is the detailed content of What layout methods does bootstrap have?. For more information, please follow other related articles on the PHP Chinese website!

Hot AI Tools

Undresser.AI Undress
AI-powered app for creating realistic nude photos

AI Clothes Remover
Online AI tool for removing clothes from photos.

Undress AI Tool
Undress images for free

Clothoff.io
AI clothes remover

Video Face Swap
Swap faces in any video effortlessly with our completely free AI face swap tool!

Hot Article

Hot Tools

Notepad++7.3.1
Easy-to-use and free code editor

SublimeText3 Chinese version
Chinese version, very easy to use

Zend Studio 13.0.1
Powerful PHP integrated development environment

Dreamweaver CS6
Visual web development tools

SublimeText3 Mac version
God-level code editing software (SublimeText3)

Hot Topics
 How to use bootstrap in vue
Apr 07, 2025 pm 11:33 PM
Using Bootstrap in Vue.js is divided into five steps: Install Bootstrap. Import Bootstrap in main.js. Use the Bootstrap component directly in the template. Optional: Custom style. Optional: Use plug-ins.
 How to get the bootstrap search bar
Apr 07, 2025 pm 03:33 PM
How to use Bootstrap to get the value of the search bar: Determines the ID or name of the search bar. Use JavaScript to get DOM elements. Gets the value of the element. Perform the required actions.
 How to do vertical centering of bootstrap
Apr 07, 2025 pm 03:21 PM
Use Bootstrap to implement vertical centering: flexbox method: Use the d-flex, justify-content-center, and align-items-center classes to place elements in the flexbox container. align-items-center class method: For browsers that do not support flexbox, use the align-items-center class, provided that the parent element has a defined height.
 How to set up the framework for bootstrap
Apr 07, 2025 pm 03:27 PM
To set up the Bootstrap framework, you need to follow these steps: 1. Reference the Bootstrap file via CDN; 2. Download and host the file on your own server; 3. Include the Bootstrap file in HTML; 4. Compile Sass/Less as needed; 5. Import a custom file (optional). Once setup is complete, you can use Bootstrap's grid systems, components, and styles to create responsive websites and applications.
 How to write split lines on bootstrap
Apr 07, 2025 pm 03:12 PM
There are two ways to create a Bootstrap split line: using the tag, which creates a horizontal split line. Use the CSS border property to create custom style split lines.
 How to insert pictures on bootstrap
Apr 07, 2025 pm 03:30 PM
There are several ways to insert images in Bootstrap: insert images directly, using the HTML img tag. With the Bootstrap image component, you can provide responsive images and more styles. Set the image size, use the img-fluid class to make the image adaptable. Set the border, using the img-bordered class. Set the rounded corners and use the img-rounded class. Set the shadow, use the shadow class. Resize and position the image, using CSS style. Using the background image, use the background-image CSS property.
 How to use bootstrap button
Apr 07, 2025 pm 03:09 PM
How to use the Bootstrap button? Introduce Bootstrap CSS to create button elements and add Bootstrap button class to add button text
 How to resize bootstrap
Apr 07, 2025 pm 03:18 PM
To adjust the size of elements in Bootstrap, you can use the dimension class, which includes: adjusting width: .col-, .w-, .mw-adjust height: .h-, .min-h-, .max-h-


