How to use WordPress dashboard
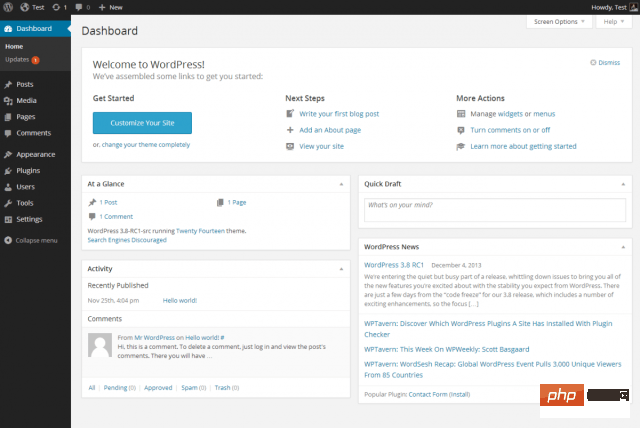
The WordPress Dashboard is the first screen you will see when you log into your blog’s admin area and will display an overview of your website. It is a collection of widgets that provide information and provide an overview of what is going on with your blog. There are some quick links you can use to customize your needs, such as writing a quick draft, replying to the latest comments, etc.
Dashboards can be categorized as shown in the snapshot below. The following sections discuss each of these categories:
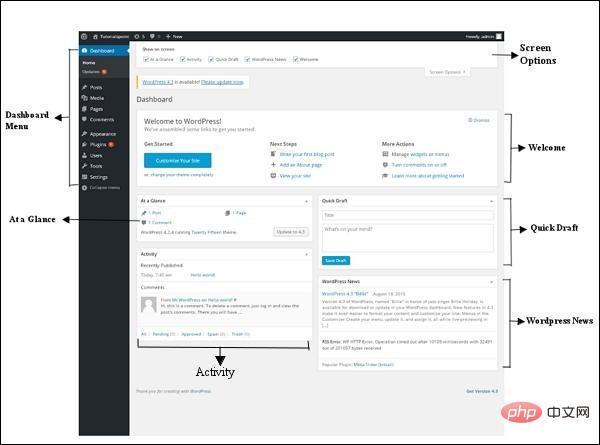
Dashboard Menu
WordPress Dashboard Offers Got the navigation menu which contains some menu options like Posts, Library, Pages, Comments, Appearance Options, Plugins, Users, Tools and Settings on the left.
Screen Options
The dashboard contains different types of widgets that can be shown or hidden on certain screens. It contains checkboxes to show or hide screen options and also allows us to customize sections on the admin screen.
Welcome
It includes Customize Your Website buttons to customize your WordPress theme. The center column provides some useful links, such as creating a blog post, creating a page, and viewing the front end of your website. The last column contains links to annotation-related widgets, menus, settings, and links to the WordPress first step page in the WordPress code.
Quick Draft
Quick Draft is a mini post editor that allows writing, saving and publishing posts from the admin dashboard. It includes the title of the draft, some notes on the draft, and saves it as a draft.
WordPress News
WordPress News widget displays latest news like latest software versions, updates, alerts, news about software etc. From the official WordPress blog.
Activity(dynamic)
The Activity widget contains the latest comments, recent posts and recently published posts on your blog. It allows you to approve, reject, reply, edit or delete comments. It also allows you to move comments to spam.
At a Glance
This section provides an overview of your blog posts, the number of posts and pages published, and the number of comments. When you click on these links, you will be taken to the corresponding screen. It displays the currently running WordPress version as well as the currently running theme.
1. Navigation bar on WordPress
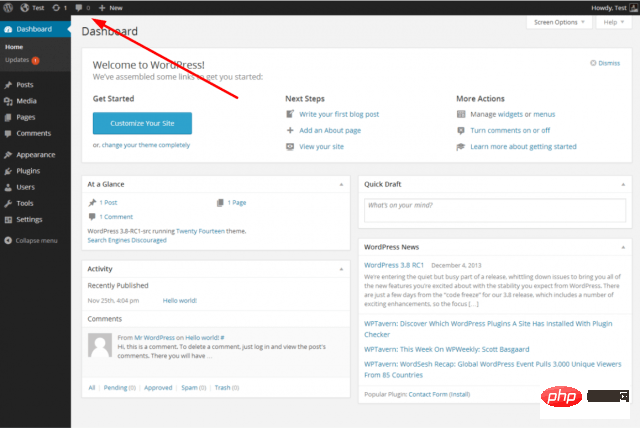
In addition to the frequently used left navigation bar, when you log in to the backend panel, you will also see a band at the top of the screen. Black box with white text.
The function in this column that requires your special attention is "Visit the website". You can click on the website name in this column to visit. After clicking on the text, you can also open the website in the same tab (if you want to open the dashboard, right-click and it will open in a new tab).
When you visit the live website, you will still see the black box. If you entered the website from here, you can return to your WordPress dashboard through the same method.
2. WYSIWYG Editor
In addition to the dashboard, you often use the editing page and the WordPress editor. So, you need to learn how to use a "What You See Is What You Get" (WYSIWYG) editor. When you make a new page or publish a post (or edit existing content), you’ll see something like this:
In most cases, editing in WordPress is the same as Editing in document editors like Microsoft Word or Google Docs is very similar. Just as you would enter the body section of a blank text document, you'll enter the text in the main window and then use the edit buttons at the top of the section to adjust the layout of the page content.
Some points to note when using WordPress editing tools:
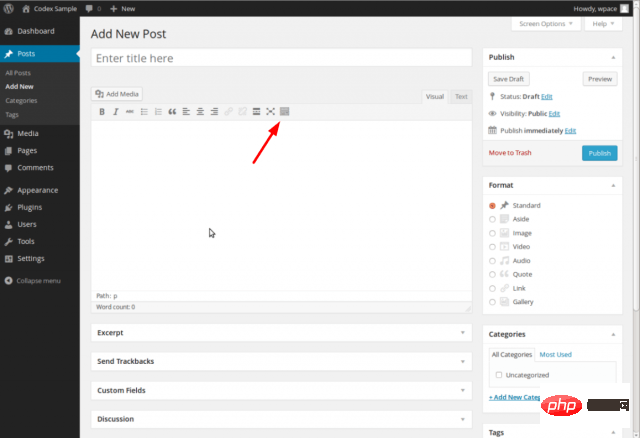
· Clicking the "Control Button" (the part pointed by the red arrow in the picture above) will open the second row of editing tools for you to choose from.
· Add bulleted lists, numbered lists, bold text, italic text and partial headings (such as heading 1, heading 2, heading 3, etc. tags) to make your completed text content more readable .
· Use the Add Media feature to embed images, video files, etc. from your media library into your content.
You need to spend some time exploring the various editing functions and click the "Publish" button before the content created in the WYSIWYG editor will be published. You can preview your draft content and revise it until you're happy with it.
Related recommendations: "WordPress Tutorial"
3. WordPress code editing program
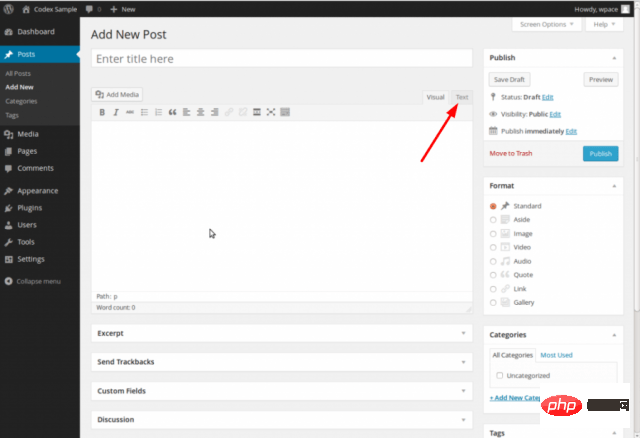
WordPress displays the visual editor by default when you create or edit posts and pages. If you know basic coding knowledge, you can display the code editor for modification by clicking the "Text" button:
Though most beginners will not use this feature , but this function has the following advantages:
· Users with coding foundation can easily modify the code.
· If you find code errors in some content in the visual editor, you can use the code editor to modify them manually.
· Learn basic HTML code by seeing how pages created in the visual editor are rendered as text.
4. Media Library
The Media Library hosts all the visual files used to build a WordPress website, such as images and videos.
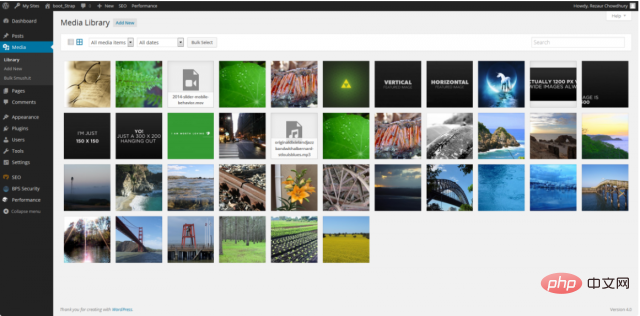
You can access the media library from the left navigation bar or call it from within WordPress’s different editing features. Once in the media library, you can get the address of each visual library, which you can manually add to the website (for example, in a text widget in the website sidebar), which solves the basic resources for you Editing requirements.
5. Do Not Disturb Mode
It is not difficult to find that WordPress is constantly changing. For example, to minimize distractions and create a better writing experience, you can click the four-way arrow button in the image below to enter WordPress’s “Do Not Disturb Mode.”
The above is the detailed content of How to use WordPress dashboard. For more information, please follow other related articles on the PHP Chinese website!

Hot AI Tools

Undresser.AI Undress
AI-powered app for creating realistic nude photos

AI Clothes Remover
Online AI tool for removing clothes from photos.

Undress AI Tool
Undress images for free

Clothoff.io
AI clothes remover

Video Face Swap
Swap faces in any video effortlessly with our completely free AI face swap tool!

Hot Article

Hot Tools

Notepad++7.3.1
Easy-to-use and free code editor

SublimeText3 Chinese version
Chinese version, very easy to use

Zend Studio 13.0.1
Powerful PHP integrated development environment

Dreamweaver CS6
Visual web development tools

SublimeText3 Mac version
God-level code editing software (SublimeText3)

Hot Topics
 1662
1662
 14
14
 1418
1418
 52
52
 1311
1311
 25
25
 1261
1261
 29
29
 1234
1234
 24
24
 How to adjust the wordpress article list
Apr 20, 2025 am 10:48 AM
There are four ways to adjust the WordPress article list: use theme options, use plugins (such as Post Types Order, WP Post List, Boxy Stuff), use code (add settings in the functions.php file), or modify the WordPress database directly.
 How to build a website for wordpress host
Apr 20, 2025 am 11:12 AM
To build a website using WordPress hosting, you need to: select a reliable hosting provider. Buy a domain name. Set up a WordPress hosting account. Select a topic. Add pages and articles. Install the plug-in. Customize your website. Publish your website.
 How to change the head image of the wordpress theme
Apr 20, 2025 am 10:00 AM
A step-by-step guide to replacing a header image of WordPress: Log in to the WordPress dashboard and navigate to Appearance >Theme. Select the topic you want to edit and click Customize. Open the Theme Options panel and look for the Site Header or Header Image options. Click the Select Image button and upload a new head image. Crop the image and click Save and Crop. Click the Save and Publish button to update the changes.
 What are the plugins for wordpress blocking ip
Apr 20, 2025 am 08:27 AM
WordPress IP blocking plugin selection is crucial. The following types can be considered: based on .htaccess: efficient, but complex operation; database operation: flexible, but low efficiency; firewall: high security performance, but complex configuration; self-written: highest control, but requires more technical level.
 How to cancel the editing date of wordpress
Apr 20, 2025 am 10:54 AM
WordPress editing dates can be canceled in three ways: 1. Install the Enable Post Date Disable plug-in; 2. Add code in the functions.php file; 3. Manually edit the post_modified column in the wp_posts table.
 How to write a header of a wordpress
Apr 20, 2025 pm 12:09 PM
The steps to create a custom header in WordPress are as follows: Edit the theme file "header.php". Add your website name and description. Create a navigation menu. Add a search bar. Save changes and view your custom header.
 How to import the source code of wordpress
Apr 20, 2025 am 11:24 AM
Importing WordPress source code requires the following steps: Create a sub-theme for theme modification. Import the source code and overwrite the files in the sub-topic. Activate the sub-theme to make it effective. Test the changes to make sure everything works.
 How to view the front-end of WordPress
Apr 20, 2025 am 10:30 AM
You can view the WordPress front-end by logging into the dashboard and switching to the View Sites tab; automate the viewing process with a headless browser; installing the WordPress plugin to preview the front-end within the dashboard; viewing the front-end via a local URL (if WordPress is set locally).


