How to modify the time in linux

The server time does not match the network time:
Recommended: "Linux video tutorial》
1. Manual modification
1. date command: View the current time

2. Date -s hours, minutes and seconds: modify the time

You also need to change the date
3. date -s Complete date and time (YYYY-MM-DD hh:mm[:ss]): Modify date and time

The time must be enclosed in double quotes. Otherwise, an error will be reported
Manual modification will have a certain time error
4. hwclock -w

Write the time into bios to avoid restart failure .
After we complete the Linux time calibration, we still need to use hwclock to update the BIOS time, because every time it is restarted, the system will read out the time again by the BIOS, so the BIOS is Important time basis.
2. Synchronize network time
1. Check whether the ntp service is installed on the system
Install the ntp service command:
apt-get install ntp 或者 yum install ntp
2 . service --status-all: Check whether the ntp service is started


[ ] indicates that the service has been started
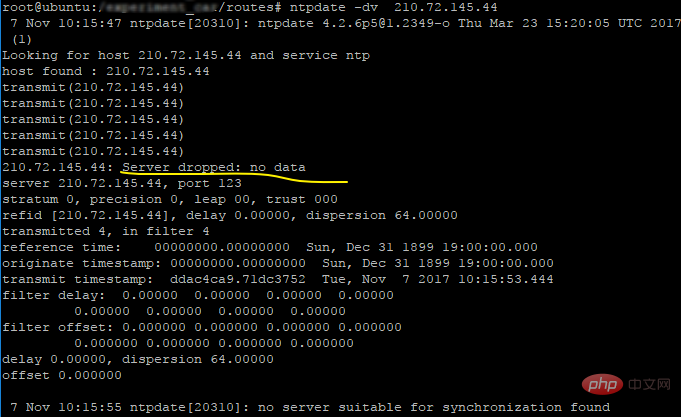
3 . ntpdate server IP: synchronize server time
ntp commonly used server:
    中国国家授时中心:210.72.145.44
    NTP服务器(上海) :ntp.api.bz
    美国:time.nist.gov
    复旦:ntp.fudan.edu.cn
    微软公司授时主机(美国) :time.windows.com
    台警大授时中心(台湾):asia.pool.ntp.org
There seems to be something wrong. . .


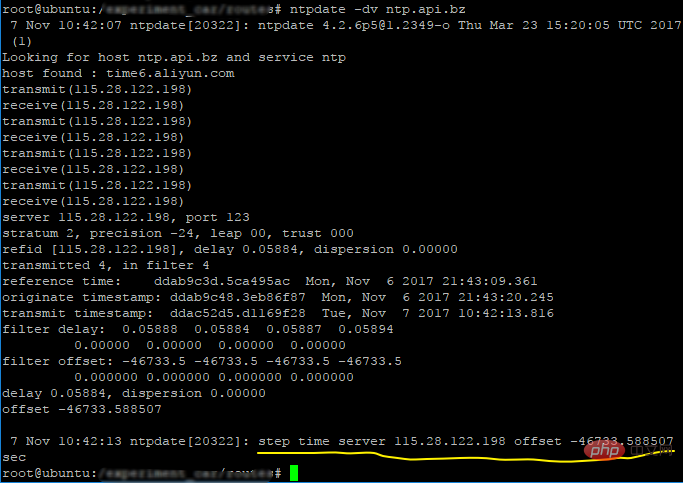
The server was changed to Shanghai’s


The time is still one minute off. I manually changed the time interval from the current time to be larger. Then I found something wrong with synchronization. The server time is simply wrong. It’s half a day off. /(ㄒoㄒ)/~~
Using the Microsoft timing host (USA), I found that the time is almost the same as the server time in Shanghai. Is there a problem with the time zone setting? ?
4. Modify the server time zone
4.1 date -R: View the current time zone

Another server (time is normal) time zone:

so, now it’s time to change the time zone
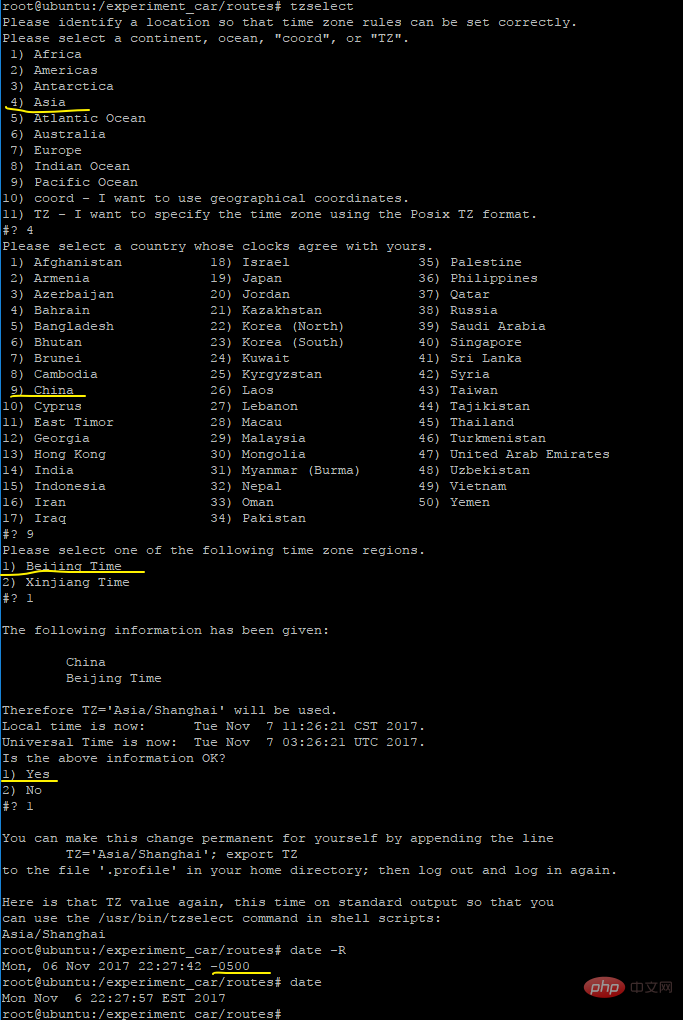
4.2 tzselect

The time zone has not been changed back
The last step


Modification successful!
The above is the detailed content of How to modify the time in linux. For more information, please follow other related articles on the PHP Chinese website!

Hot AI Tools

Undresser.AI Undress
AI-powered app for creating realistic nude photos

AI Clothes Remover
Online AI tool for removing clothes from photos.

Undress AI Tool
Undress images for free

Clothoff.io
AI clothes remover

Video Face Swap
Swap faces in any video effortlessly with our completely free AI face swap tool!

Hot Article

Hot Tools

Notepad++7.3.1
Easy-to-use and free code editor

SublimeText3 Chinese version
Chinese version, very easy to use

Zend Studio 13.0.1
Powerful PHP integrated development environment

Dreamweaver CS6
Visual web development tools

SublimeText3 Mac version
God-level code editing software (SublimeText3)

Hot Topics
 1665
1665
 14
14
 1423
1423
 52
52
 1321
1321
 25
25
 1269
1269
 29
29
 1249
1249
 24
24
 Where to view the logs of Tigervnc on Debian
Apr 13, 2025 am 07:24 AM
In Debian systems, the log files of the Tigervnc server are usually stored in the .vnc folder in the user's home directory. If you run Tigervnc as a specific user, the log file name is usually similar to xf:1.log, where xf:1 represents the username. To view these logs, you can use the following command: cat~/.vnc/xf:1.log Or, you can open the log file using a text editor: nano~/.vnc/xf:1.log Please note that accessing and viewing log files may require root permissions, depending on the security settings of the system.
 How debian readdir integrates with other tools
Apr 13, 2025 am 09:42 AM
The readdir function in the Debian system is a system call used to read directory contents and is often used in C programming. This article will explain how to integrate readdir with other tools to enhance its functionality. Method 1: Combining C language program and pipeline First, write a C program to call the readdir function and output the result: #include#include#include#includeintmain(intargc,char*argv[]){DIR*dir;structdirent*entry;if(argc!=2){
 Linux Architecture: Unveiling the 5 Basic Components
Apr 20, 2025 am 12:04 AM
The five basic components of the Linux system are: 1. Kernel, 2. System library, 3. System utilities, 4. Graphical user interface, 5. Applications. The kernel manages hardware resources, the system library provides precompiled functions, system utilities are used for system management, the GUI provides visual interaction, and applications use these components to implement functions.
 How to interpret the output results of Debian Sniffer
Apr 12, 2025 pm 11:00 PM
DebianSniffer is a network sniffer tool used to capture and analyze network packet timestamps: displays the time for packet capture, usually in seconds. Source IP address (SourceIP): The network address of the device that sent the packet. Destination IP address (DestinationIP): The network address of the device receiving the data packet. SourcePort: The port number used by the device sending the packet. Destinatio
 How to install PHPStorm in Debian system
Apr 13, 2025 am 06:03 AM
Install PHPStorm on the Debian system to easily solve your PHP development environment! The following steps will guide you through the entire installation process. Installation steps: Download PHPStorm: Visit the official website of JetBrains and download the latest version of PHPStorm. Unzip the installation package: After downloading using wget or curl, unzip it to the specified directory (for example /opt). Command example: wgethttps://download.jetbrains.com/phpstorm/phpstorm-2024.3.5.tar.gztar-xzfphpstorm-2024.3.5.tar.gz
 How to recycle packages that are no longer used
Apr 13, 2025 am 08:51 AM
This article describes how to clean useless software packages and free up disk space in the Debian system. Step 1: Update the package list Make sure your package list is up to date: sudoaptupdate Step 2: View installed packages Use the following command to view all installed packages: dpkg--get-selections|grep-vdeinstall Step 3: Identify redundant packages Use the aptitude tool to find packages that are no longer needed. aptitude will provide suggestions to help you safely delete packages: sudoaptitudesearch '~pimportant' This command lists the tags
 How to monitor Nginx SSL performance on Debian
Apr 12, 2025 pm 10:18 PM
This article describes how to effectively monitor the SSL performance of Nginx servers on Debian systems. We will use NginxExporter to export Nginx status data to Prometheus and then visually display it through Grafana. Step 1: Configuring Nginx First, we need to enable the stub_status module in the Nginx configuration file to obtain the status information of Nginx. Add the following snippet in your Nginx configuration file (usually located in /etc/nginx/nginx.conf or its include file): location/nginx_status{stub_status
 How to locate memory leaks in Tomcat logs
Apr 13, 2025 am 08:18 AM
This article introduces how to troubleshoot memory leaks through Tomcat logs and related tools. 1. Memory monitoring and heap dump First, use tools such as JVisualVM or jstat to monitor Tomcat's memory usage in real time, observe the changes in the heap memory, and determine whether there is a memory leak. Once a leak is suspected, use the jmap command to generate a heap dump file (heap.bin): jmap-dump:format=b,file=heap.bin, which is the Tomcat process ID. 2. Heap dump file analysis Use EclipseMemoryAnalyzerTool (MAT) or other tools to open the heap.bin file and analyze the memory.


