
 Operation and Maintenance
Linux Operation and Maintenance
Detailed explanation of Linux virtual network device veth-pair, this article is very informative
Operation and Maintenance
Linux Operation and Maintenance
Detailed explanation of Linux virtual network device veth-pair, this article is very informative
Detailed explanation of Linux virtual network device veth-pair, this article is very informative

This article introduces veth-pair and its connectivity, as well as the connectivity between two namespaces.
01 What is veth-pair
As the name suggests , veth-pair is a pair of virtual device interfaces. Different from tap/tun devices, they all appear in pairs. One end is connected to the protocol stack, and the other end is connected to each other. As shown in the figure below:

#Because of this feature, it often acts as a bridge to connect various virtual network devices. A typical example is like "between two namespaces" "Connection between", "Connection between Bridge and OVS", "Connection between Docker containers", etc., to build a very complex virtual network structure, such as OpenStack Neutron.
02 veth-pair connectivity
We assign IPs to veth0 and veth1 in the above figure: 10.1.1.2 and 10.1.1.3 respectively, and then ping veth1 from veth0. Theoretically, they are on the same network segment and can be pinged successfully, but the result is that pinging fails.
Grab a packet and take a look, tcpdump -nnt -i veth0
root@ubuntu:~# tcpdump -nnt -i veth0
tcpdump: verbose output suppressed, use -v or -vv for full protocol decode
listening on veth0, link-type EN10MB (Ethernet), capture size 262144 bytes
ARP, Request who-has 10.1.1.3 tell 10.1.1.2, length 28
ARP, Request who-has 10.1.1.3 tell 10.1.1.2, length 28
You can see that since veth0 and veth1 are in the same network segment, and this is the first time connection, so an ARP packet will be sent in advance, but veth1 does not respond to the ARP packet.
After checking, this is caused by some ARP-related default configuration restrictions in the Ubuntu system kernel I use. I need to modify the configuration items:
echo 1 > /proc/sys/net/ipv4/conf/veth1/accept_local
echo 1 > /proc/sys/net/ipv4/conf/veth0/accept_local
echo 0 > /proc/sys/net/ipv4/conf/all/rp_filter
echo 0 > /proc/sys/net/ipv4/conf/veth0/rp_filter
echo 0 > /proc/sys/net/ipv4/conf/veth1/rp_filter
Just ping again after finishing.
root@ubuntu:~# ping -I veth0 10.1.1.3 -c 2
PING 10.1.1.3 (10.1.1.3) from 10.1.1.2 veth0: 56(84) bytes of data.
64 bytes from 10.1.1.3: icmp_seq=1 ttl=64 time=0.047 ms
64 bytes from 10.1.1.3: icmp_seq=2 ttl=64 time=0.064 ms

--- 10.1.1.3 ping statistics ---
2 packets transmitted, 2 received, 0% packet loss, time 3008ms
rtt min/avg/max/mdev = 0.047/0.072/0.113/0.025 ms
We are more interested in this communication process and can capture the packets to take a look.
For veth0 port:
root@ubuntu:~# tcpdump -nnt -i veth0
tcpdump: verbose output suppressed, use -v or -vv for full protocol decode
listening on veth0, link-type EN10MB (Ethernet), capture size 262144 bytes
ARP, Request who-has 10.1.1.3 tell 10.1.1.2, length 28
ARP, Reply 10.1.1.3 is-at 5a:07:76:8e:fb:cd, length 28
IP 10.1.1.2 > 10.1.1.3: ICMP echo request, id 2189, seq 1, length 64
IP 10.1.1.2 > 10.1.1.3: ICMP echo request, id 2189, seq 2, length 64
IP 10.1.1.2 > 10.1.1.3: ICMP echo request, id 2189, seq 3, length 64
IP 10.1.1.2 > 10.1.1.3: ICMP echo request, id 2244, seq 1, length 64
For veth1 port:
root@ubuntu:~# tcpdump -nnt -i veth1
tcpdump: verbose output suppressed, use -v or -vv for full protocol decode
listening on veth1, link-type EN10MB (Ethernet), capture size 262144 bytes
ARP, Request who-has 10.1.1.3 tell 10.1.1.2, length 28
ARP, Reply 10.1.1.3 is-at 5a:07:76:8e:fb:cd, length 28
IP 10.1.1.2 > 10.1.1.3: ICMP echo request, id 2189, seq 1, length 64
IP 10.1.1.2 > 10.1.1.3: ICMP echo request, id 2189, seq 2, length 64
IP 10.1.1.2 > 10.1.1.3: ICMP echo request, id 2189, seq 3, length 64
IP 10.1.1.2 > 10.1.1.3: ICMP echo request, id 2244, seq 1, length 64
Strange, we did not see the ICMP echo reply packet, then it is How can I ping?
Actually, echo reply here uses the localback port. If you don’t believe me, grab a package and have a look:
root@ubuntu:~# tcpdump -nnt -i lo
tcpdump: verbose output suppressed, use -v or -vv for full protocol decode
listening on lo, link-type EN10MB (Ethernet), capture size 262144 bytes
IP 10.1.1.3 > 10.1.1.2: ICMP echo reply, id 2244, seq 1, length 64
IP 10.1.1.3 > 10.1.1.2: ICMP echo reply, id 2244, seq 2, length 64
IP 10.1.1.3 > 10.1.1.2: ICMP echo reply, id 2244, seq 3, length 64
IP 10.1.1.3 > 10.1.1.2: ICMP echo reply, id 2244, seq 4, length 64
Why?
We will understand if we look at the entire communication process.
- First, the ping program constructs ICMP
echo requestand sends it to the protocol stack through the socket. - Since ping specifies the veth0 port, if it is the first time, you need to send an ARP request, otherwise the protocol stack will directly hand over the data packet to veth0.
- Since veth0 is connected to veth1, the ICMP request is sent directly to veth1.
- After receiving the request, veth1 hands it to the protocol stack at the other end.
- The protocol stack sees that there is an IP address of 10.1.1.3 locally, so it constructs an ICMP reply packet, checks the routing table, and finds that the data packet returned to the 10.1.1.0 network segment should go through the localback port, so it hands the reply packet to lo port (it will check table 0 of the routing table first,
ip route show table 0to check). - lo After receiving the reply packet from the protocol stack, it did nothing but changed hands and returned it to the protocol stack.
- After the protocol stack receives the reply packet, it finds that there is a socket waiting for the packet, so it gives the packet to the socket.
- Waiting for the ping program in user mode to find that the socket returns, so the ICMP reply packet is received.
The entire process is shown in the figure below:

03 Connectivity between two namespaces
namespace is a feature supported by Linux 2.6.x kernel version and later, mainly used for resource isolation. With namespace, a Linux system can abstract multiple network subsystems. Each subsystem has its own network equipment, protocol stack, etc., without affecting each other.
What should we do if we need to communicate between namespaces? The answer is to use veth-pair as a bridge.
According to the connection method and scale, it can be divided into "direct connection", "connection through Bridge" and "connection through OVS".
3.1 Direct connection
Direct connection is the simplest way. As shown in the figure below, a pair of veth-pair directly connects two namespaces together.
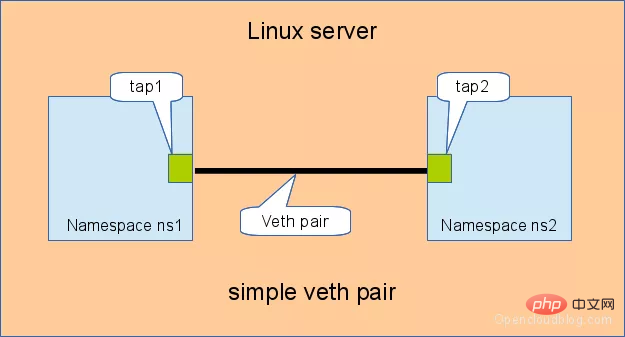
Configure IP for veth-pair and test connectivity:
# 创建 namespace
ip netns a ns1
ip netns a ns2

# 创建一对 veth-pair veth0 veth1
ip l a veth0 type veth peer name veth1

# 将 veth0 veth1 分别加入两个 ns
ip l s veth0 netns ns1
ip l s veth1 netns ns2

# 给两个 veth0 veth1 配上 IP 并启用
ip netns exec ns1 ip a a 10.1.1.2/24 dev veth0
ip netns exec ns1 ip l s veth0 up
ip netns exec ns2 ip a a 10.1.1.3/24 dev veth1
ip netns exec ns2 ip l s veth1 up

# 从 veth0 ping veth1
[root@localhost ~]# ip netns exec ns1 ping 10.1.1.3
PING 10.1.1.3 (10.1.1.3) 56(84) bytes of data.
64 bytes from 10.1.1.3: icmp_seq=1 ttl=64 time=0.073 ms
64 bytes from 10.1.1.3: icmp_seq=2 ttl=64 time=0.068 ms

--- 10.1.1.3 ping statistics ---
15 packets transmitted, 15 received, 0% packet loss, time 14000ms
rtt min/avg/max/mdev = 0.068/0.084/0.201/0.032 ms
3.2 Connect through Bridge
Linux Bridge is equivalent to a switch , can transfer the traffic of two namespaces. Let's see what role veth-pair plays in it.
As shown below, two pairs of veth-pairs connect two namespaces to the Bridge.
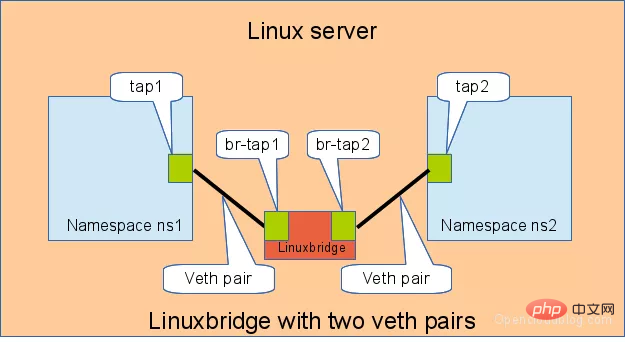
Similarly configure IP for veth-pair and test its connectivity:
# 首先创建 bridge br0
ip l a br0 type bridge
ip l s br0 up

# 然后创建两对 veth-pair
ip l a veth0 type veth peer name br-veth0
ip l a veth1 type veth peer name br-veth1

# 分别将两对 veth-pair 加入两个 ns 和 br0
ip l s veth0 netns ns1
ip l s br-veth0 master br0
ip l s br-veth0 up

ip l s veth1 netns ns2
ip l s br-veth1 master br0
ip l s br-veth1 up

# 给两个 ns 中的 veth 配置 IP 并启用
ip netns exec ns1 ip a a 10.1.1.2/24 dev veth0
ip netns exec ns1 ip l s veth0 up

ip netns exec ns2 ip a a 10.1.1.3/24 dev veth1
ip netns exec ns2 ip l s veth1 up

# veth0 ping veth1
[root@localhost ~]# ip netns exec ns1 ping 10.1.1.3
PING 10.1.1.3 (10.1.1.3) 56(84) bytes of data.
64 bytes from 10.1.1.3: icmp_seq=1 ttl=64 time=0.060 ms
64 bytes from 10.1.1.3: icmp_seq=2 ttl=64 time=0.105 ms

--- 10.1.1.3 ping statistics ---
2 packets transmitted, 2 received, 0% packet loss, time 999ms
rtt min/avg/max/mdev = 0.060/0.082/0.105/0.024 ms
3.3 Connect through OVS
OVS is a third-party open source Bridge with more powerful functions than Linux Bridge. For the same experiment, we use OVS to see what the effect is.
As shown in the figure below:
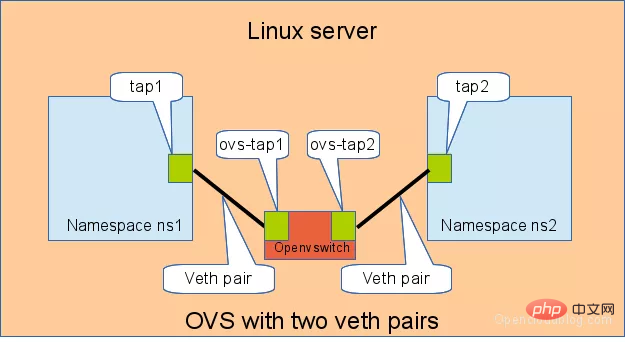
# 用 ovs 提供的命令创建一个 ovs bridge
ovs-vsctl add-br ovs-br

# 创建两对 veth-pair
ip l a veth0 type veth peer name ovs-veth0
ip l a veth1 type veth peer name ovs-veth1

# 将 veth-pair 两端分别加入到 ns 和 ovs bridge 中
ip l s veth0 netns ns1
ovs-vsctl add-port ovs-br ovs-veth0
ip l s ovs-veth0 up

ip l s veth1 netns ns2
ovs-vsctl add-port ovs-br ovs-veth1
ip l s ovs-veth1 up

# 给 ns 中的 veth 配置 IP 并启用
ip netns exec ns1 ip a a 10.1.1.2/24 dev veth0
ip netns exec ns1 ip l s veth0 up

ip netns exec ns2 ip a a 10.1.1.3/24 dev veth1
ip netns exec ns2 ip l s veth1 up

# veth0 ping veth1
[root@localhost ~]# ip netns exec ns1 ping 10.1.1.3
PING 10.1.1.3 (10.1.1.3) 56(84) bytes of data.
64 bytes from 10.1.1.3: icmp_seq=1 ttl=64 time=0.311 ms
64 bytes from 10.1.1.3: icmp_seq=2 ttl=64 time=0.087 ms
^C
--- 10.1.1.3 ping statistics ---
2 packets transmitted, 2 received, 0% packet loss, time 999ms
rtt min/avg/max/mdev = 0.087/0.199/0.311/0.112 ms
相关课程推荐:Linux视频教程
总结
veth-pair 在虚拟网络中充当着桥梁的角色,连接多种网络设备构成复杂的网络。
veth-pair 的三个经典实验,直接相连、通过 Bridge 相连和通过 OVS 相连。
参考
http://www.opencloudblog.com/?p=66
https://segmentfault.com/a/1190000009251098
The above is the detailed content of Detailed explanation of Linux virtual network device veth-pair, this article is very informative. For more information, please follow other related articles on the PHP Chinese website!

Hot AI Tools

Undresser.AI Undress
AI-powered app for creating realistic nude photos

AI Clothes Remover
Online AI tool for removing clothes from photos.

Undress AI Tool
Undress images for free

Clothoff.io
AI clothes remover

Video Face Swap
Swap faces in any video effortlessly with our completely free AI face swap tool!

Hot Article
Hot Tools

Notepad++7.3.1
Easy-to-use and free code editor

SublimeText3 Chinese version
Chinese version, very easy to use

Zend Studio 13.0.1
Powerful PHP integrated development environment

Dreamweaver CS6
Visual web development tools

SublimeText3 Mac version
God-level code editing software (SublimeText3)
Hot Topics
 1656
1656
 14
1415
52
1309
25
1257
29
1229
24
14
1415
52
1309
25
1257
29
1229
24

 Linux Architecture: Unveiling the 5 Basic Components
Apr 20, 2025 am 12:04 AM
Linux Architecture: Unveiling the 5 Basic Components
Apr 20, 2025 am 12:04 AM
The five basic components of the Linux system are: 1. Kernel, 2. System library, 3. System utilities, 4. Graphical user interface, 5. Applications. The kernel manages hardware resources, the system library provides precompiled functions, system utilities are used for system management, the GUI provides visual interaction, and applications use these components to implement functions.
 vscode terminal usage tutorial
Apr 15, 2025 pm 10:09 PM
vscode terminal usage tutorial
Apr 15, 2025 pm 10:09 PM
vscode built-in terminal is a development tool that allows running commands and scripts within the editor to simplify the development process. How to use vscode terminal: Open the terminal with the shortcut key (Ctrl/Cmd). Enter a command or run the script. Use hotkeys (such as Ctrl L to clear the terminal). Change the working directory (such as the cd command). Advanced features include debug mode, automatic code snippet completion, and interactive command history.
 How to check the warehouse address of git
Apr 17, 2025 pm 01:54 PM
How to check the warehouse address of git
Apr 17, 2025 pm 01:54 PM
To view the Git repository address, perform the following steps: 1. Open the command line and navigate to the repository directory; 2. Run the "git remote -v" command; 3. View the repository name in the output and its corresponding address.
 Where to write code in vscode
Apr 15, 2025 pm 09:54 PM
Where to write code in vscode
Apr 15, 2025 pm 09:54 PM
Writing code in Visual Studio Code (VSCode) is simple and easy to use. Just install VSCode, create a project, select a language, create a file, write code, save and run it. The advantages of VSCode include cross-platform, free and open source, powerful features, rich extensions, and lightweight and fast.
 How to run java code in notepad
Apr 16, 2025 pm 07:39 PM
How to run java code in notepad
Apr 16, 2025 pm 07:39 PM
Although Notepad cannot run Java code directly, it can be achieved by using other tools: using the command line compiler (javac) to generate a bytecode file (filename.class). Use the Java interpreter (java) to interpret bytecode, execute the code, and output the result.
 vscode terminal command cannot be used
Apr 15, 2025 pm 10:03 PM
vscode terminal command cannot be used
Apr 15, 2025 pm 10:03 PM
Causes and solutions for the VS Code terminal commands not available: The necessary tools are not installed (Windows: WSL; macOS: Xcode command line tools) Path configuration is wrong (add executable files to PATH environment variables) Permission issues (run VS Code as administrator) Firewall or proxy restrictions (check settings, unrestrictions) Terminal settings are incorrect (enable use of external terminals) VS Code installation is corrupt (reinstall or update) Terminal configuration is incompatible (try different terminal types or commands) Specific environment variables are missing (set necessary environment variables)
 What is the main purpose of Linux?
Apr 16, 2025 am 12:19 AM
What is the main purpose of Linux?
Apr 16, 2025 am 12:19 AM
The main uses of Linux include: 1. Server operating system, 2. Embedded system, 3. Desktop operating system, 4. Development and testing environment. Linux excels in these areas, providing stability, security and efficient development tools.
 vscode Previous Next Shortcut Key
Apr 15, 2025 pm 10:51 PM
vscode Previous Next Shortcut Key
Apr 15, 2025 pm 10:51 PM
VS Code One-step/Next step shortcut key usage: One-step (backward): Windows/Linux: Ctrl ←; macOS: Cmd ←Next step (forward): Windows/Linux: Ctrl →; macOS: Cmd →
