 Operation and Maintenance
 Linux Operation and Maintenance
 About four secure intranet instance interoperability setting methods
About four secure intranet instance interoperability setting methods
This article introduces the four secure intranet instance interoperability setting methods, and focuses on the specific steps. The content of this article is very compact, and I hope you will study patiently.
Classic network intranet instance interoperability setting method
The security group is an instance-level firewall. In order to ensure the security of the instance, the "minimum authorization" principle must be followed when setting security group rules. The four types of security are introduced below. The intranet instance interconnection setting method.
Method 1. Use single IP address authorization
Applicable scenarios: Suitable for intranet interconnection scenarios between small-scale instances.
Advantages: Authorization by IP address, security group rules are clear and easy to understand.
Disadvantages: When the number of intranet interconnection instances is large, it will be limited by the 100 security group rules, and the later maintenance workload will be relatively large.
Setting method:
Select the instance that needs to be interconnected and enter the security group of this instance.
Select the security group to be configured and click Configure Rules.
Click the intranet inbound direction and click to add security group rules.
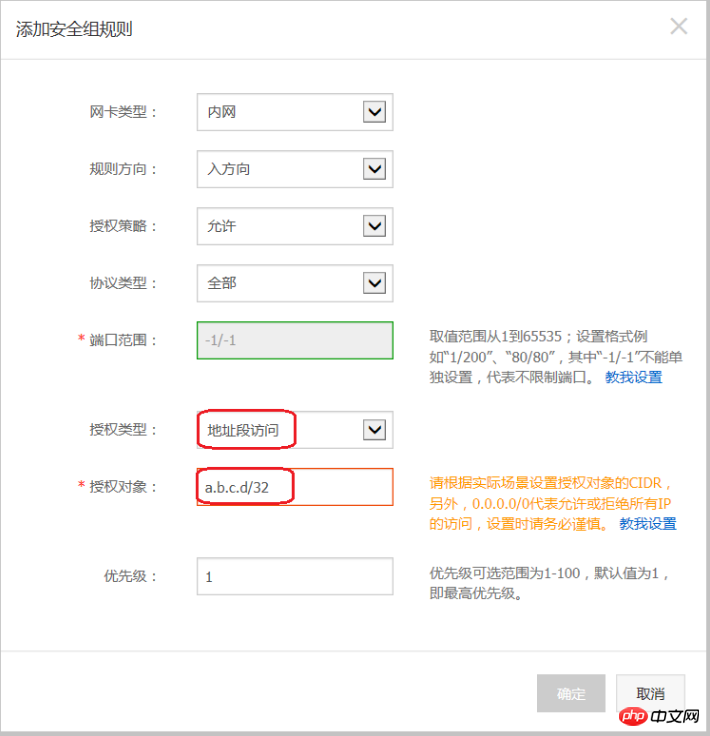
Add security group rules as described below:
Authorization policy: Allow;
Protocol type: Select the protocol type according to actual needs;
Port range: Set the port range according to your actual needs, in the format of "start port number/end port number";
Authorization type: address segment access;
Authorization object: Enter the desired intranet interoperability The intranet IP address of the instance must be in the format a.b.c.d/32. Where, the subnet mask must be /32.

Method 2. Join the same security group
Applicable scenario: If your application architecture is relatively simple , you can select the same security group for all instances. There is no need to set special rules between instances bound to the same security group, and the default network interconnection is required.
Advantages: Security group rules are clear.
Disadvantages: It is only applicable to simple application network architecture. When the network architecture is adjusted, the authorization method must be modified accordingly.
Method 3. Bind interoperability security group
Applicable scenarios: Add and bind a security group specifically for interoperability to instances that need to interoperate Group, suitable for multi-layer application network architecture scenarios.
Advantages: Simple operation, can quickly establish inter-instance interoperability, and can be applied to complex network architectures.
Disadvantages: The instance needs to be bound to multiple security groups, and the security group rules are less readable.
Setting method:
Create a new security group and name it "Interworking Security Group". There is no need to add any rules to the newly created security group.
Add the instances that need to communicate with each other and bind them to the newly created "interoperability security group", and use the default interconnection feature between instances in the same security group to achieve the effect of intranet instance interconnection.
Method 4. Security group mutual trust authorization
Applicable scenarios: If your network architecture is relatively complex, the applications deployed on each instance have For different business roles, you can choose to use security groups to authorize each other.
Advantages: Security group rules have a clear structure, are easy to read, and can be interoperated across accounts.
Disadvantages: The workload of configuring security group rules is relatively large.
Setting method:
Select the instance that needs to establish mutual trust and enter the security group of this instance.
Select the security group to be configured and click Configure Rules.
Click the intranet inbound direction and click to add security group rules.
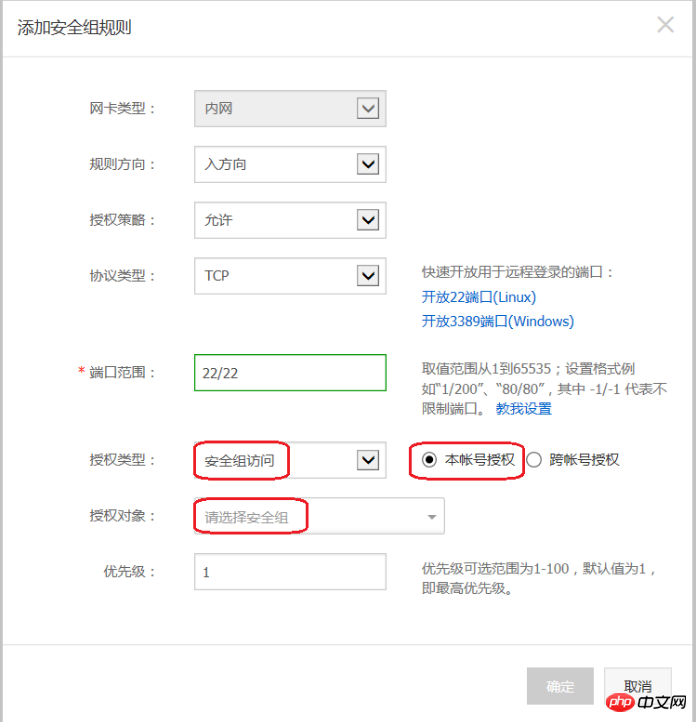
Add security group rules as described below:
Authorization policy: Allow;
Protocol type: Select the protocol type according to your actual needs;
Port Scope: Set according to actual needs;
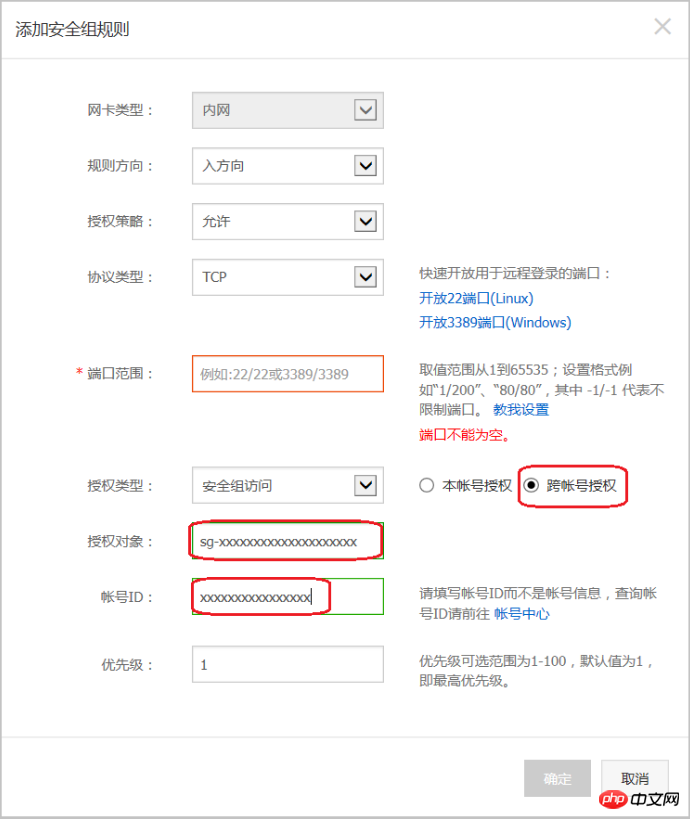
Authorization type: Security group access.
Authorization Object:
If you choose to authorize this account: According to your networking requirements, fill in the security group ID of the peer instance that requires intranet interoperability into the Authorization Object.
If you choose cross-account authorization: Authorization object should be filled in with the security group ID of the peer instance; the account ID is the peer account ID (can be found in Account Management > Security Settings).


##Recommendation
If the initial security group authorization is too large , it is recommended to adopt the following process to tighten the scope of authorization.
Deleting 0.0.0.0 in the figure refers to deleting the original security group rule that allows the 0.0.0.0/0 address segment.
If you change the security group rules improperly, your inter-instance communication may be affected. Please back up the security group rules you want to operate before modifying the settings so that you can restore them in time if interoperability problems occur.
The security group maps the role of the instance in the entire application architecture. It is recommended to plan the firewall rules according to the application architecture. For example: For a common three-tier Web application architecture, you can plan three security groups, and bind the instances where the corresponding applications or databases are deployed to the corresponding security groups:
Web layer security group: open port 80;
APP layer security group: open port 8080;
DB layer security group: open port 3306.
The above is the detailed content of About four secure intranet instance interoperability setting methods. For more information, please follow other related articles on the PHP Chinese website!

Hot AI Tools

Undresser.AI Undress
AI-powered app for creating realistic nude photos

AI Clothes Remover
Online AI tool for removing clothes from photos.

Undress AI Tool
Undress images for free

Clothoff.io
AI clothes remover

Video Face Swap
Swap faces in any video effortlessly with our completely free AI face swap tool!

Hot Article

Hot Tools

Notepad++7.3.1
Easy-to-use and free code editor

SublimeText3 Chinese version
Chinese version, very easy to use

Zend Studio 13.0.1
Powerful PHP integrated development environment

Dreamweaver CS6
Visual web development tools

SublimeText3 Mac version
God-level code editing software (SublimeText3)

Hot Topics
 What computer configuration is required for vscode
Apr 15, 2025 pm 09:48 PM
VS Code system requirements: Operating system: Windows 10 and above, macOS 10.12 and above, Linux distribution processor: minimum 1.6 GHz, recommended 2.0 GHz and above memory: minimum 512 MB, recommended 4 GB and above storage space: minimum 250 MB, recommended 1 GB and above other requirements: stable network connection, Xorg/Wayland (Linux)
 Linux Architecture: Unveiling the 5 Basic Components
Apr 20, 2025 am 12:04 AM
The five basic components of the Linux system are: 1. Kernel, 2. System library, 3. System utilities, 4. Graphical user interface, 5. Applications. The kernel manages hardware resources, the system library provides precompiled functions, system utilities are used for system management, the GUI provides visual interaction, and applications use these components to implement functions.
 How to run java code in notepad
Apr 16, 2025 pm 07:39 PM
Although Notepad cannot run Java code directly, it can be achieved by using other tools: using the command line compiler (javac) to generate a bytecode file (filename.class). Use the Java interpreter (java) to interpret bytecode, execute the code, and output the result.
 vscode terminal usage tutorial
Apr 15, 2025 pm 10:09 PM
vscode built-in terminal is a development tool that allows running commands and scripts within the editor to simplify the development process. How to use vscode terminal: Open the terminal with the shortcut key (Ctrl/Cmd). Enter a command or run the script. Use hotkeys (such as Ctrl L to clear the terminal). Change the working directory (such as the cd command). Advanced features include debug mode, automatic code snippet completion, and interactive command history.
 How to check the warehouse address of git
Apr 17, 2025 pm 01:54 PM
To view the Git repository address, perform the following steps: 1. Open the command line and navigate to the repository directory; 2. Run the "git remote -v" command; 3. View the repository name in the output and its corresponding address.
 vscode cannot install extension
Apr 15, 2025 pm 07:18 PM
The reasons for the installation of VS Code extensions may be: network instability, insufficient permissions, system compatibility issues, VS Code version is too old, antivirus software or firewall interference. By checking network connections, permissions, log files, updating VS Code, disabling security software, and restarting VS Code or computers, you can gradually troubleshoot and resolve issues.
 Where to write code in vscode
Apr 15, 2025 pm 09:54 PM
Writing code in Visual Studio Code (VSCode) is simple and easy to use. Just install VSCode, create a project, select a language, create a file, write code, save and run it. The advantages of VSCode include cross-platform, free and open source, powerful features, rich extensions, and lightweight and fast.
 Can vscode be used for mac
Apr 15, 2025 pm 07:36 PM
VS Code is available on Mac. It has powerful extensions, Git integration, terminal and debugger, and also offers a wealth of setup options. However, for particularly large projects or highly professional development, VS Code may have performance or functional limitations.


