The usage process of Echo in Laravel framework
Today’s article will share with you about the use of echo in the laravel framework. The content of the article is step by step. It took 16 steps to complete a process. The process is very clear. I hope it can help friends in need. Bar. Without further ado, let’s get straight to the content.
Pusher or laravel-echo-server (which is an implementation using NodeJS Socket.IO WebSocket server). In China, individuals still do not recommend using Pusher, as the access speed will be affected, and it is still a commercial product.
Today, take advantage of the simplest "16" steps and go through the code integration laradock and laravel-echo-server to use Laravel Echo.
Build the basic environment
// 1. new project
laravel new echolearning

// 2. 使用 laradock
git clone https://github.com/Laradock/laradock.git

// 3. 创建 .env
cp env-example .env

// 4. 创建 container
docker-compose up -d php-worker laravel-echo-server nginx redis
 ##
##
// 5. 进入 workspace 容器
docker-compose exec --user=laradock workspace bash

// 6. 安装插件
// 6.1 推荐使用 laravel-china 维护的 composer 国内镜像
composer config -g repo.packagist composer https://packagist.laravel-china.org

// 6.2 并行下载插件
composer global require "hirak/prestissimo"

// 6.3 配置 yarn 国内镜像
yarn config set registry 'https://registry.npm.taobao.org'

// 注:以上可以在 laradock 中配置
// 6.4 执行安装
composer install

yarn install

// 7. 创建 .env 和 key
cp .env.example .env
php artisan key:generate

Using Laravel Echo Server
Because laradock integrates " Laravel Echo Server", so we can useLaravel Echo very conveniently.
// 8. 配置广播驱动和 redis 服务器
BROADCAST_DRIVER=redis
REDIS_HOST=redis

// 9. 安装 predis
composer require predis/predis
Laravel Echo is a front-end tool.
// 10. 安装 socket.io-client laravel-echo
yarn add socket.io-client laravel-echo
Echo in resources/assets/js/bootstrap.js:
// 11. 实例化 Echo
import Echo from 'laravel-echo'

window.io = require('socket.io-client')

window.Echo = new Echo({
    broadcaster: 'socket.io',
    host: window.location.hostname + ':6001'
});

// Laravel 官方推荐使用 pusher
// window.Pusher = require('pusher-js');

// window.Echo = new Echo({
//     broadcaster: 'pusher',
//     key: process.env.MIX_PUSHER_APP_KEY,
//     cluster: process.env.MIX_PUSHER_APP_CLUSTER,
//     encrypted: true
// });Echo Example, listen for broadcasts or notifications sent from the backend.
ExampleComponent we have given to transform it, create an Echo listener, wait for the arrival of data, and then display it on the page. The code is simple:
<template>
<p>
</p>
<p>
</p>
<p>
</p>
<p>
</p>
<p>Example Component</p>
<p>
</p>
<ul>
<li>{{ name }}</li>
</ul>
</template>
<script>
export default {
data () {
return {
names: []
}
},
mounted() {
let that = this
// 12. 创建 Echo 监听
Echo.channel('rss')
.listen('RssCreatedEvent', (e) => {
that.names.push(e.name)
});
}
}
</script>rss created event RssCreatedEvent in the backend and inherit ShouldBroadcast.
// 13. 创建 RssCreatedEvent 事件
php artisan make:event RssCreatedEvent
<?php namespace App\Events;
use Carbon\Carbon;
use Illuminate\Broadcasting\Channel;
use Illuminate\Queue\SerializesModels;
use Illuminate\Broadcasting\PrivateChannel;
use Illuminate\Broadcasting\PresenceChannel;
use Illuminate\Foundation\Events\Dispatchable;
use Illuminate\Broadcasting\InteractsWithSockets;
use Illuminate\Contracts\Broadcasting\ShouldBroadcast;
class RssCreatedEvent implements ShouldBroadcast
{
use Dispatchable, InteractsWithSockets, SerializesModels;
/**
* Create a new event instance.
*
* @return void
*/
public function __construct()
{
//
}
/**
* Get the channels the event should broadcast on.
*
* @return \Illuminate\Broadcasting\Channel|array
*/
public function broadcastOn()
{
// 14. 创建频道
return new Channel('rss');
}
/**
* 指定广播数据。
*
* @return array
*/
public function broadcastWith()
{
// 返回当前时间
return ['name' => Carbon::now()->toDateTimeString()];
}
}protected function schedule(Schedule $schedule)
{
// 15. 每隔一分钟执行一次
$schedule->call(function () {
event(new RssCreatedEvent());
})->everyMinute();
}vue component and refresh the test:
nbsp;html>
getLocale() }}">

        <meta>
        <meta>
        <meta>
        <meta>
        <title>Laravel</title>


    <p>
        <example-component></example-component>
    </p>
    <script></script>
<meta>
needs to be introduced in header to compile Front-end:
// 16. 运行 watch
yarn run watch-poll

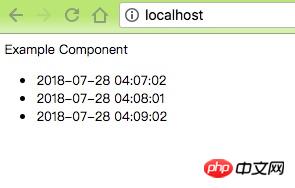
laravel-echo listens and captures the broadcast, then reads the data and displays it.
Summary
So far, the technologies we have used are: 1. The use of laradock2. Use of laravel echo server3. Broadcast event4.event() auxiliary function5.$schedule scheduled task6.Laravel Echo The useWe can basically useLaravel Echo. As for more in-depth use, it is recommended to check the official website documentation.
laradock to deploy the Docker development environment, because I believe laradock has prepared all the tools and environments you want to use for you. .
laravel framework introductory tutorial.
Recommended related articles:Code analysis of the Autoloader module in the Laravel framework
In-depth analysis of the appearance mode in the Laravel framework
Related course recommendations:The latest five Laravel video tutorial recommendations in 2017
The above is the detailed content of The usage process of Echo in Laravel framework. For more information, please follow other related articles on the PHP Chinese website!

Hot AI Tools

Undresser.AI Undress
AI-powered app for creating realistic nude photos

AI Clothes Remover
Online AI tool for removing clothes from photos.

Undress AI Tool
Undress images for free

Clothoff.io
AI clothes remover

Video Face Swap
Swap faces in any video effortlessly with our completely free AI face swap tool!

Hot Article

Hot Tools

Notepad++7.3.1
Easy-to-use and free code editor

SublimeText3 Chinese version
Chinese version, very easy to use

Zend Studio 13.0.1
Powerful PHP integrated development environment

Dreamweaver CS6
Visual web development tools

SublimeText3 Mac version
God-level code editing software (SublimeText3)

Hot Topics
 1657
1657
 14
14
 1415
1415
 52
52
 1309
1309
 25
25
 1257
1257
 29
29
 1230
1230
 24
24
 Laravel Introduction Example
Apr 18, 2025 pm 12:45 PM
Laravel is a PHP framework for easy building of web applications. It provides a range of powerful features including: Installation: Install the Laravel CLI globally with Composer and create applications in the project directory. Routing: Define the relationship between the URL and the handler in routes/web.php. View: Create a view in resources/views to render the application's interface. Database Integration: Provides out-of-the-box integration with databases such as MySQL and uses migration to create and modify tables. Model and Controller: The model represents the database entity and the controller processes HTTP requests.
 Solve caching issues in Craft CMS: Using wiejeben/craft-laravel-mix plug-in
Apr 18, 2025 am 09:24 AM
When developing websites using CraftCMS, you often encounter resource file caching problems, especially when you frequently update CSS and JavaScript files, old versions of files may still be cached by the browser, causing users to not see the latest changes in time. This problem not only affects the user experience, but also increases the difficulty of development and debugging. Recently, I encountered similar troubles in my project, and after some exploration, I found the plugin wiejeben/craft-laravel-mix, which perfectly solved my caching problem.
 The Continued Use of PHP: Reasons for Its Endurance
Apr 19, 2025 am 12:23 AM
What’s still popular is the ease of use, flexibility and a strong ecosystem. 1) Ease of use and simple syntax make it the first choice for beginners. 2) Closely integrated with web development, excellent interaction with HTTP requests and database. 3) The huge ecosystem provides a wealth of tools and libraries. 4) Active community and open source nature adapts them to new needs and technology trends.
 Laravel user login function
Apr 18, 2025 pm 12:48 PM
Laravel provides a comprehensive Auth framework for implementing user login functions, including: Defining user models (Eloquent model), creating login forms (Blade template engine), writing login controllers (inheriting Auth\LoginController), verifying login requests (Auth::attempt) Redirecting after login is successful (redirect) considering security factors: hash passwords, anti-CSRF protection, rate limiting and security headers. In addition, the Auth framework also provides functions such as resetting passwords, registering and verifying emails. For details, please refer to the Laravel documentation: https://laravel.com/doc
 Laravel framework installation method
Apr 18, 2025 pm 12:54 PM
Article summary: This article provides detailed step-by-step instructions to guide readers on how to easily install the Laravel framework. Laravel is a powerful PHP framework that speeds up the development process of web applications. This tutorial covers the installation process from system requirements to configuring databases and setting up routing. By following these steps, readers can quickly and efficiently lay a solid foundation for their Laravel project.
 How to learn Laravel How to learn Laravel for free
Apr 18, 2025 pm 12:51 PM
Want to learn the Laravel framework, but suffer from no resources or economic pressure? This article provides you with free learning of Laravel, teaching you how to use resources such as online platforms, documents and community forums to lay a solid foundation for your PHP development journey from getting started to master.
 How to view the version number of laravel? How to view the version number of laravel
Apr 18, 2025 pm 01:00 PM
The Laravel framework has built-in methods to easily view its version number to meet the different needs of developers. This article will explore these methods, including using the Composer command line tool, accessing .env files, or obtaining version information through PHP code. These methods are essential for maintaining and managing versioning of Laravel applications.
 What versions of laravel are there? How to choose the version of laravel for beginners
Apr 18, 2025 pm 01:03 PM
In the Laravel framework version selection guide for beginners, this article dives into the version differences of Laravel, designed to assist beginners in making informed choices among many versions. We will focus on the key features of each release, compare their pros and cons, and provide useful advice to help beginners choose the most suitable version of Laravel based on their skill level and project requirements. For beginners, choosing a suitable version of Laravel is crucial because it can significantly impact their learning curve and overall development experience.


