
 Backend Development
Python Tutorial
pytorch + visdom CNN method of processing self-built image data sets
Backend Development
Python Tutorial
pytorch + visdom CNN method of processing self-built image data sets
pytorch + visdom CNN method of processing self-built image data sets

This article mainly introduces the method of pytorch visdom CNN processing self-built image data sets. It has certain reference value. Now I share it with you. Friends in need can refer to it
Environment
System: win10
cpu: i7-6700HQ
gpu: gtx965m
python: 3.6
pytorch: 0.3
Data download
comes from Sasank Chilamkurthy’s tutorial; Data: Download link.
After downloading, unzip and place it in the project root directory:
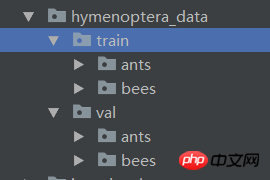
The data set is used to classify ants and bees. There are about 120 training images and 75 validation images for each class.
Data import
You can use the torchvision.datasets.ImageFolder(root,transforms) module to convert images into tensors.
Define transform first:
ata_transforms = {
  'train': transforms.Compose([
    # 随机切成224x224 大小图片 统一图片格式
    transforms.RandomResizedCrop(224),
    # 图像翻转
    transforms.RandomHorizontalFlip(),
    # totensor 归一化(0,255) >> (0,1)  normalize  channel=(channel-mean)/std
    transforms.ToTensor(),
    transforms.Normalize(mean=[0.485, 0.456, 0.406], std=[0.229, 0.224, 0.225])
  ]),
  "val" : transforms.Compose([
    # 图片大小缩放 统一图片格式
    transforms.Resize(256),
    # 以中心裁剪
    transforms.CenterCrop(224),
    transforms.ToTensor(),
    transforms.Normalize(mean=[0.485, 0.456, 0.406], std=[0.229, 0.224, 0.225])
  ])
}Import and load data:
data_dir = './hymenoptera_data'
# trans data
image_datasets = {x: datasets.ImageFolder(os.path.join(data_dir, x), data_transforms[x]) for x in ['train', 'val']}
# load data
data_loaders = {x: DataLoader(image_datasets[x], batch_size=BATCH_SIZE, shuffle=True) for x in ['train', 'val']}

data_sizes = {x: len(image_datasets[x]) for x in ['train', 'val']}
class_names = image_datasets['train'].classes
print(data_sizes, class_names){'train': 244, 'val': 153} ['ants', 'bees']There are 244 images in the training set and 153 images in the test set.
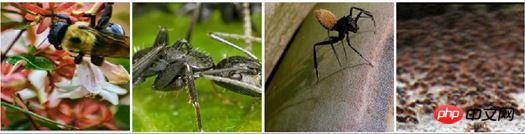
Visualize some pictures. Since visdom supports tensor input, you don’t need to change it to numpy. You can directly use tensor calculation:
inputs, classes = next(iter(data_loaders['val']))
out = torchvision.utils.make_grid(inputs)
inp = torch.transpose(out, 0, 2)
mean = torch.FloatTensor([0.485, 0.456, 0.406])
std = torch.FloatTensor([0.229, 0.224, 0.225])
inp = std * inp + mean
inp = torch.transpose(inp, 0, 2)
viz.images(inp)
Create CNN
net Based on the previous article's processing of cifar10, I changed the specifications:
class CNN(nn.Module):
  def __init__(self, in_dim, n_class):
    super(CNN, self).__init__()
    self.cnn = nn.Sequential(
      nn.BatchNorm2d(in_dim),
      nn.ReLU(True),
      nn.Conv2d(in_dim, 16, 7), # 224 >> 218
      nn.BatchNorm2d(16),
      nn.ReLU(inplace=True),
      nn.MaxPool2d(2, 2), # 218 >> 109
      nn.ReLU(True),
      nn.Conv2d(16, 32, 5), # 105
      nn.BatchNorm2d(32),
      nn.ReLU(True),
      nn.Conv2d(32, 64, 5), # 101
      nn.BatchNorm2d(64),
      nn.ReLU(True),
      nn.Conv2d(64, 64, 3, 1, 1),
      nn.BatchNorm2d(64),
      nn.ReLU(True),
      nn.MaxPool2d(2, 2), # 101 >> 50
      nn.Conv2d(64, 128, 3, 1, 1), #
      nn.BatchNorm2d(128),
      nn.ReLU(True),
      nn.MaxPool2d(3), # 50 >> 16
    )
    self.fc = nn.Sequential(
      nn.Linear(128*16*16, 120),
      nn.BatchNorm1d(120),
      nn.ReLU(True),
      nn.Linear(120, n_class))
  def forward(self, x):
    out = self.cnn(x)
    out = self.fc(out.view(-1, 128*16*16))
    return out

# 输入3层rgb ,输出 分类 2
model = CNN(3, 2)loss, optimization function:
line = viz.line(Y=np.arange(10))
loss_f = nn.CrossEntropyLoss()
optimizer = optim.SGD(model.parameters(), lr=LR, momentum=0.9)
scheduler = optim.lr_scheduler.StepLR(optimizer, step_size=7, gamma=0.1)
Parameters:
BATCH_SIZE = 4
LR = 0.001
EPOCHS = 10
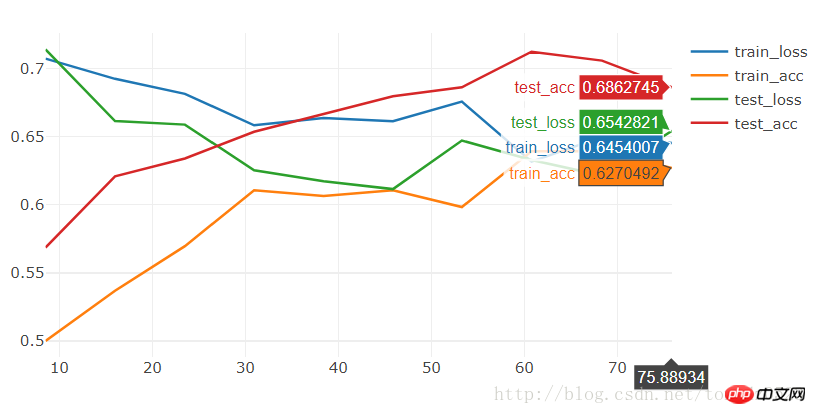
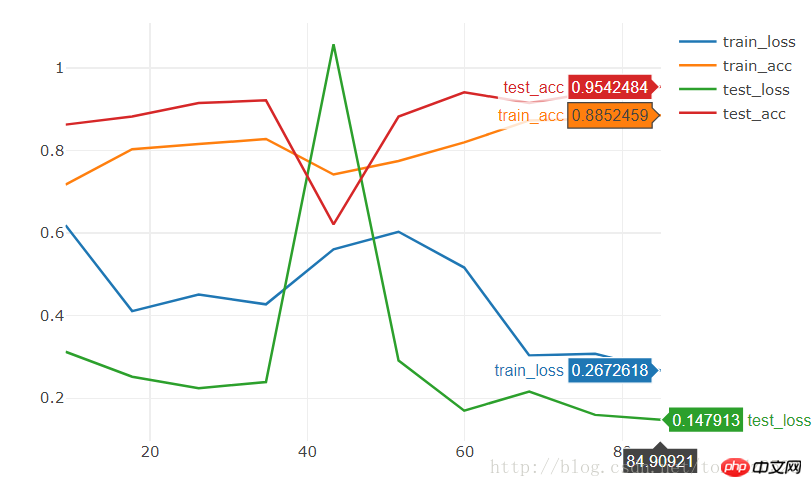
Run 10 epochs and see:
[9/10] train_loss:0.650|train_acc:0.639|test_loss:0.621|test_acc0.706
[10/10] train_loss:0.645|train_acc:0.627|test_loss:0.654|test_acc0.686
Training complete in 1m 16s
Best val Acc: 0.712418
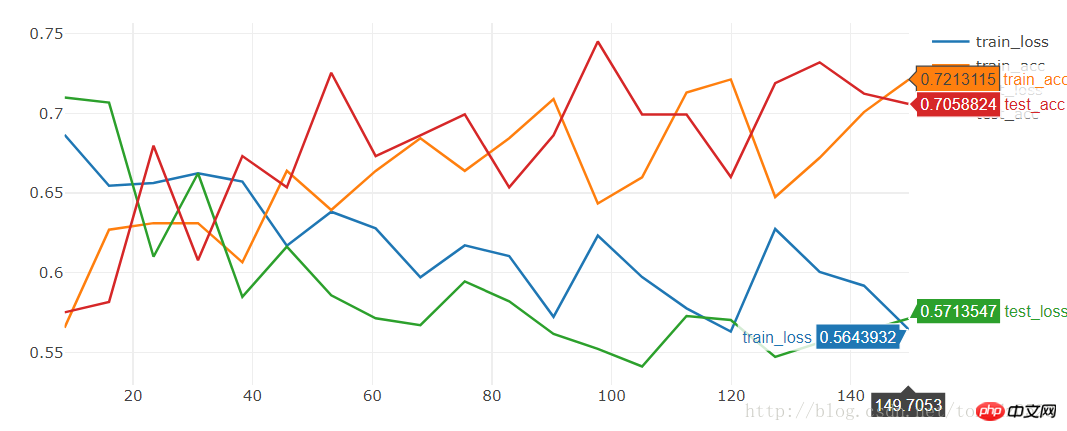
Run 20 epochs and see:
[19/20] train_loss:0.592|train_acc:0.701|test_loss:0.563|test_acc0.712
[20/20] train_loss:0.564|train_acc:0.721|test_loss:0.571|test_acc0.706
Training complete in 2m 30s
Best val Acc: 0.745098
model = torchvision.models.resnet18(True)
num_ftrs = model.fc.in_features
model.fc = nn.Linear(num_ftrs, 2)
[9/10] train_loss:0.621|train_acc:0.652|test_loss:0.588|test_acc0.667
[10/10] train_loss:0.610|train_acc:0.680|test_loss:0.561|test_acc0.667
Training complete in 1m 24s
Best val Acc: 0.686275
model = torchvision.models.resnet18(pretrained=True)
num_ftrs = model.fc.in_features
model.fc = nn.Linear(num_ftrs, 2)
[9/10] train_loss:0.308|train_acc:0.877|test_loss:0.160|test_acc0.941
[10/10] train_loss:0.267|train_acc:0.885|test_loss:0.148|test_acc0.954
Training complete in 1m 25s
Best val Acc: 0.954248
pytorch
visdom handles simple classification problems
The above is the detailed content of pytorch + visdom CNN method of processing self-built image data sets. For more information, please follow other related articles on the PHP Chinese website!

Hot AI Tools

Undresser.AI Undress
AI-powered app for creating realistic nude photos

AI Clothes Remover
Online AI tool for removing clothes from photos.

Undress AI Tool
Undress images for free

Clothoff.io
AI clothes remover

Video Face Swap
Swap faces in any video effortlessly with our completely free AI face swap tool!

Hot Article
Hot Tools

Notepad++7.3.1
Easy-to-use and free code editor

SublimeText3 Chinese version
Chinese version, very easy to use

Zend Studio 13.0.1
Powerful PHP integrated development environment

Dreamweaver CS6
Visual web development tools

SublimeText3 Mac version
God-level code editing software (SublimeText3)
Hot Topics
 1672
1672
 14
1428
52
1332
25
1277
29
1257
24
14
1428
52
1332
25
1277
29
1257
24

 How to solve the problem of automatically saving pictures when publishing on Xiaohongshu? Where is the automatically saved image when posting?
Mar 22, 2024 am 08:06 AM
How to solve the problem of automatically saving pictures when publishing on Xiaohongshu? Where is the automatically saved image when posting?
Mar 22, 2024 am 08:06 AM
With the continuous development of social media, Xiaohongshu has become a platform for more and more young people to share their lives and discover beautiful things. Many users are troubled by auto-save issues when posting images. So, how to solve this problem? 1. How to solve the problem of automatically saving pictures when publishing on Xiaohongshu? 1. Clear the cache First, we can try to clear the cache data of Xiaohongshu. The steps are as follows: (1) Open Xiaohongshu and click the "My" button in the lower right corner; (2) On the personal center page, find "Settings" and click it; (3) Scroll down and find the "Clear Cache" option. Click OK. After clearing the cache, re-enter Xiaohongshu and try to post pictures to see if the automatic saving problem is solved. 2. Update the Xiaohongshu version to ensure that your Xiaohongshu
 How to post pictures in TikTok comments? Where is the entrance to the pictures in the comment area?
Mar 21, 2024 pm 09:12 PM
How to post pictures in TikTok comments? Where is the entrance to the pictures in the comment area?
Mar 21, 2024 pm 09:12 PM
With the popularity of Douyin short videos, user interactions in the comment area have become more colorful. Some users wish to share images in comments to better express their opinions or emotions. So, how to post pictures in TikTok comments? This article will answer this question in detail and provide you with some related tips and precautions. 1. How to post pictures in Douyin comments? 1. Open Douyin: First, you need to open Douyin APP and log in to your account. 2. Find the comment area: When browsing or posting a short video, find the place where you want to comment and click the "Comment" button. 3. Enter your comment content: Enter your comment content in the comment area. 4. Choose to send a picture: In the interface for entering comment content, you will see a "picture" button or a "+" button, click
 The perfect combination of PyCharm and PyTorch: detailed installation and configuration steps
Feb 21, 2024 pm 12:00 PM
The perfect combination of PyCharm and PyTorch: detailed installation and configuration steps
Feb 21, 2024 pm 12:00 PM
PyCharm is a powerful integrated development environment (IDE), and PyTorch is a popular open source framework in the field of deep learning. In the field of machine learning and deep learning, using PyCharm and PyTorch for development can greatly improve development efficiency and code quality. This article will introduce in detail how to install and configure PyTorch in PyCharm, and attach specific code examples to help readers better utilize the powerful functions of these two. Step 1: Install PyCharm and Python
 How to make ppt pictures appear one by one
Mar 25, 2024 pm 04:00 PM
How to make ppt pictures appear one by one
Mar 25, 2024 pm 04:00 PM
In PowerPoint, it is a common technique to display pictures one by one, which can be achieved by setting animation effects. This guide details the steps to implement this technique, including basic setup, image insertion, adding animation, and adjusting animation order and timing. Additionally, advanced settings and adjustments are provided, such as using triggers, adjusting animation speed and order, and previewing animation effects. By following these steps and tips, users can easily set up pictures to appear one after another in PowerPoint, thereby enhancing the visual impact of the presentation and grabbing the attention of the audience.
 How to use HTML, CSS and jQuery to implement advanced functions of image merging and display
Oct 27, 2023 pm 04:36 PM
How to use HTML, CSS and jQuery to implement advanced functions of image merging and display
Oct 27, 2023 pm 04:36 PM
Overview of advanced functions of how to use HTML, CSS and jQuery to implement image merge display: In web design, image display is an important link, and image merge display is one of the common techniques to improve page loading speed and enhance user experience. This article will introduce how to use HTML, CSS and jQuery to implement advanced functions of image merging and display, and provide specific code examples. 1. HTML layout: First, we need to create a container in HTML to display the merged images. You can use di
 6 Ways to Make Pictures Sharper on iPhone
Mar 04, 2024 pm 06:25 PM
6 Ways to Make Pictures Sharper on iPhone
Mar 04, 2024 pm 06:25 PM
Apple's recent iPhones capture memories with crisp detail, saturation and brightness. But sometimes, you may encounter some issues that may cause the image to look less clear. While autofocus on iPhone cameras has come a long way, allowing you to take photos quickly, the camera can mistakenly focus on the wrong subject in certain situations, making the photo blurry in unwanted areas. If your photos on your iPhone look out of focus or lack sharpness overall, the following post should help you make them sharper. How to Make Pictures Clearer on iPhone [6 Methods] You can try using the native Photos app to clean up your photos. If you want more features and options
 What should I do if the images on the webpage cannot be loaded? 6 solutions
Mar 15, 2024 am 10:30 AM
What should I do if the images on the webpage cannot be loaded? 6 solutions
Mar 15, 2024 am 10:30 AM
Some netizens found that when they opened the browser web page, the pictures on the web page could not be loaded for a long time. What happened? I checked that the network is normal, so where is the problem? The editor below will introduce to you six solutions to the problem that web page images cannot be loaded. Web page images cannot be loaded: 1. Internet speed problem The web page cannot display images. It may be because the computer's Internet speed is relatively slow and there are more softwares opened on the computer. And the images we access are relatively large, which may be due to loading timeout. As a result, the picture cannot be displayed. You can turn off the software that consumes more network speed. You can go to the task manager to check. 2. Too many visitors. If the webpage cannot display pictures, it may be because the webpages we visited were visited at the same time.
 Introduction to five sampling methods in natural language generation tasks and Pytorch code implementation
Feb 20, 2024 am 08:50 AM
Introduction to five sampling methods in natural language generation tasks and Pytorch code implementation
Feb 20, 2024 am 08:50 AM
In natural language generation tasks, sampling method is a technique to obtain text output from a generative model. This article will discuss 5 common methods and implement them using PyTorch. 1. GreedyDecoding In greedy decoding, the generative model predicts the words of the output sequence based on the input sequence time step by time. At each time step, the model calculates the conditional probability distribution of each word, and then selects the word with the highest conditional probability as the output of the current time step. This word becomes the input to the next time step, and the generation process continues until some termination condition is met, such as a sequence of a specified length or a special end marker. The characteristic of GreedyDecoding is that each time the current conditional probability is the best
