

Tips on Vue component development (detailed tutorial)
This article provides you with a detailed analysis of the relevant skills and knowledge points of Vue component development through code examples. Readers in need may refer to it.
Preface
As I near graduation, I wrote a simple personal blog. The project address is click me to visit the project address (please ask for a star by the way). This article is the first in a series of summaries. Next, I will imitate a low-profile version of Element's dialog box and pop-up components step by step.
Text
Vue single file component development
When using vue-cli to initialize a project, you will find that there are A HelloWorld.vue file, this is the basic development model of single-file components.
// 注册
Vue.component('my-component', {
template: '<p>A custom component!</p>'
})
// 创建根实例
new Vue({
el: '#example'
})Next, start writing a dialog component.
Dialog
The basic style of the target dialog component is as shown in the figure:
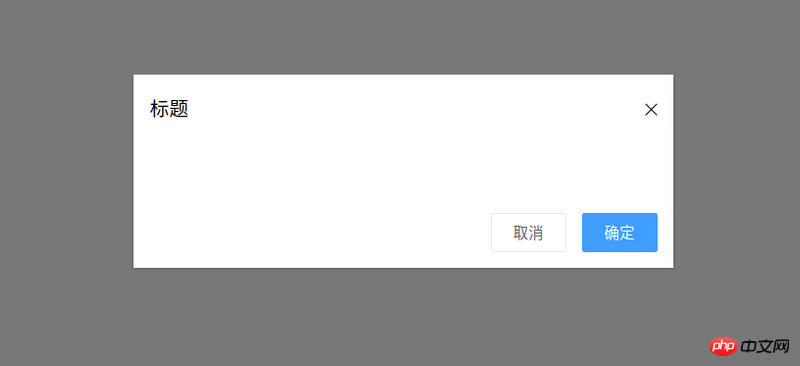
According to the target style, it can be summarized Out:
The dialog component needs a titleprops to indicate the pop-up window title
The dialog component needs to emit an OK event when the OK button is pressed ( That is, tell the parent component that it is confirmed)
Similarly, the dialog component needs to emit a cancellation event
The dialog component needs to provide a slot to facilitate Custom content
Then, the encoding is as follows:
<template>
<p class="ta-dialog__wrapper">
<p class="ta-dialog">
<p class="ta-dialog__header">
<span>{{ title }}</span>
<i class="ios-close-empty" @click="handleCancel()"></i>
</p>
<p class="ta-dialog__body">
<slot></slot>
</p>
<p class="ta-dialog__footer">
<button @click="handleCancel()">取消</button>
<button @click="handleOk()">确定</button>
</p>
</p>
</p>
</template>
<script>
export default {
name: 'Dialog',
props: {
title: {
type: String,
default: '标题'
},
},
methods: {
handleCancel() {
this.$emit('cancel')
},
handleOk() {
this.$emit('ok')
},
},
}
</script>This completes the development of the dialog component. The usage method is as follows:
<ta-dialog
 title="弹窗标题"
 @ok="handleOk"
 @cancel="handleCancel">
 <p>我是内容</p>
</ta-dialog>
At this time, I found One problem, when using v-if or v-show to control the display of the pop-up window, there is no animation! ! ! , looks very stiff. Coach, I want to add animation. At this time, the transition component comes into play. Using the transition component combined with css can create many animations with good effects. Next, enhance the dialog component animation. The code is as follows:
<template>
<transition name="slide-down">
<p class="ta-dialog__wrapper" v-if="isShow">
// 省略
</p>
</transition>
</template>
<script>
export default {
data() {
return {
isShow: true
}
},
methods: {
handleCancel() {
this.isShow = false
this.$emit('cancel')
},
handleOk() {
this.isShow = true
this.$emit('ok')
},
},
}
</script> You can see that the transition component receives a nameprops, so how to write css to complete the animation? A very simple way, just write two
key class (css className) styles:
.slide-down-enter-active {
 animation: dialog-enter ease .3s;
}

.slide-down-leave-active {
 animation: dialog-leave ease .5s;
}

@keyframes dialog-enter {
 from {
 opacity: 0;
 transform: translateY(-20px);
 }

 to {
 opacity: 1;
 transform: translateY(0);
 }
}

@keyframes dialog-leave {
 from {
 opacity: 1;
 transform: translateY(0);
 }

 to {
 opacity: 0;
 transform: translateY(-20px);
 }
}It is so simple to develop a good dynamic effect. Note that the name of the transition component is slide-down, and the key className of the animation written is slide-down-enter-active and slide-down-leave-active.
Encapsulate Dialog to make MessageBox
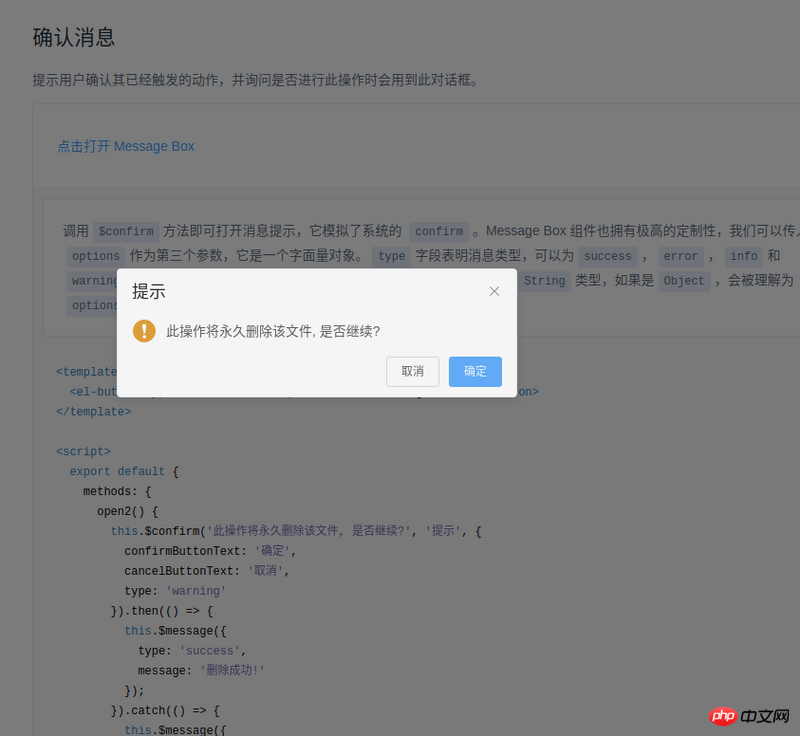
The method of using Element's MessageBox is as follows:
this.$confirm('此操作将永久删除该文件, 是否继续?', '提示', {
 confirmButtonText: '确定',
 cancelButtonText: '取消',
 type: 'warning'
}).then(() => {
 this.$message({
 type: 'success',
 message: '删除成功!'
 });
}).catch(() => {
 this.$message({
 type: 'info',
 message: '已取消删除'
 });
});When I saw this code, I felt so magical. So magical, so magical (exclamation three times in a row). Take a closer look, this component is actually an encapsulated dialog,
#Next, I will also encapsulate such a component. First, let’s sort out our thoughts:
The usage method of Element is this.$confirm. Isn’t this just a matter of hanging it on Vue’s prototype?
Element's then means OK, catch means cancel, just promise.
After sorting out my thoughts, I started coding:
import Vue from 'vue'
import MessgaeBox from './src/index'

const Ctur = Vue.extend(MessgaeBox)
let instance = null

const callback = action => {
 if (action === 'confirm') {
 if (instance.showInput) {
  instance.resolve({ value: instance.inputValue, action })
 } else {
  instance.resolve(action)
 }
 } else {
 instance.reject(action)
 }

 instance = null
}

const showMessageBox = (tip, title, opts) => new Promise((resolve, reject) => {
 const propsData = { tip, title, ...opts }

 instance = new Ctur({ propsData }).$mount()
 instance.reject = reject
 instance.resolve = resolve
 instance.callback = callback

 document.body.appendChild(instance.$el)
})


const confirm = (tip, title, opts) => showMessageBox(tip, title, opts)

Vue.prototype.$confirm = confirmAt this point, you may be wondering what to do As for callback, I actually wrote an encapsulated dialog and named it MessageBox.
In its code, there are two methods:
onCancel() {
 this.visible = false
 this.callback && (this.callback.call(this, 'cancel'))
},

onConfirm() {
 this.visible = false
 this.callback && (this.callback.call(this, 'confirm'))
},Yes, it is callback when confirming and canceling . I would also like to talk about Vue.extend, which introduces MessageBox into the code.
Instead of using new MessageBox directly, I use new Ctur because this can define data (not just props), for example:
instance = new Ctur({ propsData }).$mount()At this time, there is actually no MessageBox on the page. We need to execute:
document.body.appendChild(instance.$el)
If you do this directly, you may find that there is no animation when the MessageBox is opened, but there is animation when it is closed. The solution is also very simple, make it still invisible when
appendChild, and then use code like this:
Vue.nextTick(() => instance.visible = true)
This way there will be animation.
Summary
Achieve good animation through transition and css. Among them, the name of the transition component determines the two key classes for writing css, named [name]-enter-active and [name]-leave-active
Inherit one through Vue.extend The constructor of the component (I don’t know how to say it properly, let’s just say it like this), and then through this constructor, you can customize the related properties of the component (usage scenario: js calls the component)
When js calls a component, in order to maintain the animation effect of the component, you can first document.body.appendChild and then Vue.nextTick(() => instance.visible = true)
The above is I compiled it for everyone, I hope it will be helpful to everyone in the future.
Related articles:
postman json springmvc test batch addition instance
JS and Canvas implement image preview compression and upload function
Two ways for Vue single-page application to reference separate style files
The above is the detailed content of Tips on Vue component development (detailed tutorial). For more information, please follow other related articles on the PHP Chinese website!

Hot AI Tools

Undresser.AI Undress
AI-powered app for creating realistic nude photos

AI Clothes Remover
Online AI tool for removing clothes from photos.

Undress AI Tool
Undress images for free

Clothoff.io
AI clothes remover

Video Face Swap
Swap faces in any video effortlessly with our completely free AI face swap tool!

Hot Article
Hot Tools

Notepad++7.3.1
Easy-to-use and free code editor

SublimeText3 Chinese version
Chinese version, very easy to use

Zend Studio 13.0.1
Powerful PHP integrated development environment

Dreamweaver CS6
Visual web development tools

SublimeText3 Mac version
God-level code editing software (SublimeText3)
Hot Topics
 1655
1655
 14
1413
52
1306
25
1252
29
1225
24
14
1413
52
1306
25
1252
29
1225
24

 Four recommended AI-assisted programming tools
Apr 22, 2024 pm 05:34 PM
Four recommended AI-assisted programming tools
Apr 22, 2024 pm 05:34 PM
This AI-assisted programming tool has unearthed a large number of useful AI-assisted programming tools in this stage of rapid AI development. AI-assisted programming tools can improve development efficiency, improve code quality, and reduce bug rates. They are important assistants in the modern software development process. Today Dayao will share with you 4 AI-assisted programming tools (and all support C# language). I hope it will be helpful to everyone. https://github.com/YSGStudyHards/DotNetGuide1.GitHubCopilotGitHubCopilot is an AI coding assistant that helps you write code faster and with less effort, so you can focus more on problem solving and collaboration. Git
 Win11 Tips Sharing: Skip Microsoft Account Login with One Trick
Mar 27, 2024 pm 02:57 PM
Win11 Tips Sharing: Skip Microsoft Account Login with One Trick
Mar 27, 2024 pm 02:57 PM
Win11 Tips Sharing: One trick to skip Microsoft account login Windows 11 is the latest operating system launched by Microsoft, with a new design style and many practical functions. However, for some users, having to log in to their Microsoft account every time they boot up the system can be a bit annoying. If you are one of them, you might as well try the following tips, which will allow you to skip logging in with a Microsoft account and enter the desktop interface directly. First, we need to create a local account in the system to log in instead of a Microsoft account. The advantage of doing this is
 Which AI programmer is the best? Explore the potential of Devin, Tongyi Lingma and SWE-agent
Apr 07, 2024 am 09:10 AM
Which AI programmer is the best? Explore the potential of Devin, Tongyi Lingma and SWE-agent
Apr 07, 2024 am 09:10 AM
On March 3, 2022, less than a month after the birth of the world's first AI programmer Devin, the NLP team of Princeton University developed an open source AI programmer SWE-agent. It leverages the GPT-4 model to automatically resolve issues in GitHub repositories. SWE-agent's performance on the SWE-bench test set is similar to Devin, taking an average of 93 seconds and solving 12.29% of the problems. By interacting with a dedicated terminal, SWE-agent can open and search file contents, use automatic syntax checking, edit specific lines, and write and execute tests. (Note: The above content is a slight adjustment of the original content, but the key information in the original text is retained and does not exceed the specified word limit.) SWE-A
 Learn how to develop mobile applications using Go language
Mar 28, 2024 pm 10:00 PM
Learn how to develop mobile applications using Go language
Mar 28, 2024 pm 10:00 PM
Go language development mobile application tutorial As the mobile application market continues to boom, more and more developers are beginning to explore how to use Go language to develop mobile applications. As a simple and efficient programming language, Go language has also shown strong potential in mobile application development. This article will introduce in detail how to use Go language to develop mobile applications, and attach specific code examples to help readers get started quickly and start developing their own mobile applications. 1. Preparation Before starting, we need to prepare the development environment and tools. head
 A must-have for veterans: Tips and precautions for * and & in C language
Apr 04, 2024 am 08:21 AM
A must-have for veterans: Tips and precautions for * and & in C language
Apr 04, 2024 am 08:21 AM
In C language, it represents a pointer, which stores the address of other variables; & represents the address operator, which returns the memory address of a variable. Tips for using pointers include defining pointers, dereferencing pointers, and ensuring that pointers point to valid addresses; tips for using address operators & include obtaining variable addresses, and returning the address of the first element of the array when obtaining the address of an array element. A practical example demonstrating the use of pointer and address operators to reverse a string.
 What are the tips for novices to create forms?
Mar 21, 2024 am 09:11 AM
What are the tips for novices to create forms?
Mar 21, 2024 am 09:11 AM
We often create and edit tables in excel, but as a novice who has just come into contact with the software, how to use excel to create tables is not as easy as it is for us. Below, we will conduct some drills on some steps of table creation that novices, that is, beginners, need to master. We hope it will be helpful to those in need. A sample form for beginners is shown below: Let’s see how to complete it! 1. There are two methods to create a new excel document. You can right-click the mouse on a blank location on the [Desktop] - [New] - [xls] file. You can also [Start]-[All Programs]-[Microsoft Office]-[Microsoft Excel 20**] 2. Double-click our new ex
 VSCode Getting Started Guide: A must-read for beginners to quickly master usage skills!
Mar 26, 2024 am 08:21 AM
VSCode Getting Started Guide: A must-read for beginners to quickly master usage skills!
Mar 26, 2024 am 08:21 AM
VSCode (Visual Studio Code) is an open source code editor developed by Microsoft. It has powerful functions and rich plug-in support, making it one of the preferred tools for developers. This article will provide an introductory guide for beginners to help them quickly master the skills of using VSCode. In this article, we will introduce how to install VSCode, basic editing operations, shortcut keys, plug-in installation, etc., and provide readers with specific code examples. 1. Install VSCode first, we need
 Exploring Go language front-end technology: a new vision for front-end development
Mar 28, 2024 pm 01:06 PM
Exploring Go language front-end technology: a new vision for front-end development
Mar 28, 2024 pm 01:06 PM
As a fast and efficient programming language, Go language is widely popular in the field of back-end development. However, few people associate Go language with front-end development. In fact, using Go language for front-end development can not only improve efficiency, but also bring new horizons to developers. This article will explore the possibility of using the Go language for front-end development and provide specific code examples to help readers better understand this area. In traditional front-end development, JavaScript, HTML, and CSS are often used to build user interfaces
