
 Web Front-end
JS Tutorial
Example of how Node.js implements registration email activation function_node.js
Web Front-end
JS Tutorial
Example of how Node.js implements registration email activation function_node.js
Example of how Node.js implements registration email activation function_node.js

Nowadays, many websites need to have the registration email activation function. This article mainly introduces the example of the method of realizing the registration email activation function in Node.js. Now I share it with you and give it as a reference. Let’s take a look together
When doing geek tutorials on your own node project, you need to develop a function for registering email activation. This function is very common. When we register an account, there will definitely be this step, as follows Let’s see how to implement this function.
1. Register an email address
First register an email address that supports sending verification emails. The one I registered here is NetEase’s 163 email address, so the 163 email address is used below. After successful registration, log in to the sending email address
, then click Settings on the navigation bar, select POP3/SMTP/IMAP, enable the POP3/SMTP/IMAP service, and set the authorization code.
2. Download the nodemailer plug-in
Enter on the command line: npm install --save nodemailer
3. Write and send Email code
3.1 Encapsulate the activation email code and export it:
//email.js

// 引入 nodemailer
const nodemailer = require('nodemailer');

// 创建一个SMTP客户端配置
const config = {
    host: 'smtp.163.com',
    port: 465,
    auth: {
      user: 'xxxx@163.com', //刚才注册的邮箱账号
      pass: 'xxxxxx' //邮箱的授权码,不是注册时的密码
    }
  };

// 创建一个SMTP客户端对象
const transporter = nodemailer.createTransport(config);

// 发送邮件
module.exports = function (mail){
  transporter.sendMail(mail, function(error, info){
    if(error) {
      return console.log(error);
    }
    console.log('mail sent:', info.response);
  });
};3.2 Test:
//sendtest.js
var send = require('./email.js');
// 创建一个邮件对象
var mail = {
// 发件人
from: '极客教程 <xxxx@163.com>',
// 主题
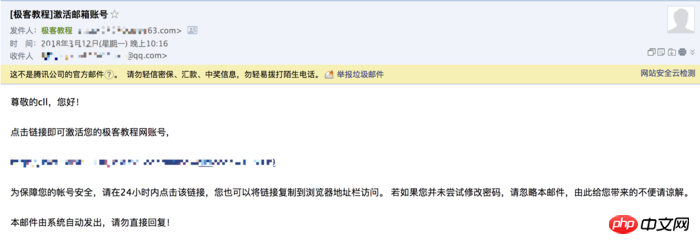
subject: '[极客教程]激活邮箱账号',
// 收件人
to: 'xxxx@qq.com',
// 邮件内容,HTML格式
text: `尊敬的${user.name},您好!点击链接即可激活您的极客教程
网账号,http://localhost:3000/checkCode?name=${user.name}&code=${user.code}为保障您的帐号安全,请在24小时内点击该链接,您也可以将链接复制到浏览器地址栏访问。 若如果您并未尝试修改密码,请忽略本邮件,由此给您带来的不便请谅解。本邮件由系统自动发出,请勿直接回复!` //接收激活请求的链接
};
send(mail);If successful, you can see the message sent in the test mailbox.
4. Verification steps
Let’s briefly talk about how to implement email verification.
1. In the database user data structure you define, there must be fields such as activation code, expiration time, and whether it has been activated, which are used to judge during activation;
{
  code: String, //激活码,格式自己定义
  date: Number, //过期日期,过期后不能激活
  islive: Boolean //判断是否激活
}2 . Send an activation link containing your username and activation code, like this:
// 创建一个邮件对象
var mail = {
// 发件人
from: '极客教程 <xxxx@163.com>',
// 主题
subject: '[极客教程]激活邮箱账号',
// 收件人
to: 'xxxx@qq.com',
// 邮件内容,HTML格式
text: `尊敬的${user.name},您好!点击链接即可激活您的极客教程
网账号,http://localhost:3000/checkCode?name=${user.name}&code=${user.code}为保障您的帐号安全,请在24小时内点击该链接,您也可以将链接复制到浏览器地址栏访问。 若如果您并未尝试修改密码,请忽略本邮件,由此给您带来的不便请谅解。本邮件由系统自动发出,请勿直接回复!` //接收激活请求的链接
};
send(mail);3 . Respond to the activation request , search based on the user name of the activation link. If the user exists, determine whether the activation code is consistent, and determine whether the activation code has expired. If all are correct, change the activation status. At this time, the activation is successful, as follows:
// check email code
exports.checkCode = function (req, res){
  var username = req.query.name;
  var code = req.query.code;
  User.findOne({name: username}, function (err, user){
      if (user.code === code && (user.date - Date.now()) > 0){
          User.update({name: username}, {islive: true}, function (err){
              if (err){
                  res.json({error: true})
              }else{
                  console.log(user)
                  res.json({ok: true})
              }
          });
      }else{
        res.json({
          email: user.mail,
          failure: true
        })
      }
  });
}5. Problems encountered
The following problems were encountered during development:
{ [AuthError: Invalid login - 535 Error: authentication failed]
name: 'AuthError',
data: '535 Error: authentication failed',
stage: 'auth' }
smtp server verification failed because NetEase's email has authorization restrictions. Be sure to check the account number and authorization code when you registered your email.
Related recommendations:
Node.js implements compression and decompression
Instance of Node.js implementing Restful style webservice
The above is the detailed content of Example of how Node.js implements registration email activation function_node.js. For more information, please follow other related articles on the PHP Chinese website!

Hot AI Tools

Undresser.AI Undress
AI-powered app for creating realistic nude photos

AI Clothes Remover
Online AI tool for removing clothes from photos.

Undress AI Tool
Undress images for free

Clothoff.io
AI clothes remover

Video Face Swap
Swap faces in any video effortlessly with our completely free AI face swap tool!

Hot Article
Hot Tools

Notepad++7.3.1
Easy-to-use and free code editor

SublimeText3 Chinese version
Chinese version, very easy to use

Zend Studio 13.0.1
Powerful PHP integrated development environment

Dreamweaver CS6
Visual web development tools

SublimeText3 Mac version
God-level code editing software (SublimeText3)
Hot Topics
 1655
1655
 14
1414
52
1307
25
1254
29
1228
24
14
1414
52
1307
25
1254
29
1228
24

 How to turn off the office activation wizard? (How to turn off the Office Activation Wizard prompt)
Mar 14, 2024 pm 07:00 PM
How to turn off the office activation wizard? (How to turn off the Office Activation Wizard prompt)
Mar 14, 2024 pm 07:00 PM
In the process of computer work, office software is often used, but as soon as office is opened, a window prompt of the activation wizard appears. How to close it? Is there any way to completely turn off the activation wizard prompt? In fact, the operation is very simple, you can follow the editor's method. 1. Use the Windows key + R key combination to close the Excel Activation Wizard 1. First, use the Windows key + R shortcut key to open the run window; 2. Enter "excel/regserver" in the run window, and then press the Enter key; 3. Wait for a moment, and you will see a black box appear with the message "Registration Successful" displayed.
 How to fix Win10 activation error code '0xc0000022”?
Jan 12, 2024 pm 06:15 PM
How to fix Win10 activation error code '0xc0000022”?
Jan 12, 2024 pm 06:15 PM
The Win10 system provides more powerful and complete functions, coupled with its convenient operation methods, allowing more and more users to choose to install this operating system. However, many users have encountered many unknown errors during installation. In the end, A common problem is that Win10 activation fails and the error code "0xc0000022" is prompted. Below, the editor will bring you a graphic tutorial to solve the problem of activation failure and the error code "0xc0000022". Since Microsoft released win10, users have been looking forward to it. Therefore, many users have installed win10, and in order to be more perfect, activation is necessary. However, recently, some win10 users have failed to activate on their computers and prompted error code 0xc0000022. This is
 Activating PyCharm Professional Edition in one minute
Feb 22, 2024 pm 05:27 PM
Activating PyCharm Professional Edition in one minute
Feb 22, 2024 pm 05:27 PM
Since activating PyCharm Professional requires purchasing a license, the activation process does not take just one minute to complete. During the process of activating PyCharm Professional Edition, you usually need to use a license key and activation code. If you have a legitimate license key and activation code, you can activate PyCharm Professional Edition by following these steps: Open the PyCharm software and select "Help" - "Register" in the menu bar. In the pop-up dialog box, select "Licensese
 How to activate cad2020-cad2020 activation tutorial
Mar 04, 2024 pm 06:00 PM
How to activate cad2020-cad2020 activation tutorial
Mar 04, 2024 pm 06:00 PM
Many friends still don’t know how to activate cad2020, so the editor below explains the activation tutorial of cad2020. Friends in need should take a look at it. I believe it will be helpful to everyone. 1. Double-click the [CAD2020 icon] on the desktop to pop up the transplant custom settings. Click the [tick] icon. 2. You can click [Yes] or [No]. 3. When [AutoCAD-DWG Association] pops up, click the first one. 4. Select [Single User] and click [Enter Serial Number]. 5. Click [I agree]. 6. Click [Activate]. 7. Serial number: [666-69696969], enter product key: [001L1], click [Next]. 8. Check I have Aut
 How to upgrade win10 enterprise version 2016 long-term service version to professional version
Jan 03, 2024 pm 11:26 PM
How to upgrade win10 enterprise version 2016 long-term service version to professional version
Jan 03, 2024 pm 11:26 PM
When we no longer want to continue using the current Win10 Enterprise Edition 2016 Long-Term Service Edition, we can choose to switch to the Professional Edition. The method is also very simple. We only need to change some contents and install the system image. How to change win10 enterprise version 2016 long-term service version to professional version 1. Press win+R, and then enter "regedit" 2. Paste the following path directly in the address bar above: Computer\HKEY_LOCAL_MACHINE\SOFTWARE\Microsoft\WindowsNT\CurrentVersion3 , then find the EditionID and replace the content with "professional" to confirm
 How to activate Xiaomi Xiaoai
Mar 19, 2024 am 09:30 AM
How to activate Xiaomi Xiaoai
Mar 19, 2024 am 09:30 AM
Friends who are familiar with the MIUI system should know that it has many convenient operations, such as one-touch dialing on the desktop, three-finger slide down to take screenshots, etc. What I want to introduce to you today is the long press operation of MIUI14. For example, press and hold the application icon on the desktop to display the extended menu. Press and hold the power button on any interface to wake up Xiao Ai classmates. Long press can realize functions such as direct function and quick startup. . How to activate Xiaomi Xiaoai Classmate? In the phone settings, find and click "Xiaomi Xiaoai Classmate". Then enter the Xiaoai interface and click "Voice Assistant". Then on the voice assistant interface, click the button to the right of "Voice Wake" to turn it on.
 How to obtain Windows 10 activation key and precautions
Mar 27, 2024 pm 09:09 PM
How to obtain Windows 10 activation key and precautions
Mar 27, 2024 pm 09:09 PM
The Windows 10 activation key is a set of serial numbers that need to be entered when installing the Windows 10 operating system. It is used to verify the legitimacy of the system and unlock all functions in the operating system. For many users, activating Windows 10 systems may encounter some difficulties, so this article will introduce some methods and precautions for obtaining Windows 10 activation keys. How to get the Windows 10 activation key 1. Purchase the genuine key Purchase the genuine Windows 10 activation key
 PyCharm activation guide sharing: Make your programming more comfortable
Feb 21, 2024 pm 08:51 PM
PyCharm activation guide sharing: Make your programming more comfortable
Feb 21, 2024 pm 08:51 PM
PyCharm activation guide sharing: Make your programming more comfortable. For many Python developers, PyCharm is a commonly used integrated development environment (IDE) that provides powerful functions to facilitate writing, debugging, and managing Python code. However, many users may face problems activating PyCharm, especially for newbies. In this article, we will share the PyCharm activation strategy to help you enjoy programming more easily. Step 1: Download PyCharm first
