

vue study notes (1)--webpack study

Before learning vue, first learn the front-end packaging tool-webpack. This article shares the learning about webpack. Friends who are interested can take a look.
Recently, vue has been used in the project, and I have been hearing about its name for a long time. , but I know very little about it, so I took this opportunity to learn about vue.
Before learning vue, I first learned the front-end packaging tool-webpack, which is currently a very excellent and widely used packaging tool. Follow the official webpack tutorial to learn, but the official tutorial is currently based on webpack3, and the actual use is webpack4. There are some big differences at present, and I have also made some summaries. I will make a simple record here to facilitate future review and study.
一webpack concept
Webpack is a static compilation tool (pre-compilation) [static module bundle], which is different from seaJs and requireJS (online compilation), similar to the difference between javac and jit
Several concepts in webpack
Entry
output
loader
##webpack is used to process various files, loader can process and use All files introduced by import (theoretically). The loader needs to be configured in module.rules. It has two required attributes: test (which files to process) and use (which loader to use). If the configuration is wrong, webpack will report an error
- plugin
Separation of two environments
The webpack.DefinePlugin plug-in is used in webpack3 to achieve separation of different environments: development and production
new webpack.DefinePlugin({
    //许多 library 将通过与 process.env.NODE_ENV 环境变量关联,以决定 library 中应该引用哪些内容
     // 在webpack4中mode会自动设置该信息,废弃该配置
    "process.env.NODE_ENV": JSON.stringify("development")
})Using this method in webpack4 is no longer valid, and you need to use the newly provided mode to specify different environments.
Mode is divided into development and production, and one must be set, otherwise an error message will be reported.// 环境设置,webpack4必须有该值,使用该属性来设置不同的环境,目前有development和production两种,也可以使用:--mode development设置 // process.env.NODE_ENV会被该设置覆盖 mode:"development",
Three source map
Eval is used by default in webpack4, and the default settings can be changed by setting devtool: "inline-source-map". It is recommended to use "source-map" in the production environment
Four code separation
4.1 Separate CSS, etc.
Use the plugin extract-text-webpack-plugin to separate css and js separation. Official example:
https://doc.webpack-china.org...The specific settings are as follows:
// 将CSS分离 https://doc.webpack-china.org/plugins/extract-text-webpack-plugin
const ExtractTextPlugin = require("extract-text-webpack-plugin");
//使用extractTextPlugin就不能在单独使用style-loader
config.module:{
     rules:[
      {
        test:/\.css$/,
        use : ExtractTextPlugin.extract({
            fallback : "style-loader",
            //这样使用会出现url()解析路径错误的问题
            //use : "css-loader"
            //使用该方式解决url()路径问题
            use:[
                {
                    loader:"css-loader",
                    options:{
                        //用于解决url()路径解析错误
                        url:false,
                        minimize:true,
                        sourceMap:true
                    }
                }
                ]
            })
        },
    ]
}4.2 Split the public module
Since CommonChunkPlugin has been replaced by webpack4 Deprecated, webpack4 recommends using SplitChunkPlugin to extract public modules. Since the webpack official website (https://webpack.js.org)..., the online information introduction is not very detailed. Based on the online search results, the separation of public modules has finally been achieved, but there are still many questions that have not been resolved. Still need to find relevant information.
You can refer to the official example: https://github.com/webpack/we...The specific configuration is as follows:
There are two ways to use SplitChunkPlugin:
1. Optimization .splitChunksoptimization: {
//提取公共模块,webpack4去除了CommonsChunkPlugin,使用SplitChunksPlugin作为替代
//主要用于多页面
//例子代码 https://github.com/webpack/webpack/tree/master/examples/common-chunk-and-vendor-chunk
//SplitChunksPlugin配置,其中缓存组概念目前不是很清楚
splitChunks: {
// 表示显示块的范围,有三个可选值:initial(初始块)、async(按需加载块)、all(全部块),默认为all;
chunks: "all",
// 表示在压缩前的最小模块大小,默认为0;
minSize: 30000,
//表示被引用次数,默认为1
minChunks: 1,
//最大的按需(异步)加载次数,默认为1;
maxAsyncRequests: 3,
//最大的初始化加载次数,默认为1;
maxInitialRequests: 3,
// 拆分出来块的名字(Chunk Names),默认由块名和hash值自动生成;设置ture则使用默认值
name: true,
//缓存组,目前在项目中设置cacheGroup可以抽取公共模块,不设置则不会抽取
cacheGroups: {
//缓存组信息,名称可以自己定义
commons: {
//拆分出来块的名字,默认是缓存组名称+"~" + [name].js
name: "test",
// 同上
chunks: "all",
// 同上
minChunks: 3,
// 如果cacheGroup中没有设置minSize,则据此判断是否使用上层的minSize,true:则使用0,false:使用上层minSize
enforce: true,
//test: 缓存组的规则,表示符合条件的的放入当前缓存组,值可以是function、boolean、string、RegExp,默认为空;
test:""
},
//设置多个缓存规则
vendor: {
test: /node_modules/,
chunks: "all",
name: "vendor",
//表示缓存的优先级
priority: 10,
enforce: true
}
}
}
}
The specific configuration is the same as optimization.splitChunks
Five hot replacement
Use the following configuration to implement:
Use the following configuration in webpack3//查看要修补(patch)的依赖,被optimization.namedModules代替,development模式下默认开启,显示模块的相对路径 new webpack.NamedModulesPlugin(), // 热替换插件 new webpack.HotModuleReplacementPlugin(),
In webpack4, NamedModulesPlugin has been set as the default setting and will be automatically turned on in development mode. There is no need to configure this item
六treeshaking
webpack4 does not use Tree shaking in development mode and is only enabled in production mode. You can use uglifyjs-webpack-plugin to compress obfuscated code
7 Lazy loading
Use import() to introduce the required modules. This part is called in the method, not at the beginning of js.
It is recommended to use the lazy loading implementation that comes with vue, react and other frameworks
##
The above is the detailed content of vue study notes (1)--webpack study. For more information, please follow other related articles on the PHP Chinese website!

Hot AI Tools

Undresser.AI Undress
AI-powered app for creating realistic nude photos

AI Clothes Remover
Online AI tool for removing clothes from photos.

Undress AI Tool
Undress images for free

Clothoff.io
AI clothes remover

Video Face Swap
Swap faces in any video effortlessly with our completely free AI face swap tool!

Hot Article
Hot Tools

Notepad++7.3.1
Easy-to-use and free code editor

SublimeText3 Chinese version
Chinese version, very easy to use

Zend Studio 13.0.1
Powerful PHP integrated development environment

Dreamweaver CS6
Visual web development tools

SublimeText3 Mac version
God-level code editing software (SublimeText3)
Hot Topics
 1666
1666
 14
1425
52
1327
25
1273
29
1252
24
14
1425
52
1327
25
1273
29
1252
24

 How to delete Xiaohongshu notes
Mar 21, 2024 pm 08:12 PM
How to delete Xiaohongshu notes
Mar 21, 2024 pm 08:12 PM
How to delete Xiaohongshu notes? Notes can be edited in the Xiaohongshu APP. Most users don’t know how to delete Xiaohongshu notes. Next, the editor brings users pictures and texts on how to delete Xiaohongshu notes. Tutorial, interested users come and take a look! Xiaohongshu usage tutorial How to delete Xiaohongshu notes 1. First open the Xiaohongshu APP and enter the main page, select [Me] in the lower right corner to enter the special area; 2. Then in the My area, click on the note page shown in the picture below , select the note you want to delete; 3. Enter the note page, click [three dots] in the upper right corner; 4. Finally, the function bar will expand at the bottom, click [Delete] to complete.
 Can deleted notes on Xiaohongshu be recovered?
Oct 31, 2023 pm 05:36 PM
Can deleted notes on Xiaohongshu be recovered?
Oct 31, 2023 pm 05:36 PM
Notes deleted from Xiaohongshu cannot be recovered. As a knowledge sharing and shopping platform, Xiaohongshu provides users with the function of recording notes and collecting useful information. According to Xiaohongshu’s official statement, deleted notes cannot be recovered. The Xiaohongshu platform does not provide a dedicated note recovery function. This means that once a note is deleted in Xiaohongshu, whether it is accidentally deleted or for other reasons, it is generally impossible to retrieve the deleted content from the platform. If you encounter special circumstances, you can try to contact Xiaohongshu’s customer service team to see if they can help solve the problem.
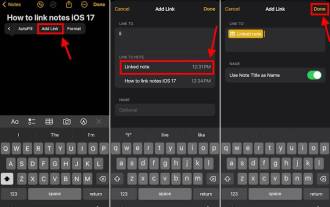 How to connect Apple Notes on iPhone in the latest iOS 17 system
Sep 22, 2023 pm 05:01 PM
How to connect Apple Notes on iPhone in the latest iOS 17 system
Sep 22, 2023 pm 05:01 PM
Link AppleNotes on iPhone using the Add Link feature. Notes: You can only create links between Apple Notes on iPhone if you have iOS17 installed. Open the Notes app on your iPhone. Now, open the note where you want to add the link. You can also choose to create a new note. Click anywhere on the screen. This will show you a menu. Click the arrow on the right to see the "Add link" option. click it. Now you can type the name of the note or the web page URL. Then, click Done in the upper right corner and the added link will appear in the note. If you want to add a link to a word, just double-click the word to select it, select "Add Link" and press
 What should I do if the notes I posted on Xiaohongshu are missing? What's the reason why the notes it just sent can't be found?
Mar 21, 2024 pm 09:30 PM
What should I do if the notes I posted on Xiaohongshu are missing? What's the reason why the notes it just sent can't be found?
Mar 21, 2024 pm 09:30 PM
As a Xiaohongshu user, we have all encountered the situation where published notes suddenly disappeared, which is undoubtedly confusing and worrying. In this case, what should we do? This article will focus on the topic of "What to do if the notes published by Xiaohongshu are missing" and give you a detailed answer. 1. What should I do if the notes published by Xiaohongshu are missing? First, don't panic. If you find that your notes are missing, staying calm is key and don't panic. This may be caused by platform system failure or operational errors. Checking release records is easy. Just open the Xiaohongshu App and click "Me" → "Publish" → "All Publications" to view your own publishing records. Here you can easily find previously published notes. 3.Repost. If found
 How to add product links in notes in Xiaohongshu Tutorial on adding product links in notes in Xiaohongshu
Mar 12, 2024 am 10:40 AM
How to add product links in notes in Xiaohongshu Tutorial on adding product links in notes in Xiaohongshu
Mar 12, 2024 am 10:40 AM
How to add product links in notes in Xiaohongshu? In the Xiaohongshu app, users can not only browse various contents but also shop, so there is a lot of content about shopping recommendations and good product sharing in this app. If If you are an expert on this app, you can also share some shopping experiences, find merchants for cooperation, add links in notes, etc. Many people are willing to use this app for shopping, because it is not only convenient, but also has many Experts will make some recommendations. You can browse interesting content and see if there are any clothing products that suit you. Let’s take a look at how to add product links to notes! How to add product links to Xiaohongshu Notes Open the app on the desktop of your mobile phone. Click on the app homepage
 How to use Nginx web server caddy
May 30, 2023 pm 12:19 PM
How to use Nginx web server caddy
May 30, 2023 pm 12:19 PM
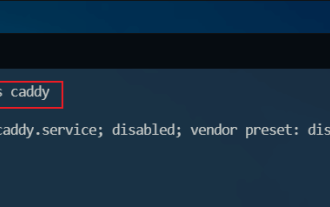
Introduction to Caddy Caddy is a powerful and highly scalable web server that currently has 38K+ stars on Github. Caddy is written in Go language and can be used for static resource hosting and reverse proxy. Caddy has the following main features: Compared with the complex configuration of Nginx, its original Caddyfile configuration is very simple; it can dynamically modify the configuration through the AdminAPI it provides; it supports automated HTTPS configuration by default, and can automatically apply for HTTPS certificates and configure it; it can be expanded to data Tens of thousands of sites; can be executed anywhere with no additional dependencies; written in Go language, memory safety is more guaranteed. First of all, we install it directly in CentO
 Real-time protection against face-blocking barrages on the web (based on machine learning)
Jun 10, 2023 pm 01:03 PM
Real-time protection against face-blocking barrages on the web (based on machine learning)
Jun 10, 2023 pm 01:03 PM
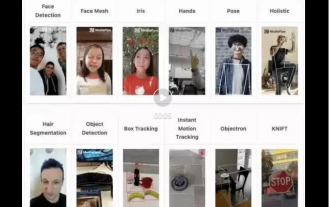
Face-blocking barrage means that a large number of barrages float by without blocking the person in the video, making it look like they are floating from behind the person. Machine learning has been popular for several years, but many people don’t know that these capabilities can also be run in browsers. This article introduces the practical optimization process in video barrages. At the end of the article, it lists some applicable scenarios for this solution, hoping to open it up. Some ideas. mediapipeDemo (https://google.github.io/mediapipe/) demonstrates the mainstream implementation principle of face-blocking barrage on-demand up upload. The server background calculation extracts the portrait area in the video screen, and converts it into svg storage while the client plays the video. Download svg from the server and combine it with barrage, portrait
 Using Jetty7 for Web server processing in Java API development
Jun 18, 2023 am 10:42 AM
Using Jetty7 for Web server processing in Java API development
Jun 18, 2023 am 10:42 AM
Using Jetty7 for Web Server Processing in JavaAPI Development With the development of the Internet, the Web server has become the core part of application development and is also the focus of many enterprises. In order to meet the growing business needs, many developers choose to use Jetty for web server development, and its flexibility and scalability are widely recognized. This article will introduce how to use Jetty7 in JavaAPI development for We
