

How Web Technology Realizes Mobile Monitoring

This article mainly introduces how Web technology can realize motion monitoring, motion detection, also generally called motion detection, which is often used for unattended surveillance video and automatic alarm. The images collected by the camera at different frame rates will be calculated and compared by the CPU according to a certain algorithm. When the picture changes, such as someone walking by and the lens is moved, the number obtained from the calculation and comparison results will exceed the threshold and indicate that the system can Automatically make corresponding processing
Introduction to Web technology for mobile monitoring
It can be concluded from the above quotation that "mobile monitoring" requires the following elements:
A computer with a camera is used to determine the movement algorithm and post-movement processing
Note: All cases involved in this article are based on PC/Mac’s newer versions of Chrome/Firefox browsers. Some cases require Completed with the camera, all screenshots are saved locally.
The other party doesn’t want to talk to you and throws you a link:
 ##Comprehensive Case
 Pixel difference
Video source
Does not rely on Flash or Silverlight, we use the navigator.getUserMedia() API in WebRTC (Web Real-Time Communications), which allows Web applications Get the user's camera and microphone streams. The sample code is as follows:<!-- 若不加 autoplay,则会停留在第一帧 -->
<video id="video" autoplay></video>
// 具体参数含义可看相关文档。
const constraints = {
audio: false,
video: {
width: 640,
height: 480
}
}
navigator.mediaDevices.getUserMedia(constraints)
.then(stream => {
// 将视频源展示在 video 中
video.srcObject = stream
})
.catch(err => {
console.log(err)
})Pixel processing
After getting the video source, we have the material to determine whether the object is moving. Of course, no advanced recognition algorithm is used here. It just uses the pixel difference between two consecutive screenshots to determine whether the object has moved (strictly speaking, it is a change in the picture).Screenshots
Sample code to get screenshots of video source:##
const video = document.getElementById('video')
const canvas = document.createElement('canvas')
const ctx = canvas.getContext('2d')
canvas.width = 640
canvas.height = 480
// 获取视频中的一帧
function capture () {
 ctx.drawImage(video, 0, 0, canvas.width, canvas.height)
 // ...其它操作
}Get the difference between screenshots
Regarding the pixel difference between the two images, the "pixel detection" collision algorithm mentioned in this blog post ""Wait a minute, let me touch!" - Common 2D Collision Detection" of the Alkaline Lab is One of the solutions. This algorithm determines whether there is a collision by traversing whether the transparency of pixels at the same position of two off-screen canvases is greater than 0 at the same time. Of course, here we need to change it to "whether the pixels at the same position are different (or the difference is less than a certain threshold)" to determine whether it is moved or not.
But the above method is a little troublesome and inefficient. Here we use
ctx.globalCompositeOperation = 'difference' to specify the new elements of the canvas (i.e. the second screenshot and the first screenshot) Synthesis method to get the difference between the two screenshots. Experience link>>
Sample code:
function diffTwoImage () {
 // 设置新增元素的合成方式
 ctx.globalCompositeOperation = 'difference'

 // 清除画布
 ctx.clearRect(0, 0, canvas.width, canvas.height)

 // 假设两张图像尺寸相等
 ctx.drawImage(firstImg, 0, 0)
 ctx.drawImage(secondImg, 0, 0)
}The difference between the two pictures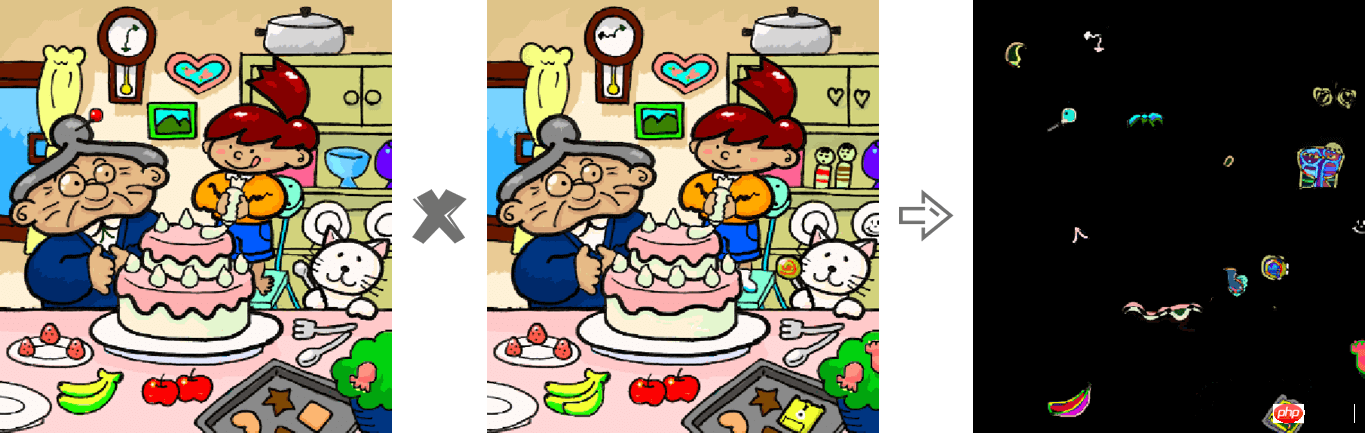
After experiencing the above case, do you have the feeling of playing the "QQ game "Let's Find Difference"" back then. In addition, this case may also be applicable to the following two situations:
- When you don’t know the difference between the two design drafts the designer gave you before and after
- When you want to see the difference in the rendering of the same web page by two browsers, when it is an "action"
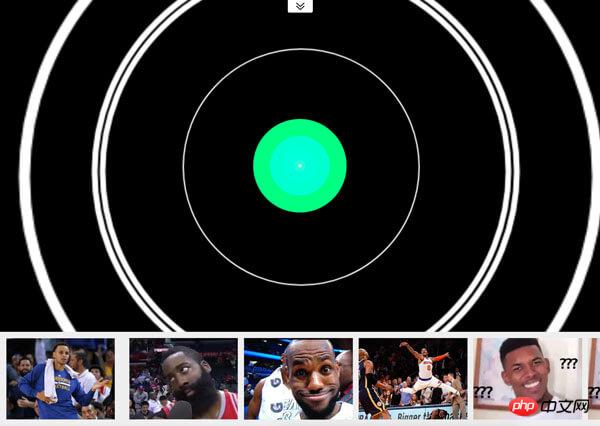
- From the above case of "difference between two images" Obtained from the center: black means that the pixel at that position has not changed, and the brighter the pixel, the greater the "movement" at that point. Therefore, when there are bright pixels after combining two consecutive screenshots, it is the generation of an "action". But in order to make the program less "sensitive", we can set a threshold. When the number of bright pixels is greater than the threshold, an "action" is considered to have occurred. Of course, we can also eliminate "not bright enough" pixels to avoid the influence of external environments (such as lights, etc.) as much as possible.
想要获取 Canvas 的像素信息,需要通过 ctx.getImageData(sx, sy, sw, sh),该 API 会返回你所指定画布区域的像素对象。该对象包含 data、width、height。其中 data 是一个含有每个像素点 RGBA 信息的一维数组,如下图所示。
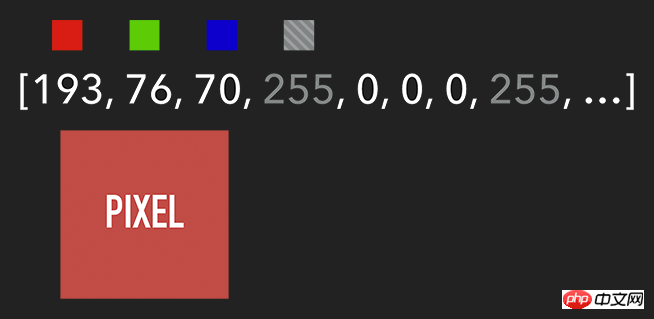
含有 RGBA 信息的一维数组
获取到特定区域的像素后,我们就能对每个像素进行处理(如各种滤镜效果)。处理完后,则可通过 ctx.putImageData() 将其渲染在指定的 Canvas 上。
扩展:由于 Canvas 目前没有提供“历史记录”的功能,如需实现“返回上一步”操作,则可通过 getImageData 保存上一步操作,当需要时则可通过 putImageData 进行复原。
示例代码:
let imageScore = 0
const rgba = imageData.data
for (let i = 0; i < rgba.length; i += 4) {
 const r = rgba[i] / 3
 const g = rgba[i + 1] / 3
 const b = rgba[i + 2] / 3

 const pixelScore = r + g + b

 // 如果该像素足够明亮
 if (pixelScore >= PIXEL_SCORE_THRESHOLD) {
 imageScore++
 }
}
// 如果明亮的像素数量满足一定条件
if (imageScore >= IMAGE_SCORE_THRESHOLD) {
 // 产生了移动
}在上述案例中,你也许会注意到画面是『绿色』的。其实,我们只需将每个像素的红和蓝设置为 0,即将 RGBA 的 r = 0; b = 0 即可。这样就会像电影的某些镜头一样,增加了科技感和神秘感。
体验地址>>
const rgba = imageData.data
for (let i = 0; i < rgba.length; i += 4) {
 rgba[i] = 0 // red
 rgba[i + 2] = 0 // blue
}
ctx.putImageData(imageData, 0, 0)
将 RGBA 中的 R 和 B 置为 0
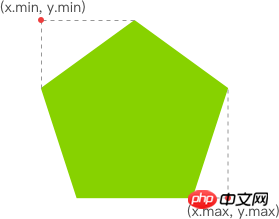
跟踪“移动物体”
有了明亮的像素后,我们就要找出其 x 坐标的最小值与 y 坐标的最小值,以表示跟踪矩形的左上角。同理,x 坐标的最大值与 y 坐标的最大值则表示跟踪矩形的右下角。至此,我们就能绘制出一个能包围所有明亮像素的矩形,从而实现跟踪移动物体的效果。
How Web Technology Realizes Mobile Monitoring
体验链接>>
示例代码:
function processDiff (imageData) {
 const rgba = imageData.data

 let score = 0
 let pixelScore = 0
 let motionBox = 0

 // 遍历整个 canvas 的像素,以找出明亮的点
 for (let i = 0; i < rgba.length; i += 4) {
 pixelScore = (rgba[i] + rgba[i+1] + rgba[i+2]) / 3

 // 若该像素足够明亮
 if (pixelScore >= 80) {
 score++

 coord = calcCoord(i)
 motionBox = calcMotionBox(montionBox, coord.x, coord.y)
 }
 }

 return {
 score,
 motionBox
 }
}
// 得到左上角和右下角两个坐标值
function calcMotionBox (curMotionBox, x, y) {
 const motionBox = curMotionBox || {
 x: { min: coord.x, max: x },
 y: { min: coord.y, max: y }
 }
 motionBox.x.min = Math.min(motionBox.x.min, x)
 motionBox.x.max = Math.max(motionBox.x.max, x)
 motionBox.y.min = Math.min(motionBox.y.min, y)
 motionBox.y.max = Math.max(motionBox.y.max, y)
 return motionBox
}
// imageData.data 是一个含有每个像素点 rgba 信息的一维数组。
// 该函数是将上述一维数组的任意下标转为 (x,y) 二维坐标。
function calcCoord(i) {
 return {
 x: (i / 4) % diffWidth,
 y: Math.floor((i / 4) / diffWidth)
 }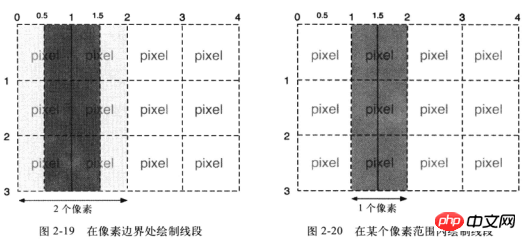
}在得到跟踪矩形的左上角和右下角的坐标值后,通过 ctx.strokeRect(x, y, width, height) API 绘制出矩形即可。
ctx.lineWidth = 6
ctx.strokeRect(
 diff.motionBox.x.min + 0.5,
 diff.motionBox.y.min + 0.5,
 diff.motionBox.x.max - diff.motionBox.x.min,
 diff.motionBox.y.max - diff.motionBox.y.min
)

这是理想效果,实际效果请打开 体验链接
扩展:为什么上述绘制矩形的代码中的
x、y要加0.5呢?一图胜千言:
性能缩小尺寸
在上一个章节提到,我们需要通过对 Canvas 每个像素进行处理,假设 Canvas 的宽为 640,高为 480,那么就需要遍历 640 * 480 = 307200 个像素。而在监测效果可接受的前提下,我们可以将需要进行像素处理的 Canvas 缩小尺寸,如缩小 10 倍。这样需要遍历的像素数量就降低 100 倍,从而提升性能。
体验地址>>
示例代码:
const motionCanvas // 展示给用户看
const backgroundCanvas // offscreen canvas 背后处理数据
motionCanvas.width = 640
motionCanvas.height = 480
backgroundCanvas.width = 64
backgroundCanvas.height = 48

尺寸缩小 10 倍
定时器
我们都知道,当游戏以『每秒60帧』运行时才能保证一定的体验。但对于我们目前的案例来说,帧率并不是我们追求的第一位。因此,每 100 毫秒(具体数值取决于实际情况)取当前帧与前一帧进行比较即可。
另外,因为我们的动作一般具有连贯性,所以可取该连贯动作中幅度最大的(即“分数”最高)或最后一帧动作进行处理即可(如存储到本地或分享到朋友圈)。
延伸
至此,用 Web 技术实现简易的“移动监测”效果已基本讲述完毕。由于算法、设备等因素的限制,该效果只能以 2D 画面为基础来判断物体是否发生“移动”。而微软的 Xbox、索尼的 PS、任天堂的 Wii 等游戏设备上的体感游戏则依赖于硬件。以微软的 Kinect 为例,它为开发者提供了可跟踪最多六个完整骨骼和每人 25 个关节等强大功能。利用这些详细的人体参数,我们就能实现各种隔空的『手势操作』,如画圈圈诅咒某人。
下面几个是通过 Web 使用 Kinect 的库:
DepthJS:以浏览器插件形式提供数据访问。
Node-Kinect2: 以 Nodejs 搭建服务器端,提供数据比较完整,实例较多。
ZigFu: Supports H5, U3D, and Flash, and has a relatively complete API.
Kinect-HTML5: Kinect-HTML5 uses C# to build a server and provide color data, depth data and bone data.
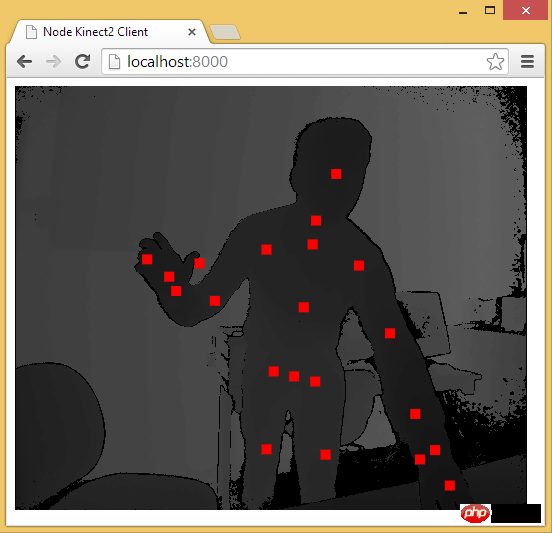
Get skeleton data through Node-Kinect2
Related recommendations:
ajax operation global monitoring ,Solution to user session failure
10 content recommendations for time monitoring category
php Timer page running time monitoring category
The above is the detailed content of How Web Technology Realizes Mobile Monitoring. For more information, please follow other related articles on the PHP Chinese website!

Hot AI Tools

Undresser.AI Undress
AI-powered app for creating realistic nude photos

AI Clothes Remover
Online AI tool for removing clothes from photos.

Undress AI Tool
Undress images for free

Clothoff.io
AI clothes remover

Video Face Swap
Swap faces in any video effortlessly with our completely free AI face swap tool!

Hot Article
Hot Tools

Notepad++7.3.1
Easy-to-use and free code editor

SublimeText3 Chinese version
Chinese version, very easy to use

Zend Studio 13.0.1
Powerful PHP integrated development environment

Dreamweaver CS6
Visual web development tools

SublimeText3 Mac version
God-level code editing software (SublimeText3)
Hot Topics


 Can the appdata folder be moved to the D drive?
Feb 18, 2024 pm 01:20 PM
Can the appdata folder be moved to the D drive?
Feb 18, 2024 pm 01:20 PM
Can the appdata folder be moved to the D drive? With the increasing popularity of computer use, more and more users' personal data and applications are stored on the computer. In Windows operating system, there is a specific folder called appdata folder, which is used to store user's application data. Many users wonder whether this folder can be moved to the D drive or other disks for data management and security considerations. In this article, we will discuss this problem and provide some solutions. First, let me
 6000 mAh silicon negative battery! Xiaomi 15Pro upgrade leaked again
Jul 24, 2024 pm 12:45 PM
6000 mAh silicon negative battery! Xiaomi 15Pro upgrade leaked again
Jul 24, 2024 pm 12:45 PM
According to news on July 23, blogger Digital Chat Station broke the news that the battery capacity of Xiaomi 15 Pro has been increased to 6000mAh and supports 90W wired flash charging. This will be the Pro model with the largest battery in Xiaomi’s digital series. Digital Chat Station previously revealed that the battery of Xiaomi 15Pro has ultra-high energy density and the silicon content is much higher than that of competing products. After silicon-based batteries are tested on a large scale in 2023, second-generation silicon anode batteries have been identified as the future development direction of the industry. This year will usher in the peak of direct competition. 1. The theoretical gram capacity of silicon can reach 4200mAh/g, which is more than 10 times the gram capacity of graphite (the theoretical gram capacity of graphite is 372mAh/g). For the negative electrode, the capacity when the lithium ion insertion amount reaches the maximum is the theoretical gram capacity, which means that under the same weight
 Stop or allow this PC to access your mobile device on Windows 11
Feb 19, 2024 am 11:45 AM
Stop or allow this PC to access your mobile device on Windows 11
Feb 19, 2024 am 11:45 AM
Microsoft changed the name of PhoneLink to MobileDevice in the latest Windows 11 version. This change allows users to control computer access to mobile devices through prompts. This article explains how to manage settings on your computer that allow or deny access from mobile devices. This feature allows you to configure your mobile device and connect it to your computer to send and receive text messages, control mobile applications, view contacts, make phone calls, view galleries, and more. Is it a good idea to connect your phone to your PC? Connecting your phone to your Windows PC is a convenient option, making it easy to transfer functions and media. This is useful for those who need to use their computer when their mobile device is unavailable
 The new king of domestic FPS! 'Operation Delta' Battlefield Exceeds Expectations
Mar 07, 2024 am 09:37 AM
The new king of domestic FPS! 'Operation Delta' Battlefield Exceeds Expectations
Mar 07, 2024 am 09:37 AM
"Operation Delta" will launch a large-scale PC test called "Codename: ZERO" today (March 7). Last weekend, this game held an offline flash mob experience event in Shanghai, and 17173 was also fortunate to be invited to participate. This test is only more than four months away from the last time, which makes us curious, what new highlights and surprises will "Operation Delta" bring in such a short period of time? More than four months ago, I experienced "Operation Delta" in an offline tasting session and the first beta version. At that time, the game only opened the "Dangerous Action" mode. However, Operation Delta was already impressive for its time. In the context of major manufacturers flocking to the mobile game market, such an FPS that is comparable to international standards
 How to implement form validation for web applications using Golang
Jun 24, 2023 am 09:08 AM
How to implement form validation for web applications using Golang
Jun 24, 2023 am 09:08 AM
Form validation is a very important link in web application development. It can check the validity of the data before submitting the form data to avoid security vulnerabilities and data errors in the application. Form validation for web applications can be easily implemented using Golang. This article will introduce how to use Golang to implement form validation for web applications. 1. Basic elements of form validation Before introducing how to implement form validation, we need to know what the basic elements of form validation are. Form elements: form elements are
 What are web standards?
Oct 18, 2023 pm 05:24 PM
What are web standards?
Oct 18, 2023 pm 05:24 PM
Web standards are a set of specifications and guidelines developed by W3C and other related organizations. It includes standardization of HTML, CSS, JavaScript, DOM, Web accessibility and performance optimization. By following these standards, the compatibility of pages can be improved. , accessibility, maintainability and performance. The goal of web standards is to enable web content to be displayed and interacted consistently on different platforms, browsers and devices, providing better user experience and development efficiency.
 How to check the temperature of your CPU
Feb 18, 2024 am 10:46 AM
How to check the temperature of your CPU
Feb 18, 2024 am 10:46 AM
CPU temperature refers to the operating temperature of the computer's central processing unit (CPU). Normal CPU temperature is one of the important factors to ensure the normal operation of the computer. This article will introduce how to check the CPU temperature and related common problems and solutions. In most computer systems, the CPU temperature can be viewed through software tools or BIOS settings. First, let's look at ways to use software tools to check your CPU temperature. There are many specialized software to choose from, such as SpeedFan, HWMonitor, Cor
 How to enable administrative access from the cockpit web UI
Mar 20, 2024 pm 06:56 PM
How to enable administrative access from the cockpit web UI
Mar 20, 2024 pm 06:56 PM
Cockpit is a web-based graphical interface for Linux servers. It is mainly intended to make managing Linux servers easier for new/expert users. In this article, we will discuss Cockpit access modes and how to switch administrative access to Cockpit from CockpitWebUI. Content Topics: Cockpit Entry Modes Finding the Current Cockpit Access Mode Enable Administrative Access for Cockpit from CockpitWebUI Disabling Administrative Access for Cockpit from CockpitWebUI Conclusion Cockpit Entry Modes The cockpit has two access modes: Restricted Access: This is the default for the cockpit access mode. In this access mode you cannot access the web user from the cockpit
