
 Web Front-end
JS Tutorial
Detailed explanation of using eventbus to pass values between Vue components
Web Front-end
JS Tutorial
Detailed explanation of using eventbus to pass values between Vue components
Detailed explanation of using eventbus to pass values between Vue components

This article mainly introduces the use of eventbus to transfer values between vue components. The editor thinks it’s pretty good, so I’d like to share it with you now and give it as a reference. Let’s follow the editor to take a look, I hope it can help everyone.
For us on the front end, writing the interface is not the biggest problem. In many cases, what we need to focus on is data, such as data transfer on js pages, etc., learn vue We also need to know how to use data
Of course, it is also possible to use storage, but it does not have to be cached. Of course, it is recommended in vue that we use vuex for data interaction. Vuex will make your Vue code Flexible and controllable enough, the data is stored in the state in a unified manner, and mutations modifications are only allowed to be triggered through Actions. However, sometimes our projects are not complex enough to require Vuex. , (We will not discuss the abolished vm.$dispatch) In many cases we need to capture an event. At this time we can use vue's eventbus
The method of using eventbus is very simple , we need to do three steps. The first step, we need to create a container to act as our eventbus
The second step, we need to throw, or submit our event
The third step is to listen to our event (maybe this is the second part)
First, we need to define our eventbus globally
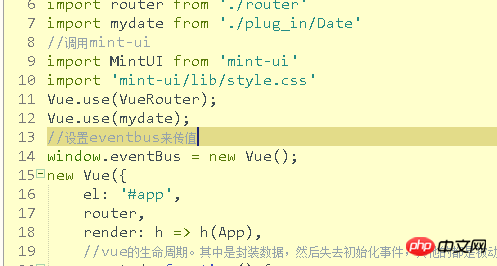
Here we define eventbus. This simply completes our first step. Of course, global variables, I think you should know where they are defined.
Then let’s throw this event first and use ¥. emit to "submit"
, this is understandable. Next, we go through the third step to monitor
certainly. It's already monitored here. Click events are just a burden,
Next we have to use them in the interface
First, pour in the files we need:
Here I am using two files: transimissionone and transimissiontwo'
Then the definition
Then is the use

Finally run our project and check the effect
This is mainly for everyone to use, so the code is captive Below, mainly four files
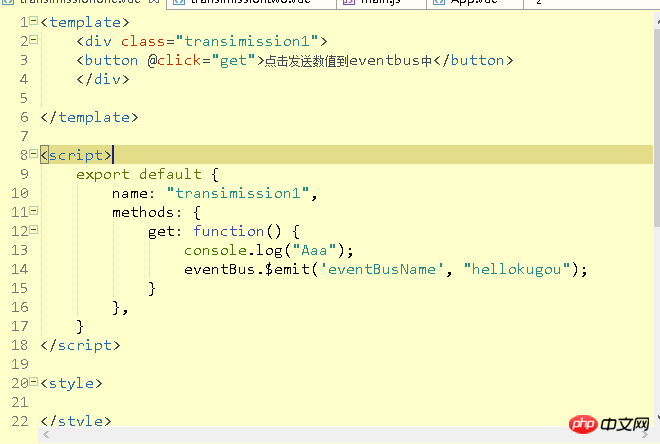
transimissionone. vue (the file that sends the event)
<template>
<p class="transimission1">
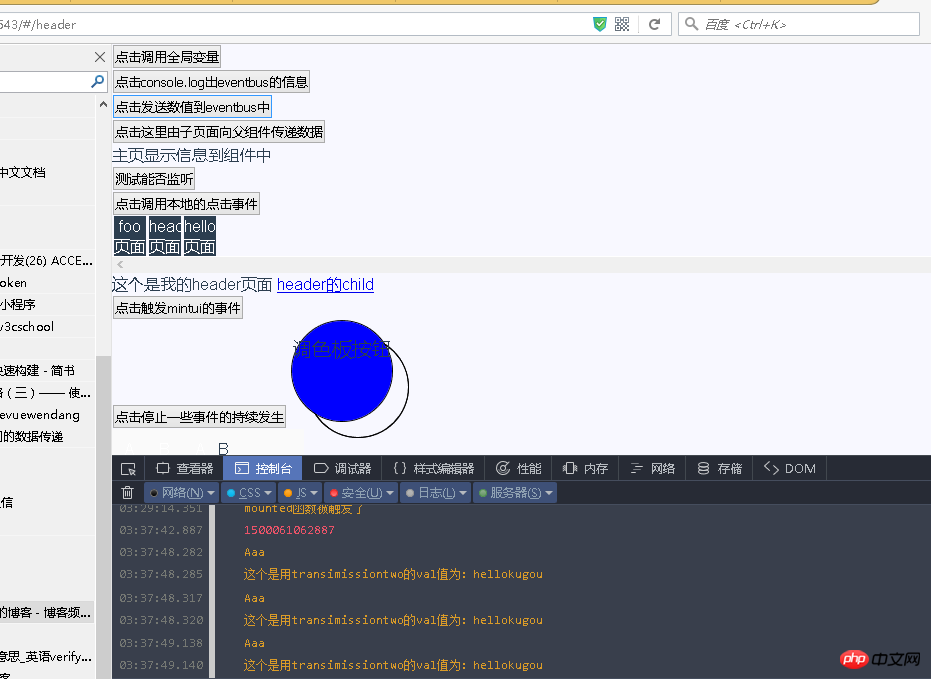
<button @click="get">点击发送数值到eventbus中</button>
</p>
</template>
<script>
export default {
name: "transimission1",
methods: {
get: function() {
console.log("Aaa");
eventBus.$emit('eventBusName', "hellokugou");
}
},
}
</script>
<style>
</style>Followed by transittwo (listener)
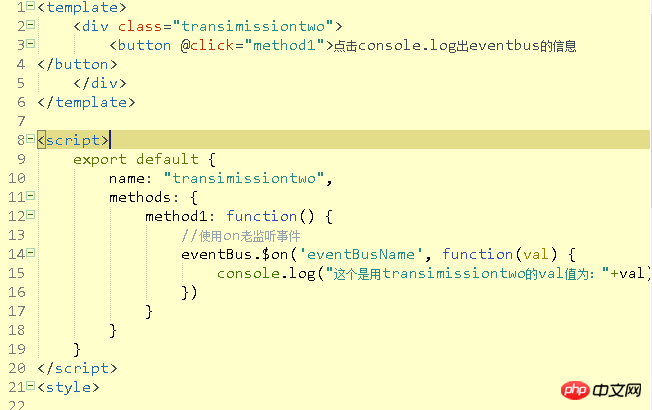
<template>
<p class="transimissiontwo">
<button @click="method1">点击console.log出eventbus的信息
</button>
</p>
</template>
<script>
export default {
name: "transimissiontwo",
methods: {
method1: function() {
//使用on老监听事件
eventBus.$on('eventBusName', function(val) {
console.log("这个是用transimissiontwo的val值为:"+val)
})
}
}
}
</script>
<style>
</style>Then It's our hub. app. When using
<template>
<p id="app">
<click></click>
<transimissiontwo></transimissiontwo>
<transimissionone></transimissionone>
<sendparent @listenertochildevent="getmessagefromchild"></sendparent>
<value :locallogo="netlogo"></value>
<!--无法监听,说明要在那个组件中-->
<button @listenertochildevent="getmessagefromchild">测试能否监听</button>
<my_plug_in></my_plug_in>
<p class="choose_p">
<ul>
<li>
<router-link to="/foo">foo页面</router-link>
</li>
<li>
<router-link to="/header">header页面</router-link>
</li>
<li>
<router-link to="/hello">hello页面</router-link>
</li>
<li style="clear: both;list-style: none;"></li>
</ul>
</p>
<p class="main">
<router-view class="my_router_iew"></router-view>
</p>
<testmintui></testmintui>
</p>
</template>
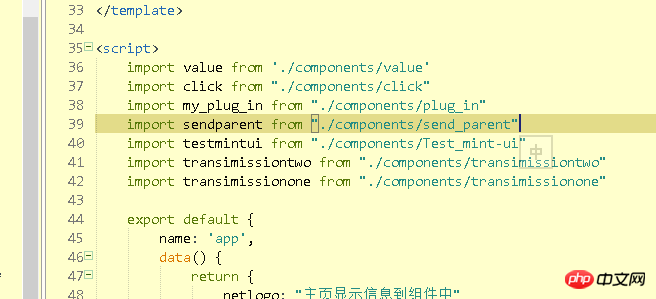
<script>
import value from './components/value'
import click from "./components/click"
import my_plug_in from "./components/plug_in"
import sendparent from "./components/send_parent"
import testmintui from "./components/Test_mint-ui"
import transimissiontwo from "./components/transimissiontwo"
import transimissionone from "./components/transimissionone"
export default {
name: 'app',
data() {
return {
netlogo: "主页显示信息到组件中"
}
},
components: {
value,
click,
my_plug_in,
sendparent,
testmintui,
transimissionone,
transimissiontwo,
},
methods: {
getmessagefromchild: function(data) {
console.log(data);
}
}
}
</script>
<style>
body {
background-color: #f8f8ff;
font-family: 'Avenir', Helvetica, Arial, sans-serif;
color: #2c3e50;
}
ul {
width: 12rem;
}
ul li {
list-style: none;
}
ul li:not(:last-child) {
list-style: none;
width: 2rem;
margin-left: 0.1rem;
margin-right: 0.1rem;
float: left;
text-align: center;
background: #2C3E50;
color: white;
}
ul li a {
text-decoration: none;
font-size: 16px;
color: white;
line-height: 1rem;
text-align: center;
}
ul li:nth-child {
list-style: none;
clear: both;
}
.choose_p {
width: 100%;
overflow: scroll;
}
</style>in vue, please ignore the useless code. The next step is to define the eventbus
window.eventBus = new Vue();
That’s it, it’s very simple. Of course, you can use prop for levels, which I’ll talk about next time.
Related recommendations:
How to solve the problem of eventbus being triggered multiple times in vue
detailed explanation of guava eventbus instance code
Sharing the simple implementation method of page reverse transmission value in vue
The above is the detailed content of Detailed explanation of using eventbus to pass values between Vue components. For more information, please follow other related articles on the PHP Chinese website!

Hot AI Tools

Undresser.AI Undress
AI-powered app for creating realistic nude photos

AI Clothes Remover
Online AI tool for removing clothes from photos.

Undress AI Tool
Undress images for free

Clothoff.io
AI clothes remover

Video Face Swap
Swap faces in any video effortlessly with our completely free AI face swap tool!

Hot Article
Hot Tools

Notepad++7.3.1
Easy-to-use and free code editor

SublimeText3 Chinese version
Chinese version, very easy to use

Zend Studio 13.0.1
Powerful PHP integrated development environment

Dreamweaver CS6
Visual web development tools

SublimeText3 Mac version
God-level code editing software (SublimeText3)
Hot Topics


 What software is crystaldiskmark? -How to use crystaldiskmark?
Mar 18, 2024 pm 02:58 PM
What software is crystaldiskmark? -How to use crystaldiskmark?
Mar 18, 2024 pm 02:58 PM
CrystalDiskMark is a small HDD benchmark tool for hard drives that quickly measures sequential and random read/write speeds. Next, let the editor introduce CrystalDiskMark to you and how to use crystaldiskmark~ 1. Introduction to CrystalDiskMark CrystalDiskMark is a widely used disk performance testing tool used to evaluate the read and write speed and performance of mechanical hard drives and solid-state drives (SSD). Random I/O performance. It is a free Windows application and provides a user-friendly interface and various test modes to evaluate different aspects of hard drive performance and is widely used in hardware reviews
 How to download foobar2000? -How to use foobar2000
Mar 18, 2024 am 10:58 AM
How to download foobar2000? -How to use foobar2000
Mar 18, 2024 am 10:58 AM
foobar2000 is a software that can listen to music resources at any time. It brings you all kinds of music with lossless sound quality. The enhanced version of the music player allows you to get a more comprehensive and comfortable music experience. Its design concept is to play the advanced audio on the computer The device is transplanted to mobile phones to provide a more convenient and efficient music playback experience. The interface design is simple, clear and easy to use. It adopts a minimalist design style without too many decorations and cumbersome operations to get started quickly. It also supports a variety of skins and Theme, personalize settings according to your own preferences, and create an exclusive music player that supports the playback of multiple audio formats. It also supports the audio gain function to adjust the volume according to your own hearing conditions to avoid hearing damage caused by excessive volume. Next, let me help you
 BTCC tutorial: How to bind and use MetaMask wallet on BTCC exchange?
Apr 26, 2024 am 09:40 AM
BTCC tutorial: How to bind and use MetaMask wallet on BTCC exchange?
Apr 26, 2024 am 09:40 AM
MetaMask (also called Little Fox Wallet in Chinese) is a free and well-received encryption wallet software. Currently, BTCC supports binding to the MetaMask wallet. After binding, you can use the MetaMask wallet to quickly log in, store value, buy coins, etc., and you can also get 20 USDT trial bonus for the first time binding. In the BTCCMetaMask wallet tutorial, we will introduce in detail how to register and use MetaMask, and how to bind and use the Little Fox wallet in BTCC. What is MetaMask wallet? With over 30 million users, MetaMask Little Fox Wallet is one of the most popular cryptocurrency wallets today. It is free to use and can be installed on the network as an extension
 How to use NetEase Mailbox Master
Mar 27, 2024 pm 05:32 PM
How to use NetEase Mailbox Master
Mar 27, 2024 pm 05:32 PM
NetEase Mailbox, as an email address widely used by Chinese netizens, has always won the trust of users with its stable and efficient services. NetEase Mailbox Master is an email software specially created for mobile phone users. It greatly simplifies the process of sending and receiving emails and makes our email processing more convenient. So how to use NetEase Mailbox Master, and what specific functions it has. Below, the editor of this site will give you a detailed introduction, hoping to help you! First, you can search and download the NetEase Mailbox Master app in the mobile app store. Search for "NetEase Mailbox Master" in App Store or Baidu Mobile Assistant, and then follow the prompts to install it. After the download and installation is completed, we open the NetEase email account and log in. The login interface is as shown below
 How to use Baidu Netdisk app
Mar 27, 2024 pm 06:46 PM
How to use Baidu Netdisk app
Mar 27, 2024 pm 06:46 PM
Cloud storage has become an indispensable part of our daily life and work nowadays. As one of the leading cloud storage services in China, Baidu Netdisk has won the favor of a large number of users with its powerful storage functions, efficient transmission speed and convenient operation experience. And whether you want to back up important files, share information, watch videos online, or listen to music, Baidu Cloud Disk can meet your needs. However, many users may not understand the specific use method of Baidu Netdisk app, so this tutorial will introduce in detail how to use Baidu Netdisk app. Users who are still confused can follow this article to learn more. ! How to use Baidu Cloud Network Disk: 1. Installation First, when downloading and installing Baidu Cloud software, please select the custom installation option.
 Detailed explanation of obtaining administrator rights in Win11
Mar 08, 2024 pm 03:06 PM
Detailed explanation of obtaining administrator rights in Win11
Mar 08, 2024 pm 03:06 PM
Windows operating system is one of the most popular operating systems in the world, and its new version Win11 has attracted much attention. In the Win11 system, obtaining administrator rights is an important operation. Administrator rights allow users to perform more operations and settings on the system. This article will introduce in detail how to obtain administrator permissions in Win11 system and how to effectively manage permissions. In the Win11 system, administrator rights are divided into two types: local administrator and domain administrator. A local administrator has full administrative rights to the local computer
 Teach you how to use the new advanced features of iOS 17.4 'Stolen Device Protection'
Mar 10, 2024 pm 04:34 PM
Teach you how to use the new advanced features of iOS 17.4 'Stolen Device Protection'
Mar 10, 2024 pm 04:34 PM
Apple rolled out the iOS 17.4 update on Tuesday, bringing a slew of new features and fixes to iPhones. The update includes new emojis, and EU users will also be able to download them from other app stores. In addition, the update also strengthens the control of iPhone security and introduces more "Stolen Device Protection" setting options to provide users with more choices and protection. "iOS17.3 introduces the "Stolen Device Protection" function for the first time, adding extra security to users' sensitive information. When the user is away from home and other familiar places, this function requires the user to enter biometric information for the first time, and after one hour You must enter information again to access and change certain data, such as changing your Apple ID password or turning off stolen device protection.
 How to use Thunder to download magnet links
Feb 25, 2024 pm 12:51 PM
How to use Thunder to download magnet links
Feb 25, 2024 pm 12:51 PM
With the rapid development of network technology, our lives have also been greatly facilitated, one of which is the ability to download and share various resources through the network. In the process of downloading resources, magnet links have become a very common and convenient download method. So, how to use Thunder magnet links? Below, I will give you a detailed introduction. Xunlei is a very popular download tool that supports a variety of download methods, including magnet links. A magnet link can be understood as a download address through which we can obtain relevant information about resources.
