
 Web Front-end
JS Tutorial
Detailed explanation of Angular's implementation of form validation function
Web Front-end
JS Tutorial
Detailed explanation of Angular's implementation of form validation function
Detailed explanation of Angular's implementation of form validation function

Angular form validation is divided into two types of validation: 1. Built-in validation (required, minlength, etc.); 2. Custom validation (regular expression). This article mainly introduces the form verification function of Angular in detail. It has certain reference value. Interested friends can refer to it. I hope it can help you.
Next, let’s use a demo to register an account to see how these two verifications are implemented.
Project interface
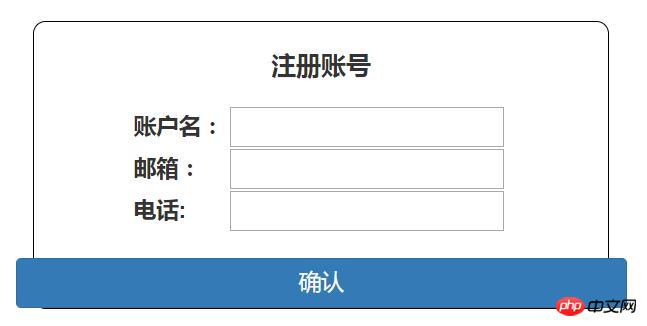
1. Built-in verification
Among the accounts There are required verification and minimum length verification, and the other two are only required verification
1. Project directory
----------app.component.ts
----------app.component.html
----------app.component.css
------ ----app.module.ts
2. Project code
app.module.ts
import { BrowserModule } from '@angular/platform-browser';
import { NgModule } from '@angular/core';
import { FormsModule,ReactiveFormsModule }  from '@angular/forms';//表单验证必须导入这两个模块

import { AppComponent } from './app.component';

@NgModule({
 declarations: [
  AppComponent
 ],
 imports: [
  BrowserModule,
  FormsModule,  //注册模块
  ReactiveFormsModule
 ],
 providers: [],
 bootstrap: [AppComponent]
})
export class AppModule { }app.component. ts
import { Component,OnInit } from '@angular/core';
import { FormGroup, FormControl, Validators } from '@angular/forms';

@Component({
 selector: 'app-root',
 templateUrl: './app.component.html',
 styleUrls: ['./app.component.css']
})
export class AppComponent {
 title = 'app';
 Form:FormGroup;
 data={
   name:"",
   email:"",
   tel:""
 }
 ngOnInit(): void {
   this.Form = new FormGroup({
      'name': new FormControl(this.data.name, [
       Validators.required,
       Validators.minLength(4)
      ]),
      'email': new FormControl(this.data.email, Validators.required),
      'tel': new FormControl(this.data.tel, Validators.required)
     });
  }

  get name() { return this.Form.get('name'); }
  get email() { return this.Form.get('email'); }
  get tel() { return this.Form.get('tel'); }
}Simply speaking, when using the verification form, it is roughly divided into four steps:
(1) Import related modules FormGroup, FormControl, Validators;
(2) Declare the form validation variable From:FromGroup;
(3) Define validation rules;
(4) Through the control group (FormGroup) to which it belongs The get method to access the form control
app.component.html
<p class="wrapper">
  <p class="row">
    <p class="title-wrapper">注册账号</p>
  </p>
  <p class="row">
    <p class="contain-wrapper" [formGroup]="Form">
      <label for="name">账户名:</label>
      <input type="text" id="name" formControlName="name"><br/>
      <p *ngIf="name.invalid && (name.dirty || name.touched)" class="alert alert-danger">
        <p *ngIf="name.errors.required">
          请输入长度账户名!
        </p>
        <p *ngIf="name.errors.minlength">
          账户名长度不小于4!
        </p>
      </p>
      <label for="email">邮箱:</label>
      <input type="text" id="email" formControlName="email"><br/>
      <p *ngIf="email.invalid && (email.dirty || email.touched)" class="alert alert-danger">
        <p *ngIf="email.errors.required">
          请输入邮箱!
        </p>
      </p>
      <label for="tel">电话:</label>
      <input type="text" id="tel" formControlName="tel">
      <p *ngIf="tel.invalid && (tel.dirty || tel.touched)" class="alert alert-danger">
        <p *ngIf="tel.errors.required">
          请输入电话!
        </p>
      </p>
    </p>
  </p>
  <p class="row">
    <button class="btn btn-primary confirm">确认</button>
  </p>
</p>app.component.css
*{
  font-size: 18px;
}
.wrapper{
  margin: 0 auto;
  margin-top:10%;
  width:30%;
  height: 20%;
  border:1px solid black;
  border-radius: 10px;
}

.title-wrapper{
  margin: 0 auto;
  padding-top: 20px;
  padding-bottom: 20px;
  width:370px;
  text-align: center;
  font-size: 20px;
  font-weight: 800;
}
label{
  display: inline-block;
  width:72px;
}
.contain-wrapper{
  width: 300px;
  margin:0 auto;
}
.confirm{
  margin-top:20px;
  width:100%;

}3. Project effect
2. Custom verification
Custom form verification, required Create a custom validator. Next, we change the verification of the mailbox to formatted verification instead of simple existence verification. First, let’s take a look at the changes to the project directory
1.Project Directory
----------app.component.ts
----------app.component.html
--- -------app.component.css
----------app.module.ts
----------emailAuthentication .ts
2. Project code
app.module.ts
Register custom validator EmailValidatorDirective
import { BrowserModule } from '@angular/platform-browser';
import { NgModule } from '@angular/core';
import { FormsModule,ReactiveFormsModule }  from '@angular/forms';
import { EmailValidatorDirective } from './emailAuthentication';

import { AppComponent } from './app.component';

@NgModule({
 declarations: [
  AppComponent,
  EmailValidatorDirective
 ],
 imports: [
  BrowserModule,
  FormsModule,
  ReactiveFormsModule
 ],
 providers: [],
 bootstrap: [AppComponent]
})
export class AppModule { }emailAuthentication.ts
import { Directive, Input, OnChanges, SimpleChanges } from '@angular/core';
import { AbstractControl, NG_VALIDATORS, Validator, ValidatorFn, Validators } from '@angular/forms';

/** A hero's name can't match the given regular expression */
export function emailValidator(nameRe: RegExp): ValidatorFn {
  return (control: AbstractControl): { [key: string]: any } => {
    const forbidden = !nameRe.test(control.value);
    return forbidden ? { 'forbiddenName': { value: control.value } } : null;
  };
}

@Directive({
  selector: '[appForbiddenName]',
  providers: [{ provide: NG_VALIDATORS, useExisting: EmailValidatorDirective, multi: true }]
})
export class EmailValidatorDirective implements Validator {
  @Input() forbiddenName: string;

  validate(control: AbstractControl): { [key: string]: any } {
    return this.forbiddenName ? emailValidator(new RegExp(this.forbiddenName, 'i'))(control)
      : null;
  }
}app.component.ts
##
import { Component,OnInit } from '@angular/core';
import { FormGroup, FormControl, Validators } from '@angular/forms';
import { emailValidator } from './emailAuthentication'; //导入emailValidator自定义验证器

@Component({
 selector: 'app-root',
 templateUrl: './app.component.html',
 styleUrls: ['./app.component.css']
})
export class AppComponent {
 title = 'app';
 //email的正则表达式
 emailExp = /^([a-zA-Z0-9_-])+@([a-zA-Z0-9_-])+(.[a-zA-Z0-9_-])+/ ;
 Form:FormGroup;
 data={
   name:"",
   email:"",
   tel:""
 }
 ngOnInit(): void {
   this.Form = new FormGroup({
      'name': new FormControl(this.data.name, [
       Validators.required,
       Validators.minLength(4)
      ]),
      'email': new FormControl(this.data.email, [
        Validators.required,
        emailValidator(this.emailExp) //自定义验证器
        ]),
      'tel': new FormControl(this.data.tel, Validators.required)
     });
  }

  get name() { return this.Form.get('name'); }
  get email() { return this.Form.get('email'); }
  get tel() { return this.Form.get('tel'); }
}<p class="wrapper">
<p class="row">
<p class="title-wrapper">注册账号</p>
</p>
<p class="row">
<p class="contain-wrapper" [formGroup]="Form">
<label for="name">账户名:</label>
<input type="text" id="name" formControlName="name"><br/>
<p *ngIf="name.invalid && (name.dirty || name.touched)" class="alert alert-danger">
<p *ngIf="name.errors.required">
请输入账户名!
</p>
<p *ngIf="name.errors.minlength">
账户名长度不小于4!
</p>
</p>
<label for="email">邮箱:</label>
<input type="text" id="email" formControlName="email" required><br/>
<p *ngIf="email.invalid && (email.dirty || email.touched)" class="alert alert-danger">
<p *ngIf="email.errors.forbiddenName">
请输入正确格式的邮箱!
</p>
</p>
<label for="tel">电话:</label>
<input type="text" id="tel" formControlName="tel">
<p *ngIf="tel.invalid && (tel.dirty || tel.touched)" class="alert alert-danger">
<p *ngIf="tel.errors.required">
请输入电话!
</p>
</p>
</p>
</p>
<p class="row">
<button class="btn btn-primary confirm" [disabled]="Form.invalid" >确认</button>
</p>
</p>
jquery form validation plug-in
JQuery form validation example code
Implementing form validation in JavaScript
The above is the detailed content of Detailed explanation of Angular's implementation of form validation function. For more information, please follow other related articles on the PHP Chinese website!

Hot AI Tools

Undresser.AI Undress
AI-powered app for creating realistic nude photos

AI Clothes Remover
Online AI tool for removing clothes from photos.

Undress AI Tool
Undress images for free

Clothoff.io
AI clothes remover

Video Face Swap
Swap faces in any video effortlessly with our completely free AI face swap tool!

Hot Article
Hot Tools

Notepad++7.3.1
Easy-to-use and free code editor

SublimeText3 Chinese version
Chinese version, very easy to use

Zend Studio 13.0.1
Powerful PHP integrated development environment

Dreamweaver CS6
Visual web development tools

SublimeText3 Mac version
God-level code editing software (SublimeText3)
Hot Topics


 How to implement page jump after PHP form submission
Aug 12, 2023 am 11:30 AM
How to implement page jump after PHP form submission
Aug 12, 2023 am 11:30 AM
How to implement page jump after PHP form submission [Introduction] In web development, form submission is a common functional requirement. After the user fills out the form and clicks the submit button, the form data usually needs to be sent to the server for processing, and the user is redirected to another page after processing. This article will introduce how to use PHP to implement page jump after form submission. [Step 1: HTML Form] First, we need to write a page containing a form in an HTML page so that users can fill in the data that needs to be submitted.
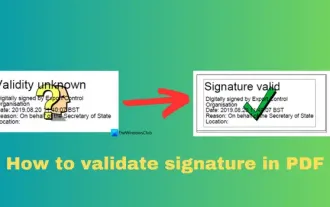 How to verify signature in PDF
Feb 18, 2024 pm 05:33 PM
How to verify signature in PDF
Feb 18, 2024 pm 05:33 PM
We usually receive PDF files from the government or other agencies, some with digital signatures. After verifying the signature, we see the SignatureValid message and a green check mark. If the signature is not verified, the validity is unknown. Verifying signatures is important, let’s see how to do it in PDF. How to Verify Signatures in PDF Verifying signatures in PDF format makes it more trustworthy and the document more likely to be accepted. You can verify signatures in PDF documents in the following ways. Open the PDF in Adobe Reader Right-click the signature and select Show Signature Properties Click the Show Signer Certificate button Add the signature to the Trusted Certificates list from the Trust tab Click Verify Signature to complete the verification Let
 Detailed method to unblock using WeChat friend-assisted verification
Mar 25, 2024 pm 01:26 PM
Detailed method to unblock using WeChat friend-assisted verification
Mar 25, 2024 pm 01:26 PM
1. After opening WeChat, click the search icon, enter WeChat team, and click the service below to enter. 2. After entering, click the self-service tool option in the lower left corner. 3. After clicking, in the options above, click the option of unblocking/appealing for auxiliary verification.
 How to install Angular on Ubuntu 24.04
Mar 23, 2024 pm 12:20 PM
How to install Angular on Ubuntu 24.04
Mar 23, 2024 pm 12:20 PM
Angular.js is a freely accessible JavaScript platform for creating dynamic applications. It allows you to express various aspects of your application quickly and clearly by extending the syntax of HTML as a template language. Angular.js provides a range of tools to help you write, update and test your code. Additionally, it provides many features such as routing and form management. This guide will discuss how to install Angular on Ubuntu24. First, you need to install Node.js. Node.js is a JavaScript running environment based on the ChromeV8 engine that allows you to run JavaScript code on the server side. To be in Ub
 How to use JavaScript to realize the automatic prompt function of the input box content of the form?
Oct 20, 2023 pm 04:01 PM
How to use JavaScript to realize the automatic prompt function of the input box content of the form?
Oct 20, 2023 pm 04:01 PM
How to use JavaScript to realize the automatic prompt function of the input box content of the form? Introduction: The automatic prompt function of the form input box content is very common in web applications. It can help users quickly enter the correct content. This article will introduce how to use JavaScript to achieve this function and provide specific code examples. Create the HTML structure First, we need to create an HTML structure that contains the input box and the auto-suggestion list. You can use the following code: <!DOCTYP
 How to validate IFSC code using regular expressions?
Aug 26, 2023 pm 10:17 PM
How to validate IFSC code using regular expressions?
Aug 26, 2023 pm 10:17 PM
Indian Financial System Code is the abbreviation. Indian bank branches participating in the electronic funds transfer system are identified by a special 11-character code. The Reserve Bank of India uses this code in internet transactions to transfer funds between banks. IFSC code is divided into two parts. Banks are identified by the first four characters, while branches are identified by the last six characters. NEFT (National Electronic Funds Transfer), RTGS (Real Time Gross Settlement) and IMPS (Immediate Payment Service) are some of the electronic transactions that require IFSC codes. Method Some common ways to validate IFSC codes using regular expressions are: Check if the length is correct. Check the first four characters. Checkthefifthcharacter.Che
 How to handle user rights management in PHP forms
Aug 10, 2023 pm 01:06 PM
How to handle user rights management in PHP forms
Aug 10, 2023 pm 01:06 PM
How to handle user rights management in PHP forms With the continuous development of web applications, user rights management is one of the important functions. User rights management can control users' operating rights in applications and ensure the security and legality of data. In PHP forms, user rights management can be implemented through some simple code. This article will introduce how to handle user rights management in PHP forms and give corresponding code examples. 1. Definition and management of user roles First of all, defining and managing user roles is a matter of user rights.
 New features in PHP 8: Added verification and signing
Mar 27, 2024 am 08:21 AM
New features in PHP 8: Added verification and signing
Mar 27, 2024 am 08:21 AM
PHP8 is the latest version of PHP, bringing more convenience and functionality to programmers. This version has a special focus on security and performance, and one of the noteworthy new features is the addition of verification and signing capabilities. In this article, we'll take a closer look at these new features and their uses. Verification and signing are very important security concepts in computer science. They are often used to ensure that the data transmitted is complete and authentic. Verification and signatures become even more important when dealing with online transactions and sensitive information because if someone is able to tamper with the data, it could potentially
