
 Web Front-end
JS Tutorial
React technology stack practice of small application for movie collection
Web Front-end
JS Tutorial
React technology stack practice of small application for movie collection
React technology stack practice of small application for movie collection

This article mainly shares with you the practice of react technology stack of small application for movie collection, hoping to help everyone.
Main functions
Crawl Douban movie information and enter it into MongoDB
-
Movie list display, classification, search
Movie details display and attachment management
Registration and login
Permission control, ordinary users can enter, Favorites, administrator entry, modification, deletion
User center, my favorites list

Some summary
Front-end
The front-end uses react, redux and redux-saga. Let’s briefly summarize redux and record a dependency issue on front and rear interface calls
redux
To sum up redux in one sentence, I think it is to entangle the vertical props transfer between components and the love-hate state between parent and child components. It's evened out, and a vertical relationship is transformed into multiple components interacting directly with an independent state object. After this, the code structure does look clearer.
The core concepts of redux, action, reducer, and store
action means that I want to operate a state. How to operate it is the reducer’s business, and all states are stored in the store. , the store issues an action and leaves it to the designated reducer for processing
Redux forces us to standardize our operations on the state, which can only be done in actions and reducers. In this way, the originally complicated business logic processing can be After changing the location and limiting it to actions and reducers, the components look very clean. In fact, it is complicated no matter where to put this complicated thing, but now it is clearer
The disadvantage of using redux is that it is too cumbersome to define various actions and connect various components. . . . . Now there is another Mobx, I don’t know how powerful it is, but everyone agrees~
redux-saga
redux-saga is used to handle asynchronous Calls and other things, use generators to make asynchronous code look more concise. Commonly used ones are take, takeLatest, takeEvery, put, call, fork, select. During use, there are dependencies before and after an interface call is encountered. The relationship problem is quite interesting.
Describe it:
There is an interface /api/user/checkLogin, which is used to determine whether to log in. The action is triggered in componentDidMount of the outermost
component to initiate this request, and if the interface return status is logged in, a
function* checkLogin() {
    const res = yield Util.fetch('/api/user/checkLogin')
    yield put(recieveCheckLogin(!res.code))
    if (!res.code) {
        //已登录
        yield put(fetchUinfo())
    }
}
export function* watchCheckLogin() {
    yield takeLatest(CHECK_LOAGIN, checkLogin)
}Then I have a movie details page component, which will launch /api/movies/${id} in
componentDidMountThe interface obtains movie information. If the user is logged in, it will also initiate an interface to obtain movie attachment information/api/movies/${id}/attach,The entire step is written in a generator
function* getItemMovie(id) {
    return yield Util.fetch(`/api/movies/${id}`)
}

function* getMovieAttach(id) {
    return yield Util.fetch(`/api/movies/${id}/attach`)
}

function* getMovieInfo(action) {
    const { movieId } = action
    let { login } = yield select(state => state.loginStatus)
    const res = yield call(getItemMovie, movieId)
    yield put(recieveItemMovieInfo(res.data[0]))
    if (res.data[0].attachId && login) {
        const attach = yield call(getMovieAttach, movieId)
        yield put(recieveMovieAttach(attach.data[0]))
    }
}

export function* watchLoadItemMovie() {
    yield takeLatest(LOAD_ITEM_MOVIE, getMovieInfo)
}The user logs in and enters the details. The process is normal, but if the page is refreshed on the details page , the interface for obtaining attachments is not triggered, because the checkLogin interface has not returned the result at this time, the
state.loginStatusstatus is still false, and the above does not go to the ifAt first I was thinking about how to control the sequence of yields in some generators to solve the problem (if the user is not logged in, send another CHECK_LOAGIN, and the process will return to continue), but there are CHECK_LOAGIN calls twice. If the user is logged in, it will be called again. It is definitely not possible to call the interface for obtaining user information once more.
function* getMovieInfo(action) {
    const { movieId } = action
    let { login } = yield select(state => state.loginStatus)
    const res = yield call(getItemMovie, movieId)
    yield put(recieveItemMovieInfo(res.data[0]))
    // if (!login) {
    //     //刷新页面的时候,如果此时checklogin接口还没返回数据或还没发出,应触发一个checklogin
    //     //checklogin返回后才能得到login状态
    //     yield put({
    //         type: CHECK_LOAGIN
    //     })
    //     const ret = yield take(RECIEVE_CHECK_LOAGIN)
    //     login = ret.loginStatus
    // }
    if (res.data[0].attachId && login) {
        const attach = yield call(getMovieAttach, movieId)
        yield put(recieveMovieAttach(attach.data[0]))
    }
}The final method is to decompose the responsibilities of the generator and properly trigger the action of obtaining attachments in componentWillUpdate.
//将获取附件的动作从 getMovieInfo这个generator中分离出来
function* getMovieInfo(action) {
    const { movieId } = action
    const res = yield call(getItemMovie, movieId)
    yield put(recieveItemMovieInfo(res.data[0]))
}
function* watchLoadItemMovie() {
    yield takeLatest(LOAD_ITEM_MOVIE, getMovieInfo)
}
function* watchLoadAttach() {
    while (true) {
        const { movieId } = yield take(LOAD_MOVIE_ATTACH)
        const { attachId } = yield select(state => state.detail.movieInfo)
        const attach = yield call(getMovieAttach, movieId)
        yield put(recieveMovieAttach(attach.data[0]))
    }
}

//组件中
componentWillUpdate(nextProps) {
        if (nextProps.loginStatus && (nextProps.movieInfo!==this.props.movieInfo)) {
            //是登录状态,并且movieInfo已经返回时
            const { id } = this.props.match.params
            this.props.loadMovieAttach(id)
        }
}Summary, use the hook function of the component reasonably, do not process too many operations in the generator, and increase flexibility
Backend
The backend uses express and mongodb, and also uses redis. The main technical points areUse pm2 to manage node applications and deploy code, enable identity authentication in mongodb, and use token+ Redis is used for identity authentication and unit tests are written in node. It is still worth recording.
Use jwt + redis for token-based user identity authentication
Token-based authentication process
The client initiates a login request
The server verifies the username and password
After successful verification, the server generates a token and responds to the client
The client will carry this token in the header of each subsequent request
The server needs to verify the token for the interface that requires authentication, and the verification successfully receives the request
Here jsonwebtoken is used to generate the token,
jwt.sign(payload, secretOrPrivateKey, [options, callback])
is used express-jwt verification token (successful verification will put the token information in request.user)
express_jwt({
        secret: SECRET,
        getToken: (req)=> {
        if (req.headers.authorization && req.headers.authorization.split(' ')[0] === 'Bearer') {
            return req.headers.authorization.split(' ')[1];
        } else if (req.query && req.query.token) {
            return req.query.token;
        }
        return null;
    }
}Why use redis
**When using jsonwebtoken to generate a token, you can specify the validity period of the token, and the verify method of jsonwebtoken also provides options to update the validity period of the token.
But express_jwt middleware is used here, and express_jwt does not provide a method to refresh the token. **
Idea:
The client requests login successfully and generates a token
Save this token in redis, Set the validity period of redis (for example, 1h)
When a new request comes, first express_jwt verifies the token, the verification is successful, and then verifies whether the token exists in redis, the existence indicates that it is valid
During the validity period, a new request comes from the client, extract the token, and update the validity period of this token in redis
The client exits the login request and deletes the token in redis
Specific code
Use mocha + supertest + should to write unit tests
Test coverage I wrote all the interfaces. During development, I wrote them slowly because there were no progress requirements. After writing an interface, I wrote a test. The test writing was quite detailed. After the test passed, I then adjusted the interface on the front end. The whole process was quite interesting.
mocha is a node unit testing framework, similar to the front-end jasmine, and the syntax is also similar
supertest is a library used to test the node interface
should nodejs assertion library, very readable
An example of testing, the length is too long, so I won’t put it here
Related recommendations :
Exploring the internal mechanism of React
What are the ways to write components in React
react.js identifies ref, get the content
The above is the detailed content of React technology stack practice of small application for movie collection. For more information, please follow other related articles on the PHP Chinese website!

Hot AI Tools

Undresser.AI Undress
AI-powered app for creating realistic nude photos

AI Clothes Remover
Online AI tool for removing clothes from photos.

Undress AI Tool
Undress images for free

Clothoff.io
AI clothes remover

Video Face Swap
Swap faces in any video effortlessly with our completely free AI face swap tool!

Hot Article
Hot Tools

Notepad++7.3.1
Easy-to-use and free code editor

SublimeText3 Chinese version
Chinese version, very easy to use

Zend Studio 13.0.1
Powerful PHP integrated development environment

Dreamweaver CS6
Visual web development tools

SublimeText3 Mac version
God-level code editing software (SublimeText3)
Hot Topics
 1662
1662
 14
1418
52
1311
25
1261
29
1234
24
14
1418
52
1311
25
1261
29
1234
24

 How to Undo Delete from Home Screen in iPhone
Apr 17, 2024 pm 07:37 PM
How to Undo Delete from Home Screen in iPhone
Apr 17, 2024 pm 07:37 PM
Deleted something important from your home screen and trying to get it back? You can put app icons back on the screen in a variety of ways. We have discussed all the methods you can follow and put the app icon back on the home screen. How to Undo Remove from Home Screen in iPhone As we mentioned before, there are several ways to restore this change on iPhone. Method 1 – Replace App Icon in App Library You can place an app icon on your home screen directly from the App Library. Step 1 – Swipe sideways to find all apps in the app library. Step 2 – Find the app icon you deleted earlier. Step 3 – Simply drag the app icon from the main library to the correct location on the home screen. This is the application diagram
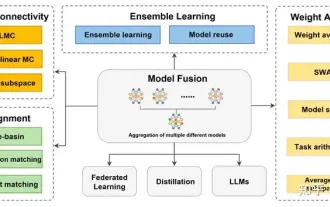 Review! Deep model fusion (LLM/basic model/federated learning/fine-tuning, etc.)
Apr 18, 2024 pm 09:43 PM
Review! Deep model fusion (LLM/basic model/federated learning/fine-tuning, etc.)
Apr 18, 2024 pm 09:43 PM
In September 23, the paper "DeepModelFusion:ASurvey" was published by the National University of Defense Technology, JD.com and Beijing Institute of Technology. Deep model fusion/merging is an emerging technology that combines the parameters or predictions of multiple deep learning models into a single model. It combines the capabilities of different models to compensate for the biases and errors of individual models for better performance. Deep model fusion on large-scale deep learning models (such as LLM and basic models) faces some challenges, including high computational cost, high-dimensional parameter space, interference between different heterogeneous models, etc. This article divides existing deep model fusion methods into four categories: (1) "Pattern connection", which connects solutions in the weight space through a loss-reducing path to obtain a better initial model fusion
 Integration of Java framework and front-end React framework
Jun 01, 2024 pm 03:16 PM
Integration of Java framework and front-end React framework
Jun 01, 2024 pm 03:16 PM
Integration of Java framework and React framework: Steps: Set up the back-end Java framework. Create project structure. Configure build tools. Create React applications. Write REST API endpoints. Configure the communication mechanism. Practical case (SpringBoot+React): Java code: Define RESTfulAPI controller. React code: Get and display the data returned by the API.
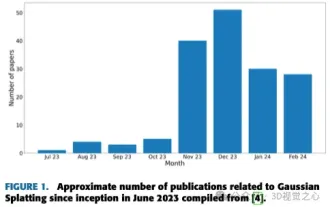 More than just 3D Gaussian! Latest overview of state-of-the-art 3D reconstruction techniques
Jun 02, 2024 pm 06:57 PM
More than just 3D Gaussian! Latest overview of state-of-the-art 3D reconstruction techniques
Jun 02, 2024 pm 06:57 PM
Written above & The author’s personal understanding is that image-based 3D reconstruction is a challenging task that involves inferring the 3D shape of an object or scene from a set of input images. Learning-based methods have attracted attention for their ability to directly estimate 3D shapes. This review paper focuses on state-of-the-art 3D reconstruction techniques, including generating novel, unseen views. An overview of recent developments in Gaussian splash methods is provided, including input types, model structures, output representations, and training strategies. Unresolved challenges and future directions are also discussed. Given the rapid progress in this field and the numerous opportunities to enhance 3D reconstruction methods, a thorough examination of the algorithm seems crucial. Therefore, this study provides a comprehensive overview of recent advances in Gaussian scattering. (Swipe your thumb up
 Revolutionary GPT-4o: Reshaping the human-computer interaction experience
Jun 07, 2024 pm 09:02 PM
Revolutionary GPT-4o: Reshaping the human-computer interaction experience
Jun 07, 2024 pm 09:02 PM
The GPT-4o model released by OpenAI is undoubtedly a huge breakthrough, especially in its ability to process multiple input media (text, audio, images) and generate corresponding output. This ability makes human-computer interaction more natural and intuitive, greatly improving the practicality and usability of AI. Several key highlights of GPT-4o include: high scalability, multimedia input and output, further improvements in natural language understanding capabilities, etc. 1. Cross-media input/output: GPT-4o+ can accept any combination of text, audio, and images as input and directly generate output from these media. This breaks the limitation of traditional AI models that only process a single input type, making human-computer interaction more flexible and diverse. This innovation helps power smart assistants
 Go language: Function introduction and unique advantages
Apr 08, 2024 pm 06:33 PM
Go language: Function introduction and unique advantages
Apr 08, 2024 pm 06:33 PM
Go Language: Introduction and Advantages Go language is an open source programming language developed by Google and is known for its concurrency and efficiency. Its key features include a concurrent programming model (based on Goroutines and channels), a static type system, and a garbage collector. The unique advantages of the Go language are: efficient concurrency, excellent performance, concise syntax, and out-of-the-box tools.
 Vue.js vs. React: Project-Specific Considerations
Apr 09, 2025 am 12:01 AM
Vue.js vs. React: Project-Specific Considerations
Apr 09, 2025 am 12:01 AM
Vue.js is suitable for small and medium-sized projects and fast iterations, while React is suitable for large and complex applications. 1) Vue.js is easy to use and is suitable for situations where the team is insufficient or the project scale is small. 2) React has a richer ecosystem and is suitable for projects with high performance and complex functional needs.
 Technical exchange and integration between Go language and JS
Mar 29, 2024 pm 01:36 PM
Technical exchange and integration between Go language and JS
Mar 29, 2024 pm 01:36 PM
In today's software development field, Go language and JavaScript are widely used in different fields and scenarios. As a statically typed, compiled language, Go language is suitable for back-end services and system-level programming; while JavaScript is a dynamically typed, interpreted language, mainly used for front-end development and interaction design. Although there are obvious differences between the two in terms of syntax and operating environment, the communication and integration between them have also become a topic of concern to software developers. With the development trend of separation of front-end and back-end, front-end
