
 Backend Development
Python Tutorial
Example explanation of automatically obtaining public IP in Python
Backend Development
Python Tutorial
Example explanation of automatically obtaining public IP in Python
Example explanation of automatically obtaining public IP in Python

The following editor will bring you an example of how to automatically obtain a public IP in Python. The editor thinks it’s pretty good, so I’ll share it with you now and give it as a reference. Let’s follow the editor and take a look
0. Preliminary knowledge
0.1 SQL Basic
ubuntu, Debian series installation:
root@raspberrypi:~/python-script# apt-get install mysql-server
Redhat, Centos series installation:
[root@localhost ~]# yum install mysql-server
Log in to the database
pi@raspberrypi:~ $ mysql -uroot -p -hlocalhost
Enter password:
Welcome to the MariaDB monitor. Commands end with ; or \g.
Your MariaDB connection id is 36
Server version: 10.0.30-MariaDB-0+deb8u2 (Raspbian)

Copyright (c) 2000, 2016, Oracle, MariaDB Corporation Ab and others.

Type 'help;' or '\h' for help. Type '\c' to clear the current input statement.

MariaDB [(none)]>
Among them, mysql is the client command -u is the specified user- p is the password - h is the host
Create database, create data table
The syntax for creating a database is as follows
MariaDB [(none)]> help create database
Name: 'CREATE DATABASE'
Description:
Syntax:
CREATE {DATABASE | SCHEMA} [IF NOT EXISTS] db_name
 [create_specification] ...

create_specification:
 [DEFAULT] CHARACTER SET [=] charset_name
 | [DEFAULT] COLLATE [=] collation_name

CREATE DATABASE creates a database with the given name. To use this
statement, you need the CREATE privilege for the database. CREATE
SCHEMA is a synonym for CREATE DATABASE.

URL: https://mariadb.com/kb/en/create-database/


MariaDB [(none)]>The syntax for creating a data table is as follows
MariaDB [(none)]> help create table
Name: 'CREATE TABLE'
Description:
Syntax:
CREATE [TEMPORARY] TABLE [IF NOT EXISTS] tbl_name
 (create_definition,...)
 [table_options]
 [partition_options]

Or:

CREATE [TEMPORARY] TABLE [IF NOT EXISTS] tbl_name
 [(create_definition,...)]
 [table_options]
 [partition_options]
 select_statement
Create database ServiceLogs
MariaDB [(none)]> CREATE DATABASE `ServiceLogs`
Create data table
MariaDB [(none)]> CREATE TABLE `python_ip_logs` (
 `serial_number` bigint(20) NOT NULL AUTO_INCREMENT,
 `time` datetime DEFAULT NULL,
 `old_data` varchar(50) DEFAULT NULL,
 `new_data` varchar(50) DEFAULT NULL,
 PRIMARY KEY (`serial_number`)
) ENGINE=InnoDB AUTO_INCREMENT=3 DEFAULT CHARSET=latin1
Query of table contents
 MariaDB [ServiceLogs]> select * from python_ip_logs;
 Empty set (0.00 sec)
0.2 python connection operation MySQL
module download and installation
Download path: https://pypi.python.org/pypi/MySQL-python
Installation:
安装:
解压
unzip MySQL-python-1.2.5.zip
进入解压后目录
cd MySQL-python-1.2.5/
安装依赖
apt-get install libmysqlclient-dev
安装
python setup.py install
如果为0则安装OK
echo $?
Connect to Mysql
root@raspberrypi:~/python-script# cat p_mysql_3.py
#!/usr/bin/env python

import MySQLdb

try :
  conn = MySQLdb.connect("主机","用户名","密码","ServiceLogs")
  print ("Connect Mysql successful")
except:
  print ("Connect MySQL Fail")
root@raspberrypi:~/python-script#If Connect Mysql successful is output, the connection is OK
Python MySQL insert statement
root@raspberrypi:~/python-script# cat p_mysql1.py
#!/usr/bin/env python

import MySQLdb

db = MySQLdb.connect("localhost","root","root","ServiceLogs")

cursor = db.cursor()

sql = "insert INTO python_ip_logs VALUES (DEFAULT,'2017-09-29 22:46:00','123','456')"

cursor.execute(sql)
db.commit()

db.close()
root@raspberrypi:~/python-script#After the execution is completed, you can view the results with the mysql client SELECT statement
1. Requirements
##1.1 Requirements
Since the broadband will obtain a new IP every time it is restarted, in this state, there will be a lot of inconvenience when making an SSH connection. Fortunately, there was peanut shell software before, It can find your IP address through the domain name and access it. This is the best. However, recently, Peanut Shell also requires real-name authentication before it can be used. So, this prompted me to write a python script to obtain the public network. IP impulse. Achievement effect: When the IP changes, it can be notified by email and the data can be written in the database1.2 General idea
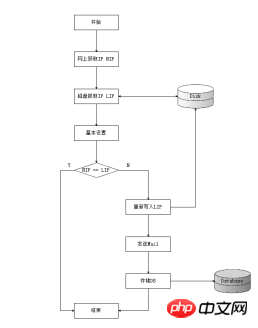
##1.3 Flowchart
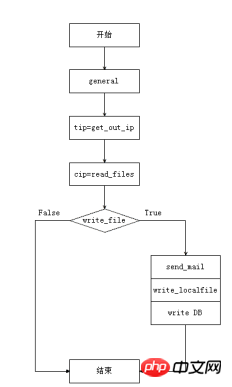
 The other codes are nothing to draw
Code writing
2.1.1 Write python codegetnetworkip.py
root@raspberrypi:~/python-script# cat getnetworkip.py
#!/usr/bin/env python
# coding:UTF-8

import requests
import send_mail
import savedb

def get_out_ip() :
  url = r'http://www.trackip.net/'
  r = requests.get(url)
  txt = r.text
  ip = txt[txt.find('title')+6:txt.find('/title')-1]
  return (ip)

def main() :
  try:
    savedb.general_files()

    tip = get_out_ip()
    cip = savedb.read_files()


    if savedb.write_files(cip,tip) :
      send_mail.SamMail(get_out_ip())
  except :
    return False

if __name__=="__main__" :
  main()
root@raspberrypi:~/python-script#savedb .py
root@raspberrypi:~/python-script# cat savedb.py
#!/usr/bin/env python
import MySQLdb
import os
import time
dirname = "logs"
filename = "logs/.ip_tmp"
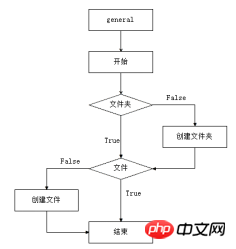
def general_files(Default_String="Null") :
var1 = Default_String
if not os.path.exists(dirname) :
os.makedirs(dirname)
if not os.path.exists(filename) :
f = open(filename,'w')
f.write(var1)
f.close()
def read_files() :
f = open(filename,'r')
txt = f.readline()
return (txt)
def write_files(txt,new_ip) :
if not txt == new_ip :
NowTime = time.strftime("%Y-%m-%d %H:%M:%S", time.localtime())
old_ip = read_files()
os.remove(filename)
general_files(new_ip)
write_db(NowTime,old_ip,new_ip)
return True
else:
return False
def write_db(NowTime,Old_ip,New_ip) :
db = MySQLdb.connect("主机","用户名","密码","库名")
cursor = db.cursor()
sql = """
INSERT INTO python_ip_logs
VALUES
(DEFAULT,"%s","%s","%s")
""" %(NowTime,Old_ip,New_ip)
try:
cursor.execute(sql)
db.commit()
except:
db.rollback()
db.close()
root@raspberrypi:~/python-script#send_mail.py
root@raspberrypi:~/python-script# cat send_mail.py
#!/usr/bin/env python
import smtplib
import email.mime.text
def SamMail(HtmlString) :
HOST = "smtp.163.com"
SUBJECT = "主题"
TO = "对方的邮箱地址"
FROM = "来自于哪里"
Remask = "The IP address has been changed"
msg = email.mime.text.MIMEText("""
<html>
<head>
<meta charset="utf-8" />
</head>
<body>
<em><h1>ip:%s</h1></em>
</body>
</html>
""" %(HtmlString),"html","utf-8")
msg['Subject'] = SUBJECT
msg['From'] = FROM
msg['TO'] = TO
try:
server = smtplib.SMTP()
server.connect(HOST,'25')
server.starttls()
server.login("用户名","密码")
server.sendmail(FROM,TO,msg.as_string())
server.quit()
except:
print ("Send mail Error")
root@raspberrypi:~/python-script#
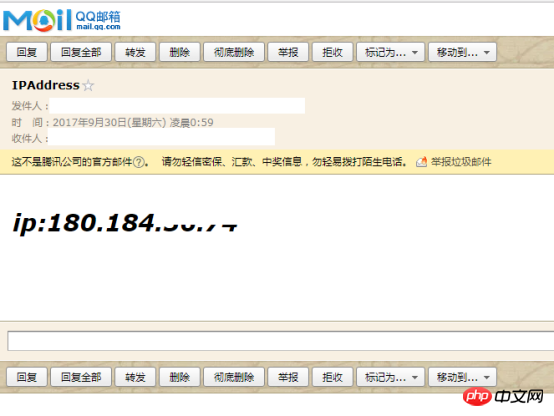
print ("%s" %(line),end='')3. EffectThe email received is as follows:
 Use SELECT to view the table, the effect is as follows:
 Put the script into crontab and let it execute scheduled tasks
The above is the detailed content of Example explanation of automatically obtaining public IP in Python. For more information, please follow other related articles on the PHP Chinese website!

Hot AI Tools

Undresser.AI Undress
AI-powered app for creating realistic nude photos

AI Clothes Remover
Online AI tool for removing clothes from photos.

Undress AI Tool
Undress images for free

Clothoff.io
AI clothes remover

Video Face Swap
Swap faces in any video effortlessly with our completely free AI face swap tool!

Hot Article
Hot Tools

Notepad++7.3.1
Easy-to-use and free code editor

SublimeText3 Chinese version
Chinese version, very easy to use

Zend Studio 13.0.1
Powerful PHP integrated development environment

Dreamweaver CS6
Visual web development tools

SublimeText3 Mac version
God-level code editing software (SublimeText3)
Hot Topics
 1662
1662
 14
1419
52
1311
25
1261
29
1234
24
14
1419
52
1311
25
1261
29
1234
24

 PHP and Python: Different Paradigms Explained
Apr 18, 2025 am 12:26 AM
PHP and Python: Different Paradigms Explained
Apr 18, 2025 am 12:26 AM
PHP is mainly procedural programming, but also supports object-oriented programming (OOP); Python supports a variety of paradigms, including OOP, functional and procedural programming. PHP is suitable for web development, and Python is suitable for a variety of applications such as data analysis and machine learning.
 Choosing Between PHP and Python: A Guide
Apr 18, 2025 am 12:24 AM
Choosing Between PHP and Python: A Guide
Apr 18, 2025 am 12:24 AM
PHP is suitable for web development and rapid prototyping, and Python is suitable for data science and machine learning. 1.PHP is used for dynamic web development, with simple syntax and suitable for rapid development. 2. Python has concise syntax, is suitable for multiple fields, and has a strong library ecosystem.
 PHP and Python: A Deep Dive into Their History
Apr 18, 2025 am 12:25 AM
PHP and Python: A Deep Dive into Their History
Apr 18, 2025 am 12:25 AM
PHP originated in 1994 and was developed by RasmusLerdorf. It was originally used to track website visitors and gradually evolved into a server-side scripting language and was widely used in web development. Python was developed by Guidovan Rossum in the late 1980s and was first released in 1991. It emphasizes code readability and simplicity, and is suitable for scientific computing, data analysis and other fields.
 Python vs. JavaScript: The Learning Curve and Ease of Use
Apr 16, 2025 am 12:12 AM
Python vs. JavaScript: The Learning Curve and Ease of Use
Apr 16, 2025 am 12:12 AM
Python is more suitable for beginners, with a smooth learning curve and concise syntax; JavaScript is suitable for front-end development, with a steep learning curve and flexible syntax. 1. Python syntax is intuitive and suitable for data science and back-end development. 2. JavaScript is flexible and widely used in front-end and server-side programming.
 How to run sublime code python
Apr 16, 2025 am 08:48 AM
How to run sublime code python
Apr 16, 2025 am 08:48 AM
To run Python code in Sublime Text, you need to install the Python plug-in first, then create a .py file and write the code, and finally press Ctrl B to run the code, and the output will be displayed in the console.
 Where to write code in vscode
Apr 15, 2025 pm 09:54 PM
Where to write code in vscode
Apr 15, 2025 pm 09:54 PM
Writing code in Visual Studio Code (VSCode) is simple and easy to use. Just install VSCode, create a project, select a language, create a file, write code, save and run it. The advantages of VSCode include cross-platform, free and open source, powerful features, rich extensions, and lightweight and fast.
 Can visual studio code be used in python
Apr 15, 2025 pm 08:18 PM
Can visual studio code be used in python
Apr 15, 2025 pm 08:18 PM
VS Code can be used to write Python and provides many features that make it an ideal tool for developing Python applications. It allows users to: install Python extensions to get functions such as code completion, syntax highlighting, and debugging. Use the debugger to track code step by step, find and fix errors. Integrate Git for version control. Use code formatting tools to maintain code consistency. Use the Linting tool to spot potential problems ahead of time.
 How to run python with notepad
Apr 16, 2025 pm 07:33 PM
How to run python with notepad
Apr 16, 2025 pm 07:33 PM
Running Python code in Notepad requires the Python executable and NppExec plug-in to be installed. After installing Python and adding PATH to it, configure the command "python" and the parameter "{CURRENT_DIRECTORY}{FILE_NAME}" in the NppExec plug-in to run Python code in Notepad through the shortcut key "F6".
