Several methods to clear float in CSS
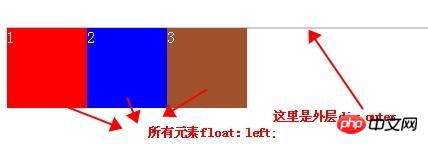
1. Throw a problem brick (display: block) and look at the phenomenon first:
 ##
##
分析HTML代码结构:


<p class="outer">
    <p class="p1">1</p>
    <p class="p2">2</p>
    <p class="p3">3</p>
</p>.outer{border: 1px solid #ccc;background: #fc9;color: #fff; margin: 50px auto;padding: 50px;}
.p1{width: 80px;height: 80px;background: red;float: left;}
.p2{width: 80px;height: 80px;background: blue;float: left;}
.p3{width: 80px;height: 80px;background: sienna;float: left;}2. Clear css floating:
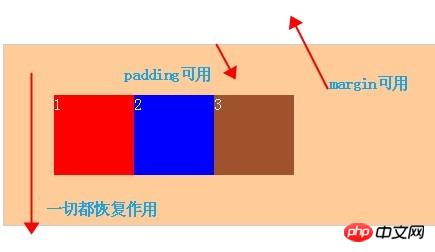
Method one: Add new elements and apply clear: both;
HTML:<p class="outer">
<p class="p1">1</p>
<p class="p2">2</p>
<p class="p3">3</p>
<p class="clear"></p>
</p>.clear{clear:both; height: 0; line-height: 0; font-size: 0}
Method 2: The parent p defines overflow: auto (note: it is the parent p, which is p.outer here)
HTML:<p class="outer over-flow"> //这里添加了一个class <p class="p1">1</p>
<p class="p2">2</p>
<p class="p3">3</p>
<!--<p class="clear"></p>--></p>.over-flow{ overflow: auto; zoom: 1; //zoom: 1; 是在处理兼容性问题}Principle: Use the overflow attribute to clear floats. One thing to note is that the overflow attribute has three attribute values: hidden, auto, and visible. We can use hidden and auto values to clear floats, but remember not to use visible values. If you use this value, you will not be able to achieve the effect of clearing floats. The other two values can be used. The difference is that one is more friendly to SEO and the other hidden is It's not very SEO-friendly, and I can't tell the other differences, and it won't be a waste of time.
Method three: It is said to be the highest method: after method: (Note: Acts on the father of floating elements)
Let’s talk about the principle first: This method of clearing floats is the most popular method of clearing floats on the Internet. It uses :after and :before to insert two element blocks inside the element to achieve the effect of clearing floats. The implementation principle is similar to the clear:both method, except that: clear inserts a p.clear tag in html, while outer uses its pseudo-class clear:after to add an effect similar to p.clear inside the element. Let’s take a look at its specific usage:.outer {zoom:1;} /*==for IE6/7 Maxthon2==*/ .outer :after {clear:both;content:'.';display:block;width: 0;height: 0;visibility:hidden;}/*==for FF/chrome/opera/IE8==*/Copy after login
where clear:both; refers to clearing all floats; content: '.';Finally: But it’s not unimportant, and it’s not unknown!display:block; for FF/chrome /opera/IE8 cannot be missing, and content() can have a value or be empty. The function of visibility:hidden; is to allow the browser to render it but not display it, so that clear floating can be achieved.
 下一标签直接清浮动兄弟标签浮动时,在下一标签的属性中直接写入清除clear:both;
 这样就可以清除以上标签的浮动而不用加入空标签来清除浮动。
结语:清除浮动的方式虽然是有很多种,但是不是每种都适合你,也不是每种都能很好的兼容所有浏览器,所以参照你觉得最好的方式去做,个人觉得方法三不错,不需多于的标签,而且也能很好的兼容。再次again:当一个内层元素是浮动的时候,如果没有关闭浮动时,其父元素也就不会再包含这个浮动的内层元素,因为此时浮动元素已经脱离了文档流。也就是为什么外层不能被撑开了!
The above is the detailed content of Several methods to clear float in CSS. For more information, please follow other related articles on the PHP Chinese website!

Hot AI Tools

Undresser.AI Undress
AI-powered app for creating realistic nude photos

AI Clothes Remover
Online AI tool for removing clothes from photos.

Undress AI Tool
Undress images for free

Clothoff.io
AI clothes remover

Video Face Swap
Swap faces in any video effortlessly with our completely free AI face swap tool!

Hot Article

Hot Tools

Notepad++7.3.1
Easy-to-use and free code editor

SublimeText3 Chinese version
Chinese version, very easy to use

Zend Studio 13.0.1
Powerful PHP integrated development environment

Dreamweaver CS6
Visual web development tools

SublimeText3 Mac version
God-level code editing software (SublimeText3)

Hot Topics
 1659
1659
 14
14
 1415
1415
 52
52
 1310
1310
 25
25
 1258
1258
 29
29
 1232
1232
 24
24
 How to use bootstrap in vue
Apr 07, 2025 pm 11:33 PM
Using Bootstrap in Vue.js is divided into five steps: Install Bootstrap. Import Bootstrap in main.js. Use the Bootstrap component directly in the template. Optional: Custom style. Optional: Use plug-ins.
 Understanding HTML, CSS, and JavaScript: A Beginner's Guide
Apr 12, 2025 am 12:02 AM
WebdevelopmentreliesonHTML,CSS,andJavaScript:1)HTMLstructurescontent,2)CSSstylesit,and3)JavaScriptaddsinteractivity,formingthebasisofmodernwebexperiences.
 The Roles of HTML, CSS, and JavaScript: Core Responsibilities
Apr 08, 2025 pm 07:05 PM
HTML defines the web structure, CSS is responsible for style and layout, and JavaScript gives dynamic interaction. The three perform their duties in web development and jointly build a colorful website.
 How to insert pictures on bootstrap
Apr 07, 2025 pm 03:30 PM
There are several ways to insert images in Bootstrap: insert images directly, using the HTML img tag. With the Bootstrap image component, you can provide responsive images and more styles. Set the image size, use the img-fluid class to make the image adaptable. Set the border, using the img-bordered class. Set the rounded corners and use the img-rounded class. Set the shadow, use the shadow class. Resize and position the image, using CSS style. Using the background image, use the background-image CSS property.
 How to write split lines on bootstrap
Apr 07, 2025 pm 03:12 PM
There are two ways to create a Bootstrap split line: using the tag, which creates a horizontal split line. Use the CSS border property to create custom style split lines.
 How to set up the framework for bootstrap
Apr 07, 2025 pm 03:27 PM
To set up the Bootstrap framework, you need to follow these steps: 1. Reference the Bootstrap file via CDN; 2. Download and host the file on your own server; 3. Include the Bootstrap file in HTML; 4. Compile Sass/Less as needed; 5. Import a custom file (optional). Once setup is complete, you can use Bootstrap's grid systems, components, and styles to create responsive websites and applications.
 How to resize bootstrap
Apr 07, 2025 pm 03:18 PM
To adjust the size of elements in Bootstrap, you can use the dimension class, which includes: adjusting width: .col-, .w-, .mw-adjust height: .h-, .min-h-, .max-h-
 How to use bootstrap button
Apr 07, 2025 pm 03:09 PM
How to use the Bootstrap button? Introduce Bootstrap CSS to create button elements and add Bootstrap button class to add button text


