4. Add code to call JavaScript in the theme. Open templates/end.php, and add the following code in the line before
:
(If you have other plug-ins or have added the jQuery library yourself, you don’t need to add the first line of code.)
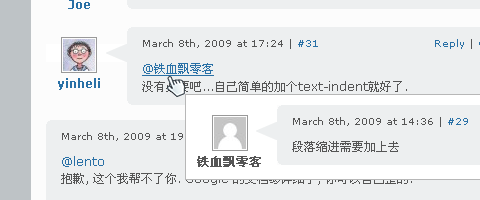
5. Okay, refresh the page with the @ reply, wait until the page is loaded, hover the mouse over the @ reply, you will see the effect.
Why can’t it be displayed across pages? Because its working principle is that when the mouse moves to @{username}, the corresponding comment is found on this page, inserted into the comment list, and displayed in an absolute position. If the comment is not on this page, it cannot be found Object, of course there is no subsequent processing.
How to get comment information across pages? If the corresponding comment cannot be found on this page, you can use AJAX to return the comment information queried in the background to the page through the comment ID. When the mouse moves over the @ comment, 'Loading...' will be displayed to the user. Prompt box, if the operation is successful, the found comment will be inserted at the end of the comment list, and the content of the comment will be replaced in the 'Loading...' box.
In other words, the loaded comments will always remain on this page, and there is no need to reload when the mouse moves over the @ comment again.
Let’s take a look at how to handle cross-page comments:
How to find the corresponding comment via @{username} on the current page?
1. Each comment will have an ID, with a structure such as: comment-{commentId}. This is to facilitate finding the comment through the anchor point, and it is also a necessary condition to complete the @ comment prompt.
2. Each @{username} is actually an anchor point pointing to a comment, and naturally the comment ID can be obtained.
So it’s actually very simple. If the comment ID is _commentId, then the corresponding comment can be found in JS through the following code.
document.getElementById(_commentId);
Copy after login
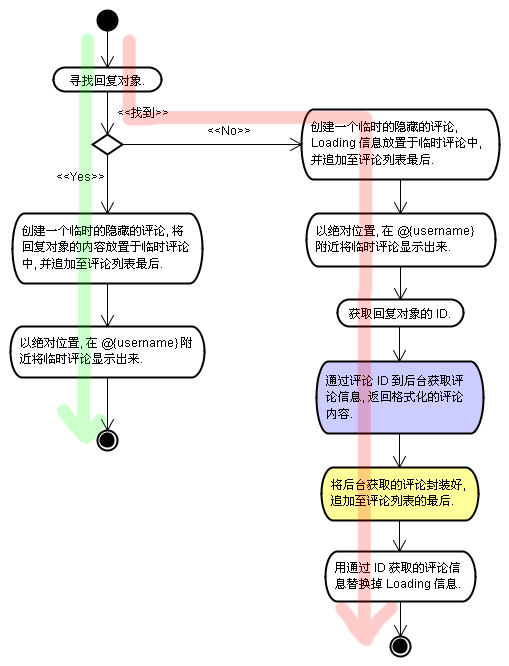
If the target comment can be found, create a hidden temporary comment, use the target comment as its content, and display it in the @{username} attachment; if the target comment is not found, use the ID to find the corresponding comment in the background Comment, perform cross-page processing.
How to load comments across pages?
The essence of cross-page is to dynamically load comments and append the obtained comments to the end of the comment list so that the comments can be found on this page. The difference is that these comments are processed through CSS and will not be displayed.
You can refer to the picture below. If the comment is not on this page, it will take the red path. After the comment is added to the current page, there will be an action to replace the Loading information in the prompt box with the comment content. When the user hovers the mouse here When stopping at @{username}, the comment is already on the current page, so there is no need to load it again. Instead, take the green path and directly bring up the comment prompt box.
Note: The blue part in the picture is background processing, and the yellow part is the focus of the entire loading process.
How to get comments and format them in the background?
Here you can write your own method to format the comment information, or you can use the comment callback method (WordPress 2.7 or above can define the comment callback method) to obtain the formatted HTML.
Note: custom_comments is the method name of my callback function.
JavaScript code
JS code based on jQuery, if you do not use or use other JS frames, please modify it yourself according to the processing ideas. It is recommended to place the code below the comment list.
This code comes from the PhilNa2 theme, it is recommended to append the code to function.php.
function load_comment(){
 if($_GET['action'] =='load_comment' && $_GET['id'] != ''){
 $comment = get_comment($_GET['id']);
 if(!$comment) {
  fail(printf('Whoops! Can\'t find the comment with id %1$s', $_GET['id']));
 }

 custom_comments($comment, null,null);
 die();
 }
}
add_action('init', 'load_comment');
Copy after login
Statement of this Website
The content of this article is voluntarily contributed by netizens, and the copyright belongs to the original author. This site does not assume corresponding legal responsibility. If you find any content suspected of plagiarism or infringement, please contact admin@php.cn
There are four ways to adjust the WordPress article list: use theme options, use plugins (such as Post Types Order, WP Post List, Boxy Stuff), use code (add settings in the functions.php file), or modify the WordPress database directly.
WordPress IP blocking plugin selection is crucial. The following types can be considered: based on .htaccess: efficient, but complex operation; database operation: flexible, but low efficiency; firewall: high security performance, but complex configuration; self-written: highest control, but requires more technical level.
To build a website using WordPress hosting, you need to: select a reliable hosting provider. Buy a domain name. Set up a WordPress hosting account. Select a topic. Add pages and articles. Install the plug-in. Customize your website. Publish your website.
WordPress editing dates can be canceled in three ways: 1. Install the Enable Post Date Disable plug-in; 2. Add code in the functions.php file; 3. Manually edit the post_modified column in the wp_posts table.
A step-by-step guide to replacing a header image of WordPress: Log in to the WordPress dashboard and navigate to Appearance >Theme. Select the topic you want to edit and click Customize. Open the Theme Options panel and look for the Site Header or Header Image options. Click the Select Image button and upload a new head image. Crop the image and click Save and Crop. Click the Save and Publish button to update the changes.
The steps to create a custom header in WordPress are as follows: Edit the theme file "header.php". Add your website name and description. Create a navigation menu. Add a search bar. Save changes and view your custom header.
WordPress Error Resolution Guide: 500 Internal Server Error: Disable the plug-in or check the server error log. 404 Page not found: Check permalink and make sure the page link is correct. White Screen of Death: Increase the server PHP memory limit. Database connection error: Check the database server status and WordPress configuration. Other tips: enable debug mode, check error logs, and seek support. Prevent errors: regularly update WordPress, install only necessary plugins, regularly back up your website, and optimize website performance.
Enable comments in WordPress website: 1. Log in to the admin panel, go to "Settings" - "Discussions", and check "Allow comments"; 2. Select a location to display comments; 3. Customize comments; 4. Manage comments, approve, reject or delete; 5. Use <?php comments_template(); ?> tags to display comments; 6. Enable nested comments; 7. Adjust comment shape; 8. Use plugins and verification codes to prevent spam comments; 9. Encourage users to use Gravatar avatar; 10. Create comments to refer to