
 Operation and Maintenance
Linux Operation and Maintenance
How to deploy php project under linux?
Operation and Maintenance
Linux Operation and Maintenance
How to deploy php project under linux?
How to deploy php project under linux?


The environment for deploying PHP projects under Linux can be divided into two types, one is installed using the compressed package of Apache, PHP, and MySQL, and the other is Use the yum command to install.
# Use the compressed packages of the three software to install, and you need to manually configure the relationship between the three. The configuration between apache and php is not difficult, but when configuring with mysql, you need to understand php.
The following is to use yum to configure the php environment in linux:
##MySql
1.It is best to install mysql and apache first, because when configuring php, you need to configure and test related mysql and apache
First download mysql-sever file, because the blogger’s Linux environment is the CentOS version, and there seems to be no mysql-sever file for normal installation of mysql in the yum source. You need to download it from the official website
1.下载mysql-service文件
[root@tele-1 ~]# wget
mysql-service
[root@tele-1 ~]# rpm -ivh mysql-community-release-el7-5.noarch.rpm
2. Install mysql
[root@tele-1 ~]# yum install mysql-community-server
3. After the installation is complete, start the mysql service
[root@tele-1 ~]# service mysqld restart
4. The initial installation of mysql does not have a password, and the default user name is root. So we need to change the password and use the mysql command line to change it
1. Enter the mysql command line
[root@tele-1 ~]# mysql -urootWelcome to the MySQL monitor.  Commands end with ; or \g.Your MySQL connection id is 474801Server version: 5.6.36 MySQL Community Server (GPL)

Copyright (c) 2000, 2017, Oracle and/or its affiliates. All rights reserved.Oracle is a registered trademark of Oracle Corporation and/or its
affiliates. Other names may be trademarks of their respective
owners.Type 'help;' or '\h' for help. Type '\c' to clear the current input statement.mysql>
2.使用命令进行密码修改
mysql> set password for 'root'@'localhost' = password('你要修改的密码');
Query OK, 0 rows affected (0.06 sec)
5. Because the blogger uses The local navicat software is used to connect to mysql under Linux, so if you want to access it locally, you need to change the user table in the mysql database
1.操作mysql数据库表
mysql> use mysql;
Reading table information for completion of table and column names
You can turn off this feature to get a quicker startup with -A

Database changedmysql>
2.查看user表中的数据(在mysql命令行中可以直接进行sql语句编写)
mysql> select * from user;+-----------+------+-----------------------------------+-------------+-------------+-------------+-------------+-------------+-----------+-------------+---------------+--------------+-----------+------------+-----------------+------------+------------+--------------+------------+-----------------------+------------------+--------------+-----------------+------------------+------------------+----------------+---------------------+--------------------+------------------+------------+--------------+------------------------+----------+------------+-------------+--------------+---------------+-------------+-----------------+----------------------+-----------------------+-----------------------+------------------+
| Host      | User | Password                                  | Select_priv | Insert_priv | Update_priv | Delete_priv | Create_priv | Drop_priv | Reload_priv | Shutdown_priv | Process_priv | File_priv | Grant_priv | References_priv | Index_priv | Alter_priv | Show_db_priv | Super_priv | Create_tmp_table_priv | Lock_tables_priv | Execute_priv | Repl_slave_priv | Repl_client_priv | Create_view_priv | Show_view_priv | Create_routine_priv | Alter_routine_priv | Create_user_priv | Event_priv | Trigger_priv | Create_tablespace_priv | ssl_type | ssl_cipher | x509_issuer | x509_subject | max_questions | max_updates | max_connections | max_user_connections | plugin                | authentication_string | password_expired |
+-----------+------+-----------------------------------+-------------+-------------+-------------+-------------+-------------+-----------+-------------+---------------+--------------+-----------+------------+-----------------+------------+------------+--------------+------------+-----------------------+------------------+--------------+-----------------+------------------+------------------+----------------+---------------------+--------------------+------------------+------------+--------------+------------------------+----------+------------+-------------+--------------+---------------+-------------+-----------------+----------------------+-----------------------+-----------------------+------------------+| %         | root | *3ce8dad2446975d8b0c771bd7e48d15b | Y           | Y           | Y           | Y           | Y           | Y         | Y           | Y             | Y            | Y         | Y          | Y               | Y          | Y          | Y            | Y          | Y                     | Y                | Y            | Y               | Y                | Y                | Y              | Y                   | Y                  | Y                | Y          | Y            | Y                      |          |            |             |              |             0 |           0 |               0 |                    0 | mysql_native_password |                       | N                || localhost | root | *3ce8dad2446975d8b0c771bd7e48d15b | Y           | Y           | Y           | Y           | Y           | Y         | Y           | Y             | Y            | Y         | Y          | Y               | Y          | Y          | Y            | Y          | Y                     | Y                | Y            | Y               | Y                | Y                | Y              | Y                   | Y                  | Y                | Y          | Y            | Y                      |          |            |             |              |             0 |           0 |               0 |                    0 | mysql_native_password |                       | N                |
| 127.0.0.1 | root | *3ce8dad2446975d8b0c771bd7e48d15b | Y           | Y           | Y           | Y           | Y           | Y         | Y           | Y             | Y            | Y         | Y          | Y               | Y          | Y          | Y            | Y          | Y                     | Y                | Y            | Y               | Y                | Y                | Y              | Y                   | Y                  | Y                | Y          | Y            | Y                      |          |            |             |              |             0 |           0 |               0 |                    0 | mysql_native_password |                       | N                |
| ::1       | root | *3ce8dad2446975d8b0c771bd7e48d15b | Y           | Y           | Y           | Y           | Y           | Y         | Y           | Y             | Y            | Y         | Y          | Y               | Y          | Y          | Y            | Y          | Y                     | Y                | Y            | Y               | Y                | Y                | Y              | Y                   | Y                  | Y                | Y          | Y            | Y                      |          |            |             |              |             0 |           0 |               0 |                    0 | mysql_native_password |                       | N                || tele-1    |      |                                           | N           | N           | N           | N           | N           | N         | N           | N             | N            | N         | N          | N               | N          | N          | N            | N          | N                     | N                | N            | N               | N                | N                | N              | N                   | N                  | N                | N          | N            | N                      |          |            |             |              |             0 |           0 |               0 |                    0 | mysql_native_password | NULL                  | N                |
+-----------+------+-----------------------------------+-------------+-------------+-------------+-------------+-------------+-----------+-------------+---------------+--------------+-----------+------------+-----------------+------------+------------+--------------+------------+-----------------------+------------------+--------------+-----------------+------------------+------------------+----------------+---------------------+--------------------+------------------+------------+--------------+------------------------+----------+------------+-------------+--------------+---------------+-------------+-----------------+----------------------+-----------------------+-----------------------+------------------+
5 rows in set (0.00 sec)mysql>
3 The blogger's table is the modified table. If you want to access remotely, you need the data marked in red above. Host refers to the IP address that can access this database, and % means that all requests can be connected. .
You can modify a piece of data or add a piece of data. But it is best not to modify the data marked in blue above. The modification statement is in the format below
mysql> update user set Host = '%' where ???
4. Finally, exit or \q are the methods to exit the mysql command line
mysql> \q
Bye
Install Apache
1. The apache installation method is relatively simple
[root@tele-2 ~]# yum install httpd
2. External network access virtual For the address in the machine, we need to modify the apache configuration file /etc/httpd/conf/httpd.conf
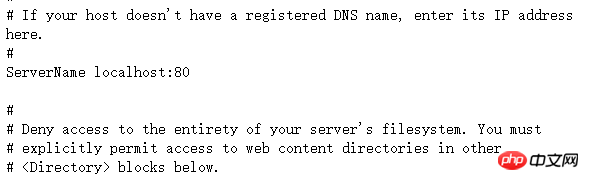
#ServerName www.example.com:80 Change to ServerName localhost:80
As shown on the right Shown: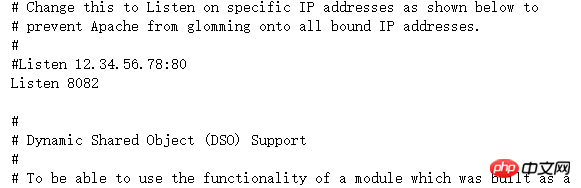 ## Find
#Listen is changed to Listen:8080 (Open port number 80XX in Linux)
As shown in the picture on the right: 3. After the modification is completed, we need to start the httpd service again and check the startup status
[root@tele-2 ~]# service httpd startRedirecting to /bin/systemctl start  httpd.service
[root@tele-2 ~]# service httpd statusRedirecting to /bin/systemctl status  httpd.service
● httpd.service - The Apache HTTP Server
   Loaded: loaded (/usr/lib/systemd/system/httpd.service; enabled; vendor preset: disabled)
   Active: active (running) since Mon 2017-06-05 15:57:34 CST; 5s ago
     Docs: man:httpd(8)
           man:apachectl(8)
  Process: 54532 ExecStop=/bin/kill -WINCH ${MAINPID} (code=exited, status=0/SUCCESS)
  Process: 39046 ExecReload=/usr/sbin/httpd $OPTIONS -k graceful (code=exited, status=0/SUCCESS)
 Main PID: 54573 (httpd)
   Status: "Processing requests..."
   Memory: 15.8M
   CGroup: /system.slice/httpd.service
           ├─54573 /usr/sbin/httpd -DFOREGROUND
           ├─54576 /usr/sbin/httpd -DFOREGROUND
           ├─54577 /usr/sbin/httpd -DFOREGROUND
           ├─54578 /usr/sbin/httpd -DFOREGROUND
           ├─54579 /usr/sbin/httpd -DFOREGROUND
           └─54580 /usr/sbin/httpd -DFOREGROUND

Jun 05 15:57:34 tele-2 systemd[1]: Starting The Apache HTTP Server...Jun 05 15:57:34 tele-2 systemd[1]: Started The Apache HTTP Server.
PHP
1.php安装命令
[root@tele-2 ~]# yum install php
2.直接一路安装,安装完成之后再次重启httpd服务
[root@tele-2 ~]# service httpd startRedirecting to /bin/systemctl start httpd.service
3.重启之后我们进行测试PHP相关信息,我们新建一个PHP界面进行测试
在apache默认页面路径/var/www/html下新建一个test.php页面,添加代码
<?php phpinfo();?>
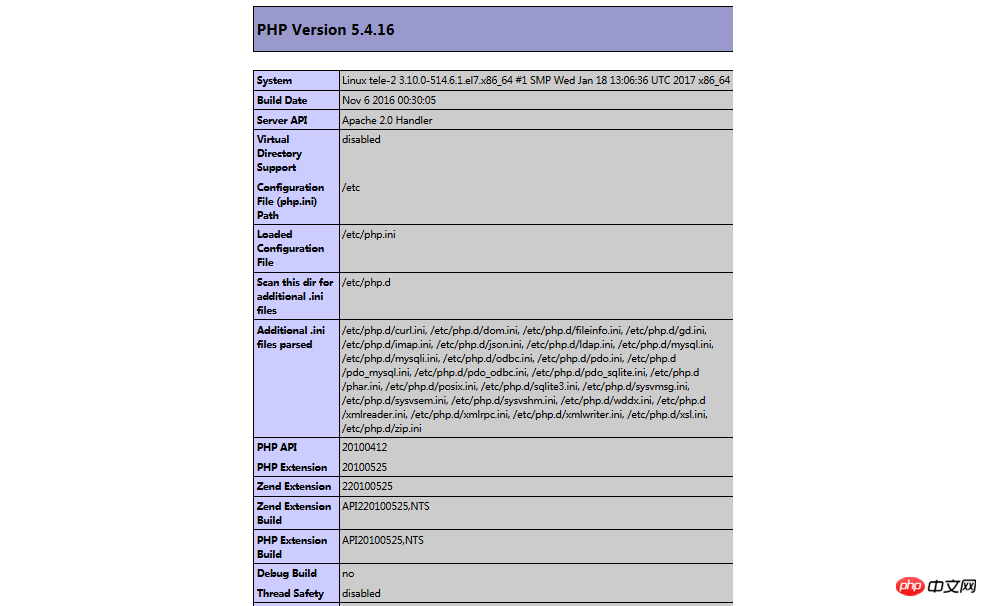
4.访问这个页面,输入localhost/test.php,或者
ip:端口号/test.php就可以看见php环境的配置信息了。如右图:
关联php和mysql
1.搜索模块
[root@tele-2 ~]# yum search php
2.安装相关模块
[root@tele-2 ~]# yum install php-mysql php-gd php-imap php-ldap php-odbc php-pear php-xml php-xmlrpc
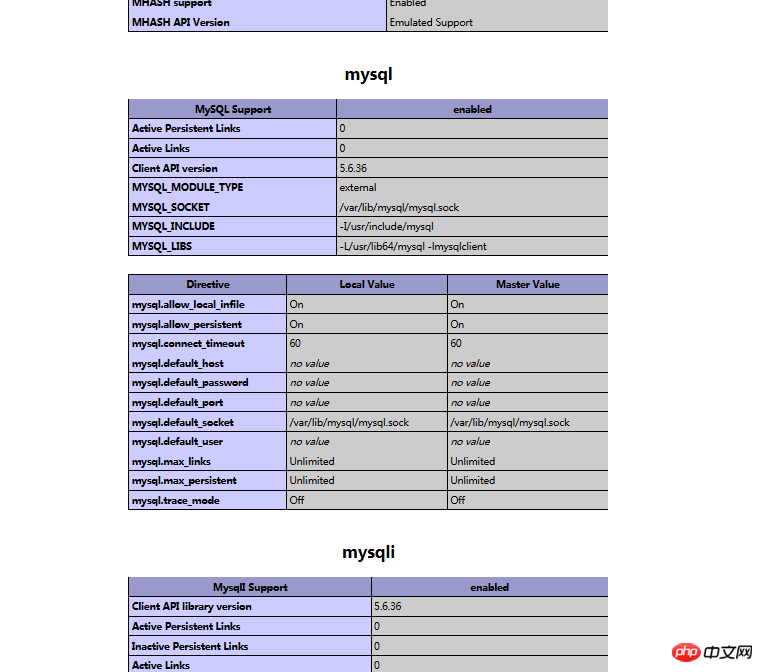
3.安装完成,重启mysqld,重启httpd
重新访问刚才的info.php,我们发现已经多了MySQL的相关信息。如右图:
至此,php在linux中的运行环境就已经成功配置完成了。
1.mysql yum安装默认文件夹及相关命令
/var/lib/mysql/

:/usr/share/mysql(mysql.server)

/usr/bin(mysqladmin mysqldump)

my.cnf: /etc/my.cnf

:/etc/rc.d/init.d/mysql
:service mysql start
停止命令:service mysql stop
运行状态:service mysql status
2.apache
配置文件路径:/etc/httpd/conf/httpd.conf
service httpd start
service httpd stop
运行状态:service httpd status
3.php
php默认页面路径:/var/www/html
The above is the detailed content of How to deploy php project under linux?. For more information, please follow other related articles on the PHP Chinese website!

Hot AI Tools

Undresser.AI Undress
AI-powered app for creating realistic nude photos

AI Clothes Remover
Online AI tool for removing clothes from photos.

Undress AI Tool
Undress images for free

Clothoff.io
AI clothes remover

Video Face Swap
Swap faces in any video effortlessly with our completely free AI face swap tool!

Hot Article
Hot Tools

Notepad++7.3.1
Easy-to-use and free code editor

SublimeText3 Chinese version
Chinese version, very easy to use

Zend Studio 13.0.1
Powerful PHP integrated development environment

Dreamweaver CS6
Visual web development tools

SublimeText3 Mac version
God-level code editing software (SublimeText3)
Hot Topics


 MySQL and phpMyAdmin: Core Features and Functions
Apr 22, 2025 am 12:12 AM
MySQL and phpMyAdmin: Core Features and Functions
Apr 22, 2025 am 12:12 AM
MySQL and phpMyAdmin are powerful database management tools. 1) MySQL is used to create databases and tables, and to execute DML and SQL queries. 2) phpMyAdmin provides an intuitive interface for database management, table structure management, data operations and user permission management.
 Docker on Linux: Containerization for Linux Systems
Apr 22, 2025 am 12:03 AM
Docker on Linux: Containerization for Linux Systems
Apr 22, 2025 am 12:03 AM
Docker is important on Linux because Linux is its native platform that provides rich tools and community support. 1. Install Docker: Use sudoapt-getupdate and sudoapt-getinstalldocker-cedocker-ce-clicotainerd.io. 2. Create and manage containers: Use dockerrun commands, such as dockerrun-d--namemynginx-p80:80nginx. 3. Write Dockerfile: Optimize the image size and use multi-stage construction. 4. Optimization and debugging: Use dockerlogs and dockerex
 The Compatibility of IIS and PHP: A Deep Dive
Apr 22, 2025 am 12:01 AM
The Compatibility of IIS and PHP: A Deep Dive
Apr 22, 2025 am 12:01 AM
IIS and PHP are compatible and are implemented through FastCGI. 1.IIS forwards the .php file request to the FastCGI module through the configuration file. 2. The FastCGI module starts the PHP process to process requests to improve performance and stability. 3. In actual applications, you need to pay attention to configuration details, error debugging and performance optimization.
 Explain the purpose of foreign keys in MySQL.
Apr 25, 2025 am 12:17 AM
Explain the purpose of foreign keys in MySQL.
Apr 25, 2025 am 12:17 AM
In MySQL, the function of foreign keys is to establish the relationship between tables and ensure the consistency and integrity of the data. Foreign keys maintain the effectiveness of data through reference integrity checks and cascading operations. Pay attention to performance optimization and avoid common errors when using them.
 CentOS: Security, Stability, and Performance
Apr 21, 2025 am 12:11 AM
CentOS: Security, Stability, and Performance
Apr 21, 2025 am 12:11 AM
CentOS is the first choice for server and enterprise environments for its superior security, stability and performance. 1) Security provides forced access control through SELinux to improve system security. 2) Stability is supported by the LTS version for up to 10 years to ensure the stability of the system. 3) Performance significantly improves system response speed and resource utilization by optimizing kernel and system configuration.
 SQL vs. MySQL: Clarifying the Relationship Between the Two
Apr 24, 2025 am 12:02 AM
SQL vs. MySQL: Clarifying the Relationship Between the Two
Apr 24, 2025 am 12:02 AM
SQL is a standard language for managing relational databases, while MySQL is a database management system that uses SQL. SQL defines ways to interact with a database, including CRUD operations, while MySQL implements the SQL standard and provides additional features such as stored procedures and triggers.
 How does MySQL differ from Oracle?
Apr 22, 2025 pm 05:57 PM
How does MySQL differ from Oracle?
Apr 22, 2025 pm 05:57 PM
MySQL is suitable for rapid development and small and medium-sized applications, while Oracle is suitable for large enterprises and high availability needs. 1) MySQL is open source and easy to use, suitable for web applications and small and medium-sized enterprises. 2) Oracle is powerful and suitable for large enterprises and government agencies. 3) MySQL supports a variety of storage engines, and Oracle provides rich enterprise-level functions.
 Compare and contrast MySQL and MariaDB.
Apr 26, 2025 am 12:08 AM
Compare and contrast MySQL and MariaDB.
Apr 26, 2025 am 12:08 AM
The main difference between MySQL and MariaDB is performance, functionality and license: 1. MySQL is developed by Oracle, and MariaDB is its fork. 2. MariaDB may perform better in high load environments. 3.MariaDB provides more storage engines and functions. 4.MySQL adopts a dual license, and MariaDB is completely open source. The existing infrastructure, performance requirements, functional requirements and license costs should be taken into account when choosing.
