

python learning to capture blog park news

前言
说到python,对它有点耳闻的人,第一反应可能都是爬虫~
这两天看了点python的皮毛知识,忍不住想写一个简单的爬虫练练手,JUST DO IT
准备工作
要制作数据抓取的爬虫,对请求的源页面结构需要有特定分析,只有分析正确了,才能更好更快的爬到我们想要的内容。
浏览器访问570973/,右键“查看源代码”,初步只想取一些简单的数据(文章标题、作者、发布时间等),在HTML源码中找到相关数据的部分:
1)标题(url):
# 2) Author: Submiter itwriter
3) Release time: Published on 2017-06-06 14:53
# 4) Current news ID: ##
##Of course, if you want to follow the lead, the structure of the "previous article" and "next article" links is very important; but I found a problem, the two tags in the page, their links and text content , is rendered through js, what should I do? Try to find information (python executes js and the like), but for python novices, it may be a bit ahead of the curve and I plan to find another solution. Although these two links are rendered through js, in theory, the reason why js can render the content should be by initiating a request and getting the response. Then is it possible to monitor the web page? Check out the loading process to see what useful information there is? I would like to give a thumbs up to browsers such as chrome/firefox. Developer Tools/Network can clearly see the request and response status of all resources.
Their request addresses are: 1) Previous news ID:
2) Next news ID:
The content of the response is JSON
The ContentID here is what we need. Based on this value, we can know the previous or next article of the current news News URL, because the page address of news releases has a fixed format:
{{ContentID}}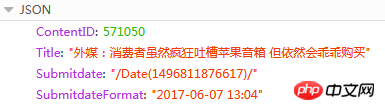
Tools
## 1) python 3.6 (install pip at the same time during installation, and add environment variables)
2) PyCharm 2017.1.3
3) Third-party python library (installation: cmd -> pip install name)
a) pyperclip: used to read and write the clipboard
b) requests: an HTTP library based on urllib and using the Apache2 Licensed open source protocol. It is more convenient than urllib and can save us a lot of work
c) beautifulsoup4: Beautifulsoup provides some simple, python-style functions to handle navigation, search, modify parse trees, etc. Function. It is a toolbox that provides users with the data they need to crawl by parsing documents
Source code
Personally I think the codes are very basic and easy to understand (after all, novices can’t write advanced code). If you have any questions or suggestions, please feel free to let me know
#! python3
# coding = utf-8
# get_cnblogs_news.py
# 根据博客园内的任意一篇新闻,获取所有新闻(标题、发布时间、发布人)
#
# 这是标题格式 :<div id="news_title"><a href="//news.cnblogs.com/n/570973/">SpaceX重复使用的“龙”飞船成功与国际空间站对接</a></div>
# 这是发布人格式 :<span class="news_poster">投递人 <a href="//home.cnblogs.com/u/34358/">itwriter</a></span>
# 这是发布时间格式 :<span class="time">发布于 2017-06-06 14:53</span>
# 当前新闻ID :<input type="hidden" value="570981" id="lbContentID">
# html中获取不到上一篇和下一篇的直接链接,因为它是使用ajax请求后期渲染的
# 需要另外请求地址,获取结果,JSON
# 上一篇
# 下一篇
# 响应内容
# ContentID : 570971
# Title : "Mac支持外部GPU VR开发套件售599美元"
# Submitdate : "/Date(1425445514)"
# SubmitdateFormat : "2017-06-06 14:47"
import sys, pyperclip
import requests, bs4
import json
# 解析并打印(标题、作者、发布时间、当前ID)
# soup : 响应的HTML内容经过bs4转化的对象
def get_info(soup):
dict_info = {'curr_id': '', 'author': '', 'time': '', 'title': '', 'url': ''}
titles = soup.select('div#news_title > a')
if len(titles) > 0:
dict_info['title'] = titles[0].getText()
dict_info['url'] = titles[0].get('href')
authors = soup.select('span.news_poster > a')
if len(authors) > 0:
dict_info['author'] = authors[0].getText()
times = soup.select('span.time')
if len(times) > 0:
dict_info['time'] = times[0].getText()
content_ids = soup.select('input#lbContentID')
if len(content_ids) > 0:
dict_info['curr_id'] = content_ids[0].get('value')
# 写文件
with open('D:/cnblognews.csv', 'a') as f:
text = '%s,%s,%s,%s\n' % (dict_info['curr_id'], (dict_info['author'] + dict_info['time']), dict_info['url'], dict_info['title'])
print(text)
f.write(text)
return dict_info['curr_id']
# 获取前一篇文章信息
# curr_id : 新闻ID
# loop_count : 向上多少条,如果为0,则无限向上,直至结束
def get_prev_info(curr_id, loop_count = 0):
private_loop_count = 0
try:
while loop_count == 0 or private_loop_count < loop_count:
res_prev = requests.get('https://news.cnblogs.com/NewsAjax/GetPreNewsById?contentId=' + curr_id)
res_prev.raise_for_status()
res_prev_dict = json.loads(res_prev.text)
prev_id = res_prev_dict['ContentID']
res_prev = requests.get('https://news.cnblogs.com/n/%s/' % prev_id)
res_prev.raise_for_status()
soup_prev = bs4.BeautifulSoup(res_prev.text, 'html.parser')
curr_id = get_info(soup_prev)
private_loop_count += 1
except:
pass
# 获取下一篇文章信息
# curr_id : 新闻ID
# loop_count : 向下多少条,如果为0,则无限向下,直至结束
def get_next_info(curr_id, loop_count = 0):
private_loop_count = 0
try:
while loop_count == 0 or private_loop_count < loop_count:
res_next = requests.get('https://news.cnblogs.com/NewsAjax/GetNextNewsById?contentId=' + curr_id)
res_next.raise_for_status()
res_next_dict = json.loads(res_next.text)
next_id = res_next_dict['ContentID']
res_next = requests.get('https://news.cnblogs.com/n/%s/' % next_id)
res_next.raise_for_status()
soup_next = bs4.BeautifulSoup(res_next.text, 'html.parser')
curr_id = get_info(soup_next)
private_loop_count += 1
except:
pass
# 参数从优先从命令行获取,如果无,则从剪切板获取
# url是博客园新闻版块下,任何一篇新闻
if len(sys.argv) > 1:
url = sys.argv[1]
else:
url = pyperclip.paste()
# 没有获取到有地址,则抛出异常
if not url:
raise ValueError
# 开始从源地址中获取新闻内容
res = requests.get(url)
res.raise_for_status()
if not res.text:
raise ValueError
#解析Html
soup = bs4.BeautifulSoup(res.text, 'html.parser')
curr_id = get_info(soup)
print('backward...')
get_prev_info(curr_id)
print('forward...')
get_next_info(curr_id)
print('done')
Run
Save the above source code to D:/get_cnblogs_news.py, under the windows platform Open the command line tool cmd:
Enter the command: py.exe D:/get_cnblogs_news.py Enter
Analysis: No need to explain py.exe, the second parameter is the python script file , the third parameter is the source page that needs to be crawled (there is another consideration in the code. If you copy this url to the system clipboard, you can run it directly: py.exe D:/get_cnblogs_news.py
Command line output interface (print)
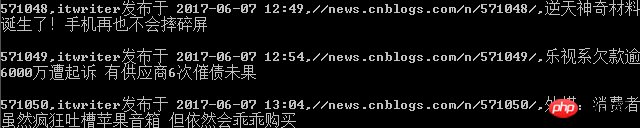
Content saved to csv file

Recommended python learning bookbox or materials for rookies:
1) Liao Xuefeng’s Python tutorial, very basic and easy to understand:
2 ) Get started with Python programming quickly and automate tedious work.pdf
The article is just a diary for myself to learn python. Please criticize and correct me if it is misleading (no Please don’t spray), I would be honored if it helped you.
The above is the detailed content of python learning to capture blog park news. For more information, please follow other related articles on the PHP Chinese website!

Hot AI Tools

Undresser.AI Undress
AI-powered app for creating realistic nude photos

AI Clothes Remover
Online AI tool for removing clothes from photos.

Undress AI Tool
Undress images for free

Clothoff.io
AI clothes remover

Video Face Swap
Swap faces in any video effortlessly with our completely free AI face swap tool!

Hot Article
Hot Tools

Notepad++7.3.1
Easy-to-use and free code editor

SublimeText3 Chinese version
Chinese version, very easy to use

Zend Studio 13.0.1
Powerful PHP integrated development environment

Dreamweaver CS6
Visual web development tools

SublimeText3 Mac version
God-level code editing software (SublimeText3)
Hot Topics
 1666
1666
 14
1425
52
1328
25
1273
29
1253
24
14
1425
52
1328
25
1273
29
1253
24

 PHP and Python: Different Paradigms Explained
Apr 18, 2025 am 12:26 AM
PHP and Python: Different Paradigms Explained
Apr 18, 2025 am 12:26 AM
PHP is mainly procedural programming, but also supports object-oriented programming (OOP); Python supports a variety of paradigms, including OOP, functional and procedural programming. PHP is suitable for web development, and Python is suitable for a variety of applications such as data analysis and machine learning.
 Choosing Between PHP and Python: A Guide
Apr 18, 2025 am 12:24 AM
Choosing Between PHP and Python: A Guide
Apr 18, 2025 am 12:24 AM
PHP is suitable for web development and rapid prototyping, and Python is suitable for data science and machine learning. 1.PHP is used for dynamic web development, with simple syntax and suitable for rapid development. 2. Python has concise syntax, is suitable for multiple fields, and has a strong library ecosystem.
 How to run sublime code python
Apr 16, 2025 am 08:48 AM
How to run sublime code python
Apr 16, 2025 am 08:48 AM
To run Python code in Sublime Text, you need to install the Python plug-in first, then create a .py file and write the code, and finally press Ctrl B to run the code, and the output will be displayed in the console.
 PHP and Python: A Deep Dive into Their History
Apr 18, 2025 am 12:25 AM
PHP and Python: A Deep Dive into Their History
Apr 18, 2025 am 12:25 AM
PHP originated in 1994 and was developed by RasmusLerdorf. It was originally used to track website visitors and gradually evolved into a server-side scripting language and was widely used in web development. Python was developed by Guidovan Rossum in the late 1980s and was first released in 1991. It emphasizes code readability and simplicity, and is suitable for scientific computing, data analysis and other fields.
 Python vs. JavaScript: The Learning Curve and Ease of Use
Apr 16, 2025 am 12:12 AM
Python vs. JavaScript: The Learning Curve and Ease of Use
Apr 16, 2025 am 12:12 AM
Python is more suitable for beginners, with a smooth learning curve and concise syntax; JavaScript is suitable for front-end development, with a steep learning curve and flexible syntax. 1. Python syntax is intuitive and suitable for data science and back-end development. 2. JavaScript is flexible and widely used in front-end and server-side programming.
 Golang vs. Python: Performance and Scalability
Apr 19, 2025 am 12:18 AM
Golang vs. Python: Performance and Scalability
Apr 19, 2025 am 12:18 AM
Golang is better than Python in terms of performance and scalability. 1) Golang's compilation-type characteristics and efficient concurrency model make it perform well in high concurrency scenarios. 2) Python, as an interpreted language, executes slowly, but can optimize performance through tools such as Cython.
 Where to write code in vscode
Apr 15, 2025 pm 09:54 PM
Where to write code in vscode
Apr 15, 2025 pm 09:54 PM
Writing code in Visual Studio Code (VSCode) is simple and easy to use. Just install VSCode, create a project, select a language, create a file, write code, save and run it. The advantages of VSCode include cross-platform, free and open source, powerful features, rich extensions, and lightweight and fast.
 How to run python with notepad
Apr 16, 2025 pm 07:33 PM
How to run python with notepad
Apr 16, 2025 pm 07:33 PM
Running Python code in Notepad requires the Python executable and NppExec plug-in to be installed. After installing Python and adding PATH to it, configure the command "python" and the parameter "{CURRENT_DIRECTORY}{FILE_NAME}" in the NppExec plug-in to run Python code in Notepad through the shortcut key "F6".
