
 Operation and Maintenance
Linux Operation and Maintenance
A detailed introduction to how to configure a website on a Linux server and bind a domain name
Operation and Maintenance
Linux Operation and Maintenance
A detailed introduction to how to configure a website on a Linux server and bind a domain name
A detailed introduction to how to configure a website on a Linux server and bind a domain name

Nginx 服务绑定域名的方法
以 YUM 安装的 Nginx 为例,域名绑定需要编辑 Nginx 的配置文件完成,Nginx 配置文件是 /etc/A detailed introduction to how to configure a A detailed introduction to how to configure a website on a Linux server and bind a domain namesite on a Linux server and bind a domain name/A detailed introduction to how to configure a A detailed introduction to how to configure a website on a Linux server and bind a domain namesite on a Linux server and bind a domain name.conf,将默认的server {...}配置修改成如下:
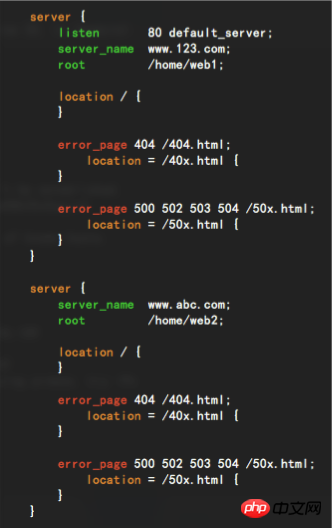
修改后的意思是:
1、访问 www.123.com,会跳转到 /home/A detailed introduction to how to configure a website on a Linux server and bind a domain name1 目录;
2、访问 www.abc.com,会跳转到 /home/A detailed introduction to how to configure a website on a Linux server and bind a domain name2 目录。
修改之后重启 Nginx 服务即可。
Tomcat 服务绑定域名的方法
域名绑定需要编辑 Tomcat 的配置文件完成,Tomcat 配置文件是 $TOMCAT_HOME/conf/server.xml,$TOMCAT_HOME 是 Tomcat 的安装目录。

将上述内容修改为:
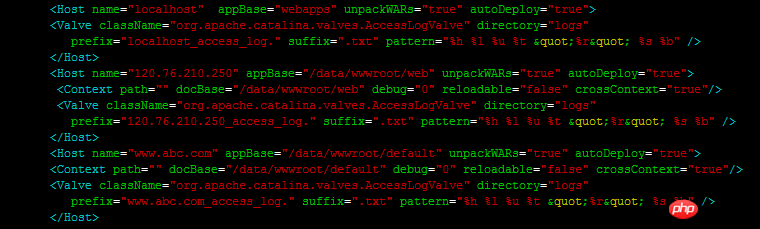
修改后的意思是:
1、访问 www.abc.com,会默认跳转到 /data/wwwroot/default 目录;
2、访问服务器的 IP 地址 120.76.210.250,会默认跳转到 /data/wwwroot/A detailed introduction to how to configure a website on a Linux server and bind a domain name 目录;
修改之后重启 Tomcat 服务器,即可生效。
Apache 服务绑定域名的方法
例如使用一键安装包配置的 Apache 环境,添加网站配置方法如下:
1、进入站点配置文件目录,命令如下:
cd /alidata/server/httpd/conf/vhosts/
2、创建一个新的配置文件,命令如下:
vi aa.conf
3、按键盘上的字母 “i” ,开始编辑文件,将下面的内容复制过去。
Order allow,denyDeny from allDocumentRoot /alidata/www/testServerName www.test.comServerAlias test.comErrorLog “/alidata/log/httpd/test-error.log”CustomLog “/alidata/log/httpd/test.log”
<strong>注意:</strong>对应的日志名字也需要自己修改一下,可以区分网站的日志信息
4、重启 Apache 测试,命令如下:
/alidata/server/httpd/bin/apachectl restart
Apache 服务配置实现多域名跳转
例如程序的目录为 /var/www/html
网站目录结构:
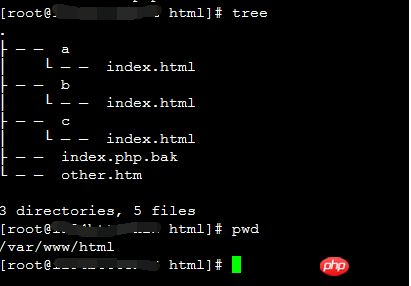
Apache 核心配置内容:
主要是开启 Apache 的虚拟主机功能,配置对应的虚拟主机到对应的目录即可。
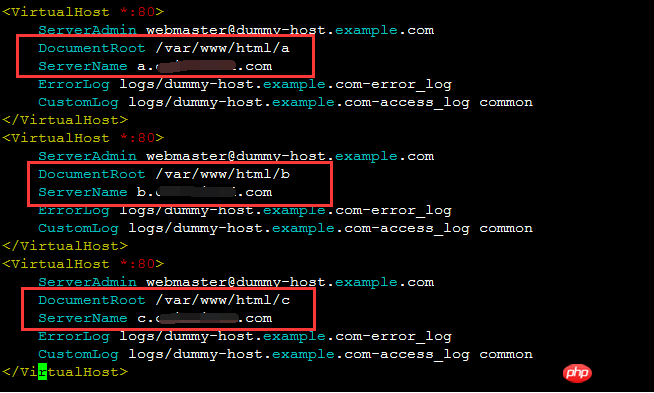
实现效果:
使用a.example.com访问时,是访问到/var/www/html/a目录
使用b.example.com访问时,是访问到/var/www/html/b目录
使用c.example.com访问时,是访问到/var/www/html/c目录
Apache 服务配置二级域名
1、拥有一个有泛域名解析的顶级域名,例如: aliyun.com
2、在 httpd.conf 中打开 mod_rewrite 模块
3、在 httpd.conf 的最后,添加以下内容:
RewriteEngine onRewriteMap lowercase int:tolowerRewriteMap vhost txt:/usr/local/etc/apache/vhost.mapRewriteCond ${lowercase:%{SERVER_NAME}} ^(.+)$RewriteCond ${vhost:%1} ^(/.)$RewriteRule ^/(.)$ %1/$1注意:其中的 /usr/local/etc/apache 是你的 Apache 服务器配置文件所在路径,根据实际情况更改。
4、在这个所在路径的目录下创建一个文件: vhost.map
www.aliyun.com /usr/local/www/data-dist/aliyunbbs.aliyun.com /usr/local/www/data-dist/aliyunbbsanyname.aliyun.com /usr/local/www/data-dist/anyname
注意:以上部分都是:” 域名+空格+绝对路径” 的形式。
5、在你的网站根目录 /usr/local/www/data-dist 下,创建对应目录:aliyun , bbs , anyname 等等,理论上可以无限。
这样,通过浏览器,访问 www.aliyun.com 时,实际上访问的就是 /usr/local/www/data-dist/aliyun目录下的文件。
同理,访问 bbs.aliyun.com 实际上访问的就是 /usr/local/www/data-dist/aliyunbbs 目录下的文件。
而且,你可以随时更改 vhost.map 来增加、删除、修改你的二级域名和所指向的实际路径,不用重启 Apache。
Apache 禁止未经许可的域名访问 ECS 上的网站
问题现象
有时 ECS 上的网站会被人恶意指向,譬如说您的 ECS 的 IP 地址为 123.123.123.123,正常服务的域名为 www.abc.com,但是此时有恶意用户使用其他的域名,恶意指向到您的网站;
如恶意用户注册了一个域名 www.fake.com,然后指向到了 IP 123.123.123.123,这样会使访问原本不属于您网站的域名 www.fake.com 也会出现您的网站内容。
解决方案
通过 Apache 的虚拟主机可以变通的解决这个问题。
测试场景:
服务器上有两个网站,分别为 t1.huigher.cn/ 和 p1.huigher.cn/
Apache 版本为 2.2.15
打开 Apache 的配置文件,CentOS 下默认位置在 /etc/httpd/conf/httpd.conf,在其中加入以下内容
注意:以实际 Apache 配置文件路径为准
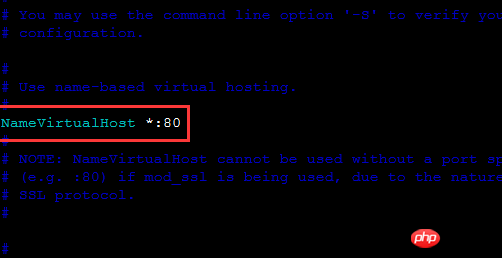
1、 首先是加入以下代码,告知 Apache 使用了基于 host 名的虚拟主机功能:
NameVirtualHost *:80
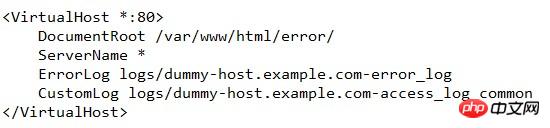
2、 然后加入以下代码,作用是当客户端携带的host头不在之后设置的网站域名内时,指向一个 403 错误页面告知用户域名非法,
其中 DocumentRoot 即是放置错误提示页面的目录,在下面可以放置一个简单的 html 页面提示用户访问的域名非法
3、 最后加入以下代码,告知 Apache 合法的网站主机头,这个代码块根据实际情况修改内容,该实例中加入了两个网站,分别是 p1.huigher.cn 和 t1.huigher.cn
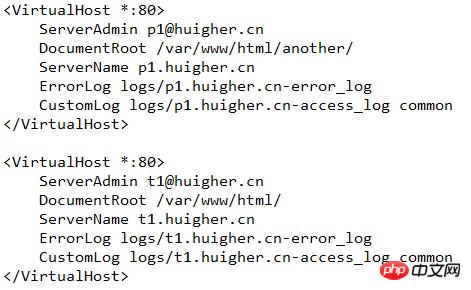
4、 最后重新启动 Apache 就可以看到效果了
5、若希望使用其他域名访问时直接返回 403 错误,可以在第二步中将代码改为以下形式:
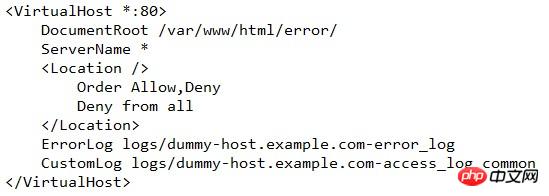
重启 Apachye 后再使用其他域名访问就会直接返回 403 错误了。
The above is the detailed content of A detailed introduction to how to configure a website on a Linux server and bind a domain name. For more information, please follow other related articles on the PHP Chinese website!

Hot AI Tools

Undresser.AI Undress
AI-powered app for creating realistic nude photos

AI Clothes Remover
Online AI tool for removing clothes from photos.

Undress AI Tool
Undress images for free

Clothoff.io
AI clothes remover

Video Face Swap
Swap faces in any video effortlessly with our completely free AI face swap tool!

Hot Article
Hot Tools

Notepad++7.3.1
Easy-to-use and free code editor

SublimeText3 Chinese version
Chinese version, very easy to use

Zend Studio 13.0.1
Powerful PHP integrated development environment

Dreamweaver CS6
Visual web development tools

SublimeText3 Mac version
God-level code editing software (SublimeText3)
Hot Topics
 1655
1655
 14
1414
52
1307
25
1253
29
1227
24
14
1414
52
1307
25
1253
29
1227
24

 Linux Architecture: Unveiling the 5 Basic Components
Apr 20, 2025 am 12:04 AM
Linux Architecture: Unveiling the 5 Basic Components
Apr 20, 2025 am 12:04 AM
The five basic components of the Linux system are: 1. Kernel, 2. System library, 3. System utilities, 4. Graphical user interface, 5. Applications. The kernel manages hardware resources, the system library provides precompiled functions, system utilities are used for system management, the GUI provides visual interaction, and applications use these components to implement functions.
 vscode terminal usage tutorial
Apr 15, 2025 pm 10:09 PM
vscode terminal usage tutorial
Apr 15, 2025 pm 10:09 PM
vscode built-in terminal is a development tool that allows running commands and scripts within the editor to simplify the development process. How to use vscode terminal: Open the terminal with the shortcut key (Ctrl/Cmd). Enter a command or run the script. Use hotkeys (such as Ctrl L to clear the terminal). Change the working directory (such as the cd command). Advanced features include debug mode, automatic code snippet completion, and interactive command history.
 How to check the warehouse address of git
Apr 17, 2025 pm 01:54 PM
How to check the warehouse address of git
Apr 17, 2025 pm 01:54 PM
To view the Git repository address, perform the following steps: 1. Open the command line and navigate to the repository directory; 2. Run the "git remote -v" command; 3. View the repository name in the output and its corresponding address.
 Where to write code in vscode
Apr 15, 2025 pm 09:54 PM
Where to write code in vscode
Apr 15, 2025 pm 09:54 PM
Writing code in Visual Studio Code (VSCode) is simple and easy to use. Just install VSCode, create a project, select a language, create a file, write code, save and run it. The advantages of VSCode include cross-platform, free and open source, powerful features, rich extensions, and lightweight and fast.
 How to run java code in notepad
Apr 16, 2025 pm 07:39 PM
How to run java code in notepad
Apr 16, 2025 pm 07:39 PM
Although Notepad cannot run Java code directly, it can be achieved by using other tools: using the command line compiler (javac) to generate a bytecode file (filename.class). Use the Java interpreter (java) to interpret bytecode, execute the code, and output the result.
 vscode terminal command cannot be used
Apr 15, 2025 pm 10:03 PM
vscode terminal command cannot be used
Apr 15, 2025 pm 10:03 PM
Causes and solutions for the VS Code terminal commands not available: The necessary tools are not installed (Windows: WSL; macOS: Xcode command line tools) Path configuration is wrong (add executable files to PATH environment variables) Permission issues (run VS Code as administrator) Firewall or proxy restrictions (check settings, unrestrictions) Terminal settings are incorrect (enable use of external terminals) VS Code installation is corrupt (reinstall or update) Terminal configuration is incompatible (try different terminal types or commands) Specific environment variables are missing (set necessary environment variables)
 What is the main purpose of Linux?
Apr 16, 2025 am 12:19 AM
What is the main purpose of Linux?
Apr 16, 2025 am 12:19 AM
The main uses of Linux include: 1. Server operating system, 2. Embedded system, 3. Desktop operating system, 4. Development and testing environment. Linux excels in these areas, providing stability, security and efficient development tools.
 vscode Previous Next Shortcut Key
Apr 15, 2025 pm 10:51 PM
vscode Previous Next Shortcut Key
Apr 15, 2025 pm 10:51 PM
VS Code One-step/Next step shortcut key usage: One-step (backward): Windows/Linux: Ctrl ←; macOS: Cmd ←Next step (forward): Windows/Linux: Ctrl →; macOS: Cmd →
