

HTML5 supports server-sent events

Simple sequence diagram of traditional WEB application communication:
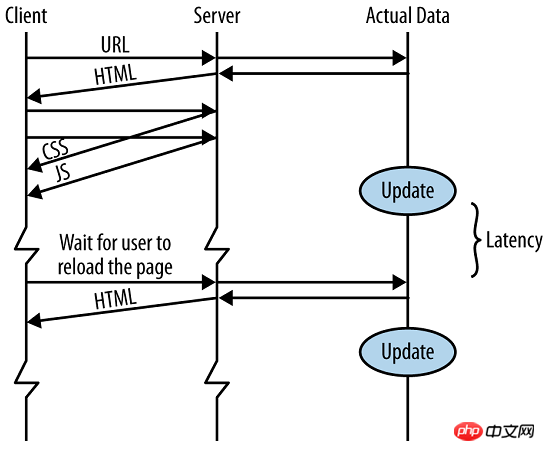
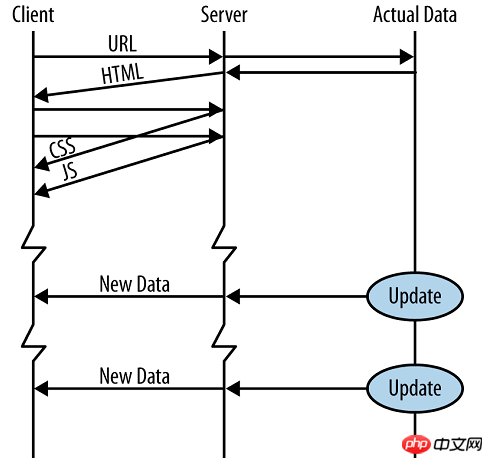
Nowadays, most of the Web Apps have Ajax, like this:

HTML5There is a Server-Sent Events (SSE) function that allows the server to push data to the client. (Usually called data push). Based on data push, when the data source has new data, it is sent to the client immediately without waiting for the client request. These new data may be the latest news, latest stock quotes, chat messages from friends, weather forecast, etc.
#The functions of data pull and push are the same, users get new data. But data push has some advantages. You may have heard that Comet, Ajax push, reverse Ajax, HTTP streaming, WebSockets and SSE are different technologies. Probably the biggest advantage is low latency. SSE is used by web applications to refresh data without requiring any action from the user.
You may have heard of HTML5 WebSockets, which can also push data to the client. WebSockets is a more complex technology to implement the server, but it is a true full-duplex socket. The server can push data to the client, and the client can also push data back to the server. SSE works with the HTTP/HTTPS protocol and supports proxy servers and authentication technologies. SSE is a text protocol and you can debug it easily. If you need to send mostly binary data from server to client, WebSocket is a better choice. The difference between SSE and WebSocket will be discussed below in this article.
HTML5 server-sent event (server-sent event) allows the web page to obtain updates from the server Server-Sent event -
One-way messagingThe Server-Sent event refers to the web page automatically getting updates from the server.
It was also possible to do this before, if the webpage had to ask if an update was available. By sending events through the server, updates can arrive automatically.
Examples: Facebook/Twitter updates, valuation updates, new blog posts, event results, etc.

EventSource object is used to receive event notification sent by the server:
    //创建一个新的 EventSource 对象,规定发送更新的页面的 URL
    var source = new EventSource("../api/MyAPI/ServerSentEvents");    //默认支持message事件
    source.onmessage = function (event) {
        console.log(source.readyState);
        console.log(event);
    };
Create a new EventSource object, and then specify the URL of the page to send updates (in this case, "demo_sse.php"),
The parameter url is the server URL , must be in the same domain (domain) as the URL of the current web page, and the protocol and port must be the same. Every time an update is received, the onmessage event will occur
The following example, we wrote an additional piece of code to detect server-sent events Browser support for:
if(!!EventSource && typeof(EventSource)!=="undefined")
{    // 浏览器支持 Server-Sent
// 一些代码.....}else{ // 浏览器不支持 Server-Sent..}In order for the above example to work, you also need to be able to Server that sends data updates (such as PHP,
ASP, ASP.NET, Java). The syntax of server-side event streaming is very simple. You
need to set the "Content-Type" header to "text/event-stream". Now you can start sending the event stream. I only know
C#, so I wrote the simplest server side using the ApiController in ASP.NET's MVC:
    public class MyAPIController : ApiController
    {        /// <summary>
        /// ...api/MyAPI/ServerSentEvents        /// </summary>
        /// <returns></returns>        [HttpGet, HttpPost]        public Task<HttpResponseMessage> ServerSentEvents()
        {            //Response.ContentType = "text/event-stream"            //Response.Expires = -1            //Response.Write("data: " & now())            //Response.Flush()

            string data = "id: 123456\nevent: message\ndata: 666\n\n";

            HttpResponseMessage response = new HttpResponseMessage
            {                //注意:ContentType = "text/event-stream"
                Content = new StringContent(data, Encoding.GetEncoding("UTF-8"), "text/event-stream")
            };            return Task.FromResult(response);
        }
} Code explanation:
Set the header "Content-Type" to "text/event-stream"
Specify that the page is not to be cached
Output the sending date (always with "data : " Beginning)
Refresh output data to the web page
##EventSource object
attribute, which indicates the state of the connection.
source.readyState It can take the following values:
0, equivalent to constant EventSource.CONNECTING means that the connection has not been established or the connection is disconnected.
1, which is equivalent to the constant EventSource.OPEN, indicating that the connection has been established and data can be accepted.
2, equivalent to the constant EventSource.CLOSED, indicating that the connection has been disconnected and will not be reconnected.
In the above example, we use the onmessage event to get the message. However, other events can also be used:
Event description
onopen When the connection to the server is opened
onmessage When a message is received
onerror When an error occurs
callback function can be defined.
source.onopen = function(event) { // han
dle open event};
Listener("open", function(event) { // handle open event
}, false);
message event
var data = event.data;
var origin = event.origin;
var lastEventId = event.lastEventId;
// handle message
};
var data = event.data;
var origin = event.origin;
var lastEventId = event.lastEventId;
// handle message
}, false);
The parameter object event has the following attributes:
// handle error event
};
// handle error event
}, false);
Custom event
var data = event.data;
var origin = event.origin;
var lastEventId = event.lastEventId;
// handle message
}, false);
The above code indicates that the browser monitors the foo event.
close();Data format
Overview
HTTP header of data sent by the server The information is as follows:
Content-Type: text/event-stream
Cache- Control: no-cache
Connection: keep-aliveThe lines following are in the following format:
field can take on four values: "data", "event", "id", or "retry", which means there are four types of header information. Each HTTP communication can contain one or more of these four types of header information. \n represents a newline character.
Here are some examples.
data: another message\n
data: with two lines \n\n
data:数据栏
数据内容用data表示,可以占用一行或多行。如果数据只有一行,则像下面这样,以“\n\n”结尾。
data: message\n\n
如果数据有多行,则最后一行用“\n\n”结尾,前面行都用“\n”结尾。
data: begin message\n
data: continue message\n\n
总之,最后一行的data,结尾要用两个换行符号,表示数据结束。
以发送JSON格式的数据为例。
data: {\n
data: "foo": "bar",\n
data: "baz", 555\n
data: }\n\n
id:数据标识符
数据标识符用id表示,相当于每一条数据的编号。
id: msg1\n
data: message\n\n
浏览器用lastEventId属性读取这个值。一旦连接断线,浏览器会发送一个HTTP头,里面包含一个特殊的“Last-Event-ID”头信息,将这个值发送回来,用来帮助服务器端重建连接。因此,这个头信息可以被视为一种同步机制。
event栏:自定义信息类型
event头信息表示自定义的数据类型,或者说数据的名字。
event: foo\n
data: a foo event\n\n
data: an unnamed event\n\n
event: bar\n
data: a bar event\n\n
上面的代码创造了三条信息。第一条是foo,触发浏览器端的foo事件;第二条未取名,表示默认类型,触发浏览器端的message事件;第三条是bar,触发浏览器端的bar事件。
retry:最大间隔时间
浏览器默认的是,如果服务器端三秒内没有发送任何信息,则开始重连。服务器端可以用retry头信息,指定通信的最大间隔时间。
retry: 10000\n
--------------------------------------------------------------------------------------
规范
Server-sent Events 规范是 HTML 5 规范的一个组成部分,具体的规范文档见参考资源。该规范比较简单,主要由两个部分组成:第一个部分是服务器端与浏览器端之间的通讯协议,第二部分则是在浏览器端可供 JavaScript 使用的 EventSource 对象。通讯协议是基于纯文本的简单协议。服务器端的响应的内容类型是“text/event-stream”。响应文本的内容可以看成是一个事件流,由不同的事件所组成。每个事件由类型和数据两部分组成,同时每个事件可以有一个可选的标识符。不同事件的内容之间通过仅包含回车符和换行符的空行(“\r\n”)来分隔。每个事件的数据可能由多行组成。代码清单 1 给出了服务器端响应的示例:
retry: 10000\n
event: message\n
id: 636307190866448426\n
data: 2017/05/18 15:44:46\n\n
响应报文头部:

响应报文内容:

每个事件之间通过空行来分隔。对于每一行来说,冒号(“:”)前面表示的是该行的类型,冒号后面则是对应的值。可能的类型包括:
类型为空白,表示该行是注释,会在处理时被忽略。
类型为 data,表示该行包含的是数据。以 data 开头的行可以出现多次。所有这些行都是该事件的数据。
类型为 event,表示该行用来声明事件的类型。浏览器在收到数据时,会产生对应类型的事件。
类型为 id,表示该行用来声明事件的标识符。
类型为 retry,表示该行用来声明浏览器在连接断开之后进行再次连接之前的等待时间。
当有多行数据时,实际的数据由每行数据以换行符连接而成。
如果服务器端返回的数据中包含了事件的标识符,浏览器会记录最近一次接收到的事件的标识符。如果与服务器端的连接中断,当浏览器端再次进行连接时,会通过 HTTP 头“Last-Event-ID”来声明最后一次接收到的事件的标识符。服务器端可以通过浏览器端发送的事件标识符来确定从哪个事件开始来继续连接。
对于服务器端返回的响应,浏览器端需要在 JavaScript 中使用 EventSource 对象来进行处理。EventSource 使用的是标准的事件监听器方式,只需要在对象上添加相应的事件处理方法即可。EventSource 提供了三个标准事件:
EventSource 对象提供的标准事件
名称 说明 事件处理方法
open 当成功与服务器建立连接时产生 onopen
message 当收到服务器发送的事件时产生 onmessage
error 当出现错误时产生 onerror
而且,服务器端可以返回自定义类型的事件。对于这些事件,可以使用 addEventListener 方法来添加相应的事件处理方法:
var es = new EventSource('events');
es.onmessage = function(e) {
    console.log(e.data);
};//自定义事件 myeventes.addEventListener('myevent', function(e) {
    console.log(e.data);
});在指定 URL 创建出 EventSource 对象之后,可以通过 onmessage 和 addEventListener 方法来添加事件处理方法。当服务器端有新的事件产生,相应的事件处理方法会被调用。EventSource 对象的 onmessage 属性的作用类似于 addEventListener( ‘ message ’ ),不过 onmessage 属性只支持一个事件处理方法。
传统的网页都是浏览器向服务器“查询”数据,但是很多场合,最有效的方式是服务器向浏览器“发送”数据。比如,每当收到新的电子邮件,服务器就向浏览器发送一个“通知”,这要比浏览器按时向服务器查询(polling)更有效率。服务器发送事件(Server-Sent Events,简称SSE)就是为了解决这个问题,而提出的一种新API,部署在EventSource对象上。目前,除了IE,其他主流浏览器都支持。
简单说,所谓SSE,就是浏览器向服务器发送一个HTTP请求,然后服务器不断单向地向浏览器推送“信息”(message)。这种信息在格式上很简单,就是“信息”加上前缀“data: ”,然后以“\n\n”结尾。
SSE与WebSocket有相似功能,都是用来建立浏览器与服务器之间的通信渠道。两者的区别在于:
WebSocket是全双工通道,可以双向通信,功能更强;SSE是单向通道,只能服务器向浏览器端发送。
WebSocket是一个新的协议,需要服务器端支持;SSE则是部署在HTTP协议之上的,现有的服务器软件都支持。
SSE是一个轻量级协议,相对简单;WebSocket是一种较重的协议,相对复杂。
SSE默认支持断线重连,WebSocket则需要额外部署。
SSE支持自定义发送的数据类型。
从上面的比较可以看出,两者各有特点,适合不同的场合。
个人完整的HTML5页面和C#(MVC实现服务端代码)如下:
前端HTML5页面:
<!DOCTYPE html><html><head>
    <meta charset="utf-8">
    <title>HTML5 服务器发送事件(Server-Sent Events)-单向消息传递</title>
    <meta name="author" content="熊仔其人" />
    <meta name="generator" content="2017-05-18" /></head><body>
    <h1>获取服务端更新数据</h1>
    <p id="result"></p><script>if(typeof(EventSource)!=="undefined")
{    //创建一个新的 EventSource 对象,规定发送更新的页面的 URL
    var source = new EventSource("../api/MyAPI/ServerSentEvents");    //默认支持open事件    source.onopen = function (event) {
        console.log(source.readyState);
        console.log(event);
    };    //默认支持error事件    source.onerror = function (event) {
        console.log(source.readyState);
        console.log(event);
    };    //默认支持message事件    source.onmessage = function (event) {
        console.log(source.readyState);
        console.log(event);
        document.getElementById("result").innerHTML += event.data + "<br>";
    };    //处理服务器响应报文中的自定义事件    source.addEventListener("CustomEvent", function (e) {
        console.log("唤醒自定义事件");
        console.log(e);
        document.getElementById("result").innerHTML += e.data + "<br>";
    });
}else{
    document.getElementById("result").innerHTML="抱歉,你的浏览器不支持 server-sent 事件...";
}</script></body></html>C#写的服务器端:
using System;using System.Net.Http;using System.Text;using System.Threading.Tasks;using System.Web.Http;namespace WebTest.Controllers
{    /// <summary>
    /// api/{controller}/{id}    /// </summary>
    public class MyAPIController : ApiController
    {        static readonly Random random = new Random();        /// <summary>
        /// ...api/MyAPI/ServerSentEvents        /// </summary>
        /// <returns></returns>        [HttpGet, HttpPost]        public Task<HttpResponseMessage> ServerSentEvents()
        {            //Response.ContentType = "text/event-stream"            //Response.Expires = -1            //Response.Write("data: " & now())            //Response.Flush()

            string data = "";            if (random.Next(0, 10) % 3 == 0)
            {                //唤醒自定义的CustomEvent
                data = ServerSentEventData("这是自定义通知", DateTime.Now.Ticks.ToString(), "CustomEvent");
            }            else
            {                //唤醒默认的message
                data = ServerSentEventData(DateTime.Now.ToString("yyyy/MM/dd HH:mm:ss"), DateTime.Now.Ticks.ToString());
            }

            HttpResponseMessage response = new HttpResponseMessage
            {                //注意:ContentType = "text/event-stream"
                Content = new StringContent(data, Encoding.GetEncoding("UTF-8"), "text/event-stream")
            };            return Task.FromResult(response);
        }        public string ServerSentEventData(string data, string id, string _event = "message", long retry = 10000)
        {
            StringBuilder sb = new StringBuilder();
            sb.AppendFormat("retry:{0}\n", retry);
            sb.AppendFormat("event:{0}\n", _event);
            sb.AppendFormat("id:{0}\n", id);
            sb.AppendFormat("data:{0}\n\n", data);            return sb.ToString();
        }

    }
}通信在页面上的显示结果:

通过Chrome监控网络交互时序:

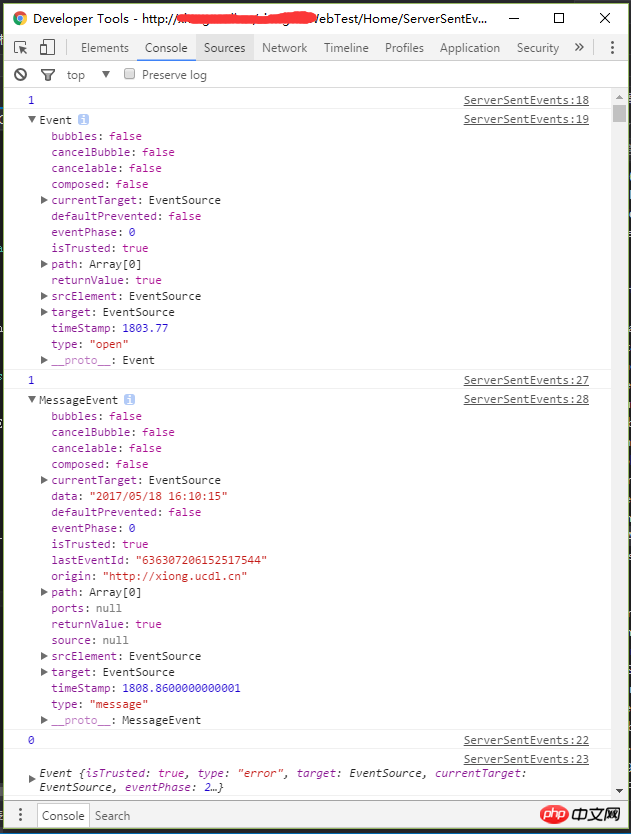
通过Chrome浏览器控制台输出,下面是一轮ope、message、error事件的详情:
至此,大功告成。
The above is the detailed content of HTML5 supports server-sent events. For more information, please follow other related articles on the PHP Chinese website!

Hot AI Tools

Undresser.AI Undress
AI-powered app for creating realistic nude photos

AI Clothes Remover
Online AI tool for removing clothes from photos.

Undress AI Tool
Undress images for free

Clothoff.io
AI clothes remover

Video Face Swap
Swap faces in any video effortlessly with our completely free AI face swap tool!

Hot Article
Hot Tools

Notepad++7.3.1
Easy-to-use and free code editor

SublimeText3 Chinese version
Chinese version, very easy to use

Zend Studio 13.0.1
Powerful PHP integrated development environment

Dreamweaver CS6
Visual web development tools

SublimeText3 Mac version
God-level code editing software (SublimeText3)
Hot Topics
 1662
1662
 14
1419
52
1312
25
1262
29
1235
24
14
1419
52
1312
25
1262
29
1235
24

 How to solve the problem that eMule search cannot connect to the server
Jan 25, 2024 pm 02:45 PM
How to solve the problem that eMule search cannot connect to the server
Jan 25, 2024 pm 02:45 PM
Solution: 1. Check the eMule settings to make sure you have entered the correct server address and port number; 2. Check the network connection, make sure the computer is connected to the Internet, and reset the router; 3. Check whether the server is online. If your settings are If there is no problem with the network connection, you need to check whether the server is online; 4. Update the eMule version, visit the eMule official website, and download the latest version of the eMule software; 5. Seek help.
 Solution to the inability to connect to the RPC server and the inability to enter the desktop
Feb 18, 2024 am 10:34 AM
Solution to the inability to connect to the RPC server and the inability to enter the desktop
Feb 18, 2024 am 10:34 AM
What should I do if the RPC server is unavailable and cannot be accessed on the desktop? In recent years, computers and the Internet have penetrated into every corner of our lives. As a technology for centralized computing and resource sharing, Remote Procedure Call (RPC) plays a vital role in network communication. However, sometimes we may encounter a situation where the RPC server is unavailable, resulting in the inability to enter the desktop. This article will describe some of the possible causes of this problem and provide solutions. First, we need to understand why the RPC server is unavailable. RPC server is a
 Detailed explanation of CentOS installation fuse and CentOS installation server
Feb 13, 2024 pm 08:40 PM
Detailed explanation of CentOS installation fuse and CentOS installation server
Feb 13, 2024 pm 08:40 PM
As a LINUX user, we often need to install various software and servers on CentOS. This article will introduce in detail how to install fuse and set up a server on CentOS to help you complete the related operations smoothly. CentOS installation fuseFuse is a user space file system framework that allows unprivileged users to access and operate the file system through a customized file system. Installing fuse on CentOS is very simple, just follow the following steps: 1. Open the terminal and Log in as root user. 2. Use the following command to install the fuse package: ```yuminstallfuse3. Confirm the prompts during the installation process and enter `y` to continue. 4. Installation completed
 How to configure Dnsmasq as a DHCP relay server
Mar 21, 2024 am 08:50 AM
How to configure Dnsmasq as a DHCP relay server
Mar 21, 2024 am 08:50 AM
The role of a DHCP relay is to forward received DHCP packets to another DHCP server on the network, even if the two servers are on different subnets. By using a DHCP relay, you can deploy a centralized DHCP server in the network center and use it to dynamically assign IP addresses to all network subnets/VLANs. Dnsmasq is a commonly used DNS and DHCP protocol server that can be configured as a DHCP relay server to help manage dynamic host configurations in the network. In this article, we will show you how to configure dnsmasq as a DHCP relay server. Content Topics: Network Topology Configuring Static IP Addresses on a DHCP Relay D on a Centralized DHCP Server
 Best Practice Guide for Building IP Proxy Servers with PHP
Mar 11, 2024 am 08:36 AM
Best Practice Guide for Building IP Proxy Servers with PHP
Mar 11, 2024 am 08:36 AM
In network data transmission, IP proxy servers play an important role, helping users hide their real IP addresses, protect privacy, and improve access speeds. In this article, we will introduce the best practice guide on how to build an IP proxy server with PHP and provide specific code examples. What is an IP proxy server? An IP proxy server is an intermediate server located between the user and the target server. It acts as a transfer station between the user and the target server, forwarding the user's requests and responses. By using an IP proxy server
 How to check server status
Oct 09, 2023 am 10:10 AM
How to check server status
Oct 09, 2023 am 10:10 AM
Methods to view server status include command line tools, graphical interface tools, monitoring tools, log files, and remote management tools. Detailed introduction: 1. Use command line tools. On Linux or Unix servers, you can use command line tools to view the status of the server; 2. Use graphical interface tools. For server operating systems with graphical interfaces, you can use the graphics provided by the system. Use interface tools to view server status; 3. Use monitoring tools. You can use special monitoring tools to monitor server status in real time, etc.
 How to enable TFTP server
Oct 18, 2023 am 10:18 AM
How to enable TFTP server
Oct 18, 2023 am 10:18 AM
The steps to start the TFTP server include selecting the TFTP server software, downloading and installing the software, configuring the TFTP server, and starting and testing the server. Detailed introduction: 1. When choosing TFTP server software, you first need to choose the TFTP server software that suits your needs. Currently, there are many TFTP server software to choose from, such as Tftpd32, PumpKIN, tftp-hpa, etc., which all provide simple and easy-to-use functions. interface and configuration options; 2. Download and install TFTP server software, etc.
 What should I do if I can't enter the game when the epic server is offline? Solution to why Epic cannot enter the game offline
Mar 13, 2024 pm 04:40 PM
What should I do if I can't enter the game when the epic server is offline? Solution to why Epic cannot enter the game offline
Mar 13, 2024 pm 04:40 PM
What should I do if I can’t enter the game when the epic server is offline? This problem must have been encountered by many friends. When this prompt appears, the genuine game cannot be started. This problem is usually caused by interference from the network and security software. So how should it be solved? The editor of this issue will explain I would like to share the solution with you, I hope today’s software tutorial can help you solve the problem. What to do if the epic server cannot enter the game when it is offline: 1. It may be interfered by security software. Close the game platform and security software and then restart. 2. The second is that the network fluctuates too much. Try restarting the router to see if it works. If the conditions are OK, you can try to use the 5g mobile network to operate. 3. Then there may be more
