 Operation and Maintenance
 Linux Operation and Maintenance
 Introduction to TOMCAT cluster under NGINX reverse proxy
Introduction to TOMCAT cluster under NGINX reverse proxy
The following editor will bring you an article about TOMCAT cluster under NGINX reverse proxy in LINUX (detailed explanation). The editor thinks it’s pretty good, so I’ll share it with you now and give it as a reference. Let’s follow the editor and take a look.
Nginx has the characteristics of reverse proxy (note the difference with forward proxy) and load balancing.
This time Nginx is installed on the linux machine 192.168.1.108. To install Nginx, you must first install the openssl library, gcc, PCRE, zlib library, etc.
Tomcat is installed on two machines, 192.168.1.168 and 192.168.1.178. The client accesses the project content deployed by Tomcat in
192.168.1.168 and 192.168.1.178 by accessing the 192.168.1.108 reverse proxy.
1. Install Nginx under Linux (machine 192.168.1.108)
Install openssl library.
yum install -y openssl openssl-devel

Need to install gcc: yum install gcc-c++

Install PCRE yum install -y pcre pcre-devel

yum install -y zlib zlib-devel
 ##Download nginx: wget
13.0.tar.gzInstalled under /usr/local/
 Unzip tar -zxvf nginx-1.13.0.tar.gz
 Enter the directory and run ./configure to generate make
 At this time, there is an extra makefile in the directory
 Compile make
 Installation: make install
After completion, there will be an additional nginx in the local directory
##Start nginx
View startup results
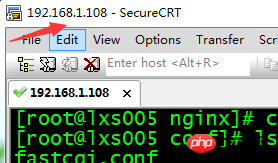
Close./nginx -s s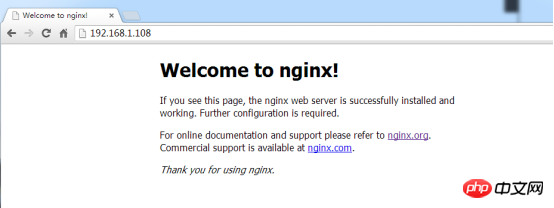 top
top

configuration file after startup 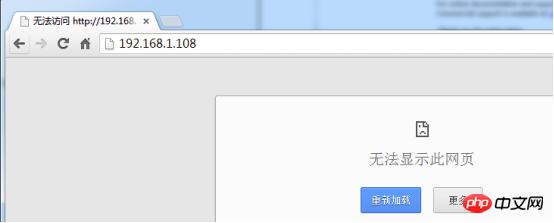 Suitable for modifying the configuration file during startup
 2. Install Tomcat under Linux (192.168.1.168 and 192.168.1.178 machines)
The installation process is very simple and I won’t go into details. Install Tomcat on the other two Linux machines (192.168.1.168 and 192.168.1.178), and deploy any project nginxTest. One content is 1111... and the other is 22222...
At this time, I am accessing a different IP address, and I have not yet configured Nginx as a reverse proxy server.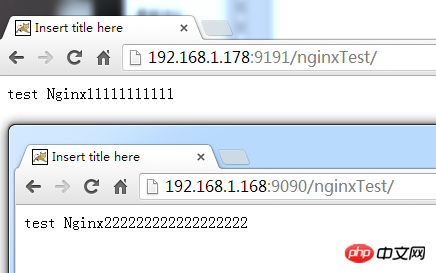
3. Nginx serves as a reverse proxy server
Mainly configure the contents of nginx.confa.
Configure servergroup, add upstream configuration between http{} nodes.
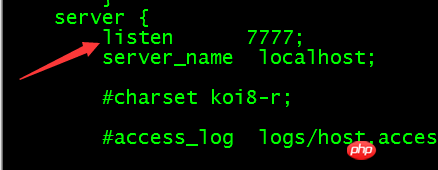
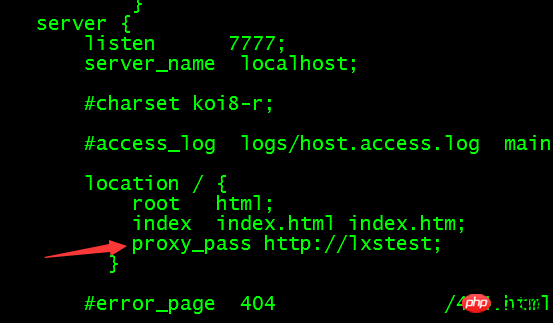
192.168.1.168:9090 and 192.168.1.178:9191 are Tomcat of the other two Linux machines (see 2 above) upstream lxstest{ server 192.168.1.168:9090; server 192.168.1.178:9191; } b. Modify the port number 80 that nginx listens to, and change it to 7777 (you can change it to any number or not). server { listen 7777; ...... } c. In location{}, use proxy_pass to configure the reverse proxy address; "http://" cannot be missing here, and the subsequent address must be consistent with the name defined by upstream in the first step. (The above is lxstest, so http://lxstest) location / { root html; index index.html index.htm; proxy_pass http://lxstest; } After the above modifications, start Nginx of 192.168.1.108 machine Last visit192.168.1.108:7777/nginxTest Different pages appear for the same address, indicating that the one visited is 192.168.1.168, and the one visited192.168 .1.178 nginxTest project. Detailed explanation of innodb_index_stats when importing data
Error prompting table primary key conflict What should I do if garbled characters appear when decompressing zip files under Linux? 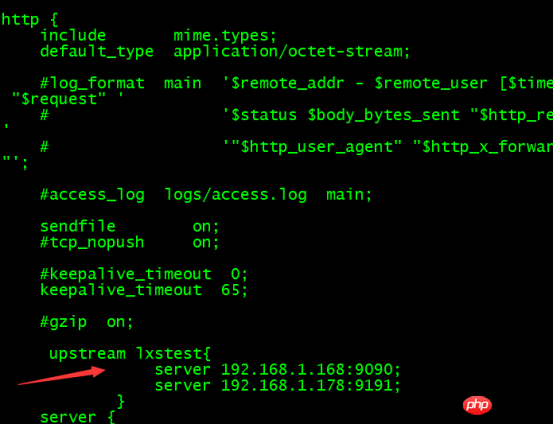


The above is the detailed content of Introduction to TOMCAT cluster under NGINX reverse proxy. For more information, please follow other related articles on the PHP Chinese website!

Hot AI Tools

Undresser.AI Undress
AI-powered app for creating realistic nude photos

AI Clothes Remover
Online AI tool for removing clothes from photos.

Undress AI Tool
Undress images for free

Clothoff.io
AI clothes remover

Video Face Swap
Swap faces in any video effortlessly with our completely free AI face swap tool!

Hot Article

Hot Tools

Notepad++7.3.1
Easy-to-use and free code editor

SublimeText3 Chinese version
Chinese version, very easy to use

Zend Studio 13.0.1
Powerful PHP integrated development environment

Dreamweaver CS6
Visual web development tools

SublimeText3 Mac version
God-level code editing software (SublimeText3)

Hot Topics
 1662
1662
 14
14
 1419
1419
 52
52
 1311
1311
 25
25
 1262
1262
 29
29
 1234
1234
 24
24
 Where to view the logs of Tigervnc on Debian
Apr 13, 2025 am 07:24 AM
In Debian systems, the log files of the Tigervnc server are usually stored in the .vnc folder in the user's home directory. If you run Tigervnc as a specific user, the log file name is usually similar to xf:1.log, where xf:1 represents the username. To view these logs, you can use the following command: cat~/.vnc/xf:1.log Or, you can open the log file using a text editor: nano~/.vnc/xf:1.log Please note that accessing and viewing log files may require root permissions, depending on the security settings of the system.
 How debian readdir integrates with other tools
Apr 13, 2025 am 09:42 AM
The readdir function in the Debian system is a system call used to read directory contents and is often used in C programming. This article will explain how to integrate readdir with other tools to enhance its functionality. Method 1: Combining C language program and pipeline First, write a C program to call the readdir function and output the result: #include#include#include#includeintmain(intargc,char*argv[]){DIR*dir;structdirent*entry;if(argc!=2){
 Linux Architecture: Unveiling the 5 Basic Components
Apr 20, 2025 am 12:04 AM
The five basic components of the Linux system are: 1. Kernel, 2. System library, 3. System utilities, 4. Graphical user interface, 5. Applications. The kernel manages hardware resources, the system library provides precompiled functions, system utilities are used for system management, the GUI provides visual interaction, and applications use these components to implement functions.
 How to interpret the output results of Debian Sniffer
Apr 12, 2025 pm 11:00 PM
DebianSniffer is a network sniffer tool used to capture and analyze network packet timestamps: displays the time for packet capture, usually in seconds. Source IP address (SourceIP): The network address of the device that sent the packet. Destination IP address (DestinationIP): The network address of the device receiving the data packet. SourcePort: The port number used by the device sending the packet. Destinatio
 How to recycle packages that are no longer used
Apr 13, 2025 am 08:51 AM
This article describes how to clean useless software packages and free up disk space in the Debian system. Step 1: Update the package list Make sure your package list is up to date: sudoaptupdate Step 2: View installed packages Use the following command to view all installed packages: dpkg--get-selections|grep-vdeinstall Step 3: Identify redundant packages Use the aptitude tool to find packages that are no longer needed. aptitude will provide suggestions to help you safely delete packages: sudoaptitudesearch '~pimportant' This command lists the tags
 How to monitor Nginx SSL performance on Debian
Apr 12, 2025 pm 10:18 PM
This article describes how to effectively monitor the SSL performance of Nginx servers on Debian systems. We will use NginxExporter to export Nginx status data to Prometheus and then visually display it through Grafana. Step 1: Configuring Nginx First, we need to enable the stub_status module in the Nginx configuration file to obtain the status information of Nginx. Add the following snippet in your Nginx configuration file (usually located in /etc/nginx/nginx.conf or its include file): location/nginx_status{stub_status
 Key Linux Operations: A Beginner's Guide
Apr 09, 2025 pm 04:09 PM
Linux beginners should master basic operations such as file management, user management and network configuration. 1) File management: Use mkdir, touch, ls, rm, mv, and CP commands. 2) User management: Use useradd, passwd, userdel, and usermod commands. 3) Network configuration: Use ifconfig, echo, and ufw commands. These operations are the basis of Linux system management, and mastering them can effectively manage the system.
 How to install PHPStorm in Debian system
Apr 13, 2025 am 06:03 AM
Install PHPStorm on the Debian system to easily solve your PHP development environment! The following steps will guide you through the entire installation process. Installation steps: Download PHPStorm: Visit the official website of JetBrains and download the latest version of PHPStorm. Unzip the installation package: After downloading using wget or curl, unzip it to the specified directory (for example /opt). Command example: wgethttps://download.jetbrains.com/phpstorm/phpstorm-2024.3.5.tar.gztar-xzfphpstorm-2024.3.5.tar.gz


