
 Backend Development
C#.Net Tutorial
Detailed example of completing the prompt function of VS Code through Typings
Backend Development
C#.Net Tutorial
Detailed example of completing the prompt function of VS Code through Typings
Detailed example of completing the prompt function of VS Code through Typings

Recently I am learning the Node.js and ThinkJS frameworks, using vscode as the development environment. By default, vscode is not good at giving ThinkJS code prompts, so after some research, it turns out that you can also use Typings to give vscode a powerful intelligent code prompt function. The following article introduces how to use Typings to implement intelligent prompts for Visual Studio Code.
Preface
I believe everyone knows that smart prompts for codes in IDEs are almost standard, although some text editors There are also some simple tips, but this is provided via code snippets. Functionally it is far from comparable to IDE. However, Visual Studio Code, a recently emerging text editor, can use Typings to implement smart prompts for JavaScript, which is rare for a text editor. Therefore, Visual Studio Code is particularly suitable for writing JavaScript (Node.js) programs; at the same time, if we need to write some experimental small code snippets, such as: Lodash.js, a small demo of a function, because We don't want to study how to use a function but use IDE to create a new project. At this time, Visual Studio Code is a very good choice, and it can also run and Debug JavaScript code (depends on Node.js) , and also contains a very convenient code prompt function.
From this point of view, I think Visual Studio Code can be regarded as a powerful small IDE.
Install Typings through NPM
We can easily install Typings through NPM, enter in the command line:
npm install -g typings
After the installation is complete, enter in the command line:
typings --version
Seeing the version information means that the typings tool installation is complete:

NPM is installed together with Node.js. If you want to use NPM, you should install Node.js first.
Install relevant prompt information files
After the installation is completed, we need to install the corresponding type information files that require prompt function libraries or frameworks. Here we create a new folder NodeSnippet, use the command line to enter the directory, and enter the following two commands to install the types of Node and LodashInterfaceInformation file:
typings install dt~node --global --save
typings install lodash --save
When do you need to use --global Parameters:
If the installed package uses a script tag to reference (such as jQuery) (that is, used in the browser)
When this package is part of the environment (such as node)
-
This package is not used
--globalWhen the installation fails
At this time we can see that there are some more files in our NodeSnippet directory:
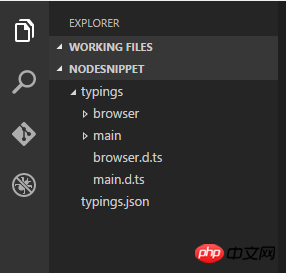
These files are type files (defined using TypeScript) that provide us with prompt information. To check whether Typings supports smart prompts for a certain library or framework, we can use the following command:
typings search exampleName
Enable smart prompts
There are two ways to start the prompt function:
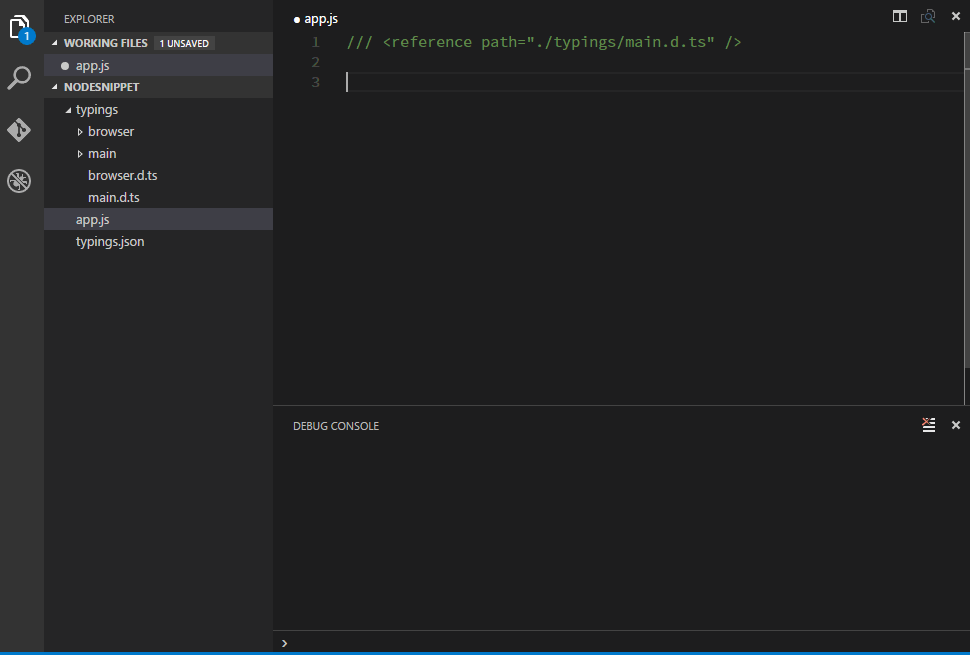
The first is to add the directory where the prompt information file is located in the top line of the file that needs to be prompted. The format is as follows:
/// <reference path="./typings/index.d.ts" />
The second is to add an empty file named jsconfig.json in the directory where the project is located (in this case, the NodeSnippet folder).
For more content of the jsconfig.json file, please refer to: code.visualstudio.com/docs/languages/javascript
After enabling the prompt function, we can use Visual Studio very happily Code provides us with the smart prompt function. As shown below:
Notes
Typings VS TSD
Typings appears as a replacement for TSD. If you have installed TSD, you need to know that TSD is no longer recommended. If TSD is already installed please execute the following command to remove it:
npm rm -g tsd
Use CNPM
在国内由于墙的原因,有时候使用NPM安装模块的速度上会很慢,这时候我们其实可以选择国内淘宝的NPM镜像,使用下面的命令来进行安装:
npm install -g cnpm --registry=https://registry.npm.taobao.org
安装完成后使用cnpm来代替npm命令即可,例如下面安装一个lodash模块的示例:
cnpm install lodash
可以看到除了cnpm替代了npm其他的并没有任何区别。
总结
【相关推荐】
1. 特别推荐:“php程序员工具箱”V0.1版本下载
2. ASP免费视频教程
3. 李炎恢ASP基础视频教程
The above is the detailed content of Detailed example of completing the prompt function of VS Code through Typings. For more information, please follow other related articles on the PHP Chinese website!

Hot AI Tools

Undresser.AI Undress
AI-powered app for creating realistic nude photos

AI Clothes Remover
Online AI tool for removing clothes from photos.

Undress AI Tool
Undress images for free

Clothoff.io
AI clothes remover

Video Face Swap
Swap faces in any video effortlessly with our completely free AI face swap tool!

Hot Article
Hot Tools

Notepad++7.3.1
Easy-to-use and free code editor

SublimeText3 Chinese version
Chinese version, very easy to use

Zend Studio 13.0.1
Powerful PHP integrated development environment

Dreamweaver CS6
Visual web development tools

SublimeText3 Mac version
God-level code editing software (SublimeText3)
Hot Topics


 How to define header files for vscode
Apr 15, 2025 pm 09:09 PM
How to define header files for vscode
Apr 15, 2025 pm 09:09 PM
How to define header files using Visual Studio Code? Create a header file and declare symbols in the header file using the .h or .hpp suffix name (such as classes, functions, variables) Compile the program using the #include directive to include the header file in the source file. The header file will be included and the declared symbols are available.
 What computer configuration is required for vscode
Apr 15, 2025 pm 09:48 PM
What computer configuration is required for vscode
Apr 15, 2025 pm 09:48 PM
VS Code system requirements: Operating system: Windows 10 and above, macOS 10.12 and above, Linux distribution processor: minimum 1.6 GHz, recommended 2.0 GHz and above memory: minimum 512 MB, recommended 4 GB and above storage space: minimum 250 MB, recommended 1 GB and above other requirements: stable network connection, Xorg/Wayland (Linux)
 vscode terminal usage tutorial
Apr 15, 2025 pm 10:09 PM
vscode terminal usage tutorial
Apr 15, 2025 pm 10:09 PM
vscode built-in terminal is a development tool that allows running commands and scripts within the editor to simplify the development process. How to use vscode terminal: Open the terminal with the shortcut key (Ctrl/Cmd). Enter a command or run the script. Use hotkeys (such as Ctrl L to clear the terminal). Change the working directory (such as the cd command). Advanced features include debug mode, automatic code snippet completion, and interactive command history.
 How to solve the problem of vscode Chinese annotations becoming question marks
Apr 15, 2025 pm 11:36 PM
How to solve the problem of vscode Chinese annotations becoming question marks
Apr 15, 2025 pm 11:36 PM
How to solve the problem that Chinese comments in Visual Studio Code become question marks: Check the file encoding and make sure it is "UTF-8 without BOM". Change the font to a font that supports Chinese characters, such as "Song Style" or "Microsoft Yahei". Reinstall the font. Enable Unicode support. Upgrade VSCode, restart the computer, and recreate the source file.
 Where to write code in vscode
Apr 15, 2025 pm 09:54 PM
Where to write code in vscode
Apr 15, 2025 pm 09:54 PM
Writing code in Visual Studio Code (VSCode) is simple and easy to use. Just install VSCode, create a project, select a language, create a file, write code, save and run it. The advantages of VSCode include cross-platform, free and open source, powerful features, rich extensions, and lightweight and fast.
 Common commands for vscode terminal
Apr 15, 2025 pm 10:06 PM
Common commands for vscode terminal
Apr 15, 2025 pm 10:06 PM
Common commands for VS Code terminals include: Clear the terminal screen (clear), list the current directory file (ls), change the current working directory (cd), print the current working directory path (pwd), create a new directory (mkdir), delete empty directory (rmdir), create a new file (touch) delete a file or directory (rm), copy a file or directory (cp), move or rename a file or directory (mv) display file content (cat) view file content and scroll (less) view file content only scroll down (more) display the first few lines of the file (head)
 vscode terminal command cannot be used
Apr 15, 2025 pm 10:03 PM
vscode terminal command cannot be used
Apr 15, 2025 pm 10:03 PM
Causes and solutions for the VS Code terminal commands not available: The necessary tools are not installed (Windows: WSL; macOS: Xcode command line tools) Path configuration is wrong (add executable files to PATH environment variables) Permission issues (run VS Code as administrator) Firewall or proxy restrictions (check settings, unrestrictions) Terminal settings are incorrect (enable use of external terminals) VS Code installation is corrupt (reinstall or update) Terminal configuration is incompatible (try different terminal types or commands) Specific environment variables are missing (set necessary environment variables)
 How to use VSCode
Apr 15, 2025 pm 11:21 PM
How to use VSCode
Apr 15, 2025 pm 11:21 PM
Visual Studio Code (VSCode) is a cross-platform, open source and free code editor developed by Microsoft. It is known for its lightweight, scalability and support for a wide range of programming languages. To install VSCode, please visit the official website to download and run the installer. When using VSCode, you can create new projects, edit code, debug code, navigate projects, expand VSCode, and manage settings. VSCode is available for Windows, macOS, and Linux, supports multiple programming languages and provides various extensions through Marketplace. Its advantages include lightweight, scalability, extensive language support, rich features and version
