
 Backend Development
Python Tutorial
Detailed tutorial on installing and building django1.10.3 and Apache2.4 under windows10
Backend Development
Python Tutorial
Detailed tutorial on installing and building django1.10.3 and Apache2.4 under windows10
Detailed tutorial on installing and building django1.10.3 and Apache2.4 under windows10

Recently, I have discovered that many tutorials are built on Linux. Windows seems not to be naturally suitable, but I am still willing to try this pit. The following article mainly introduces you to the method of installing and building django1.10.3 and Apache2.4 under Windows 10 system. Friends in need can refer to it. Let’s take a look together.
Environment introduction
python3.5.2 64-bit
django 1.10.3
apache 2.4 64-bit
windows 10
The focus is on apache.
I believe that everyone who is interested in reading this article already knows about python and django.
Install Apache2.4
Address: www.apachelounge.com/download/
Download: vc_redist.x64. exe direct installation vc_redist_x64/86.exe.
Download: httpd-2.4.17-win64-VC14.zip
Configure environment variables: add path to D:\Apache24\bin;
Extract to the specified directory and modify the configuration file: http.conf (Change the ServerRoot in the following content to your own actual Apche decompression path)
 ServerRoot "D:/Apache24"
 ……
 Listen 127.0.0.1:8081 #修改端口号
 ……
 ServerName www.example.com:8081
 ……
 DocumentRoot "D:/Apache24/htdocs"
 <Directory "D:/Apache24/htdocs">
 ……
 ScriptAlias /cgi-bin/ "D:/Apache24/cgi-bin/"
 ……
 <Directory "D:/Apache24/cgi-bin">
  AllowOverride None
  Options None
  Require all granted
 </Directory>
Start the apache service:
cmd>httpd
127.0.0.1:8081/index.html
It works! apache configuration successful
install mod_wsgi
Install first: pip install wheel
Installmod_wsgi-4.4.23+ap24vc14-cp35-cp35m-win_amd64.whl
Download: mod_wsgi-4.4.23+ap24vc14-cp35-cp35m-win_amd64.whl
Address: www.lfd.uci.edu/~gohlke/pythonlibs/#mod_wsgi
pip installation: pip install mod_wsgi-4.4.23+ap24vc14-cp35-cp35m-win_amd64.whl
Configure Apache2.4, mod_wsgi, Django project engineering
1. Copy C:\Python35\mod_wsgi.so to D:\Apache24\modules
(mod_wsgi. so can only be found after mod_wsgi-4.4.23+ap24vc14-cp35-cp35m-win_amd64.whl is installed successfully)
2. Modify the http.conf file of apache2.4:
 #添加mod_wsgi.so 模块
 LoadModule wsgi_module modules/mod_wsgi.so
3. Configure the django project and modify http.conf
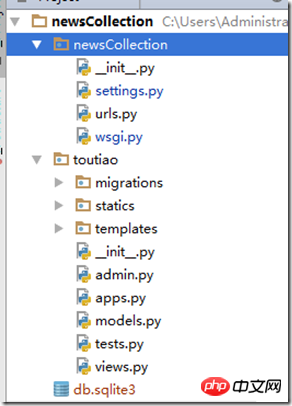
#添加mod_wsgi.so 模块
LoadModule wsgi_module modules/mod_wsgi.so
#指定静态资源路径
Alias /statics/ F:/pydj/newsCollection/toutiao/statics/
<Directory F:/pydj/newsCollection/toutiao/statics>
 Require all granted
</Directory>
#指定newsCollection项目的wsgi.py配置文件路径
WSGIScriptAlias / F:/pydj/newsCollection/newsCollection/wsgi.py
#指定项目路径
WSGIPythonPath F:/pydj/newsCollection
<Directory F:/pydj/newsCollection/newsCollection>
 <Files wsgi.py>
  Require all granted
 </Files>
</Directory>
wsgi.py content:
import os
os.environ.setdefault("DJANGO_SETTINGS_MODULE", "myweb.settings")
from django.core.wsgi import get_wsgi_application
application = get_wsgi_application()
#Note that myweb above is changed to your own project name, such as newsCollection in the picture above. Refer to the directory structure in the picture above.
Configuring the django project setting.py
ALLOWED_HOSTS = ['127.0.0.1', 'localhost']
Finally, let me tell you that there will be a log when Apche starts an error, httpd-2.4. 23-x64-vc14-r3\Apache24\logs directory error information, troubleshoot slowly
Summary
The above is the detailed content of Detailed tutorial on installing and building django1.10.3 and Apache2.4 under windows10. For more information, please follow other related articles on the PHP Chinese website!

Hot AI Tools

Undresser.AI Undress
AI-powered app for creating realistic nude photos

AI Clothes Remover
Online AI tool for removing clothes from photos.

Undress AI Tool
Undress images for free

Clothoff.io
AI clothes remover

Video Face Swap
Swap faces in any video effortlessly with our completely free AI face swap tool!

Hot Article
Hot Tools

Notepad++7.3.1
Easy-to-use and free code editor

SublimeText3 Chinese version
Chinese version, very easy to use

Zend Studio 13.0.1
Powerful PHP integrated development environment

Dreamweaver CS6
Visual web development tools

SublimeText3 Mac version
God-level code editing software (SublimeText3)
Hot Topics
 1669
1669
 14
1428
52
1329
25
1273
29
1256
24
14
1428
52
1329
25
1273
29
1256
24

 How to run sublime after writing the code
Apr 16, 2025 am 08:51 AM
How to run sublime after writing the code
Apr 16, 2025 am 08:51 AM
There are six ways to run code in Sublime: through hotkeys, menus, build systems, command lines, set default build systems, and custom build commands, and run individual files/projects by right-clicking on projects/files. The build system availability depends on the installation of Sublime Text.
 How to solve complex BelongsToThrough relationship problem in Laravel? Use Composer!
Apr 17, 2025 pm 09:54 PM
How to solve complex BelongsToThrough relationship problem in Laravel? Use Composer!
Apr 17, 2025 pm 09:54 PM
In Laravel development, dealing with complex model relationships has always been a challenge, especially when it comes to multi-level BelongsToThrough relationships. Recently, I encountered this problem in a project dealing with a multi-level model relationship, where traditional HasManyThrough relationships fail to meet the needs, resulting in data queries becoming complex and inefficient. After some exploration, I found the library staudenmeir/belongs-to-through, which easily installed and solved my troubles through Composer.
 laravel installation code
Apr 18, 2025 pm 12:30 PM
laravel installation code
Apr 18, 2025 pm 12:30 PM
To install Laravel, follow these steps in sequence: Install Composer (for macOS/Linux and Windows) Install Laravel Installer Create a new project Start Service Access Application (URL: http://127.0.0.1:8000) Set up the database connection (if required)
 git software installation
Apr 17, 2025 am 11:57 AM
git software installation
Apr 17, 2025 am 11:57 AM
Installing Git software includes the following steps: Download the installation package and run the installation package to verify the installation configuration Git installation Git Bash (Windows only)
 vscode sets the header file path
Apr 15, 2025 pm 09:24 PM
vscode sets the header file path
Apr 15, 2025 pm 09:24 PM
To set the header file path in Visual Studio Code, open the User Settings panel, add the path in the Include Path field, and click the Save button. Example: { "includePath": ["/path/to/header1", "/path/to/header2"] }.
 What is git software for? How to use git software?
Apr 17, 2025 pm 12:09 PM
What is git software for? How to use git software?
Apr 17, 2025 pm 12:09 PM
Git is a distributed version control system designed to track code changes and allow collaborative development. It enables developers to document project evolution, manage code merges, and maintain project history in an efficient and secure way. Through Git's distributed architecture, each developer has a complete copy of the project and performs common version control operations without communicating with a central server.
 NGINX and Apache: Understanding the Key Differences
Apr 26, 2025 am 12:01 AM
NGINX and Apache: Understanding the Key Differences
Apr 26, 2025 am 12:01 AM
NGINX and Apache each have their own advantages and disadvantages, and the choice should be based on specific needs. 1.NGINX is suitable for high concurrency scenarios because of its asynchronous non-blocking architecture. 2. Apache is suitable for low-concurrency scenarios that require complex configurations, because of its modular design.
 git software installation tutorial
Apr 17, 2025 pm 12:06 PM
git software installation tutorial
Apr 17, 2025 pm 12:06 PM
Git Software Installation Guide: Visit the official Git website to download the installer for Windows, MacOS, or Linux. Run the installer and follow the prompts. Configure Git: Set username, email, and select a text editor. For Windows users, configure the Git Bash environment.
