

Detailed explanation of shape usage examples in android development

Use code to generate pictures, and the pictures can be changed at will, which is convenient and saves space. The following is an introduction to how to use shape to generate custom graphics.
Steps:
1. Create a new xml file under res/drawable;
2. Reference this xml file in the code in the same way as the picture.
The syntax for defining shape graphics is as follows:
<?xml version="1.0" encoding="utf-8"?>
<shape
    xmlns:android="http://schemas.android.com/apk/res/android"
    android:shape=["rectangle" | "oval" | "line" | "ring"]      //共有4种类型,矩形(默认)/椭圆形/直线形/环形
    // 以下4个属性只有当类型为环形时才有效
    android:innerRadius="dimension"     //内环半径
    android:innerRadiusRatio="float"    //内环半径相对于环的宽度的比例,比如环的宽度为50,比例为2.5,那么内环半径为20
    android:thickness="dimension"   //环的厚度
    android:thicknessRatio="float"     //环的厚度相对于环的宽度的比例
    android:useLevel="boolean">    //如果当做是LevelListDrawable使用时值为true,否则为false.

    <corners    //定义圆角
        android:radius="dimension"      //全部的圆角半径
        android:topLeftRadius="dimension"   //左上角的圆角半径
        android:topRightRadius="dimension"  //右上角的圆角半径
        android:bottomLeftRadius="dimension"    //左下角的圆角半径
        android:bottomRightRadius="dimension" />    //右下角的圆角半径

    <gradient   //定义渐变效果
        android:type=["linear" | "radial" | "sweep"]    //共有3中渐变类型,线性渐变(默认)/放射渐变/扫描式渐变
        android:angle="integer"     //渐变角度,必须为45的倍数,0为从左到右,90为从上到下
        android:centerX="float"     //渐变中心X的相当位置,范围为0~1
        android:centerY="float"     //渐变中心Y的相当位置,范围为0~1
        android:startColor="color"      //渐变开始点的颜色
        android:centerColor="color"     //渐变中间点的颜色,在开始与结束点之间
        android:endColor="color"    //渐变结束点的颜色
        android:gradientRadius="float"  //渐变的半径,只有当渐变类型为radial时才能使用
        android:useLevel=["true" | "false"] />  //使用LevelListDrawable时就要设置为true。设为false时才有渐变效果

    <padding    //内部边距
        android:left="dimension"
        android:top="dimension"
        android:right="dimension"
        android:bottom="dimension" />

    <size   //自定义的图形大小
        android:width="dimension"
        android:height="dimension" />

    <solid  //内部填充颜色
        android:color="color" />

    <stroke     //描边
        android:width="dimension"   //描边的宽度
        android:color="color"   //描边的颜色
        // 以下两个属性设置虚线
        android:dashWidth="dimension"   //虚线的宽度,值为0时是实线
        android:dashGap="dimension" />      //虚线的间隔
</shape>The following are a few examples:
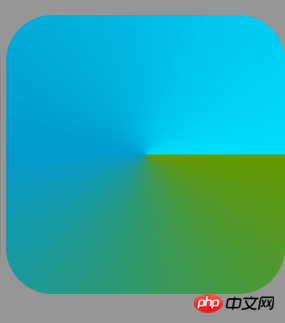
Rounded rectangle, scanning gradient
<?xml version="1.0" encoding="utf-8"?>
<shape
    xmlns:android="http://schemas.android.com/apk/res/android"
    android:shape="rectangle"
    android:useLevel="false" >

    <corners
        android:topLeftRadius="10dp"
        android:topRightRadius="10dp"
        android:bottomLeftRadius="10dp"
        android:bottomRightRadius="10dp" />

    <gradient
        android:type="sweep"
        android:endColor="@android:color/holo_blue_bright"
        android:startColor="@android:color/holo_green_dark"
        android:centerColor="@android:color/holo_blue_dark"
        android:useLevel="false" />

    <size android:width="60dp" android:height="60dp" />
</shape> Result:
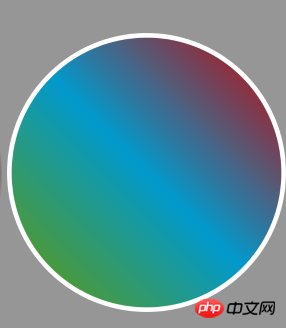
<?xml version="1.0" encoding="utf-8"?>
<shape
    xmlns:android="http://schemas.android.com/apk/res/android"
    android:shape="oval"
    android:useLevel="false" >

    <gradient
        android:type="linear"
        android:angle="45"
        android:startColor="@android:color/holo_green_dark"
        android:centerColor="@android:color/holo_blue_dark"
        android:endColor="@android:color/holo_red_dark"
        android:useLevel="false" />

    <size android:width="60dp" android:height="60dp" />

    <stroke android:width="1dp"
        android:color="@android:color/white" />

</shape> Result:
#3. Dashed line
<?xml version="1.0" encoding="utf-8"?>
<shape
    xmlns:android="http://schemas.android.com/apk/res/android"
    android:shape="line" >

    <size android:width="60dp"
        android:height="60dp" />

    <stroke android:width="2dp"
        android:color="@android:color/holo_purple"
        android:dashWidth="10dp"
        android:dashGap="5dp" />
</shape>
##4. Ring, Radial gradient
<?xml version="1.0" encoding="utf-8"?>
<shape
    xmlns:android="http://schemas.android.com/apk/res/android"
    android:shape="ring"
    android:useLevel="false"
    android:innerRadius="40dp"
    android:thickness="3dp">

    <gradient android:type="radial"
        android:gradientRadius="150"
        android:centerY="0.1"
        android:centerX="0.2"
        android:startColor="@android:color/holo_red_dark"
        android:centerColor="@android:color/holo_green_dark"
        android:endColor="@android:color/white" />

    <size android:width="90dp"
        android:height="90dp" />

</shape>Result:
The above is the detailed content of Detailed explanation of shape usage examples in android development. For more information, please follow other related articles on the PHP Chinese website!

Hot AI Tools

Undresser.AI Undress
AI-powered app for creating realistic nude photos

AI Clothes Remover
Online AI tool for removing clothes from photos.

Undress AI Tool
Undress images for free

Clothoff.io
AI clothes remover

Video Face Swap
Swap faces in any video effortlessly with our completely free AI face swap tool!

Hot Article
Hot Tools

Notepad++7.3.1
Easy-to-use and free code editor

SublimeText3 Chinese version
Chinese version, very easy to use

Zend Studio 13.0.1
Powerful PHP integrated development environment

Dreamweaver CS6
Visual web development tools

SublimeText3 Mac version
God-level code editing software (SublimeText3)
Hot Topics


 Break or return from Java 8 stream forEach?
Feb 07, 2025 pm 12:09 PM
Break or return from Java 8 stream forEach?
Feb 07, 2025 pm 12:09 PM
Java 8 introduces the Stream API, providing a powerful and expressive way to process data collections. However, a common question when using Stream is: How to break or return from a forEach operation? Traditional loops allow for early interruption or return, but Stream's forEach method does not directly support this method. This article will explain the reasons and explore alternative methods for implementing premature termination in Stream processing systems. Further reading: Java Stream API improvements Understand Stream forEach The forEach method is a terminal operation that performs one operation on each element in the Stream. Its design intention is
 PHP: A Key Language for Web Development
Apr 13, 2025 am 12:08 AM
PHP: A Key Language for Web Development
Apr 13, 2025 am 12:08 AM
PHP is a scripting language widely used on the server side, especially suitable for web development. 1.PHP can embed HTML, process HTTP requests and responses, and supports a variety of databases. 2.PHP is used to generate dynamic web content, process form data, access databases, etc., with strong community support and open source resources. 3. PHP is an interpreted language, and the execution process includes lexical analysis, grammatical analysis, compilation and execution. 4.PHP can be combined with MySQL for advanced applications such as user registration systems. 5. When debugging PHP, you can use functions such as error_reporting() and var_dump(). 6. Optimize PHP code to use caching mechanisms, optimize database queries and use built-in functions. 7
 PHP vs. Python: Understanding the Differences
Apr 11, 2025 am 12:15 AM
PHP vs. Python: Understanding the Differences
Apr 11, 2025 am 12:15 AM
PHP and Python each have their own advantages, and the choice should be based on project requirements. 1.PHP is suitable for web development, with simple syntax and high execution efficiency. 2. Python is suitable for data science and machine learning, with concise syntax and rich libraries.
 Java Program to Find the Volume of Capsule
Feb 07, 2025 am 11:37 AM
Java Program to Find the Volume of Capsule
Feb 07, 2025 am 11:37 AM
Capsules are three-dimensional geometric figures, composed of a cylinder and a hemisphere at both ends. The volume of the capsule can be calculated by adding the volume of the cylinder and the volume of the hemisphere at both ends. This tutorial will discuss how to calculate the volume of a given capsule in Java using different methods. Capsule volume formula The formula for capsule volume is as follows: Capsule volume = Cylindrical volume Volume Two hemisphere volume in, r: The radius of the hemisphere. h: The height of the cylinder (excluding the hemisphere). Example 1 enter Radius = 5 units Height = 10 units Output Volume = 1570.8 cubic units explain Calculate volume using formula: Volume = π × r2 × h (4
 PHP vs. Other Languages: A Comparison
Apr 13, 2025 am 12:19 AM
PHP vs. Other Languages: A Comparison
Apr 13, 2025 am 12:19 AM
PHP is suitable for web development, especially in rapid development and processing dynamic content, but is not good at data science and enterprise-level applications. Compared with Python, PHP has more advantages in web development, but is not as good as Python in the field of data science; compared with Java, PHP performs worse in enterprise-level applications, but is more flexible in web development; compared with JavaScript, PHP is more concise in back-end development, but is not as good as JavaScript in front-end development.
 PHP vs. Python: Core Features and Functionality
Apr 13, 2025 am 12:16 AM
PHP vs. Python: Core Features and Functionality
Apr 13, 2025 am 12:16 AM
PHP and Python each have their own advantages and are suitable for different scenarios. 1.PHP is suitable for web development and provides built-in web servers and rich function libraries. 2. Python is suitable for data science and machine learning, with concise syntax and a powerful standard library. When choosing, it should be decided based on project requirements.
 Create the Future: Java Programming for Absolute Beginners
Oct 13, 2024 pm 01:32 PM
Create the Future: Java Programming for Absolute Beginners
Oct 13, 2024 pm 01:32 PM
Java is a popular programming language that can be learned by both beginners and experienced developers. This tutorial starts with basic concepts and progresses through advanced topics. After installing the Java Development Kit, you can practice programming by creating a simple "Hello, World!" program. After you understand the code, use the command prompt to compile and run the program, and "Hello, World!" will be output on the console. Learning Java starts your programming journey, and as your mastery deepens, you can create more complex applications.
 How to Run Your First Spring Boot Application in Spring Tool Suite?
Feb 07, 2025 pm 12:11 PM
How to Run Your First Spring Boot Application in Spring Tool Suite?
Feb 07, 2025 pm 12:11 PM
Spring Boot simplifies the creation of robust, scalable, and production-ready Java applications, revolutionizing Java development. Its "convention over configuration" approach, inherent to the Spring ecosystem, minimizes manual setup, allo
