

How to use Nginx + UWSGI
After a lot of experimentation (on disqus.com and getsentry.com), I can definitely say: uwsgi should become the standard in the Python world. Combine it with nginx, and you can get a better performance experience on threads (or non-threads) on Python-based web applications.
Update: Ignore the age old saying "any metric you give is slow", by requests I mean here the backend nodes, they handle incoming events (requests from 20KB to 1MB in size), jumping through various hops in the network Authorization and quota policies, and most form some queue operations. Offload as much workload as possible. (There is a problem with the translation of this paragraph, please refer to the original text, translator’s note)
Service strategy
There are already a number of ways to run Python applications. I'm not going to use mod_wsgi, and most importantly, I'm not trying to explain how the event model works. I don't believe they are still used in the Python world, so the topic of this article is not about traditional threaded (or multi-process) Python applications.
Instead, I will focus on the two most popular solutions that I am most familiar with: gunicorn and uwsgi.
Gunicorn (wsgi server for Python UNIX platform)
Looking back on the past, the solution for Python's web server was basically mod_wsgi. One of the most popular (or considered fashionable) methods lately is Gunicorn.
In fact, I still recommend using gunicorn, which greatly reduces the inconvenience: it embeds Django beautifully and is easy to set up.
It also has 10% of the same configuration options as uwsgi (which is a good thing for some people), but other than that, by comparison, it offers almost the same basic features as uwsgi (or any other Python web server) .
uwsgi
In my opinion this is the only option, from Gunicorn to uwsgi. There will be higher performance, more configuration options that are easy to understand, and the ability to interact with nginx through the protocol also adds advantages.
Its configuration is also quite simple, just find an article related to it, more on it later.
I started using uwsgi to run some applications and used –processes=10 and –threads=10 to test the server’s multi-CPU for two purposes:
Support
Testing the possibility of reducing memory usage
Test thread safety support
(As for whether these tests are worth it, DISQUS runs in a single thread. I want to keep it as streamlined as possible and maximize the capabilities of each node)
Continuous iteration towards success
We have reduced the average API response time to less than 40ms, which I am very proud of. The API response time I am talking about here refers to the time it takes from the request hitting the Python server to the time the server returns the response to the proxy.
Unfortunately, as we started getting more and more traffic and experiencing access spikes, the response time started to go wrong. The fluctuating response times no longer matched what we had initially envisioned, although we still had about 30% of the memory on the service node and 60% of resources are available.
After a lot of adjustments, we deactivated a large number of uwsgi processes and let nginx load balance them (previously we let uwsgi itself load balance).
What this means is, instead of doing uwsgi processes=10, we run 10 separate uwsgi instances instead of --processes=10.
The result is a beautiful, consistent 20ms average response time.
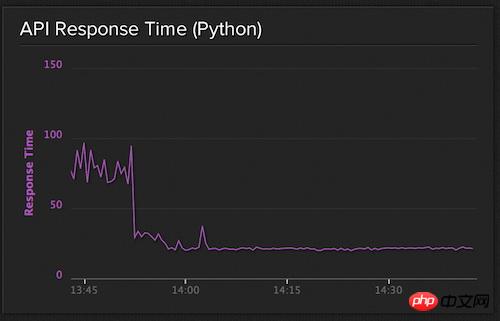
API response time
Put them together
I like to do things rather than talk about them, so here I'll give you some actual setup of our online servers.
nginx
The first piece of configuration is Nginx. We need to actually calculate and add the number of uwsgi process backends, so things are a bit complicated.
We first create a configuration list in our web page:
# recipes/web.rb

hosts = (0..(node[:getsentry][:web][:processes] - 1)).to_a.map do |x|
  port = 9000 + x
  "127.0.0.1:#{port}"
end

template "#{node['nginx']['dir']}/sites-available/getsentry.com" do
  source "nginx/getsentry.erb"
  owner "root"
  group "root"
  variables(
    :hosts => hosts
  )
  mode 0644
  notifies :reload, "service[nginx]"
endThe configuration of Nginx is very simple:
# templates/getsentry.erb

upstream internal {
<% @hosts.each do |host| %>
  server <%= host %>;
<% end %>
}

server {
  location / {
    uwsgi_pass         internal;

    uwsgi_param   Host                 $host;
    uwsgi_param   X-Real-IP            $remote_addr;
    uwsgi_param   X-Forwarded-For      $proxy_add_x_forwarded_for;
    uwsgi_param   X-Forwarded-Proto    $http_x_forwarded_proto;

    include uwsgi_params;
  }
}Now, we have set the number of uwsgi hosts and assigned weight values, starting with port 9000, which are the socket addresses used by the uwsgi configuration.
uwsgi
On the other hand, we use supervisor to control the uwsg process, which is also very simple:
# recipes/web.rb

command = "/srv/www/getsentry.com/env/bin/uwsgi -s 127.0.0.1:90%(process_num)02d --need-app --disable-logging --wsgi-file getsentry/wsgi.py --processes 1 --threads #{node['getsentry']['web']['threads']}"

supervisor_service "web" do
  directory "/srv/www/getsentry.com/current/"
  command command
  user "dcramer"
  stdout_logfile "syslog"
  stderr_logfile "syslog"
  startsecs 10
  stopsignal "QUIT"
  stopasgroup true
  killasgroup true
  process_name '%(program_name)s %(process_num)02d'
  numprocs node['getsentry']['web']['processes']
endLocation selection
Unless someone comes up with a very convincing argument why there should be another way (or something that doesn't work in this case), I'd love to hear about this pattern as the Python world becomes more standard. At the very least, I'd like to see the spark of some debate on how to improve process management within uwsgi.
The above is the detailed content of How to use Nginx + UWSGI. For more information, please follow other related articles on the PHP Chinese website!

Hot AI Tools

Undresser.AI Undress
AI-powered app for creating realistic nude photos

AI Clothes Remover
Online AI tool for removing clothes from photos.

Undress AI Tool
Undress images for free

Clothoff.io
AI clothes remover

Video Face Swap
Swap faces in any video effortlessly with our completely free AI face swap tool!

Hot Article
Hot Tools

Notepad++7.3.1
Easy-to-use and free code editor

SublimeText3 Chinese version
Chinese version, very easy to use

Zend Studio 13.0.1
Powerful PHP integrated development environment

Dreamweaver CS6
Visual web development tools

SublimeText3 Mac version
God-level code editing software (SublimeText3)
Hot Topics


 How to configure nginx in Windows
Apr 14, 2025 pm 12:57 PM
How to configure nginx in Windows
Apr 14, 2025 pm 12:57 PM
How to configure Nginx in Windows? Install Nginx and create a virtual host configuration. Modify the main configuration file and include the virtual host configuration. Start or reload Nginx. Test the configuration and view the website. Selectively enable SSL and configure SSL certificates. Selectively set the firewall to allow port 80 and 443 traffic.
 How to check the name of the docker container
Apr 15, 2025 pm 12:21 PM
How to check the name of the docker container
Apr 15, 2025 pm 12:21 PM
You can query the Docker container name by following the steps: List all containers (docker ps). Filter the container list (using the grep command). Gets the container name (located in the "NAMES" column).
 How to start containers by docker
Apr 15, 2025 pm 12:27 PM
How to start containers by docker
Apr 15, 2025 pm 12:27 PM
Docker container startup steps: Pull the container image: Run "docker pull [mirror name]". Create a container: Use "docker create [options] [mirror name] [commands and parameters]". Start the container: Execute "docker start [Container name or ID]". Check container status: Verify that the container is running with "docker ps".
 How to check whether nginx is started
Apr 14, 2025 pm 01:03 PM
How to check whether nginx is started
Apr 14, 2025 pm 01:03 PM
How to confirm whether Nginx is started: 1. Use the command line: systemctl status nginx (Linux/Unix), netstat -ano | findstr 80 (Windows); 2. Check whether port 80 is open; 3. Check the Nginx startup message in the system log; 4. Use third-party tools, such as Nagios, Zabbix, and Icinga.
 How to create containers for docker
Apr 15, 2025 pm 12:18 PM
How to create containers for docker
Apr 15, 2025 pm 12:18 PM
Create a container in Docker: 1. Pull the image: docker pull [mirror name] 2. Create a container: docker run [Options] [mirror name] [Command] 3. Start the container: docker start [Container name]
 How to check nginx version
Apr 14, 2025 am 11:57 AM
How to check nginx version
Apr 14, 2025 am 11:57 AM
The methods that can query the Nginx version are: use the nginx -v command; view the version directive in the nginx.conf file; open the Nginx error page and view the page title.
 How to configure cloud server domain name in nginx
Apr 14, 2025 pm 12:18 PM
How to configure cloud server domain name in nginx
Apr 14, 2025 pm 12:18 PM
How to configure an Nginx domain name on a cloud server: Create an A record pointing to the public IP address of the cloud server. Add virtual host blocks in the Nginx configuration file, specifying the listening port, domain name, and website root directory. Restart Nginx to apply the changes. Access the domain name test configuration. Other notes: Install the SSL certificate to enable HTTPS, ensure that the firewall allows port 80 traffic, and wait for DNS resolution to take effect.
 How to start nginx server
Apr 14, 2025 pm 12:27 PM
How to start nginx server
Apr 14, 2025 pm 12:27 PM
Starting an Nginx server requires different steps according to different operating systems: Linux/Unix system: Install the Nginx package (for example, using apt-get or yum). Use systemctl to start an Nginx service (for example, sudo systemctl start nginx). Windows system: Download and install Windows binary files. Start Nginx using the nginx.exe executable (for example, nginx.exe -c conf\nginx.conf). No matter which operating system you use, you can access the server IP
