

Detailed explanation of the sample code of html5 Canvas drawing (2)

This article mainly talks about html5 canvas clipping region (clip region), layering, compositing, How to apply Transformation (rotation, scaling) functions.
First post a basic code segment that implements all the following operations:
Base Code

<!DOCTYPE html>
<html>
<head>
<meta charset="utf-8" />
<script type="text/javascript" src="modernizr-latest.js"></script>        <script type="text/javascript">
window.addEventListener("load", eventWindowLoaded, false);
var Debugger = function() {};
Debugger.log = function(message) {
try {
 console.log(message);
}
catch (exception) {   return;   }
}

function eventWindowLoaded() { canvasApp();   }

function canvasSupport() {
return Modernizr.canvas;
}

function canvasApp() {
//是否支持CANVAS判断
if(!canvasSupport()) {
return;
}
 //取Canvas
var theCanvas = document.getElementById("canvasOne");
 //获取绘图环境
contextvar context = theCanvas.getContext("2d");
 //绘图方法的实现
function drawScreen() {}
 //绘图方法调用执行
drawScreen();
 }

</script>
</head>
<body>
<div style="position: absolute; top: 50px; left: 50px; border:1px solid #0000ff">
 <canvas id="canvasOne" width="550" height="400">
 Your browser does not support HTML5 Canvas.
</canvas>
</div>
</body>
</html>The following For all example codes, just replace the function drawScreen() above!
clip region clipping area
In the clip region, we use .save and .restore are used to push the current drawing state into the stack and restore it from the stack;
Use .save to ensure the drawing state before cropping;
Use context.rect() to determine the location of the area to be cropped;
Use context.clip() to perform the cutting action;
When drawing on Canvas, only the graphics in the cropped area can be displayed;
Use context.restore() to restore to the cropped area The state before cutting;
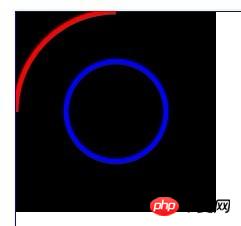
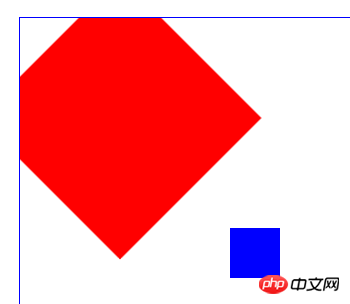
function drawScreen() {
context.fillStyle = "black";
context.fillRect(0, 0, 200, 200);
context.save();
//clip the canvas to a 50×50 square starting at 0,0
context.rect(0, 0, 100, 100);
context.clip();
//red circle
context.beginPath();
context.strokeStyle = "red";
context.lineWidth = 5;
context.arc(100, 100, 100, (Math.PI/180)*0, (Math.PI/180)*360, false);
//full circle
context.stroke();
context.closePath();
context.restore();

//reclip to the entire canvas
context.rect(0, 0, 300, 300);
context.clip();
//draw a blue line that is not clipped
context.beginPath();
context.strokeStyle = "blue"; //need list of available colors
context.lineWidth = 5;
context.arc(100, 100, 50, (Math.PI/180)*0, (Math.PI/180)*360, false);
//full circle
context.stroke();
context.closePath();
}Example renderings:
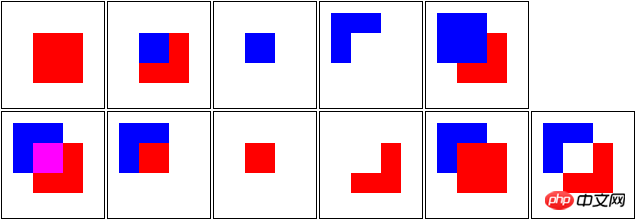
Compositing synthesis
Graphics synthesis on Canvas refers to better processing of the transparency of graphics and layer effects on the canvas;
There are two important aspects in the compositing operation Let’s first get to know the properties: globalAlpha and globalCompositeOperation
globalAlpha: refers to the transparency of Canvas, the default value is 1.0, the range is [0.0-1.0];
globalCompositeOperation: How multiple graphics with "alpha" and "transformations" applied are drawn on the Canvas.
There are 11 types: copy\ destination-atop\destination-in\destination-out\destination-over\ lighter\ source-atop\source-in\source-out\source -over\xor
There are two special words "source" and "destination" among these 11 types:
"source" : The graphic to be drawn on Canvas (new graphic);
"destination": The graphic currently displayed on Canvas (old graphic);
copy: means that the new graphics will be retained, and all others will be cleared
destination-atop: refers to displaying new graphics and overlapping Part of the old graphics, the old graphics (overlapping parts) are displayed on the upper layer
destination-in: refers to graphics that only display the overlapping parts of the old graphics
destination-out: refers to the graphics that only display the non-overlapping parts of the old graphics
destination-over: It means that both the old and new graphics are displayed, and the old graphics are displayed on the upper layer
lighter: It means that both the old and new graphics are displayed, and the overlapping parts of the old and new graphics are added with color
source-atop:指显示旧图表与重叠部分的新图形,新图形(重叠部分)显示在上层
source-in:指只显示新图形重叠部分的图形
source-out:指只显示新图形中不重叠部分的图形
source-over:指新旧图形都显示,新图形显示在上层
xor:指新旧图形都显示,新旧图形重叠的部分会变成透明。
<!DOCTYPE html>
<html lang="en">
    <head>
        <meta charset="utf-8" />
        <title>test</title>
        <script type="text/javascript" src="../script/modernizr-latest.js"></script>
        <script type="text/javascript">
            window.addEventListener("load", eventWindowLoaded, );
 Debugger = () {
            };
            Debugger.log = (message) {
 {
                    console.log(message);
                }  (exception) {
;
                }
            }
 eventWindowLoaded() {
                canvasApp();
            }

 canvasSupport() {
 Modernizr.canvas;
            }

 canvasApp() {

(!canvasSupport()) {
;
                }

 drawScreen(compositing, num) {
 name = "c" + num;
 theCanvas = document.getElementById(name);
                    theCanvas.width=100;
                    theCanvas.height=100;
 context = theCanvas.getContext("2d");
                    context.fillStyle = "blue";
                    context.fillRect(10, 10, 50, 50);
                    context.globalCompositeOperation = compositing;
                    context.fillStyle = "red";
                    context.fillRect(30, 30, 50, 50);
                }

                drawScreen("copy", 1);
                drawScreen("destination-atop", 2);
                drawScreen("destination-in", 3);
                drawScreen("destination-out", 4);
                drawScreen("destination-over", 5);
                drawScreen("lighter", 6);
                drawScreen("source-atop", 7);
                drawScreen("source-in", 8);
                drawScreen("source-out", 9);
                drawScreen("source-over", 10);
                drawScreen("xor", 11);
            }
        </script>
        <style>
            td {
                border: 1px solid #000000;
            }
        </style>
    </head>
    <body>
        <p style="position: absolute; top: 50px; left: 50px; border:1px solid #0000ff">
            <table>
                <tr>
                    <td><canvas id="c1"></canvas></td>
                    <td><canvas id="c2"></canvas></td>
                    <td><canvas id="c3"></canvas></td>
                    <td><canvas id="c4"></canvas></td>
                    <td><canvas id="c5"></canvas></td>
                </tr>
                <tr>
                    <td><canvas id="c6"></canvas></td>
                    <td><canvas id="c7"></canvas></td>
                    <td><canvas id="c8"></canvas></td>
                    <td><canvas id="c9"></canvas></td>
                    <td><canvas id="c10"></canvas></td>
                    <td><canvas id="c11"></canvas></td>
                </tr>
            </table>
        </p>
    </body>
</html>实例效果图:从左到右、从上到下,分别表示1,2,……11,这11种类型生成的效果图
Transformations 变换
变换的本质就是指从数学(矩阵)的角度来调整图形的物理属性;当然,这是原理;我们在实现的时候,只需要调用方法即可;
移动translate、旋转rotation 、缩放scale 、变换transforms
Transformations are applied to shapes and paths drawn after the setTransform() or other transformation function is called
只有在应用context.setTransform()方法后,对图形的各种变换才能生效;
实例:
function drawScreen() {
context.fillStyle = "blue";
context.fillRect(210,210,50,50);
context.setTransform(1,0,0,1,0,0);//启动变换
var angleInRadians = 45 * Math.PI / 180;
context.rotate(angleInRadians);//旋转(参数为弧度)
context.fillStyle = "red";
context.fillRect(0,0,200,200);
}效果如图:
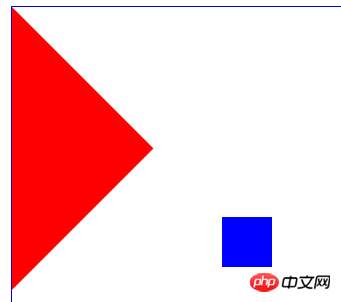
蓝色的box并没有发生旋转;红的box是以Canvas的原点为中心顺时针旋转了45度(为何没有以红色box中心为原点旋转呢?);
Canvas的旋转原点,默认为Canvas的坐标系的(0,0)点,若不进行原点平移就旋转,自然是像整个画布做了旋转;
We must “translate” the point of origin to the center of our shape to rotate it around its own center
我们必须通地context.translate()方法来平移原点,才能按绘制的图形中心来旋转图形自身;
平移原理:
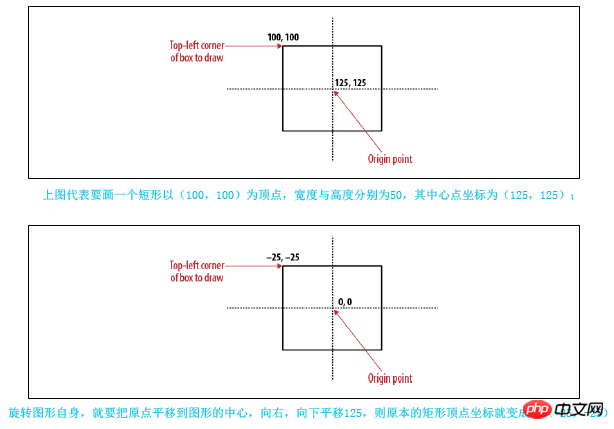
实例:
translate

function drawScreen() {
context.fillStyle = "blue";
context.fillRect(210,210,50,50);
context.setTransform(1,0,0,1,0,0);
var angleInRadians = 45 * Math.PI / 180;
var x = 0;
var y = 0;
var width = 200;
var height = 200;
context.translate(x+.5*width, y+.5*height);//平移
context.rotate(angleInRadians);
context.fillStyle = "red";
context.fillRect(-.5*width,-.5*height , width, height);
}效果图:
context.scale()实现图形的缩放,
此方法有两个参数: 一个是对X轴方向的缩放,一个是对Y轴方向的缩放,正常的图形参数默认都为1;
例如,我们要对图形放大两倍,则使用context.scale(2,2);
以(25,25)为顶点,长宽为50的正方形,放大2倍

function drawScreen() {
context.fillStyle = "blue";
context.fillRect(0, 0, 50, 50);
context.fillRect(150, 50, 50, 50);
context.fillRect(50, 150, 50, 50);
context.setTransform(1, 0, 0, 1, 0, 0);
context.scale(2, 2);
context.fillStyle = "red";
context.fillRect(25, 25, 50, 50);
}效果图:
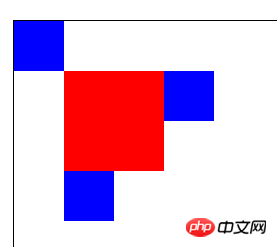
scale与ratation也存在相似问题,就是原点的问题;
如果我们在变换前不进行原点的平移的话,scale功能默认的原点也是canvas的原点;
相当于对整个画布进行scale 默认是延x轴正向(left),y轴正向进行缩放(down);
如果想图形依然在原来的位置,从图形的中心位置进行scale,就需要先进行原点的平移context.translate();

 以(25,25)为顶点,长宽为50的正方形,为其中心为原点,放大二倍
以(25,25)为顶点,长宽为50的正方形,为其中心为原点,放大二倍

function drawScreen() {

context.setTransform(1, 0, 0, 1, 0, 0);
var x = 25;
var y = 25;
var width = 50;
var height = 50;
context.translate(x + .5 * width, y + .5 * height);
context.scale(2, 2);
context.fillStyle = "red";
context.fillRect(-.5 * width, -.5 * height, width, height);
}The above is the detailed content of Detailed explanation of the sample code of html5 Canvas drawing (2). For more information, please follow other related articles on the PHP Chinese website!

Hot AI Tools

Undresser.AI Undress
AI-powered app for creating realistic nude photos

AI Clothes Remover
Online AI tool for removing clothes from photos.

Undress AI Tool
Undress images for free

Clothoff.io
AI clothes remover

Video Face Swap
Swap faces in any video effortlessly with our completely free AI face swap tool!

Hot Article
Hot Tools

Notepad++7.3.1
Easy-to-use and free code editor

SublimeText3 Chinese version
Chinese version, very easy to use

Zend Studio 13.0.1
Powerful PHP integrated development environment

Dreamweaver CS6
Visual web development tools

SublimeText3 Mac version
God-level code editing software (SublimeText3)
Hot Topics
 1677
1677
 14
1430
52
1333
25
1278
29
1257
24
14
1430
52
1333
25
1278
29
1257
24

 Table Border in HTML
Sep 04, 2024 pm 04:49 PM
Table Border in HTML
Sep 04, 2024 pm 04:49 PM
Guide to Table Border in HTML. Here we discuss multiple ways for defining table-border with examples of the Table Border in HTML.
 Nested Table in HTML
Sep 04, 2024 pm 04:49 PM
Nested Table in HTML
Sep 04, 2024 pm 04:49 PM
This is a guide to Nested Table in HTML. Here we discuss how to create a table within the table along with the respective examples.
 HTML margin-left
Sep 04, 2024 pm 04:48 PM
HTML margin-left
Sep 04, 2024 pm 04:48 PM
Guide to HTML margin-left. Here we discuss a brief overview on HTML margin-left and its Examples along with its Code Implementation.
 HTML Table Layout
Sep 04, 2024 pm 04:54 PM
HTML Table Layout
Sep 04, 2024 pm 04:54 PM
Guide to HTML Table Layout. Here we discuss the Values of HTML Table Layout along with the examples and outputs n detail.
 HTML Input Placeholder
Sep 04, 2024 pm 04:54 PM
HTML Input Placeholder
Sep 04, 2024 pm 04:54 PM
Guide to HTML Input Placeholder. Here we discuss the Examples of HTML Input Placeholder along with the codes and outputs.
 HTML Ordered List
Sep 04, 2024 pm 04:43 PM
HTML Ordered List
Sep 04, 2024 pm 04:43 PM
Guide to the HTML Ordered List. Here we also discuss introduction of HTML Ordered list and types along with their example respectively
 HTML onclick Button
Sep 04, 2024 pm 04:49 PM
HTML onclick Button
Sep 04, 2024 pm 04:49 PM
Guide to HTML onclick Button. Here we discuss their introduction, working, examples and onclick Event in various events respectively.
 Moving Text in HTML
Sep 04, 2024 pm 04:45 PM
Moving Text in HTML
Sep 04, 2024 pm 04:45 PM
Guide to Moving Text in HTML. Here we discuss an introduction, how marquee tag work with syntax and examples to implement.
