
 Database
Mysql Tutorial
Analysis of the problem of uploading images with MySQL+SSM+Ajax (picture)
Database
Mysql Tutorial
Analysis of the problem of uploading images with MySQL+SSM+Ajax (picture)
Analysis of the problem of uploading images with MySQL+SSM+Ajax (picture)

This article mainly introduces the problem of MySQL+SSM+Ajaxuploading images. Has very good reference value. Let’s take a look with the editor below
It was my first time to write the code for uploading images, and I encountered many problems. I worked on it all day yesterday and finally succeeded in the evening. Cheers loudly.
However, after finishing it, there are still many questions that I can’t figure out. So here it can be considered as writing a note. If you forget it in the future, you can review it. It can also be regarded as asking friends from all walks of life. (^_^)
Q.1. It is said on the Internet that Ajax cannot upload files, but there are not many people saying this, and there are still many people sharing files uploaded through Ajax.
I didn't make it through Ajax. In the end, I wrote it through the AjaxSubmit method.
Q.2. Does the AjaxSubmit method have a default limit on the size of file upload? If I choose a file larger than 100KB, it will not be uploaded successfully, but if it is smaller than 100KB, it will be successful.
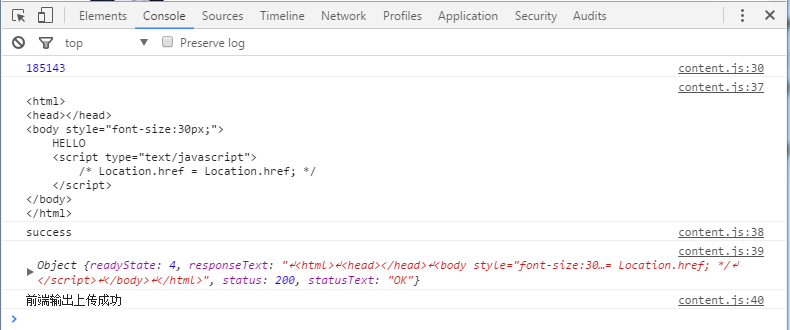
When uploading more than 100KB, the browser console returns the following prompt. It means that he still executed the success method of ajaxSubmit and returned the value of textStatus as success, but the HTML code content returned by XMLHttpRequest, and errorThrown's responseseText is what I did in spring- Exception handling View web page configured in web.xml.
##js Code (submit form event ):
function postImg(){
 if ($.trim($("#imgFile").val()) == "") {
   alert("请选择图片!");
   return;
  }
 console.log($("#imgFile")[0].files[0].size);//小于100*1024,下面的请求就可以成功
 var option = {
  url : '/cloudnote/user/insertUserPhoto.do',
  type : 'POST',
//  dataType : 'json',
  headers : {"ClientCallMode" : "ajax"}, //添加请求头部
  success : function(XMLHttpRequest, textStatus, errorThrown){
   console.log(XMLHttpRequest);
   console.log(textStatus);
   console.log(errorThrown);
   console.log("前端输出上传成功");
   $("#imgClose").click();
  },
  error: function(XMLHttpRequest, textStatus, errorThrown) {
   console.log(XMLHttpRequest);
   console.log(textStatus);
   console.log(errorThrown);
   console.log("前端输出上传失败");
  }
 };
 $("#imgForm").ajaxSubmit(option);
 return false;
}Front-endHTML form:
<form id="imgForm" >
  <p class="modal-content">
   <p class="modal-header">
   <button type="button" class="close" data-dismiss="modal" aria-hidden="true">×</button>
   <h4 class="modal-title" id="myModalLabel">修改头像</h4>
  </p>
  <p class="modal-body">
    <input type="file" id="imgFile" name="imgFile"/>
   <input id="imgId" name="userId" value="${user.id }" style="display:none" />
  </p>
  <p class="modal-footer">
    <button type="button" class="btn btn-default" data-dismiss="modal" id="imgClose">关闭</button>
   <button type="button" class="btn btn-primary" onclick="postImg();" id="imgSubmit">上传</button>
  </p>
 </p>
</form>The following is the background java code (Controller)
//更新用户头像
 @RequestMapping(value="/insertUserPhoto.do",method = RequestMethod.POST)
 public void insertUserPhoto(
   HttpServletRequest req, HttpServletResponse res){
  System.out.println("----- 插入图片 -------");
  try{
   String id = req.getParameter("userId");
   System.out.println(id);
   MultipartHttpServletRequest multipartRequest = (MultipartHttpServletRequest) req;
   MultipartFile file = multipartRequest.getFile("imgFile");
   byte[] photo = file.getBytes();
   boolean result = serv.insertUserPhoto(id, photo);
   res.setContentType("text/html;charset=utf8");
   res.getWriter().write("result:" + result);
  }catch(Exception e){
   e.printStackTrace();
  }
  System.out.println("----- 插入图片end -------");
 }
 /**
  * 读取用户头像
  * @param req
  * @param res
  */
 @RequestMapping(value="/readPhoto.do", method=RequestMethod.GET)
 public void readPhoto(HttpServletRequest req, HttpServletResponse res){
  System.out.println("------readPohto-----");
  String id = Utils.getSessionUserId(req);
  try {
   User user = serv.selectUserPhoto(id);
   res.setContentType("image/jpeg");
   res.setCharacterEncoding("utf-8");
   OutputStream outputStream = res.getOutputStream();
   InputStream in = new ByteArrayInputStream(user.getPhoto());
   int len = 0;
   byte[] buf = new byte[1024];
   while((len = in.read(buf,0,1024)) != -1){
    outputStream.write(buf, 0, len);
   }
   outputStream.close();
  } catch (IOException e) {
   e.printStackTrace();
  }
  System.out.println("-----readPohto end-----");
  return;
}Service implementation class
//查找用户图片(头像)
 public User selectUserPhoto(String id) throws ImageException {
  User user = userDao.findUserById(id);
  if(user == null){
   throw new UserNameException("用户名不存在!");
  }
  Map<String, Object> data = userDao.selectUserPhoto(id);
  System.out.println(data);
  user.setPhoto((byte[]) data.get("photo"));
  return user;
 }
 //更新用户图片(头像)
 public boolean insertUserPhoto(String userId, byte[] photo) throws ImageException, UserNameException {
  if(userId == null || userId.trim().isEmpty()){
   throw new UserNameException("用户id不存在");
  }
  User user = userDao.findUserById(userId);
  if(user == null){
   throw new UserNameException("用户不存在");
  }
  user.setPhoto(photo);
  int n = userDao.updateUserPhoto(user);
  System.out.println("插入图片:" + n);
  return n==1?true:false;
 }
mapper mapper:
<!-- 更新图片 -->
<update id="updateUserPhoto" parameterType="cn.tedu.note.entity.User">
UPDATE user set id = #{id}, photo = #{photo,jdbcType=BLOB} <!-- 这里试了,如果不加jdbcType=BLOB 会出错,虽然不是很理解,但也照做了 -->
WHERE id = #{id}
</update>
<!-- 获取图片 -->
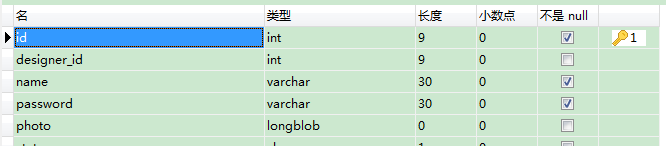
<select id="selectUserPhoto" parameterType="String" resultType="Map">
SELECT id as id, photo as photo from user
WHERE id=#{id}
</select>Spring-web.xml configuration
 <!-- 文件上传表单的视图解析器 -->
 <bean id="multipartResolver" class="org.springframework.web.multipart.commons.CommonsMultipartResolver">
  <property name="maxUploadSize"><value>100000</value></property>
  <property name="defaultEncoding"><value>UTF-8</value></property>
 </bean>
The above is the detailed content of Analysis of the problem of uploading images with MySQL+SSM+Ajax (picture). For more information, please follow other related articles on the PHP Chinese website!

Hot AI Tools

Undresser.AI Undress
AI-powered app for creating realistic nude photos

AI Clothes Remover
Online AI tool for removing clothes from photos.

Undress AI Tool
Undress images for free

Clothoff.io
AI clothes remover

Video Face Swap
Swap faces in any video effortlessly with our completely free AI face swap tool!

Hot Article
Hot Tools

Notepad++7.3.1
Easy-to-use and free code editor

SublimeText3 Chinese version
Chinese version, very easy to use

Zend Studio 13.0.1
Powerful PHP integrated development environment

Dreamweaver CS6
Visual web development tools

SublimeText3 Mac version
God-level code editing software (SublimeText3)
Hot Topics


 MySQL's Role: Databases in Web Applications
Apr 17, 2025 am 12:23 AM
MySQL's Role: Databases in Web Applications
Apr 17, 2025 am 12:23 AM
The main role of MySQL in web applications is to store and manage data. 1.MySQL efficiently processes user information, product catalogs, transaction records and other data. 2. Through SQL query, developers can extract information from the database to generate dynamic content. 3.MySQL works based on the client-server model to ensure acceptable query speed.
 How to start mysql by docker
Apr 15, 2025 pm 12:09 PM
How to start mysql by docker
Apr 15, 2025 pm 12:09 PM
The process of starting MySQL in Docker consists of the following steps: Pull the MySQL image to create and start the container, set the root user password, and map the port verification connection Create the database and the user grants all permissions to the database
 Laravel Introduction Example
Apr 18, 2025 pm 12:45 PM
Laravel Introduction Example
Apr 18, 2025 pm 12:45 PM
Laravel is a PHP framework for easy building of web applications. It provides a range of powerful features including: Installation: Install the Laravel CLI globally with Composer and create applications in the project directory. Routing: Define the relationship between the URL and the handler in routes/web.php. View: Create a view in resources/views to render the application's interface. Database Integration: Provides out-of-the-box integration with databases such as MySQL and uses migration to create and modify tables. Model and Controller: The model represents the database entity and the controller processes HTTP requests.
 Solve database connection problem: a practical case of using minii/db library
Apr 18, 2025 am 07:09 AM
Solve database connection problem: a practical case of using minii/db library
Apr 18, 2025 am 07:09 AM
I encountered a tricky problem when developing a small application: the need to quickly integrate a lightweight database operation library. After trying multiple libraries, I found that they either have too much functionality or are not very compatible. Eventually, I found minii/db, a simplified version based on Yii2 that solved my problem perfectly.
 How to install mysql in centos7
Apr 14, 2025 pm 08:30 PM
How to install mysql in centos7
Apr 14, 2025 pm 08:30 PM
The key to installing MySQL elegantly is to add the official MySQL repository. The specific steps are as follows: Download the MySQL official GPG key to prevent phishing attacks. Add MySQL repository file: rpm -Uvh https://dev.mysql.com/get/mysql80-community-release-el7-3.noarch.rpm Update yum repository cache: yum update installation MySQL: yum install mysql-server startup MySQL service: systemctl start mysqld set up booting
 Centos install mysql
Apr 14, 2025 pm 08:09 PM
Centos install mysql
Apr 14, 2025 pm 08:09 PM
Installing MySQL on CentOS involves the following steps: Adding the appropriate MySQL yum source. Execute the yum install mysql-server command to install the MySQL server. Use the mysql_secure_installation command to make security settings, such as setting the root user password. Customize the MySQL configuration file as needed. Tune MySQL parameters and optimize databases for performance.
 Laravel framework installation method
Apr 18, 2025 pm 12:54 PM
Laravel framework installation method
Apr 18, 2025 pm 12:54 PM
Article summary: This article provides detailed step-by-step instructions to guide readers on how to easily install the Laravel framework. Laravel is a powerful PHP framework that speeds up the development process of web applications. This tutorial covers the installation process from system requirements to configuring databases and setting up routing. By following these steps, readers can quickly and efficiently lay a solid foundation for their Laravel project.
 MySQL vs. Other Programming Languages: A Comparison
Apr 19, 2025 am 12:22 AM
MySQL vs. Other Programming Languages: A Comparison
Apr 19, 2025 am 12:22 AM
Compared with other programming languages, MySQL is mainly used to store and manage data, while other languages such as Python, Java, and C are used for logical processing and application development. MySQL is known for its high performance, scalability and cross-platform support, suitable for data management needs, while other languages have advantages in their respective fields such as data analytics, enterprise applications, and system programming.
