
 Web Front-end
H5 Tutorial
HTML5/CSS3 special topic canvas simulation to implement electronic lottery scratch-off sample code (picture)
Web Front-end
H5 Tutorial
HTML5/CSS3 special topic canvas simulation to implement electronic lottery scratch-off sample code (picture)
HTML5/CSS3 special topic canvas simulation to implement electronic lottery scratch-off sample code (picture)

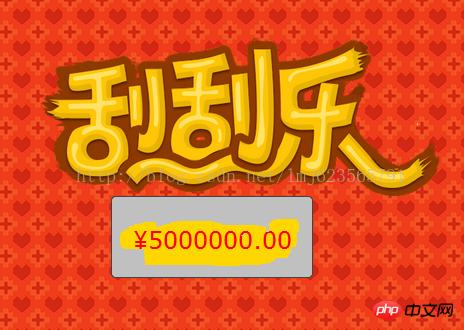
Today I will bring you a small example of a scratch-off game~based on HTML5 canvas. If you are interested, you can change it to the android version, or other~
Rendering:

Post a photo of me winning 5 million, what should I do, how to spend it~
<!DOCTYPE html>
<html>
<head>
    <title></title>
    <meta charset="utf-8">

    <script type="text/javascript" src="../../jquery-1.8.3.js"></script>
    <script type="text/javascript" src="canvas2d.js"></script>

    <script type="text/javascript" src="GuaGuaLe2.js"></script>

    <script type="text/javascript">

        $(function ()
        {
            var guaguale = new GuaGuaLe("front", "back");
            guaguale.init({msg: "¥5000000.00"});
        });
    </script>
    <style type="text/css">


        body
        {
            background: url("s_bd.jpg") repeat 0 0;
        }

        .container
        {
            position: relative;
            width: 400px;
            height: 160px;
            margin: 100px auto 0;
            background: url(s_title.png) no-repeat 0 0;
            background-size: 100% 100%;
        }

        #front, #back
        {
            position: absolute;
            width: 200px;
            left: 50%;
            top: 100%;
            margin-left: -130px;
            height: 80px;
            border-radius: 5px;
            border: 1px solid #444;
        }

    </style>

</head>
<body>

<p class="container">
    <canvas id="back" width="200" height="80"></canvas>
    <canvas id="front" width="200" height="80"></canvas>
</p>


</body>
</html>/**
* Created with JetBrains WebStorm.
* User: zhy
* Date: 13-12-17
* Time: 下午9:42
* To change this template use File | Settings | File Templates.
*/
function Canvas2D($canvas)
{
var context = $canvas[0].getContext("2d"),
width = $canvas[0].width,
height = $canvas[0].height,
pageOffset = $canvas.offset();
context.font = "24px Verdana, Geneva, sans-serif";
context.textBaseline = "top";
/**
* 绘制矩形
* @param start
* @param end
* @param isFill
*/
this.drawRect = function (start, end, isFill)
{
var w = end.x - start.x , h = end.y - start.y;
if (isFill)
{
context.fillRect(start.x, start.y, w, h);
}
else
{
context.strokeRect(start.x, start.y, w, h);
}
};
/**
* 根据书写的文本,得到该文本在canvas上书写的中心位置的左上角坐标
* @param text
* @returns {{x: number, y: number}}
*/
this.caculateTextCenterPos = function (text)
{
var metrics = context.measureText(text);
console.log(metrics);
// context.font = fontSize + "px Verdana, Geneva, sans-serif";
var textWidth = metrics.width;
var textHeight = parseInt(context.font);
return {
x: width / 2 - textWidth / 2,
y: height / 2 - textHeight / 2
};
}
this.width = function ()
{
return width;
}
this.height = function ()
{
return height;
}
this.resetOffset = function ()
{
pageOffset = $canvas.offset();
}
/**
* 当屏幕大小发生变化,重新计算offset
*/
$(window).resize(function ()
{
pageOffset = $canvas.offset();
});
/**
* 将页面上的左边转化为canvas中的坐标
* @param pageX
* @param pageY
* @returns {{x: number, y: number}}
*/
this.getCanvasPoint = function (pageX, pageY)
{
return{
x: pageX - pageOffset.left,
y: pageY - pageOffset.top
}
}
/**
* 清除区域,此用户鼠标擦出刮奖涂层
* @param start
* @returns {*}
*/
this.clearRect = function (start)
{
context.clearRect(start.x, start.y, 10, 10);
return this;
};
/**
*将文本绘制到canvas的中间
* @param text
* @param fill
*/
this.drawTextInCenter = function (text, fill)
{
var point = this.caculateTextCenterPos(text);
if (fill)
{
context.fillText(text, point.x, point.y);
}
else
{
context.strokeText(text, point.x, point.y);
}
};
/**
* 设置画笔宽度
* @param newWidth
* @returns {*}
*/
this.penWidth = function (newWidth)
{
if (arguments.length)
{
context.lineWidth = newWidth;
return this;
}
return context.lineWidth;
};
/**
* 设置画笔颜色
* @param newColor
* @returns {*}
*/
this.penColor = function (newColor)
{
if (arguments.length)
{
context.strokeStyle = newColor;
context.fillStyle = newColor;
return this;
}
return context.strokeStyle;
};
/**
* 设置字体大小
* @param fontSize
* @returns {*}
*/
this.fontSize = function (fontSize)
{
if (arguments.length)
{
context.font = fontSize + "px Verdana, Geneva, sans-serif";
return this;
}
return context.fontSize;
}
}/**
* Created with JetBrains WebStorm.
* User: zhy
* Date: 14-6-24
* Time: 上午11:36
* To change this template use File | Settings | File Templates.
*/
function GuaGuaLe(idFront, idBack)
{
this.$eleBack = $("#" + idBack);
this.$eleFront = $("#" + idFront);
this.frontCanvas = new Canvas2D(this.$eleFront);
this.backCanvas = new Canvas2D(this.$eleBack);
this.isStart = false;
}
GuaGuaLe.prototype = {
constructor: GuaGuaLe,
/**
* 将用户的传入的参数和默认参数做合并
* @param desAttr
* @returns {{frontFillColor: string, backFillColor: string, backFontColor: string, backFontSize: number, msg: string}}
*/
mergeAttr: function (desAttr)
{
var defaultAttr = {
frontFillColor: "silver",
backFillColor: "gold",
backFontColor: "red",
backFontSize: 24,
msg: "谢谢惠顾"
};
for (var p in desAttr)
{
defaultAttr[p] = desAttr[p];
}
return defaultAttr;
},
init: function (desAttr)
{
var attr = this.mergeAttr(desAttr);
//初始化canvas
this.backCanvas.penColor(attr.backFillColor);
this.backCanvas.fontSize(attr.backFontSize);
this.backCanvas.drawRect({x: 0, y: 0}, {x: this.backCanvas.width(), y: this.backCanvas.height()}, true);
this.backCanvas.penColor(attr.backFontColor);
this.backCanvas.drawTextInCenter(attr.msg, true);
//初始化canvas
this.frontCanvas.penColor(attr.frontFillColor);
this.frontCanvas.drawRect({x: 0, y: 0}, {x: this.frontCanvas.width(), y: this.frontCanvas.height()}, true);
var _this = this;
//设置事件
this.$eleFront.mousedown(function (event)
{
_this.mouseDown(event);
}).mousemove(function (event)
{
_this.mouseMove(event);
}).mouseup(function (event)
{
_this.mouseUp(event);
});
},
mouseDown: function (event)
{
this.isStart = true;
this.startPoint = this.frontCanvas.getCanvasPoint(event.pageX, event.pageY);
},
mouseMove: function (event)
{
if (!this.isStart)return;
var p = this.frontCanvas.getCanvasPoint(event.pageX, event.pageY);
this.frontCanvas.clearRect(p);
},
mouseUp: function (event)
{
this.isStart = false;
}
};passes the two canvas ids passed in by the user, and then generates an object, performs initialization operations, and sets events. Of course, it also provides users with optional parameters, various colors, information displayed after scraping, etc. Through {
FrontFillcolor: "Silver",
Backfillcolor: "Gold",
Backfontcolor: " Red ",
Backfontsize: 24,
MSG:" Thank you Hui Gu "
}; passed to the init method for settings.


  var k;
        if (p.x > this.startPoint.x)
        {
            k = (p.y - this.startPoint.y) / (p.x - this.startPoint.x);
            for (var i = this.startPoint.x; i < p.x; i += 5)
            {
                this.frontCanvas.clearRect({x: i, y: (this.startPoint.y + (i - this.startPoint.x) * k)});
            }
        } else
        {
            k = (p.y - this.startPoint.y) / (p.x - this.startPoint.x);
            for (var i = this.startPoint.x; i > p.x; i -= 5)
            {
                this.frontCanvas.clearRect({x: i, y: (this.startPoint.y + ( i - this.startPoint.x  ) * k)});
            }
        }
this.startPoint = p;/**
* Created with JetBrains WebStorm.
* User: zhy
* Date: 14-6-24
* Time: 上午11:36
* To change this template use File | Settings | File Templates.
*/
function GuaGuaLe(idFront, idBack)
{
this.$eleBack = $("#" + idBack);
this.$eleFront = $("#" + idFront);
this.frontCanvas = new Canvas2D(this.$eleFront);
this.backCanvas = new Canvas2D(this.$eleBack);
this.isStart = false;
}
GuaGuaLe.prototype = {
constructor: GuaGuaLe,
/**
* 将用户的传入的参数和默认参数做合并
* @param desAttr
* @returns {{frontFillColor: string, backFillColor: string, backFontColor: string, backFontSize: number, msg: string}}
*/
mergeAttr: function (desAttr)
{
var defaultAttr = {
frontFillColor: "silver",
backFillColor: "gold",
backFontColor: "red",
backFontSize: 24,
msg: "谢谢惠顾"
};
for (var p in desAttr)
{
defaultAttr[p] = desAttr[p];
}
return defaultAttr;
},
init: function (desAttr)
{
var attr = this.mergeAttr(desAttr);
//初始化canvas
this.backCanvas.penColor(attr.backFillColor);
this.backCanvas.fontSize(attr.backFontSize);
this.backCanvas.drawRect({x: 0, y: 0}, {x: this.backCanvas.width(), y: this.backCanvas.height()}, true);
this.backCanvas.penColor(attr.backFontColor);
this.backCanvas.drawTextInCenter(attr.msg, true);
//初始化canvas
this.frontCanvas.penColor(attr.frontFillColor);
this.frontCanvas.drawRect({x: 0, y: 0}, {x: this.frontCanvas.width(), y: this.frontCanvas.height()}, true);
var _this = this;
//设置事件
this.$eleFront.mousedown(function (event)
{
_this.mouseDown(event);
}).mousemove(function (event)
{
_this.mouseMove(event);
}).mouseup(function (event)
{
_this.mouseUp(event);
});
},
mouseDown: function (event)
{
this.isStart = true;
this.startPoint = this.frontCanvas.getCanvasPoint(event.pageX, event.pageY);
},
mouseMove: function (event)
{
if (!this.isStart)return;
var p = this.frontCanvas.getCanvasPoint(event.pageX, event.pageY);
this.frontCanvas.clearRect(p);
},
mouseUp: function (event)
{
this.isStart = false;
}
}The above is the detailed content of HTML5/CSS3 special topic canvas simulation to implement electronic lottery scratch-off sample code (picture). For more information, please follow other related articles on the PHP Chinese website!

Hot AI Tools

Undresser.AI Undress
AI-powered app for creating realistic nude photos

AI Clothes Remover
Online AI tool for removing clothes from photos.

Undress AI Tool
Undress images for free

Clothoff.io
AI clothes remover

Video Face Swap
Swap faces in any video effortlessly with our completely free AI face swap tool!

Hot Article
Hot Tools

Notepad++7.3.1
Easy-to-use and free code editor

SublimeText3 Chinese version
Chinese version, very easy to use

Zend Studio 13.0.1
Powerful PHP integrated development environment

Dreamweaver CS6
Visual web development tools

SublimeText3 Mac version
God-level code editing software (SublimeText3)
Hot Topics


 Table Border in HTML
Sep 04, 2024 pm 04:49 PM
Table Border in HTML
Sep 04, 2024 pm 04:49 PM
Guide to Table Border in HTML. Here we discuss multiple ways for defining table-border with examples of the Table Border in HTML.
 Nested Table in HTML
Sep 04, 2024 pm 04:49 PM
Nested Table in HTML
Sep 04, 2024 pm 04:49 PM
This is a guide to Nested Table in HTML. Here we discuss how to create a table within the table along with the respective examples.
 HTML margin-left
Sep 04, 2024 pm 04:48 PM
HTML margin-left
Sep 04, 2024 pm 04:48 PM
Guide to HTML margin-left. Here we discuss a brief overview on HTML margin-left and its Examples along with its Code Implementation.
 HTML Table Layout
Sep 04, 2024 pm 04:54 PM
HTML Table Layout
Sep 04, 2024 pm 04:54 PM
Guide to HTML Table Layout. Here we discuss the Values of HTML Table Layout along with the examples and outputs n detail.
 HTML Input Placeholder
Sep 04, 2024 pm 04:54 PM
HTML Input Placeholder
Sep 04, 2024 pm 04:54 PM
Guide to HTML Input Placeholder. Here we discuss the Examples of HTML Input Placeholder along with the codes and outputs.
 HTML Ordered List
Sep 04, 2024 pm 04:43 PM
HTML Ordered List
Sep 04, 2024 pm 04:43 PM
Guide to the HTML Ordered List. Here we also discuss introduction of HTML Ordered list and types along with their example respectively
 Moving Text in HTML
Sep 04, 2024 pm 04:45 PM
Moving Text in HTML
Sep 04, 2024 pm 04:45 PM
Guide to Moving Text in HTML. Here we discuss an introduction, how marquee tag work with syntax and examples to implement.
 HTML onclick Button
Sep 04, 2024 pm 04:49 PM
HTML onclick Button
Sep 04, 2024 pm 04:49 PM
Guide to HTML onclick Button. Here we discuss their introduction, working, examples and onclick Event in various events respectively.
