
 Web Front-end
H5 Tutorial
HTML5 WebSocket implementation of multiple file uploads at the same time
Web Front-end
H5 Tutorial
HTML5 WebSocket implementation of multiple file uploads at the same time
HTML5 WebSocket implementation of multiple file uploads at the same time

In traditional HTTP applications, it is very troublesome to upload multiple files at the same time and check the upload progress. Of course, there are also some SWF-based file upload components that provide this convenience. In HTML5, it is The control of file reading and uploading is very flexible. HTML5 provides a series of AIPs for file reading, including calculating the content of a certain part of the file. It is also very convenient. Combined with Websocket, file transmission becomes more convenient and flexible. The following is a simple way to implement multiple file upload applications at the same time by using HTML5 combined with websocet.
Achieve functions
A rough preview of the functions that need to be done: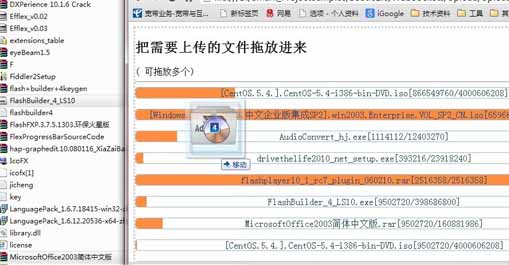
The main function is that users can directly drag and drop the files in the folder to the web page and upload them, and the upload progress information will be displayed during the upload process.
FileInfo Class encapsulation
In order to facilitate reading file information, a simple object class for reading file information is encapsulated based on the original File.
function FileInfo(file, pagesize) {

    this.Size = file.size;

    this.File = file;

    this.FileType = file.type;

    this.FileName = file.name;

    this.PageSize = pagesize;

    this.PageIndex = 0;

    this.Pages = 0;

    this.UploadError = null;

    this.UploadProcess = null;

    this.DataBuffer = null;

    this.UploadBytes = 0;

    this.ID = Math.floor(Math.random() * 0x10000).toString(16);

    this.LoadCallBack = null;

    if (Math.floor(this.Size % this.PageSize) > 0) {

        this.Pages = Math.floor((this.Size / this.PageSize)) + 1;


    }

    else {

        this.Pages = Math.floor(this.Size / this.PageSize);


    }


}

FileInfo.prototype.Reset = function () {

    this.PageIndex = 0;

    this.UploadBytes = 0;

}

FileInfo.prototype.toBase64String = function () {

    var binary = ''

    var bytes = new Uint8Array(this.DataBuffer)

    var len = bytes.byteLength;


    for (var i = 0; i < len; i++) {

        binary += String.fromCharCode(bytes[i])

    }

    return window.btoa(binary);

}

FileInfo.prototype.OnLoadData = function (evt) {

    var obj = evt.target["tag"];


    if (evt.target.readyState == FileReader.DONE) {

        obj.DataBuffer = evt.target.result;

        if (obj.LoadCallBack != null)

            obj.LoadCallBack(obj);


    }

    else {

        if (obj.UploadError != null)

            obj.UploadError(fi, evt.target.error);

    }


}


FileInfo.prototype.Load = function (completed) {

    this.LoadCallBack = completed;

    if (this.filereader == null || this.filereader == undefined)

        this.filereader = new FileReader();

    var reader = this.filereader;

    reader["tag"] = this;

    reader.onloadend = this.OnLoadData;

    var count = this.Size - this.PageIndex * this.PageSize;

    if (count > this.PageSize)

        count = this.PageSize;

    this.UploadBytes += count;

    var blob = this.File.slice(this.PageIndex * this.PageSize, this.PageIndex * this.PageSize + count);


    reader.readAsArrayBuffer(blob);

};


FileInfo.prototype.OnUploadData = function (file) {

    var channel = file._channel;

    var url = file._url;

    channel.Send({ url: url, parameters: { FileID: file.ID, PageIndex: file.PageIndex, Pages: file.Pages, Base64Data: file.toBase64String()} }, function (result) {

        if (result.status == null || result.status == undefined) {

            file.PageIndex++;

            if (file.UploadProcess != null)

                file.UploadProcess(file);

            if (file.PageIndex < file.Pages) {

                file.Load(file.OnUploadData);

            }

        }

        else {


            if (file.UploadError != null)

                file.UploadError(file, data.status);

        }

    });

}


FileInfo.prototype.Upload = function (channel, url) {

    var fi = this;

    channel.Send({ url: url, parameters: { FileName: fi.FileName, Size: fi.Size, FileID: fi.ID} }, function (result) {

        if (result.status == null || result.status == undefined) {

            fi._channel = channel;

            fi._url = result.data;

            fi.Load(fi.OnUploadData);

        }

        else {

            if (file.UploadError != null)

                file.UploadError(fi, result.status);

        }

    });


}## The processing of the
# class is very simple. Initialize some file information through file initialization and specify the block size, such as the number of pages, page size, etc. Of course, the most important thing is to encapsulate the Upload method corresponding to the file, which is used to store the file block information. The base64 information is packaged and sent to the server through Websocket.
File drag and drop
There is no need to do complicated things to accept system file drag and drop in HTML5. You only need to bind relevant events to the container element.
function onDragEnter(e) {

            e.stopPropagation();

            e.preventDefault();

        }


        function onDragOver(e) {

            e.stopPropagation();

            e.preventDefault();

            $(dropbox).addClass('rounded');

        }


        function onDragLeave(e) {

            e.stopPropagation();

            e.preventDefault();

            $(dropbox).removeClass('rounded');

        }


        function onDrop(e) {

            e.stopPropagation();

            e.preventDefault();

            $(dropbox).removeClass('rounded');

            var readFileSize = 0;

            var files = e.dataTransfer.files;

            if (files.length > 0) {

                onFileOpen(files);

            }


        }
You only need to obtain the relevant drag and drop files during the onDrop process, which may be passed through some HTML5 Tutorials can help.
At this time, you only need to build the relevant FileInfo object for the selected file and call the upload method.
function onFileOpen(files) {

            if (files.length > 0) {

                for (var i = 0; i < files.length; i++) {

                    var info = new FileInfo(files[i], 32768);

                    uploads.push(info);

                    info.UploadProcess = onUploadProcess;

                    addUploadItem(info);

                }

            }

        }
Upload through the UploadProcess event File progress information is updated with a setting
function onUploadProcess(file) {

            $('#p_' + file.ID).progressbar({ value: (file.PageIndex / file.Pages) * 100,

                text: file.FileName + '[' + file.UploadBytes + '/' + file.Size + ']'

            });

        }
C#Server
With the help of Beetle’s support for websocket, the corresponding service The implementation on the end is very simple
/// <summary>

    /// Copyright © henryfan 2012

    ///CreateTime:  2012/12/14 21:13:34

    /// </summary>

    public class Handler

    {

        public void UploadPackage(string FileID, int PageIndex, int Pages, string Base64Data)

        {

            Console.WriteLine("FileID:{2},PageIndex:{0} Pages:{1} DataLength:{3}", PageIndex, Pages, FileID,Base64Data.Length);


        }

        public string UploadFile(string FileID, string FileName, long Size)

        {

            Console.WriteLine("FileID:{2},FileName:{0} Size:{1}", FileName, Size, FileID);

            return "Handler.UploadPackage";

        }

    }
There are two server-side methods, one is to upload file request, and the other is to upload file block receiving method.
Summary
Only the above simple code can realize the function of uploading multiple files at the same time. Here, json is used to process the uploaded information, so the file stream needs to be encoded with base64. Since the data submitted by websocket browsing generally has MASK processing and the loss of base64 is relatively heavy, in fact websocket provides a stream packet format (arraybuffer); of course, this kind of processing is not as convenient and simple as json in operation. .
Download code: WebSocketUpload.rar

Hot AI Tools

Undresser.AI Undress
AI-powered app for creating realistic nude photos

AI Clothes Remover
Online AI tool for removing clothes from photos.

Undress AI Tool
Undress images for free

Clothoff.io
AI clothes remover

Video Face Swap
Swap faces in any video effortlessly with our completely free AI face swap tool!

Hot Article
Hot Tools

Notepad++7.3.1
Easy-to-use and free code editor

SublimeText3 Chinese version
Chinese version, very easy to use

Zend Studio 13.0.1
Powerful PHP integrated development environment

Dreamweaver CS6
Visual web development tools

SublimeText3 Mac version
God-level code editing software (SublimeText3)
Hot Topics


 Table Border in HTML
Sep 04, 2024 pm 04:49 PM
Table Border in HTML
Sep 04, 2024 pm 04:49 PM
Guide to Table Border in HTML. Here we discuss multiple ways for defining table-border with examples of the Table Border in HTML.
 Nested Table in HTML
Sep 04, 2024 pm 04:49 PM
Nested Table in HTML
Sep 04, 2024 pm 04:49 PM
This is a guide to Nested Table in HTML. Here we discuss how to create a table within the table along with the respective examples.
 HTML margin-left
Sep 04, 2024 pm 04:48 PM
HTML margin-left
Sep 04, 2024 pm 04:48 PM
Guide to HTML margin-left. Here we discuss a brief overview on HTML margin-left and its Examples along with its Code Implementation.
 HTML Table Layout
Sep 04, 2024 pm 04:54 PM
HTML Table Layout
Sep 04, 2024 pm 04:54 PM
Guide to HTML Table Layout. Here we discuss the Values of HTML Table Layout along with the examples and outputs n detail.
 HTML Input Placeholder
Sep 04, 2024 pm 04:54 PM
HTML Input Placeholder
Sep 04, 2024 pm 04:54 PM
Guide to HTML Input Placeholder. Here we discuss the Examples of HTML Input Placeholder along with the codes and outputs.
 HTML Ordered List
Sep 04, 2024 pm 04:43 PM
HTML Ordered List
Sep 04, 2024 pm 04:43 PM
Guide to the HTML Ordered List. Here we also discuss introduction of HTML Ordered list and types along with their example respectively
 HTML onclick Button
Sep 04, 2024 pm 04:49 PM
HTML onclick Button
Sep 04, 2024 pm 04:49 PM
Guide to HTML onclick Button. Here we discuss their introduction, working, examples and onclick Event in various events respectively.
 Moving Text in HTML
Sep 04, 2024 pm 04:45 PM
Moving Text in HTML
Sep 04, 2024 pm 04:45 PM
Guide to Moving Text in HTML. Here we discuss an introduction, how marquee tag work with syntax and examples to implement.
