 Web Front-end
 PS Tutorial
 The first part of the series on the skillful use of photoshop for front-end engineer skills - Preparation
The first part of the series on the skillful use of photoshop for front-end engineer skills - Preparation
Previous words
Photoshop is a software that front-end engineers cannot avoid. The software itself is very powerful, but we only need to use this tool to complete basic cutting work. This article will start the first article in the series of photoshop skills - preparation
Function
Why should we cut the picture? This requires talking about the project process. A complete project process involves market demand analysis, product prototypes, UI design drawings based on the project prototypes, front-end production pages based on the design drawings, back-end data-related work, and website testing before going online.
What we often call cutting is actually cutting the UI design into the materials needed for the web page. Specifically, where on the web page do you need materials? Mainly includes two categories:
【1】 tag in HTML
<img src="img/xx.jpg" alt="">
【2】Background-image in CSS Attribute
{background-image: url(../img/xx.jpg);}
Initialization
Front-end engineers need to make some initialization settings before using photoshop, mainly including the following 3
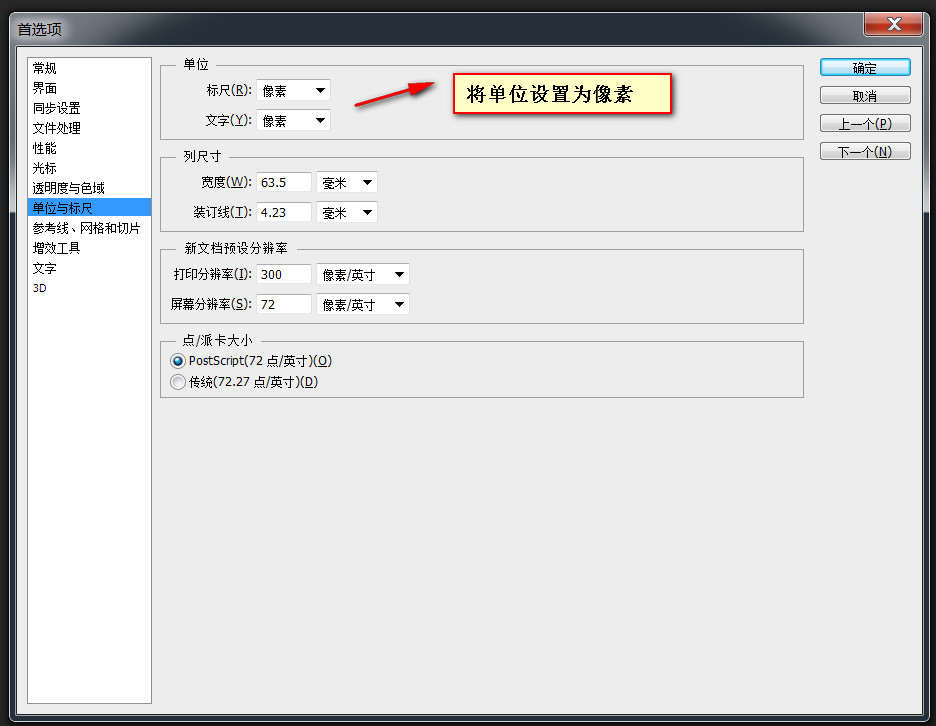
【1】Preference settings
编辑 > 首选项 > 单位与标尺 > 把标尺和文字的单位都改成像素
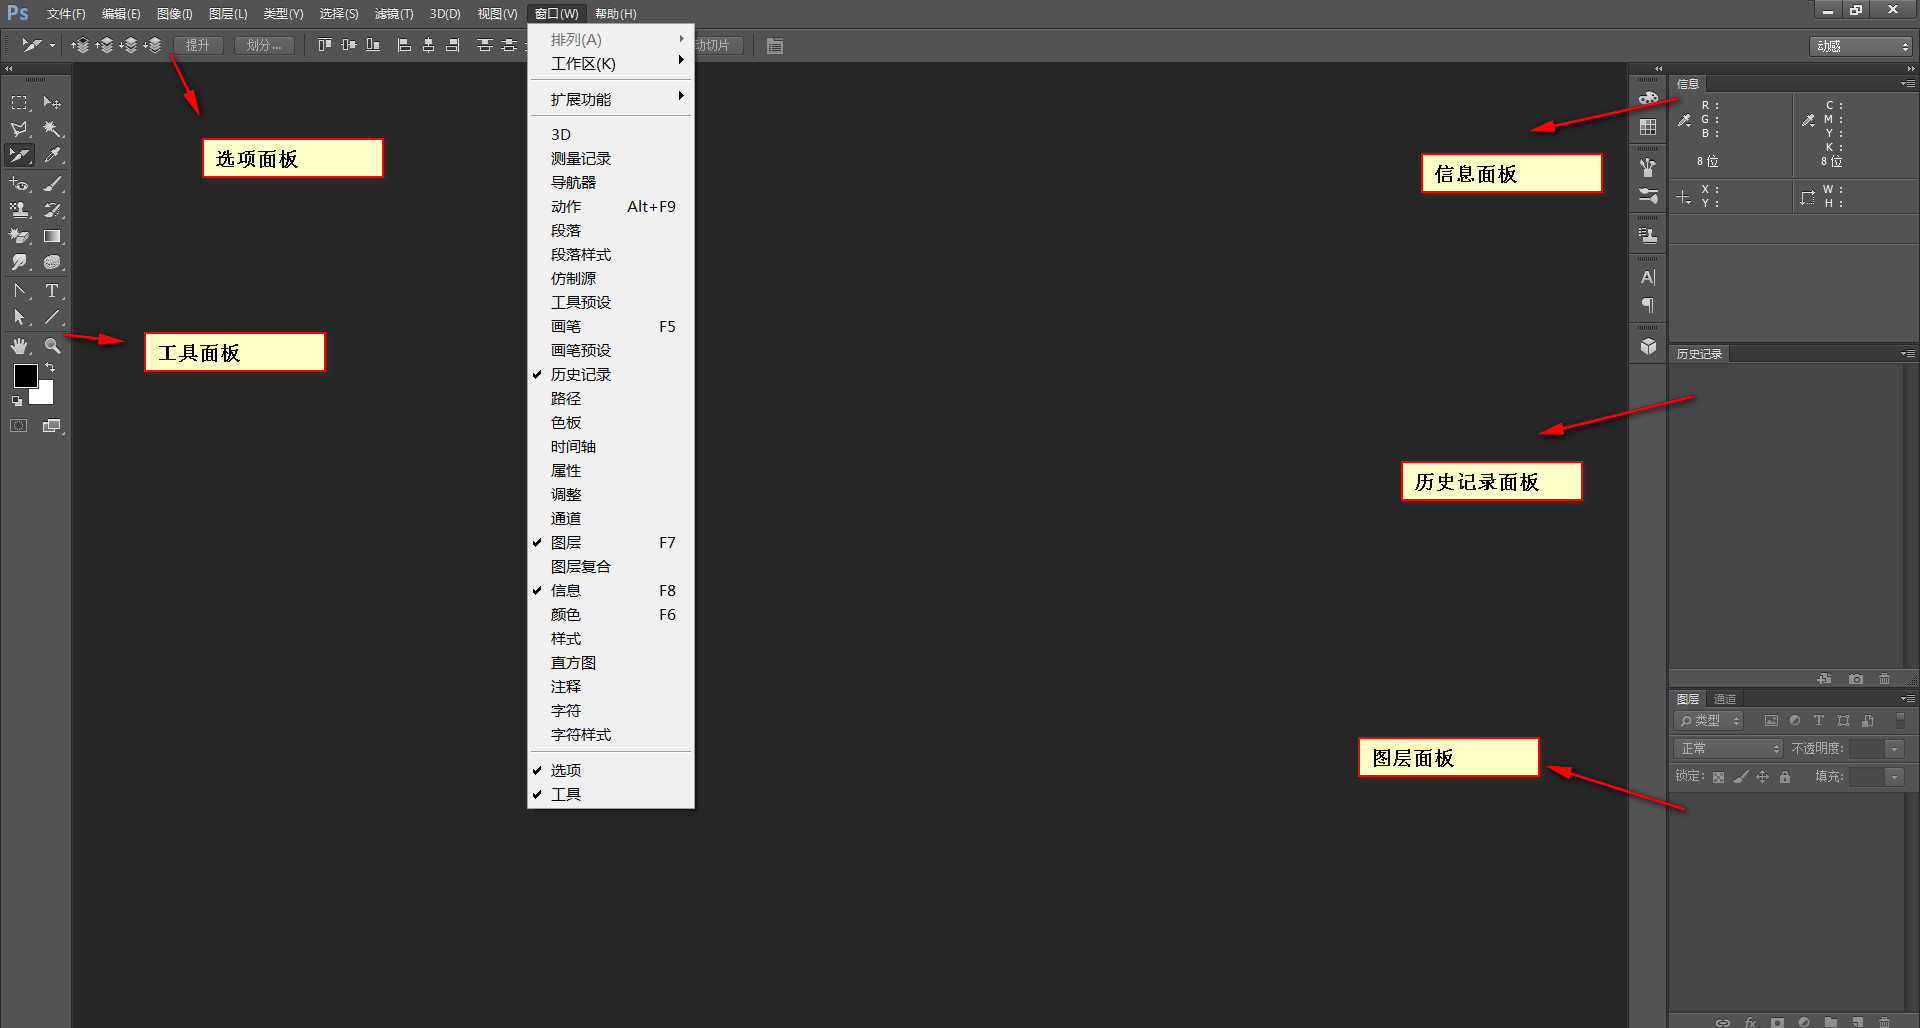
 【2】Panel settings (under the window menu )
1. Tools (two-column or single-column layout can be switched)
2. Options (one-to-one correspondence with the currently selected tool)
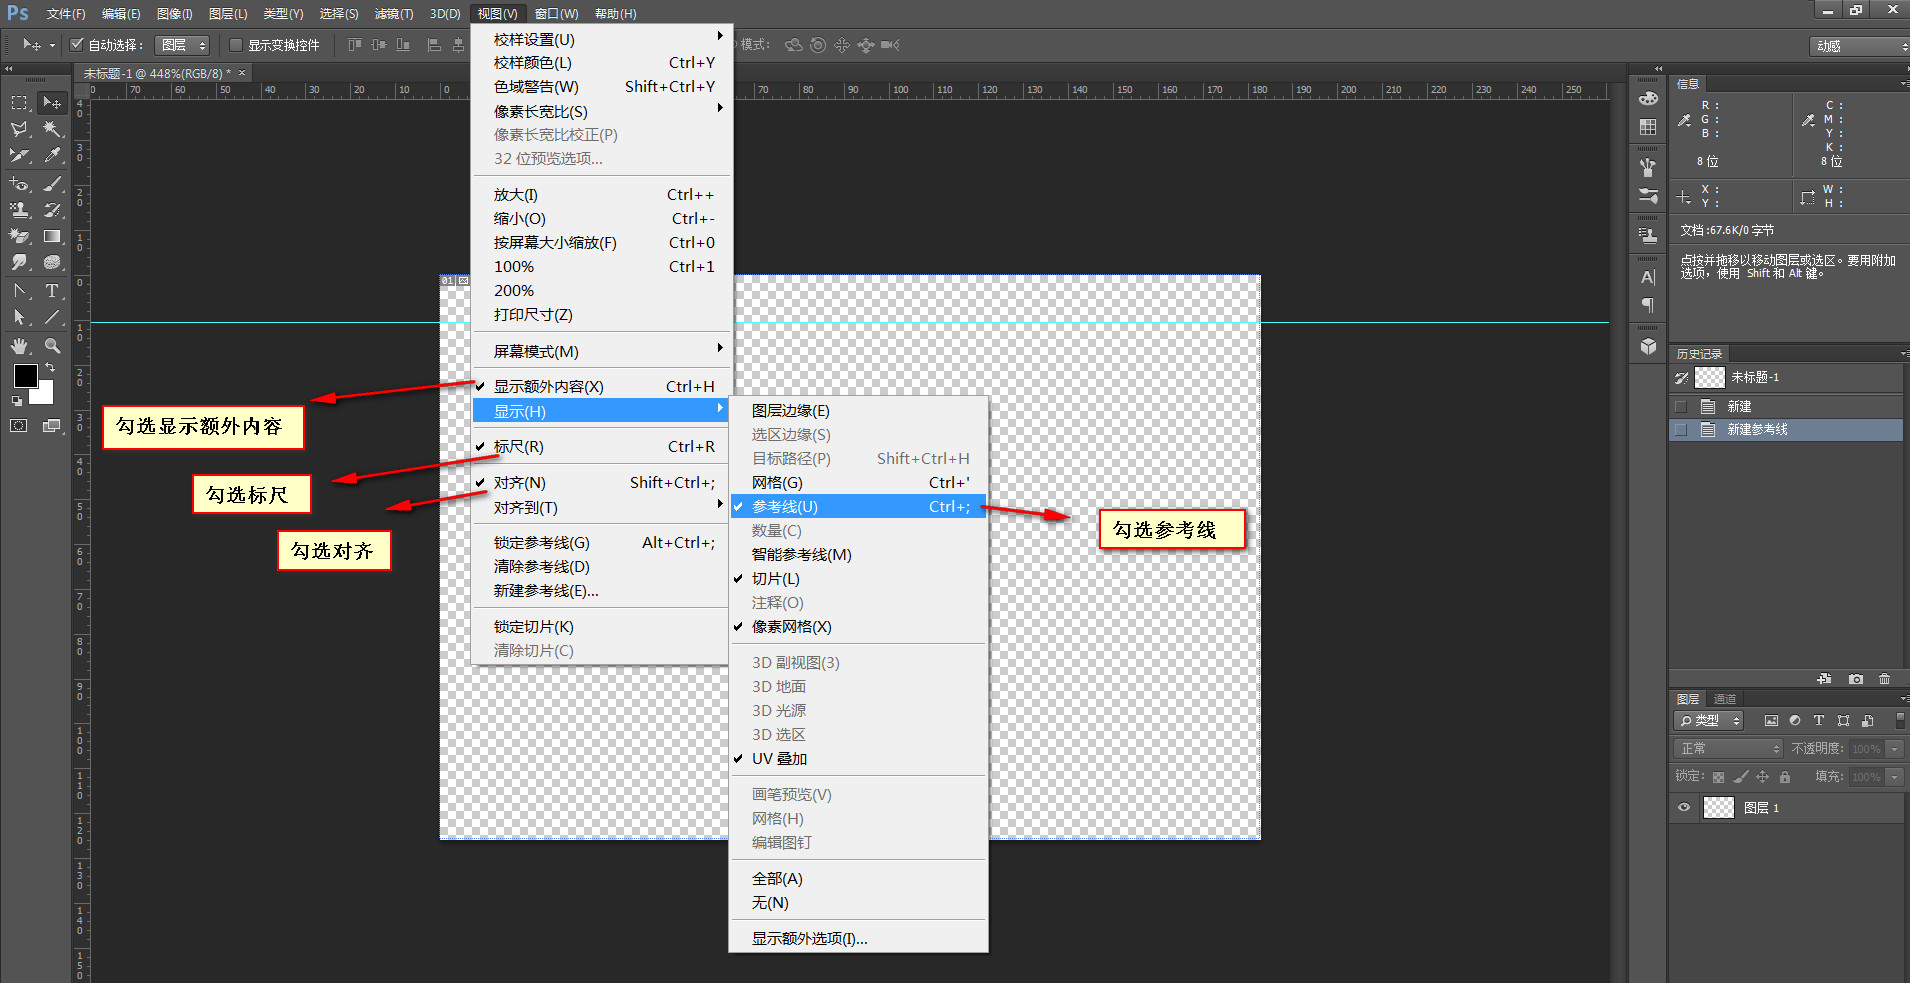
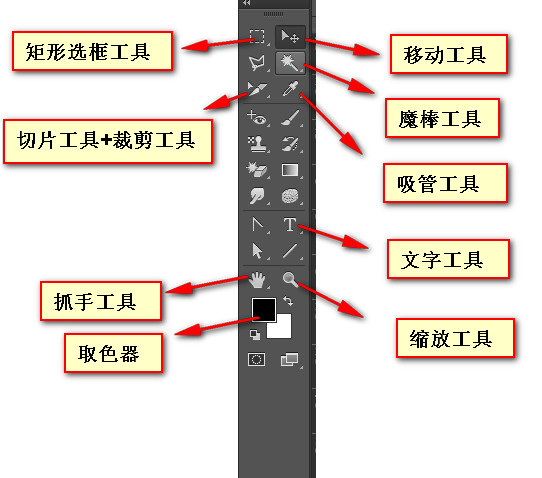
3. Information 4. Layer 5. History record (record historical operations) , often used for rollback) 1. Alignment 2. Ruler 3. Guide line [Note] You need to check Show additional content to see the guides and grid in the canvas 【1】Move tool In the selection tool The options panel in has two options: layer and group. Group generally refers to a folder that may contain multiple layers, while layer only refers to the layer itself [Note] Corresponding to the move tool The automatic selection on the options panel must be checked 【2】Rectangular Marquee Tool If you observe carefully , you will find that there is a small triangle in the lower right corner of the rectangular marquee tool. If you click without releasing the mouse, multiple options will pop up, including rectangular marquee tool, elliptical marquee tool, single row marquee tool and single column marquee tool. . [Note] If you hold down the shift key while using the rectangular marquee tool, a square will be generated Generally, using the rectangular marquee tool is to create a new selection, but in practice , you can also perform the following operations on the selection 1. Add to the selection: shift 2. Subtract from the selection: alt 3. Intersect with the selection: shift + alt 【3】Magic Wand Tool [Note]Tolerance is used to set the range when color sampling, and a tolerance of 0 represents Only select the current color value 【4】Crop Tool + Slice Tool [Note] The crop tool cuts the work area, no matter how many pictures it is Layers can be cropped 【5】Zoom tool 【tips】Commonly used zoom shortcut keys b.alt+scroll up 2.Zoom out: a.ctrl+minus b.alt+scrolldown 3. Display as 100%: ctrl+1 【6】Color Picker + Eyedropper Tool (Color Picking) 1. Fill the foreground color: alt+del 2. Fill the background color: ctrl+del 3. Switch the foreground color and background color: Shortcut keys In addition to the above After the shortcut keys mentioned, there are also some commonly used shortcut keys that need to be noted 【3】Auxiliary view (under the view menu)
Common tools
1. Zoom in:
a , ctrl+plus sign

Hot AI Tools

Undresser.AI Undress
AI-powered app for creating realistic nude photos

AI Clothes Remover
Online AI tool for removing clothes from photos.

Undress AI Tool
Undress images for free

Clothoff.io
AI clothes remover

Video Face Swap
Swap faces in any video effortlessly with our completely free AI face swap tool!

Hot Article

Hot Tools

Notepad++7.3.1
Easy-to-use and free code editor

SublimeText3 Chinese version
Chinese version, very easy to use

Zend Studio 13.0.1
Powerful PHP integrated development environment

Dreamweaver CS6
Visual web development tools

SublimeText3 Mac version
God-level code editing software (SublimeText3)

Hot Topics
 1666
1666
 14
14
 1426
1426
 52
52
 1328
1328
 25
25
 1273
1273
 29
29
 1254
1254
 24
24
 Advanced Photoshop Tutorial: Master Retouching & Compositing
Apr 17, 2025 am 12:10 AM
Photoshop's advanced photo editing and synthesis technologies include: 1. Use layers, masks and adjustment layers for basic operations; 2. Use image pixel values to achieve photo editing effects; 3. Use multiple layers and masks for complex synthesis; 4. Use "liquefaction" tools to adjust facial features; 5. Use "frequency separation" technology to perform delicate photo editing, these technologies can improve image processing level and achieve professional-level effects.
 Photoshop's Key Features: A Deep Dive
Apr 19, 2025 am 12:08 AM
Key features of Photoshop include layers and masks, adjustment tools, filters and effects. 1. Layers and masks allow independent editing of image parts. 2. Adjust tools such as brightness/contrast can modify image tone and brightness. 3. Filters and effects can quickly add visual effects. Mastering these features can help creative professionals achieve their creative vision.
 Using Photoshop: Creative Possibilities and Practical Uses
Apr 22, 2025 am 12:09 AM
Photoshop is very practical and creative in practical applications. 1) It provides basic editing, repairing and synthesis functions, suitable for beginners and professionals. 2) Advanced features such as content recognition fill and layer style can improve image effects. 3) Mastering shortcut keys and optimizing layer structure can improve work efficiency.
 Photoshop for Designers: Creating Visual Concepts
Apr 13, 2025 am 12:09 AM
Creating visual concepts in Photoshop can be achieved through the following steps: 1. Create a new document, 2. Add a background layer, 3. Use the brush tool to draw basic shapes, 4. Adjust colors and brightness, 5. Add text and graphics, 6. Use masks for local editing, 7. Apply filter effects, these steps help designers build a complete visual work from scratch.
 Photoshop: Investigating Free Trials and Discount Options
Apr 14, 2025 am 12:06 AM
You can get the access to Photoshop in the most economical way: 1. Experience the software features with a 7-day free trial; 2. Find student or teacher discounts, as well as seasonal promotions; 3. Use coupons on third-party websites; 4. Subscribe to Adobe CreativeCloud's monthly or annual plan.
 Photoshop and Digital Art: Painting, Illustration, and Compositing
Apr 18, 2025 am 12:01 AM
Photoshop's applications in digital art include painting, illustration and image synthesis. 1) Painting: Using brushes, pencils and mixing tools, the artist can create realistic effects. 2) Illustration: With vector and shape tools, artists can accurately draw complex graphics and add effects. 3) Synthesis: Using mask and layer blending mode, artists can seamlessly blend different image elements.
 Using Photoshop for Graphic Design: Branding and More
Apr 16, 2025 am 12:02 AM
The steps to using Photoshop for brand design include: 1. Use the Pen tool to draw basic shapes, 2. Add shadows and highlights through layer styles, 3. Adjust colors and details, 4. Use smart objects and actions to automatically generate different versions of the design. Photoshop helps designers create and optimize brand elements with the flexibility of layers and masks, ensuring consistency and professionalism of designs, from simple logos to complex branding guides.
 Photoshop for Photographers: Enhancing and Retouching Images
Apr 25, 2025 am 12:01 AM
Enhance and retouching photos in Photoshop can be achieved by adjusting brightness and contrast, using the Repair Brush Tool. 1) Adjust brightness and contrast: Increase brightness and contrast to improve underexposed photos through the Image->Adjustments->Brightness/Contrast menu. 2) Use the Repair Brush Tool: Select HealingBrushTool in the toolbar and apply to remove miscellaneous points or scars in the image.


