Photoshop to create jade bracelet
I remember seeing a lot of pictures of items on the Internet. They were very real and beautiful. As I was looking at them, someone said, "They are all drawn with software. What are you doing here? Do you want to learn PS?" I didn't believe it at the time, but then I learned that there was a program called Photoshop that could process photos and so on.
About the year before last, I studied the Three Musketeers of the Web. There is a firework in it that can process pictures. After I learned it, I made some pop advertisements (like wall charts). Later, I used the finished pictures to color them. Damn, because Photoshop is popular, and the psd pictures exported using Fireworks are not very compatible. I can only see the appearance of the picture, and I have to ask others to re-do it. As a result, it almost hinders their use, so I taught myself Photoshop for a period of time, and the results are It’s not very big. I just used Photoshop to make some things I learned from Fireworks. I read tutorials on the Internet, and then gradually put them down. I recently participated in a training class. Fortunately, this class can I’ve studied it systematically. Now that I’ve said so much nonsense, let’s talk about how to use Photoshop to make a very realistic jade bracelet.
The first preparation is to install Photoshop, then open Photoshop and create a new file. If you can’t do this, I suggest you learn the basics of windows first: 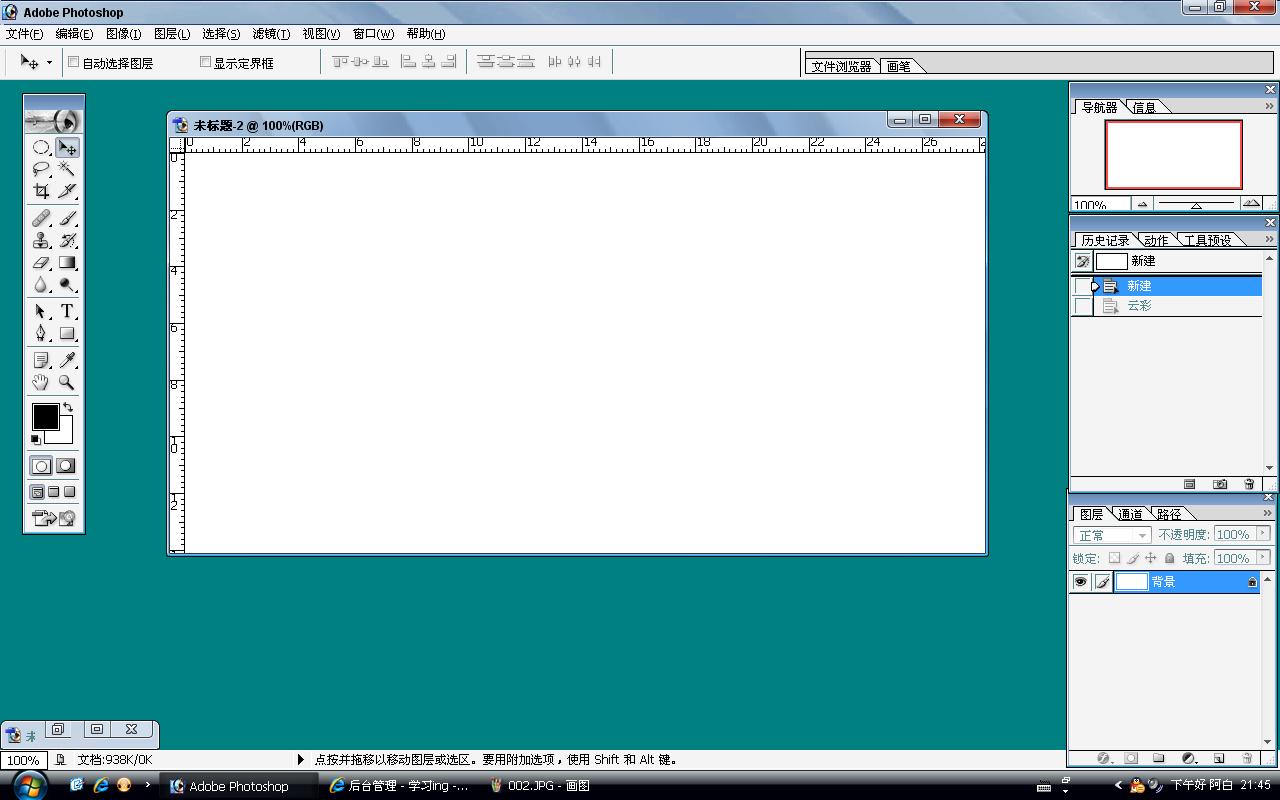
Next click Filter->Rendering->Clouds, you will see that the background changes to clouds as shown below: 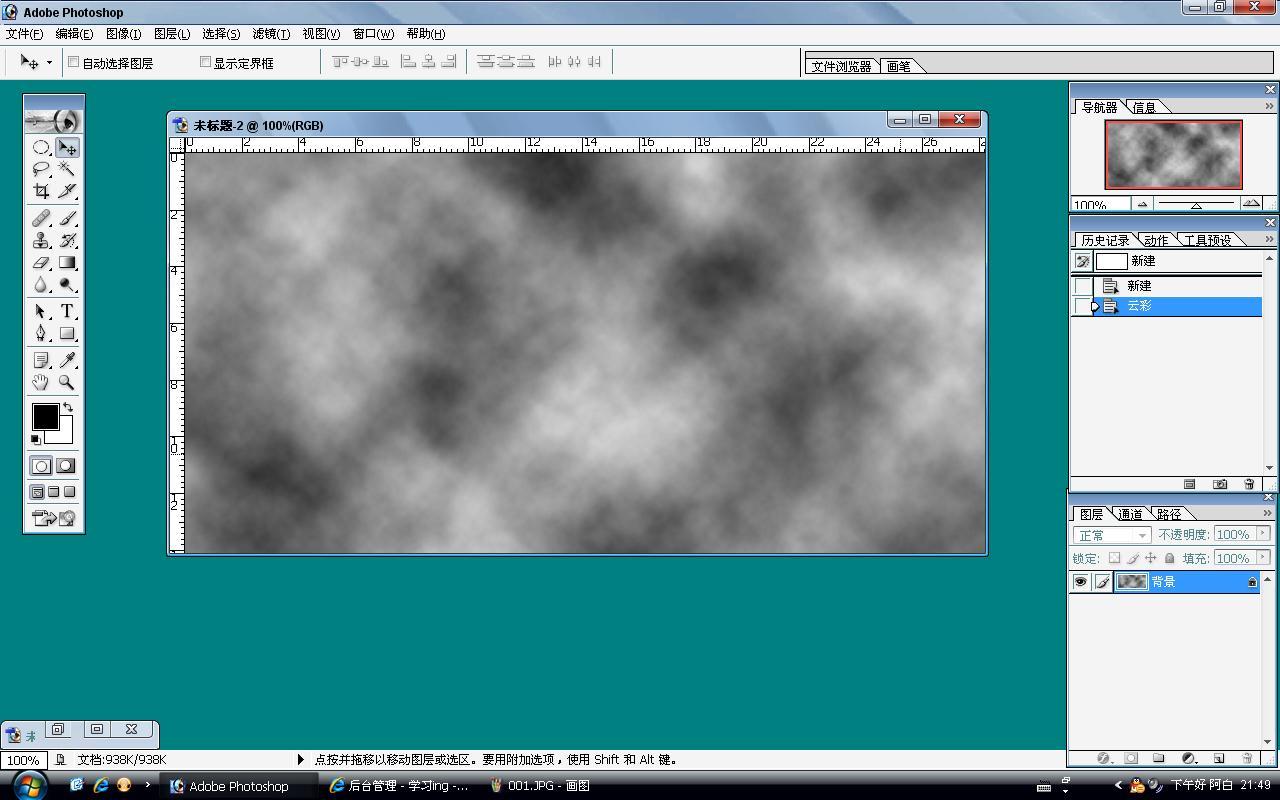
Then click Filter-> 〉Liquefy, make a rough circle in the dialog box that appears (this is used for the texture of the jade bracelet)
As shown below: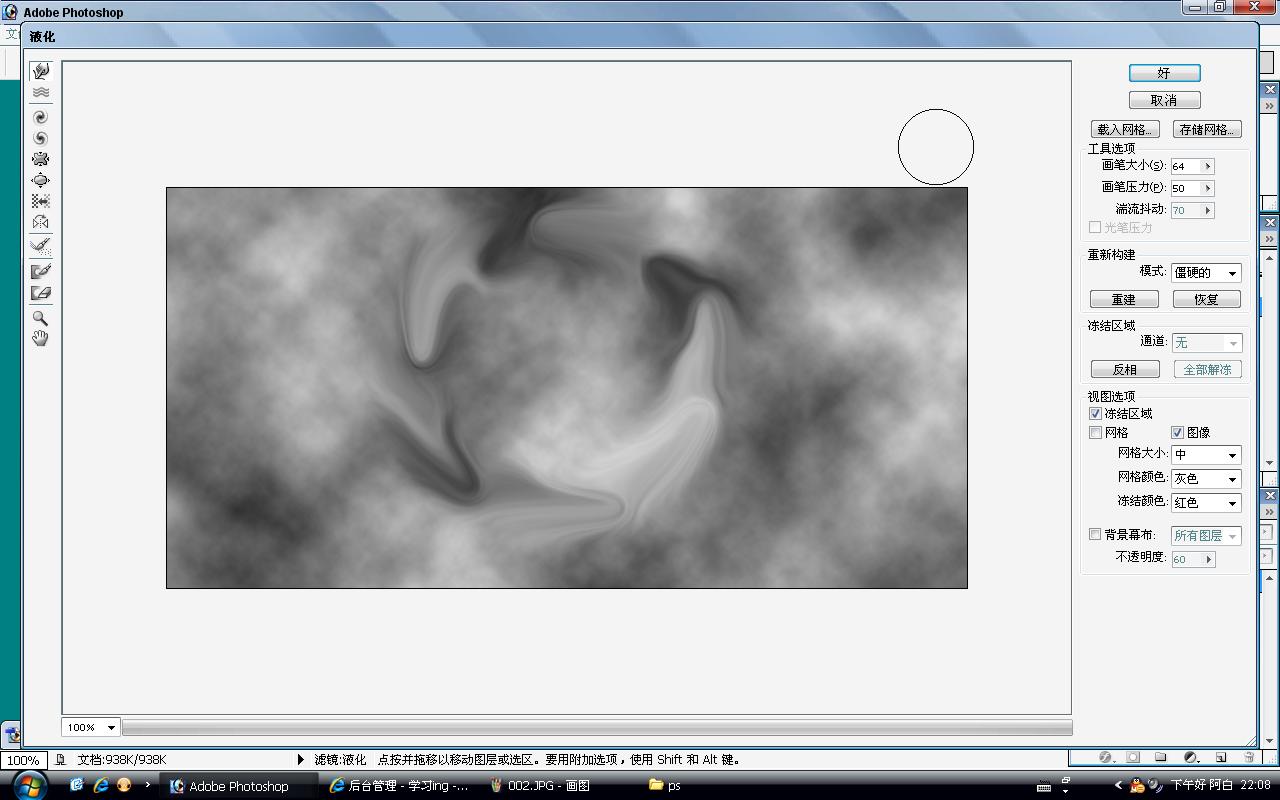
Then click OK button, for the convenience of making concentric circles, drag two auxiliary lines (one horizontal and one vertical) directly from the ruler and place them roughly in the center of the circle you drew, and use the ellipse selection tool to select the point where the auxiliary lines intersect. Draw a circle with the center of the circle. (Hold down Alt to use the point where you clicked the mouse as the center of the circle, and hold down Shift to draw a perfect circle) 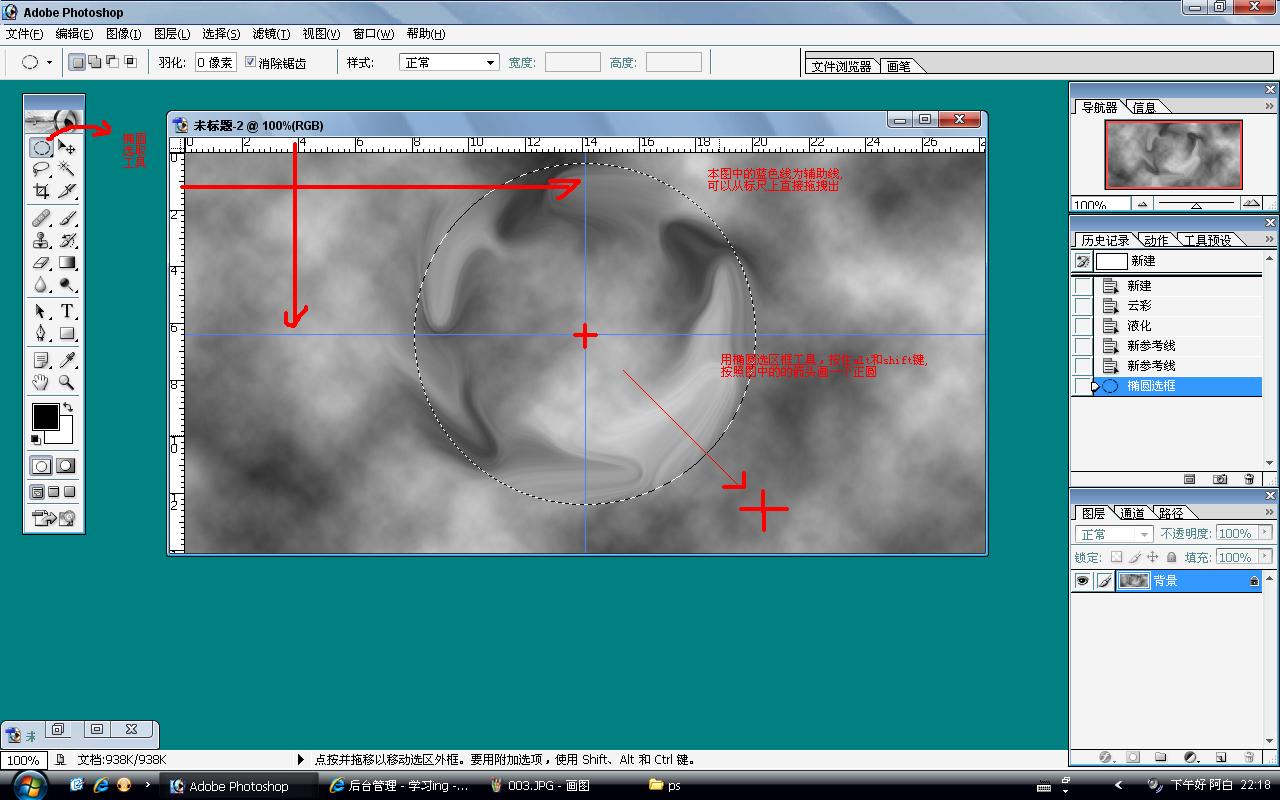
Release the mouse and buttons, or use the center of the circle just now, Press and hold the Alt and Shift keys again to draw a circle. There may be a conflict with Alt here (the conflict is that you want to subtract the selected area and draw a circle with the center of the circle). The solution is to just release the Alt key and press it again or change the shortcut key. (Only the CS1 version can be modified). Hold down Shift to draw a perfect circle, so that you can get a concentric circle. Press the shortcut key combination Ctrl and J (copy the selected area to a new layer) 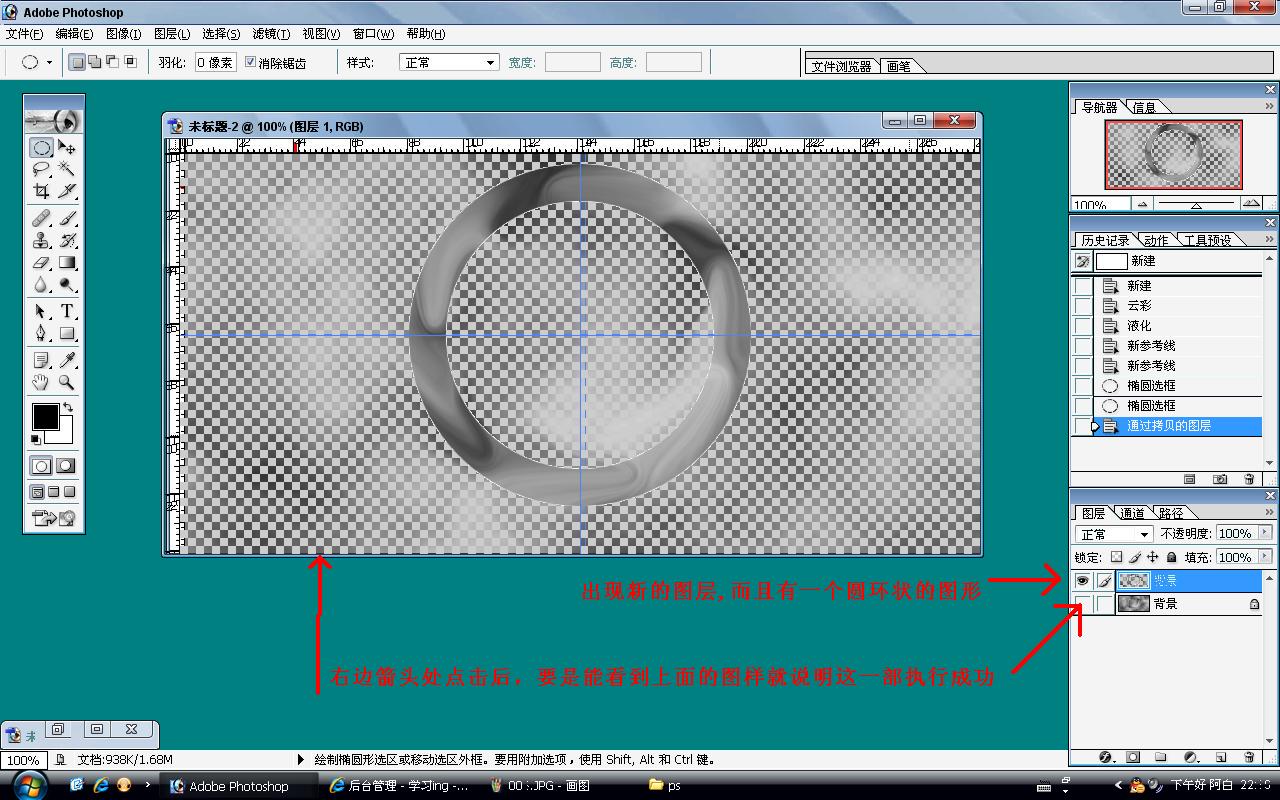
Actually, if you look closely, it looks a bit like the natural pattern inside the bracelet, but it’s too fake. It doesn’t look like a bracelet to anyone. Let’s adjust it and the bracelet will appear. Everyone, follow suit,
First select the background from the layer on the right, press Ctrl and delete (color), it is recommended to be white,
Then select the newly created layer (the layer where the ring is located) and click Layer->Layer Style -> Bevel and Emboss (or right-click on the layer -> Blending Options -> Click Bevel and Emboss)
Set as shown below (click OK after setting):
Note: Fill in the height with 72, The size can be adjusted between 20-40 according to your own observation, and the other defaults can be 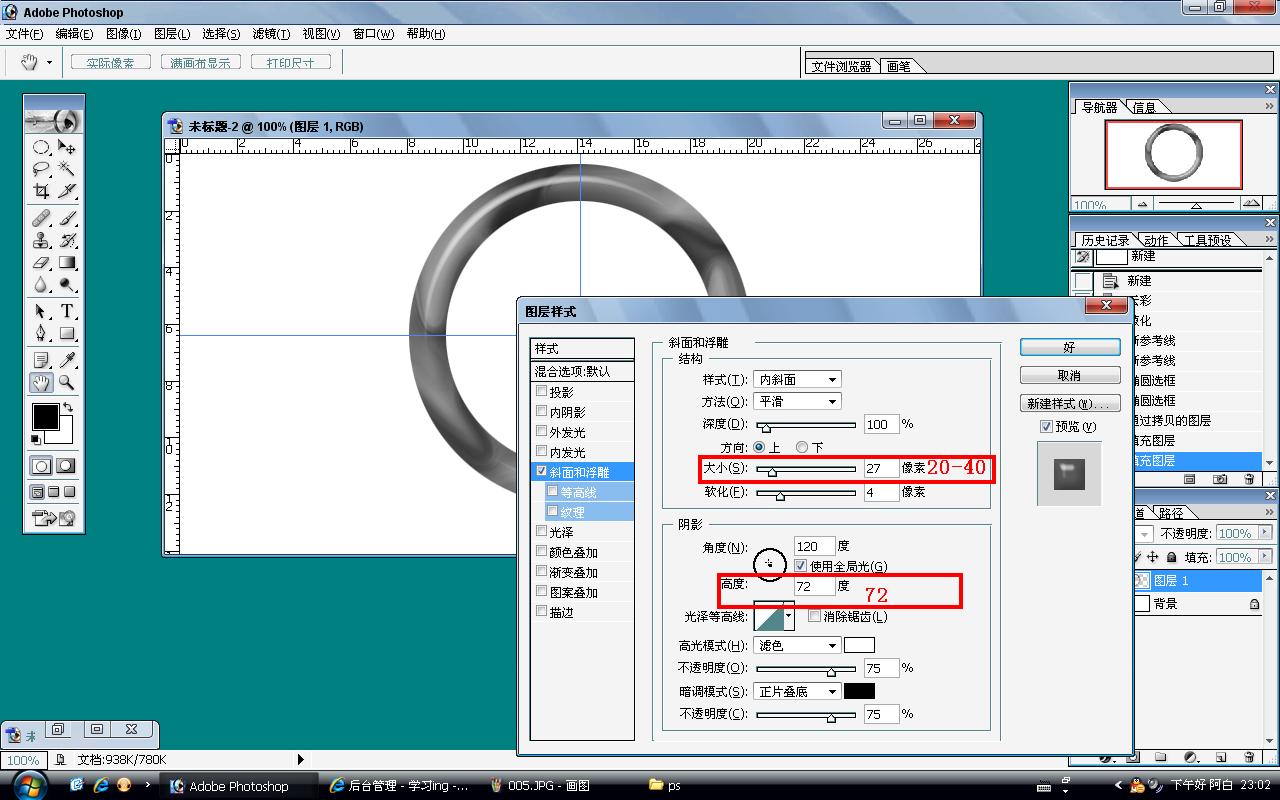
Haha, you can see the effect, when the height has been adjusted to 72 Once you see the effect (except the color), then just adjust the color.
The method is: Image->Adjustment->Hue/Saturation (the shortcut key is Ctrl + U)
Select coloring and set The values of hue and saturation (just look at the picture and feel good) I won’t talk about it” (I have a teacher’s mantra), it’s time to save it, it’s time to try it, it’s time to eat, it’s time to sleep, it’s time to stay up all night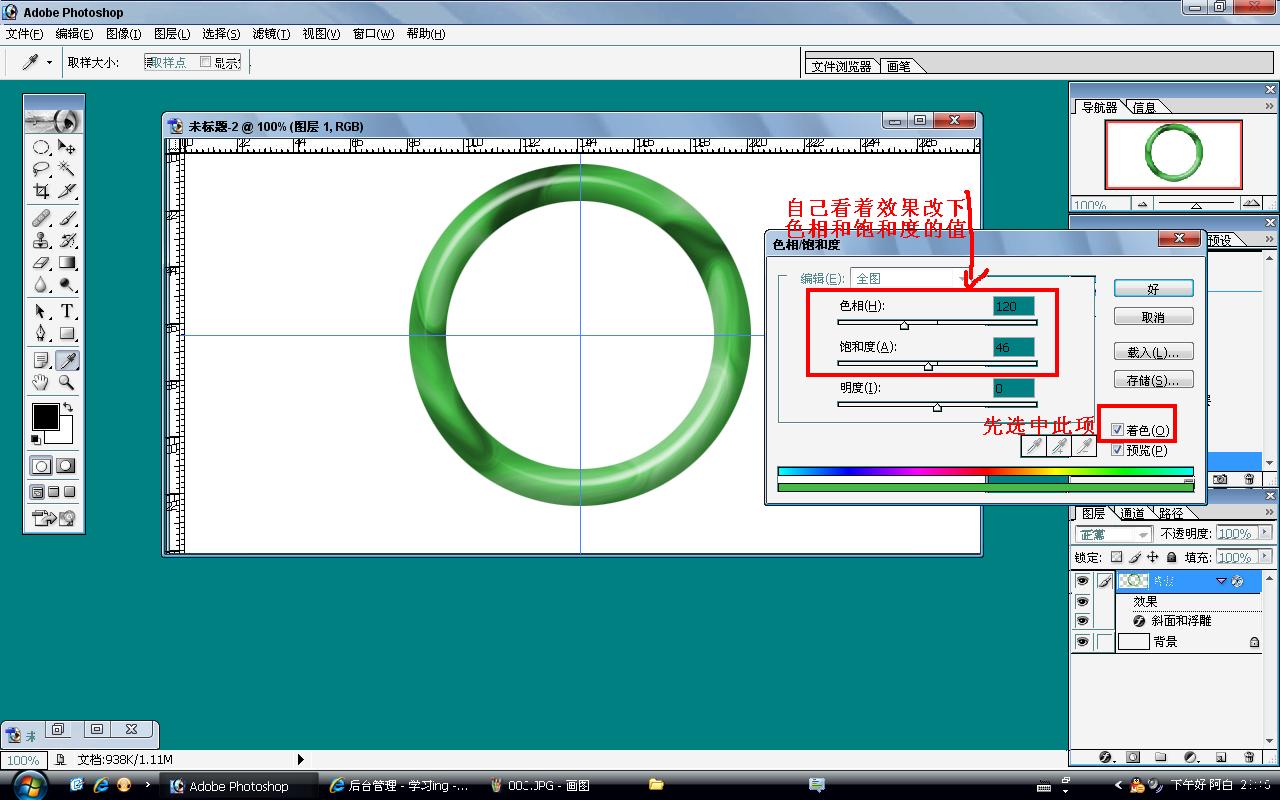 For more articles related to making jade bracelets with Photoshop, please pay attention to the PHP Chinese website!

Hot AI Tools

Undresser.AI Undress
AI-powered app for creating realistic nude photos

AI Clothes Remover
Online AI tool for removing clothes from photos.

Undress AI Tool
Undress images for free

Clothoff.io
AI clothes remover

Video Face Swap
Swap faces in any video effortlessly with our completely free AI face swap tool!

Hot Article

Hot Tools

Notepad++7.3.1
Easy-to-use and free code editor

SublimeText3 Chinese version
Chinese version, very easy to use

Zend Studio 13.0.1
Powerful PHP integrated development environment

Dreamweaver CS6
Visual web development tools

SublimeText3 Mac version
God-level code editing software (SublimeText3)

Hot Topics
 1666
1666
 14
14
 1425
1425
 52
52
 1327
1327
 25
25
 1273
1273
 29
29
 1252
1252
 24
24
 Advanced Photoshop Tutorial: Master Retouching & Compositing
Apr 17, 2025 am 12:10 AM
Photoshop's advanced photo editing and synthesis technologies include: 1. Use layers, masks and adjustment layers for basic operations; 2. Use image pixel values to achieve photo editing effects; 3. Use multiple layers and masks for complex synthesis; 4. Use "liquefaction" tools to adjust facial features; 5. Use "frequency separation" technology to perform delicate photo editing, these technologies can improve image processing level and achieve professional-level effects.
 Photoshop's Key Features: A Deep Dive
Apr 19, 2025 am 12:08 AM
Key features of Photoshop include layers and masks, adjustment tools, filters and effects. 1. Layers and masks allow independent editing of image parts. 2. Adjust tools such as brightness/contrast can modify image tone and brightness. 3. Filters and effects can quickly add visual effects. Mastering these features can help creative professionals achieve their creative vision.
 Using Photoshop: Creative Possibilities and Practical Uses
Apr 22, 2025 am 12:09 AM
Photoshop is very practical and creative in practical applications. 1) It provides basic editing, repairing and synthesis functions, suitable for beginners and professionals. 2) Advanced features such as content recognition fill and layer style can improve image effects. 3) Mastering shortcut keys and optimizing layer structure can improve work efficiency.
 Is Photoshop Free? Understanding Subscription Plans
Apr 12, 2025 am 12:11 AM
Photoshop is not free, but there are several ways to use it at low cost or free: 1. The free trial period is 7 days, and you can experience all functions during this period; 2. Student and teacher discounts can cut costs by half, and school proof is required; 3. The CreativeCloud package is suitable for professional users and includes a variety of Adobe tools; 4. PhotoshopElements and Lightroom are low-cost alternatives, with fewer functions but lower prices.
 Photoshop: Investigating Free Trials and Discount Options
Apr 14, 2025 am 12:06 AM
You can get the access to Photoshop in the most economical way: 1. Experience the software features with a 7-day free trial; 2. Find student or teacher discounts, as well as seasonal promotions; 3. Use coupons on third-party websites; 4. Subscribe to Adobe CreativeCloud's monthly or annual plan.
 Photoshop and Digital Art: Painting, Illustration, and Compositing
Apr 18, 2025 am 12:01 AM
Photoshop's applications in digital art include painting, illustration and image synthesis. 1) Painting: Using brushes, pencils and mixing tools, the artist can create realistic effects. 2) Illustration: With vector and shape tools, artists can accurately draw complex graphics and add effects. 3) Synthesis: Using mask and layer blending mode, artists can seamlessly blend different image elements.
 Photoshop for Designers: Creating Visual Concepts
Apr 13, 2025 am 12:09 AM
Creating visual concepts in Photoshop can be achieved through the following steps: 1. Create a new document, 2. Add a background layer, 3. Use the brush tool to draw basic shapes, 4. Adjust colors and brightness, 5. Add text and graphics, 6. Use masks for local editing, 7. Apply filter effects, these steps help designers build a complete visual work from scratch.
 Using Photoshop for Graphic Design: Branding and More
Apr 16, 2025 am 12:02 AM
The steps to using Photoshop for brand design include: 1. Use the Pen tool to draw basic shapes, 2. Add shadows and highlights through layer styles, 3. Adjust colors and details, 4. Use smart objects and actions to automatically generate different versions of the design. Photoshop helps designers create and optimize brand elements with the flexibility of layers and masks, ensuring consistency and professionalism of designs, from simple logos to complex branding guides.


