SVG基础|绘制SVG文字
我们可以使用SVG 的
<svg xmlns="http://www.w3.org/2000/svg">
  <text x="20" y="40">这里是SVG文字</text>
</svg>
这个例子中定义一个位于x=20,y=40位置的文本。文字显示为“这里是SVG文字”。下面是它的返回结果:
这里是SVG文字
文字的定义
在深入了解SVG文字之前,先来看看下面的三个定义:
Glyphs:Glyphs是字母或符号的视觉表现。例如,因为字母“a”有多种不同的视觉表现方式,所以可以使用不同的Glyphs来绘制它。
Fonts:Fonts代表字体,它是glyphs的集合,可以用于表现一组字母或符号。
Characters:Characters是代表一个字母或符号的二进制数字。一个character可以使用1个或多个字节来表示。一个characters在被计算机渲染的时候,会将它映射为字体中的一个符号。
文字的位置
SVG文字的位置有
观察直线位于文字的位置
注意观察,文字的y属性位于文字的下边,而不是上边。
Text Anchor
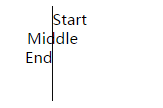
文字的anchor决定哪个部分的文字放置在text元素中的x属性定义的位置。默认的anchor是文字左边部,即文字的开始处。你也可以将anchor设置为middle,使它位于文字的中间,设置为end,使它位于文字的右边。
要设置文字的anchor,可以使用CSS的text-anchor属性。该属性的取值为:start、middle和end。下面的例子展示了设置不同的text-anchor值时文字的位置。

垂直的直线是三串文本的x位置。它们都位于x="50"的位置上。你可以观察不同的取值时文字的不同定位方式。
上效果的代码如下:
<text x="50" y="20"
      style="text-anchor: start">
    Start
</text>
<text x="50" y="40"
      style="text-anchor: middle">
    Middle
</text>
<text x="50" y="60"
      style="text-anchor: end">
    End
</text>文字的描边和填充
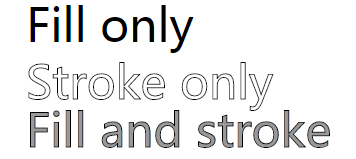
和其它SVG图形一样,SVG文字也可以进行描边和填充操作。如果你只指定了文字的描边属性,文字将会渲染为一个文字轮廓。如果你只指定了文字的填充属性,那么文字看起来和平常是一样的。来看看下面的三种文字描边和填充的效果:

你也可以使用stroke-width属性为文字的描边设置宽度。下面的例子将文字的描边宽度设置为2:

SVG文字的间距和字距调整
我们可以使用letter-spacing和kerning属性来控制文字的间距和字距调整(两个glyphs之间的距离)。下面是一个简单的例子:
<svg xmlns="http://www.w3.org/2000/svg">
  <text x="20"  y="20" >Example SVG text</text>
  <text x="20"  y="40" style="kerning:2;">Example SVG text</text>
  <text x="20"  y="60" style="letter-spacing:2;">Example SVG text</text>
</svg>
下面是上面代码的返回结果:
Example SVG text
Example SVG text
Example SVG text
上面的letter-spacing和kerning使用的是正数值,如果你使用负数值,那么字距将会收缩。
单词间距
你可以使用word-spacing CSS属性来指定单词的间距。单词的间距是指单词之间的空白符的数量。看下面的例子:
<svg xmlns="http://www.w3.org/2000/svg">
  <text x="20" y="20">
    Word spacing is normal
  </text>
  <text x="20" y="40"
        style="word-spacing: 4;">
      Word spacing is 4
  </text>
  <text x="20" y="60"
        style="word-spacing: 8;">
      Word spacing is 8
  </text>
</svg>下面是返回的结果。注意:Firefox浏览器有可能不支持这个word-spacing属性。
Word spacing is normal
Word spacing is 4
Word spacing is 8
word-spacing的值也可以设置为负数,这时单词的间距将会被压缩。
文字布局-SVG文字没有自动换行功能
SVG文字是没有自动换行功能的。你必须自己定位每一行文本。需要制作多行文本的话,
你还可以将文字放置在一条路径上,例如一个圆或一条曲线上。达到这种效果你需要使用
旋转文本
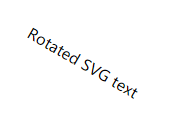
你可以像旋转其它SVG图形一样旋转SVG文字。旋转SVG文字需要使用SVG transform属性。
<svg xmlns="http://www.w3.org/2000/svg">
  <text x="20"  y="40"
          transform="rotate(30 20,40)"
          style="stroke:none; fill:#000000;"
          >Rotated SVG text</text>
</svg>上面代码的返回结果是:

关于SVG的transform属性,后面会有文字详细讲解。
垂直文字
你可以使用旋转的方法来制作垂直的SVG文字,但是还有一种简单的方法来显示垂直文字。那就是使用writing-mode属性,将它的值设置为tb(Top to Bottom)。Firefox22以下的版本不支持这个属性。看下面的例子:
<svg xmlns="http://www.w3.org/2000/svg">
  <text x="10" y="20" style="writing-mode: tb;">
    垂直文字
  </text>
</svg>上面的代码的返回结果是:
垂
直
文
字
我们在来看看英文的情况:
<svg xmlns="http://www.w3.org/2000/svg">
  <text x="10" y="20" style="writing-mode: tb;">
    Vertical
  </text>
</svg>
你会发现如果是英文的话,字母也被旋转了90度。如果你需要每个字母都不被旋转,可以设置glyph-orientation-vertical CSS属性值为0。这个属性值用于旋转glyphs。默认值它的值为90度。看下面的例子:
<text x="10" y="10" style="writing-mode: tb; glyph-orientation-vertical: 0;">
    Vertical
</text>
<text x="110" y="10" style="writing-mode: tb; glyph-orientation-vertical: 90;">
    Vertical
</text>上面的代码的返回结果是:

文字的方向
你可以使用direction CSSS属性来设置文字的渲染方向。direction属性有两个取值:ltr和rtl。分别是“从左向右”和“从右向左”的意思。另外,在渲染英文的时候,如果需要字母也从右向左渲染,需要设置unicode-bidi: bidi-override;。看下面的例子:
<text x="130" y="40" style="direction: rtl;">从右向左显示</text>
<text x="130" y="80" style="direction: rtl; unicode-bidi: bidi-override;">right to Left</text>
right to Left
SVG文字样式
下面列出了一组可以使用在SVG文字上的CSS属性。你还可以为文字的描边和填充设置渐变,填充模式和遮罩等效果。
注意,下面的CSS属性名称必须是小写,否则渲染时会被忽略!
| 属性 | 描述 |
| font-family | 设置字体 |
| font-size | 设置文字大小 |
| kerning | 设置字距调整的值 |
| letter-spacing | 字母之间的间距 |
| word-spacing | 单词之间的间距 |
| text-decoration | 是否带下划线。可选值有:none、underline、overline和line-through |
| stroke | 文字的描边颜色。默认文字只有填充色,没有描边,添加描边将使文字变粗 |
| stroke-width | 文字描边的宽度 |
| fill | 文字的填充色 |
下面是一个使用了上面的一些属性的例子:
<svg xmlns="http://www.w3.org/2000/svg">
    <text x="20"  y="40"
          style="font-family: Arial;
                 font-size  : 34;
                 stroke     : #000000;
                 fill       : #00ff00;
                "
          >Styled SVG text</text>
</svg>上面的代码的返回结果是:

文字的长度
你可以使用textLength属性来设置文字的长度。文字的长度可以用来调整字符(characters)之间的距离来适应指定的长度。同时也会调整符号(glyphs)的宽度。使用lengthAdjust属性你可以指定是否同时调整字符间距和符号的宽度。看下面的例子:
<text x="5" y="20" textLength="140" lengthAdjust="spacing">
  A long, long, long text.
</text>
<text x="5" y="40" textLength="200" lengthAdjust="spacing">
    A long, long, long text.
</text>
<text x="5" y="60" textLength="200" lengthAdjust="spacingAndGlyphs">
    A long, long, long text.
</text>上面的代码的返回结果如下。注意最后两串文字的间距和字符大小:
A long, long, long text.
A long, long, long text.
A long, long, long text.
以上就是SVG基础|绘制SVG文字的内容,更多相关内容请关注PHP中文网(www.php.cn)!

Hot AI Tools

Undresser.AI Undress
AI-powered app for creating realistic nude photos

AI Clothes Remover
Online AI tool for removing clothes from photos.

Undress AI Tool
Undress images for free

Clothoff.io
AI clothes remover

Video Face Swap
Swap faces in any video effortlessly with our completely free AI face swap tool!

Hot Article

Hot Tools

Notepad++7.3.1
Easy-to-use and free code editor

SublimeText3 Chinese version
Chinese version, very easy to use

Zend Studio 13.0.1
Powerful PHP integrated development environment

Dreamweaver CS6
Visual web development tools

SublimeText3 Mac version
God-level code editing software (SublimeText3)

Hot Topics
 How to make round pictures and text in ppt
Mar 26, 2024 am 10:23 AM
First, draw a circle in PPT, then insert a text box and enter text content. Finally, set the fill and outline of the text box to None to complete the production of circular pictures and text.
 How to add dots to text in word?
Mar 19, 2024 pm 08:04 PM
When we create Word documents on a daily basis, we sometimes need to add dots under certain words in the document, especially when there are test questions. To highlight this part of the content, the editor will share with you the tips on how to add dots to text in Word. I hope it can help you. 1. Open a blank word document. 2. For example, add dots under the words "How to add dots to text". 3. We first select the words "How to add dots to text" with the left mouse button. Note that if you want to add dots to that word in the future, you must first use the left button of the mouse to select which word. Today we are adding dots to these words, so we have chosen several words. Select these words, right-click, and click Font in the pop-up function box. 4. Then something like this will appear
 Can the floor plan be drawn directly in architectural ppt?
Mar 20, 2024 am 08:43 AM
ppt is widely used in many fields and work, especially in education, architecture, etc. When it comes to architectural ppt, we must first think of the presentation of some architectural drawings. If we do not use professional drawing software, can we directly draw a simple architectural plan? In fact, we can complete the operation here. Below, we will draw a relatively simple floor plan to give you an idea. I hope you can complete better floor plan drawings based on this idea. 1. First, we double-click to open the ppt software on the desktop and click to create a new presentation blank document. 2. We find Insert→Shape→Rectangle in the menu bar. 3. After drawing the rectangle, double-click the graphic and modify the fill color type. Here we can modify
 Let's talk about how to use SVG to achieve image mosaic effect
Sep 01, 2022 am 11:05 AM
How to use SVG to achieve image mosaic effect without using Javascript? The following article will give you a detailed understanding, I hope it will be helpful to you!
 Golang Image Processing: Learn How to Add Watermarks and Text
Aug 17, 2023 am 08:41 AM
Golang Image Processing: Learn How to Add Watermarks and Text Quotes: In the modern era of digitalization and social media, image processing has become an important skill. Whether for personal use or business operations, adding watermarks and text are common needs. In this article, we will explore how to use Golang for image processing and learn how to add watermarks and text. Background: Golang is an open source programming language known for its concise syntax, efficient performance and powerful concurrency capabilities. it has become the subject of many developments
 How to modify text on pictures
Aug 29, 2023 am 10:29 AM
Modifying the text on the image can be done by using image editing software, online tools or screenshot tools. The specific steps are: 1. Open the picture editing software and import the picture that needs to be modified; 2. Select the text tool; 3. Click the text area on the picture to create a text box; 4. Enter the text you want in the text box. 5. If you just want to delete the text on the picture, you can use the eraser tool or the selection tool to select and delete the text area.
 How to draw geometric shapes on a picture using Python
Aug 18, 2023 pm 01:02 PM
How to use Python to draw geometric shapes on pictures Introduction: Python, as a powerful programming language, can not only perform advanced technologies such as data processing and machine learning, but also perform image processing and graphics drawing. In image processing, it is often necessary to draw various geometric shapes on pictures. This article will introduce how to use Python to draw geometric shapes on pictures. 1. Environment preparation and library installation. Before starting, we first need to install several necessary libraries for Python, mainly including OpenCV.
 How to draw lines with arrows in OpenCV using Java?
Aug 20, 2023 pm 02:41 PM
The org.opencv.imgproc package of the JavaOpenCV library contains a class called Imgproc that provides various methods to process input images. It provides a set of methods for drawing geometric shapes on images. To draw an arrowed line, you need to call the arrowedLine() method of this class. The method accepts the following parameters: a Mat object representing the image on which the line is to be drawn. A Point object representing two points between lines. drawn. A Scalar object representing the line color. (BGR) An integer representing the thickness of the line (default: 1). Example importorg.opencv.core.Core;importo


