SVG进阶|SVG过滤器(SVG Filters)
SVG过滤器可以为SVG图形添加一些非常酷的效果,如阴影、模糊和高光等效果。
SVG过滤器的例子
先来看一个简单的SVG过滤器的例子,直观的感受一些它的效果:
<defs>
  <filter id="blurFilter" y="-5" height="40"
      <feGaussianBlur in="SourceGraphic" stdDeviation="3" y="-"/>
  </filter>
</defs>

<ellipse cx="55" cy="60" rx="25" ry="15"
  style="stroke: none; fill: #663399; " />

<ellipse cx="155" cy="60" rx="25" ry="15"
style="stroke: none; fill: #663399; filter: url(#blurFilter);" /> 在这个例子中,对一个SVG椭圆形应用了模糊滤镜,得到的结果如下:
SVG过滤器的输入和输出
SVG过滤器在应用过滤效果的时候需要一个输入源。这个输入源可以是一个图形,或图形的alpha通道,或另一个过滤器的输出值。
SVG过滤器可以从输入源中产生一个输出图像。一个过滤器的输出可以是另一个过滤器的输入,这样,过滤器可以被链接起来使用。
下面是一张SVG过滤器输入和输出的说明图片:

SVG过滤器的输入通常在SVG滤镜的in属性中指定,例如:
<feGaussianBlur stdDeviation="3" in="SourceGraphic" />
如果你需要将一个SVG过滤器的输出作为另一个过滤器的输入,需要在输出元素上添加一个result属性:
<feGaussianBlur stdDeviation="3" in="SourceGraphic" result="blur"/>
这样,在另一个过滤器中,可以通过在in属性中设置值为blur来使用它作为输入源。
过滤器的尺寸
一个SVG过滤器的尺寸由x、y、width和height属性来决定。
x和y属性是相对于输入源图形的x和y属性来设定。由于过滤器的输出图形通常会比输入图形大(例如对图形添加模糊效果),因此,我们通常需要将x和y属性设置为负值来剪切掉多出的部分。
width和height属性指定过滤器的宽度和高度,大多数时候你需要指定宽度和高度大于输出图像的尺寸,以便于在剪切后尺寸和原来的图形基本相等。
多重过滤器
你可以通过
<defs>
    <filter id="blurFilter2" y="-10" height="40" x="-10" width="150">
        <feOffset in="SourceAlpha" dx="3" dy="3" result="offset2" />
        <feGaussianBlur in="offset2" stdDeviation="3"  result="blur2"/>

        <feMerge>
            <feMergeNode in="blur2" />
            <feMergeNode in="SourceGraphic" />
        </feMerge>
    </filter>
</defs>

<ellipse cx="55" cy="60" rx="25" ry="15"
style="stroke: none; fill: #0000ff; filter: url(#blurFilter2);" />这个例子中创建了一个SVG过滤器,它包括两个滤镜元素:
上面的代码得到的结果类似于一个drop阴影效果,下面是输出的结果:

高斯模糊滤镜
SVG高斯模糊滤镜可以将图像进行模糊处理。要使用高斯模糊滤镜,可以使用元素。下面是一个例子:
<defs>
    <filter id="blurFilter4" x="-20" y="-20" width="200" height="200">
        <feGaussianBlur in="SourceGraphic" stdDeviation="10" />
    </filter>
</defs>
<rect x="20" y="20" width="90" height="90"
      style="stroke: none; fill: #00ff00; filter: url(#blurFilter4);" />
这个例子中,在

模糊的尺寸
<defs>
    <filter id="blurFilter5" x="-20" y="-20" width="200" height="200">
        <feGaussianBlur in="SourceGraphic" stdDeviation="2" />
    </filter>
    <filter id="blurFilter6" x="-20" y="-20" width="200" height="200">
        <feGaussianBlur in="SourceGraphic" stdDeviation="6" />
    </filter>
    <filter id="blurFilter7" x="-20" y="-20" width="200" height="200">
        <feGaussianBlur in="SourceGraphic" stdDeviation="12" />
    </filter>
</defs>

<rect x="20" y="24" width="90" height="90"
      style="stroke: none; fill: #00ff00; filter: url(#blurFilter5);" />
<rect x="150" y="24" width="90" height="90"
      style="stroke: none; fill: #00ff00; filter: url(#blurFilter6);" />
<rect x="300" y="24" width="90" height="90"
style="stroke: none; fill: #00ff00; filter: url(#blurFilter7);" />得到的返回结果如下:

通过ALPHA通道进行模糊
在上面的例子中,过滤器的输入源是SourceGraphic,意思是使用图形的RGB颜色来作为输入源。你也可以使用图形的alpha通道来作为输入源,只需要将
<defs>
    <filter id="blurFilter8" x="-20" y="-20" width="200" height="200">
        <feGaussianBlur <b>in="SourceAlpha"</b> stdDeviation="10" />
    </filter>
</defs>
<rect x="20" y="20" width="90" height="90"
      style="stroke: none; fill: #00ff00; filter: url(#blurFilter8);" />
得到的返回结果如下:
注意观察,矩形的填充色是绿色的,但是通过alpha通道来进行模糊之后,得到的结果是黑白色的图像。
偏移滤镜
偏移滤镜会将输入图形进行移动之后作为结果输出。你可以使用它来上下左右移动图形。通常偏移滤镜都是用于制作drop阴影效果。下面是一个例子:
<defs>
    <filter id="offsetFilter1" x="-20" y="-20" width="200" height="200">
        <feOffset in="SourceGraphic" dx="80" dy="20" />
    </filter>
</defs>
<rect x="20" y="20" width="90" height="90"
      style="stroke: #9a12b3; fill: none; filter: url(#offsetFilter1);" />
<rect x="20" y="20" width="90" height="90"
style="stroke: #1f3a93; fill: none; " />得到的结果如下所示:
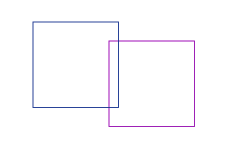
这个例子中定义了两个矩形,它们的尺寸和位置都相同。紫色描边的矩形被应用了偏移滤镜,使它相对于原来的位置向右移动了80个单位,向下移动了20各单位。
颜色矩阵滤镜
颜色矩阵滤镜用来在图形的颜色中应用矩阵变换。下面是一个例子:
<defs>
    <filter id="colorMatrixFilter1" x="-20" y="-20" width="200" height="200">
        <feColorMatrix in="SourceGraphic" type="matrix"
                values="0 0 0 1 0
                        0 0 0 1 0
                        0 0 0 1 0
                        0 0 0 1 0
                "/>
    </filter>
</defs>
<rect x="20" y="20" width="90" height="90"
      style="stroke: none; fill: #049372; filter: url(#colorMatrixFilter1);" />
<rect x="150" y="20" width="90" height="90"
style="stroke: #049372; fill: #049372;" />矩阵的值有
0 0 0 red   0
0 0 0 green 0
0 0 0 blue  0
0 0 0 1     0
上面的代码得到的返回结果如下:

注意观察,左边的图形应用了颜色矩阵滤镜,它原来有一个绿色的填充颜色,在使用了颜色矩阵之后只剩下描边了。右边是没有使用颜色矩阵的图形。
混合(BLEND)滤镜
混合滤镜可以将多个输入滤镜混合为一个。下面是一个例子:
<svg width="500" height="100">
  <defs>
    <filter id="blurFilter3" y="-10" height="40" x="-10" width="150">
      <feOffset in="SourceAlpha" dx="3" dy="3" result="offset3" />
      <feGaussianBlur in="offset3" stdDeviation="3"  result="blur3"/>

      <feBlend  in="SourceGraphic" in2="blur3" x="-10" width="160"/>

    </filter>
  </defs>

  <ellipse cx="55" cy="60" rx="25" ry="15"
         style="stroke: none; fill: #1f3a93;
                filter: url(#blurFilter3);" />

</svg>这个例子声明了三个滤镜。第一个偏移滤镜,第二个是高斯模糊滤镜。高斯模糊滤镜的输入是偏移滤镜的输出。第三个
上面代码得到的结果如下: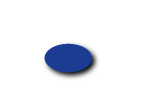
以上就是SVG进阶|SVG过滤器(SVG Filters)的内容,更多相关内容请关注PHP中文网(www.php.cn)!

Hot AI Tools

Undresser.AI Undress
AI-powered app for creating realistic nude photos

AI Clothes Remover
Online AI tool for removing clothes from photos.

Undress AI Tool
Undress images for free

Clothoff.io
AI clothes remover

Video Face Swap
Swap faces in any video effortlessly with our completely free AI face swap tool!

Hot Article

Hot Tools

Notepad++7.3.1
Easy-to-use and free code editor

SublimeText3 Chinese version
Chinese version, very easy to use

Zend Studio 13.0.1
Powerful PHP integrated development environment

Dreamweaver CS6
Visual web development tools

SublimeText3 Mac version
God-level code editing software (SublimeText3)

Hot Topics
 What exactly does H5 page production mean?
Apr 06, 2025 am 07:18 AM
H5 page production refers to the creation of cross-platform compatible web pages using technologies such as HTML5, CSS3 and JavaScript. Its core lies in the browser's parsing code, rendering structure, style and interactive functions. Common technologies include animation effects, responsive design, and data interaction. To avoid errors, developers should be debugged; performance optimization and best practices include image format optimization, request reduction and code specifications, etc. to improve loading speed and code quality.
 How to run the h5 project
Apr 06, 2025 pm 12:21 PM
Running the H5 project requires the following steps: installing necessary tools such as web server, Node.js, development tools, etc. Build a development environment, create project folders, initialize projects, and write code. Start the development server and run the command using the command line. Preview the project in your browser and enter the development server URL. Publish projects, optimize code, deploy projects, and set up web server configuration.
 How to make h5 click icon
Apr 06, 2025 pm 12:15 PM
The steps to create an H5 click icon include: preparing a square source image in the image editing software. Add interactivity in the H5 editor and set the click event. Create a hotspot that covers the entire icon. Set the action of click events, such as jumping to the page or triggering animation. Export H5 documents as HTML, CSS, and JavaScript files. Deploy the exported files to a website or other platform.
 What Does H5 Refer To? Exploring the Context
Apr 12, 2025 am 12:03 AM
H5referstoHTML5,apivotaltechnologyinwebdevelopment.1)HTML5introducesnewelementsandAPIsforrich,dynamicwebapplications.2)Itsupportsmultimediawithoutplugins,enhancinguserexperienceacrossdevices.3)SemanticelementsimprovecontentstructureandSEO.4)H5'srespo
 What is the H5 programming language?
Apr 03, 2025 am 12:16 AM
H5 is not a standalone programming language, but a collection of HTML5, CSS3 and JavaScript for building modern web applications. 1. HTML5 defines the web page structure and content, and provides new tags and APIs. 2. CSS3 controls style and layout, and introduces new features such as animation. 3. JavaScript implements dynamic interaction and enhances functions through DOM operations and asynchronous requests.
 What application scenarios are suitable for H5 page production
Apr 05, 2025 pm 11:36 PM
H5 (HTML5) is suitable for lightweight applications, such as marketing campaign pages, product display pages and corporate promotion micro-websites. Its advantages lie in cross-platformity and rich interactivity, but its limitations lie in complex interactions and animations, local resource access and offline capabilities.
 Is h5 same as HTML5?
Apr 08, 2025 am 12:16 AM
"h5" and "HTML5" are the same in most cases, but they may have different meanings in certain specific scenarios. 1. "HTML5" is a W3C-defined standard that contains new tags and APIs. 2. "h5" is usually the abbreviation of HTML5, but in mobile development, it may refer to a framework based on HTML5. Understanding these differences helps to use these terms accurately in your project.
 How to make pop-up windows with h5
Apr 06, 2025 pm 12:12 PM
H5 pop-up window creation steps: 1. Determine the triggering method (click, time, exit, scroll); 2. Design content (title, text, action button); 3. Set style (size, color, font, background); 4. Implement code (HTML, CSS, JavaScript); 5. Test and deployment.


