Detailed explanation of how to use Bootstrap tree menu plug-in TreeView.js
The jQuery multi-level list tree plug-in is based on Twitter Bootstrap and displays some inheritance tree structures, such as view trees, list trees, etc., in a simple and elegant way.
Bootstrap Tree View is a practical Bootstrap tree menu special effects plug-in. It is a very good Bootstrap plug-in. Many pages produced by Bootstrap now need this function. This plug-in requires Bootstrap 3 version and jQuery 2.0 or above. It supports many parameter customization functions. , colors, background colors, icons, links, etc. are still very good.
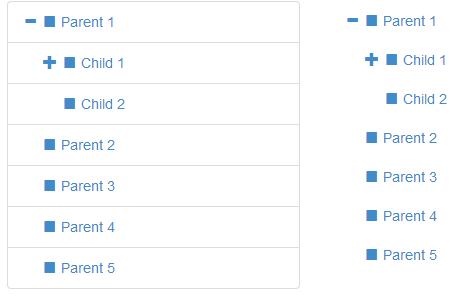
Rendering:
Specific usage:
Plug-in dependencies
Bootstrap v3.0.3
jQuery v2.0.3
The above two external dependency files have been tested and can be used normally. Other versions Bootstrap needs to be tested separately. This plugin does not support bootstrap 2.
How to use
First, introduce the dependency file and bootstrap-treeview.js file into the page.
<!-- Required Stylesheets --> <link href="./css/bootstrap.css" rel="stylesheet"> <!-- Required Javascript --> <script src="./js/jquery.js"></script> <script src="./js/bootstrap-treeview.js"></script>
HTML structure
You can use any HTML DOM element as the container of the list tree:
function getTree() { // Some logic to retrieve, or generate tree structure return data; } $('#tree').treeview({data: getTree()});
Data structure
In order to create the inheritance structure of the tree, you need to provide a nested structure js object for the list tree plug-in. For example:var tree = [ { text: "Parent 1", nodes: [ { text: "Child 1", nodes: [ { text: "Grandchild 1" }, { text: "Grandchild 2" } ] }, { text: "Child 2" } ] }, { text: "Parent 2" }, { text: "Parent 3" }, { text: "Parent 4" }, { text: "Parent 5" } ];
The simplest tree structure can only have one node, which can be implemented using a js object with a text attribute:
{ text: "Node 1" }
If you need to customize more content, you can Reference below:
{ text: "Node 1", icon: "glyphicon glyphicon-stop", selectedIcon: "glyphicon glyphicon-stop", color: "#000000", backColor: "#FFFFFF", href: "#node-1", selectable: true, state: { checked: true, disabled: true, expanded: true, selected: true }, tags: ['available'], nodes: [ {}, ... ] }
Global parameters
Parameters can customize the default appearance and behavior of treeview. The parameter uses an object to be passed in when the plug-in is initialized:
// Example: initializing the treeview // expanded to 5 levels // with a background color of green $('#tree').treeview({ data: data, // data is not optional levels: 5, backColor: 'green' });
Available methods
You can call methods in two ways:1. Plug-in wrapper: The wrapper of the plug-in can be used to access the underlying method agent.
$('#tree').treeview('methodName', args)
2. Use treeview directly: You can obtain the treeview object instance through one of the following two methods.
//该方法返回一个treeview的对象实例 $('#tree').treeview(true) .methodName(args); //对象实例也保存在DOM元素的data中, //可以使用'treeview'的id来访问它。 $('#tree').data('treeview') .methodName(args);

Hot AI Tools

Undresser.AI Undress
AI-powered app for creating realistic nude photos

AI Clothes Remover
Online AI tool for removing clothes from photos.

Undress AI Tool
Undress images for free

Clothoff.io
AI clothes remover

Video Face Swap
Swap faces in any video effortlessly with our completely free AI face swap tool!

Hot Article

Hot Tools

Notepad++7.3.1
Easy-to-use and free code editor

SublimeText3 Chinese version
Chinese version, very easy to use

Zend Studio 13.0.1
Powerful PHP integrated development environment

Dreamweaver CS6
Visual web development tools

SublimeText3 Mac version
God-level code editing software (SublimeText3)

Hot Topics

Using Bootstrap in Vue.js is divided into five steps: Install Bootstrap. Import Bootstrap in main.js. Use the Bootstrap component directly in the template. Optional: Custom style. Optional: Use plug-ins.

How to use Bootstrap to get the value of the search bar: Determines the ID or name of the search bar. Use JavaScript to get DOM elements. Gets the value of the element. Perform the required actions.

Use Bootstrap to implement vertical centering: flexbox method: Use the d-flex, justify-content-center, and align-items-center classes to place elements in the flexbox container. align-items-center class method: For browsers that do not support flexbox, use the align-items-center class, provided that the parent element has a defined height.

To set up the Bootstrap framework, you need to follow these steps: 1. Reference the Bootstrap file via CDN; 2. Download and host the file on your own server; 3. Include the Bootstrap file in HTML; 4. Compile Sass/Less as needed; 5. Import a custom file (optional). Once setup is complete, you can use Bootstrap's grid systems, components, and styles to create responsive websites and applications.

There are two ways to create a Bootstrap split line: using the tag, which creates a horizontal split line. Use the CSS border property to create custom style split lines.

There are several ways to insert images in Bootstrap: insert images directly, using the HTML img tag. With the Bootstrap image component, you can provide responsive images and more styles. Set the image size, use the img-fluid class to make the image adaptable. Set the border, using the img-bordered class. Set the rounded corners and use the img-rounded class. Set the shadow, use the shadow class. Resize and position the image, using CSS style. Using the background image, use the background-image CSS property.

How to use the Bootstrap button? Introduce Bootstrap CSS to create button elements and add Bootstrap button class to add button text

To adjust the size of elements in Bootstrap, you can use the dimension class, which includes: adjusting width: .col-, .w-, .mw-adjust height: .h-, .min-h-, .max-h-