 Web Front-end
 JS Tutorial
 Node.js development tutorial: Implementing file upload and verification functions based on the OnceIO framework
Node.js development tutorial: Implementing file upload and verification functions based on the OnceIO framework
OnceIO is the underlying web framework of OnceDoc enterprise content (network disk). It can realize full caching of template files and static files. It does not require I/O operations at all to run, and supports client cache optimization, GZIP compression, etc. (only in First compression), has very good performance, saving you server costs. Its modular function allows your Web to be stored in a distributed manner, that is, an expansion package includes front-end, back-end and database definitions. You can delete functions by adding/deleting directories to achieve true Modular expansion. Here is a series of articles introducing how to use OnceIO.
In this chapter, we will demonstrate how to use OnceIO to implement the file upload function.
Build a form in a web page file
Take a simple web page file.html that only has a file upload function as an example:
<!DOCTYPE html>
<html>
<body>
<form method="post" enctype="multipart/form-data" action="/file/upload">
<input type="file" name="file" /><br>
<input type="submit" value="Upload" />
</form>
</body>
</html>
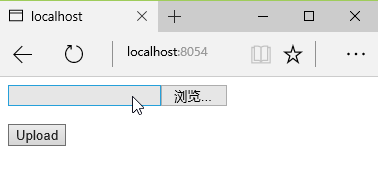
The browser display effect is like this:

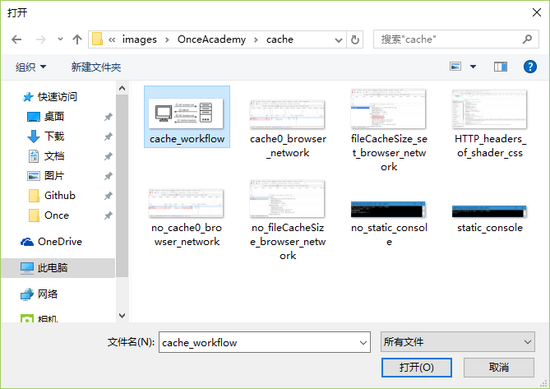
Click on the blank bar or "Browse..." The button can open the file browsing window to select the file that needs to be uploaded:

Establish the server receiving file logic
The server file websvr.js code is like this:
var fs = require('fs')
var path = require('path')
var onceio = require('../onceio/onceio')
var app = onceio()
app.get('/', function(req, res){
res.render('file.html')
})
app.file('/file/upload', function(req, res) {
var fileInfo = req.files.file || {}
fs.link(fileInfo.path, path.join('./fileStore', fileInfo.name))
res.send('File Uploaded Successfully')
}).before(function(req, res) {
var contentLength = req.headers['content-length'] || 0
if (contentLength > 1048576) {
res.send({ error: 'Error: File Size Limit (1 MB) Exceeded' })
} else {
return true
}
})var fs = require('fs') and var path = require('path') respectively imports the file system (fs) module provided by Node.js for operating files and the path module for processing file paths.
app.file(path, callback).before(callback) is equivalent to app.use(path, callback, {file: true}).before(callback) and is a middleware that processes uploaded files.
After the file is uploaded, its size, storage address, name, format and modification time will be placed in the file attribute of req.files (the name is the value of name in the input tag of type 'file') , its size information will be placed in the content-length attribute of req.headers.
before function
before is one of the main differences between OnceIO and other web frameworks. It can perform some basic verification on files before receiving them, such as size, type, etc., in order to obtain the best performance. Return true indicates that the verification is successful and the file starts to be received, otherwise the connection is closed and the upload is cancelled. In before, the req.session object is not available because the session may exist in a file or database redis, and obtaining the session is an asynchronous process that takes time. The before function needs to make an immediate judgment on the legality of the file.
In this example, the before callback function determines whether the uploaded file exceeds the size limit based on the content-length in req.headers (developers can change the upper limit of file upload size by modifying the constant in the if statement. The unit of content-length is byte. , 1024 * 1024 represents 1 MB), if it is exceeded, the file will not be uploaded, and the server will return an error message; if it is not exceeded, the function return value is true, and the server will continue to execute the callback function in app.file to transfer the file from temporary The address is transferred to the specified storage address, and the file is uploaded here.
Solving the problem of duplicate file names
Our current server program cannot solve the problem of duplicate file names. If the user uploads a file with the same name, the server will return an error that the file already exists. In order to solve this problem, we can add a timestamp between the main file name and the extension name of the file. The function code for this processing is as follows:
var timestampName = function(fileName){
// get filename extension
var extName = path.extname(fileName)
// get base name of the file
var baseName = path.basename(fileName, extName)
// insert timestamp between base name and filename extension
// the plus sign ('+') before new Date() converts it into a number
return baseName + +new Date() + extName
}Then replace fileInfo.name in the fs.link statement with timestampName(fileInfo. name):
fs.link(fileInfo.path, path.join('./fileStore', timestampName(fileInfo.name)))
The improved server program allows users to upload files with the same name. Taking the file named 'cache_workflow.png' uploaded 5 times as an example, 5 names will appear in the server's file storage address. Files starting with 'cache_workflow' but with different timestamps:

Hot AI Tools

Undresser.AI Undress
AI-powered app for creating realistic nude photos

AI Clothes Remover
Online AI tool for removing clothes from photos.

Undress AI Tool
Undress images for free

Clothoff.io
AI clothes remover

Video Face Swap
Swap faces in any video effortlessly with our completely free AI face swap tool!

Hot Article

Hot Tools

Notepad++7.3.1
Easy-to-use and free code editor

SublimeText3 Chinese version
Chinese version, very easy to use

Zend Studio 13.0.1
Powerful PHP integrated development environment

Dreamweaver CS6
Visual web development tools

SublimeText3 Mac version
God-level code editing software (SublimeText3)

Hot Topics
 1659
1659
 14
14
 1415
1415
 52
52
 1310
1310
 25
25
 1258
1258
 29
29
 1232
1232
 24
24
 Detailed graphic explanation of the memory and GC of the Node V8 engine
Mar 29, 2023 pm 06:02 PM
This article will give you an in-depth understanding of the memory and garbage collector (GC) of the NodeJS V8 engine. I hope it will be helpful to you!
 An article about memory control in Node
Apr 26, 2023 pm 05:37 PM
The Node service built based on non-blocking and event-driven has the advantage of low memory consumption and is very suitable for handling massive network requests. Under the premise of massive requests, issues related to "memory control" need to be considered. 1. V8’s garbage collection mechanism and memory limitations Js is controlled by the garbage collection machine
 Let's talk about how to choose the best Node.js Docker image?
Dec 13, 2022 pm 08:00 PM
Choosing a Docker image for Node may seem like a trivial matter, but the size and potential vulnerabilities of the image can have a significant impact on your CI/CD process and security. So how do we choose the best Node.js Docker image?
 Node.js 19 is officially released, let's talk about its 6 major features!
Nov 16, 2022 pm 08:34 PM
Node 19 has been officially released. This article will give you a detailed explanation of the 6 major features of Node.js 19. I hope it will be helpful to you!
 Let's talk in depth about the File module in Node
Apr 24, 2023 pm 05:49 PM
The file module is an encapsulation of underlying file operations, such as file reading/writing/opening/closing/delete adding, etc. The biggest feature of the file module is that all methods provide two versions of **synchronous** and **asynchronous**, with Methods with the sync suffix are all synchronization methods, and those without are all heterogeneous methods.
 Let's talk about the event loop in Node
Apr 11, 2023 pm 07:08 PM
The event loop is a fundamental part of Node.js and enables asynchronous programming by ensuring that the main thread is not blocked. Understanding the event loop is crucial to building efficient applications. The following article will give you an in-depth understanding of the event loop in Node. I hope it will be helpful to you!
 Let's talk about how to use pkg to package Node.js projects into executable files.
Dec 02, 2022 pm 09:06 PM
How to package nodejs executable file with pkg? The following article will introduce to you how to use pkg to package a Node project into an executable file. I hope it will be helpful to you!
 What should I do if node cannot use npm command?
Feb 08, 2023 am 10:09 AM
The reason why node cannot use the npm command is because the environment variables are not configured correctly. The solution is: 1. Open "System Properties"; 2. Find "Environment Variables" -> "System Variables", and then edit the environment variables; 3. Find the location of nodejs folder; 4. Click "OK".


