






使用css实现按钮点击时的波纹扩散过渡,核心做法是结合伪元素与css动画。具体而言,在按钮容器上设置相对定位并隐藏溢出,利用::after伪元素创建初始状态的圆形波纹,通过javascript监听点击事件获取坐标,动态计算波纹起始位置并触发关键帧动画,从而实现从中心向外扩散且透明度渐变的视觉效果。

如何确定波纹扩散的起始坐标
波纹必须从用户点击的具体位置开始扩散,而不是固定在按钮中心。这需要获取点击事件相对于按钮元素的坐标,并将其转换为百分比或像素值赋给伪元素。通过计算点击位置距离按钮左边缘和上边缘的距离,可以精确控制波纹生成的起点,确保视觉反馈与用户操作完全同步。
<button class="ripple-btn">Click Me</button>

<style>
.ripple-btn {
  position: relative;
  overflow: hidden;
  background: #007bff;
  color: white;
  padding: 10px 20px;
  border: none;
  cursor: pointer;
}

.ripple-btn::after {
  content: "";
  position: absolute;
  border-radius: 50%;
  background: rgba(255, 255, 255, 0.6);
  width: 10px;
  height: 10px;
  transform: translate(-50%, -50%) scale(0);
  opacity: 1;
  pointer-events: none;
}

@keyframes rippleAnim {
  to {
    transform: translate(-50%, -50%) scale(25);
    opacity: 0;
  }
}
</style>

<script>
document.querySelector('.ripple-btn').addEventListener('click', function(e) {
  const btn = this;
  const rect = btn.getBoundingClientRect();
  const x = e.clientX - rect.left;
  const y = e.clientY - rect.top;

  const ripple = btn.querySelector('::after') || document.createElement('span');
  if (!btn.querySelector('.ripple-effect')) {
    const span = document.createElement('span');
    span.className = 'ripple-effect';
    span.style.position = 'absolute';
    span.style.borderRadius = '50%';
    span.style.background = 'rgba(255, 255, 255, 0.6)';
    span.style.pointerEvents = 'none';
    span.style.transform = 'translate(-50%, -50%) scale(0)';
    span.style.animation = 'rippleAnim 0.6s linear';
    btn.appendChild(span);
  }

  const effect = btn.querySelector('.ripple-effect');
  effect.style.left = x + 'px';
  effect.style.top = y + 'px';
  effect.style.width = '10px';
  effect.style.height = '10px';
  effect.style.opacity = '1';
  effect.style.animation = 'none';
  void effect.offsetWidth; // Trigger reflow
  effect.style.animation = 'rippleAnim 0.6s linear';
});
</script>
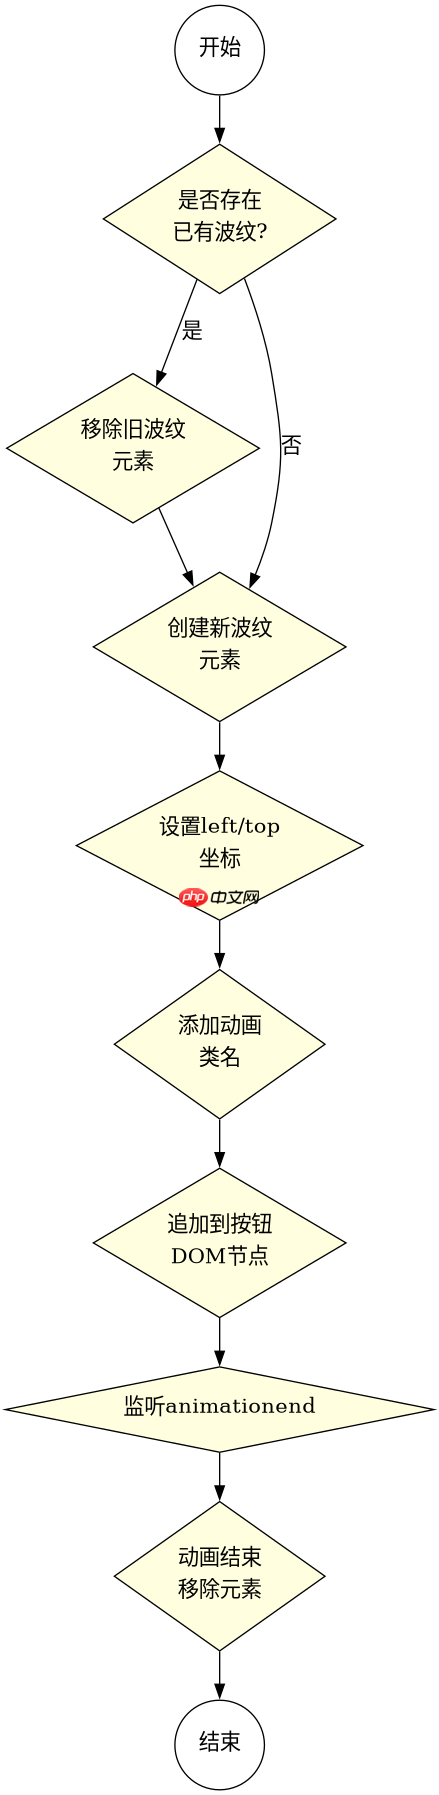
上述代码展示了完整的实现逻辑。首先定义按钮样式,设置overflow为hidden以裁剪超出边界的波纹。接着定义关键帧动画,将波纹从scale(0)放大到scale(25)并逐渐透明。JavaScript部分监听点击事件,计算点击坐标相对于按钮左上角的位置,然后动态更新波纹元素的left和top属性,并触发动画。每次点击都会复用同一个波纹元素,通过重置动画来实现连续效果。
立即学习“前端免费学习笔记(深入)”;
如何处理多次快速点击导致的样式冲突
当用户快速多次点击按钮时,如果每次点击都创建新的DOM元素,会导致内存泄漏和样式混乱。正确的做法是复用同一个波纹元素,或者在动画结束后移除旧元素并创建新元素。通过检查是否存在正在运行的波纹元素,可以避免重复添加,确保每次点击只产生一个有效的波纹效果,同时保持代码简洁高效。
<button class="ripple-btn-2">Fast Click Test</button>

<style>
.ripple-btn-2 {
  position: relative;
  overflow: hidden;
  background: #28a745;
  color: white;
  padding: 10px 20px;
  border: none;
  cursor: pointer;
}

.ripple-effect-2 {
  position: absolute;
  border-radius: 50%;
  background: rgba(255, 255, 255, 0.6);
  transform: translate(-50%, -50%) scale(0);
  opacity: 1;
  pointer-events: none;
  animation: rippleAnim2 0.6s linear forwards;
}

@keyframes rippleAnim2 {
  to {
    transform: translate(-50%, -50%) scale(25);
    opacity: 0;
  }
}
</style>

<script>
document.querySelector('.ripple-btn-2').addEventListener('click', function(e) {
  const btn = this;
  const existingRipple = btn.querySelector('.ripple-effect-2');

  if (existingRipple) {
    existingRipple.remove();
  }

  const rect = btn.getBoundingClientRect();
  const x = e.clientX - rect.left;
  const y = e.clientY - rect.top;

  const ripple = document.createElement('span');
  ripple.className = 'ripple-effect-2';
  ripple.style.left = x + 'px';
  ripple.style.top = y + 'px';
  ripple.style.width = '10px';
  ripple.style.height = '10px';
  btn.appendChild(ripple);

  ripple.addEventListener('animationend', () => {
    ripple.remove();
  });
});
</script>
该方案通过检测并移除已有的波纹元素来防止累积。每次点击时,先查找是否存在类名为ripple-effect-2的元素,若存在则立即移除。然后创建新的波纹元素,设置其位置和动画。动画结束时,通过animationend事件监听器自动移除该元素,确保DOM干净。这种方法既保证了视觉效果的连续性,又避免了性能问题。
波纹扩散动画的时间参数如何影响用户体验
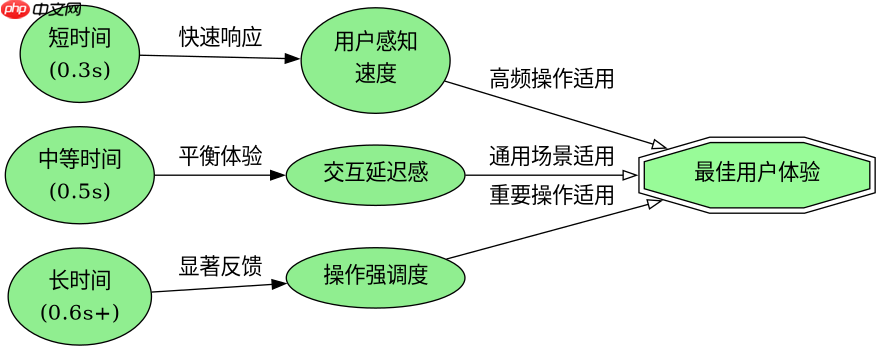
波纹扩散动画的持续时间直接影响用户的感知速度。时间过短会让波纹显得突兀,过长则会延迟交互反馈。通常建议设置为0.3至0.6秒之间,具体取决于按钮的大小和应用场景。较短的动画适合高频操作界面,较长的动画适合强调性操作。通过调整关键帧中的transform和opacity变化速率,可以精细控制波纹的扩散速度和消失过程,从而优化整体交互体验。