

Simple application of Laravel 51 events and event listening

?
Sometimes when we simply read the Laravel manual, we will have some doubts, such as authorization and events under system services, and what are the application scenarios of these functional services. In fact, if you have not experienced certain Development experienceIt is normal to have these doubts, but when we think more about it at work, we will find that sometimes we have actually seen these services before. Below is a very simple example of events and event monitoring and you will find out.
? This example is about the implementation of the number of views of the article. When the user views the article, the number of views of the article will increase by 1. Viewing the article by the user is an event. With an event, an event listener is needed to monitor the event. After the occurrence, perform the corresponding operation (increase the number of article views by 1). In fact, this monitoring mechanism is implemented in Laravel through the observer mode.
Register events and listeners
First we need to app/Providers/ Register the event listener mapping relationship in the EventServiceProvider.php under the directory, as follows:
<code><span>protected</span><span>$listen</span> = <span>[</span><span>'App\Events\BlogView'</span> => <span>[</span><span>'App\Listeners\BlogViewListener'</span><span>,</span><span>],</span><span>];</span></code>
Then execute the following command in the project root directory
<code>php artisan event:generate</code>
After the command is completed, it will automatically be in app respectively The BlogView.php and BlogViewListener.php files are generated in the /Events and app/Listensers directories.
Define events
<code><span><?php</span><span>namespace</span> App\Events<span>;</span><span>use</span> App\Events\Event<span>;</span><span>use</span> App\Post<span>;</span><span>use</span> Illuminate\Queue\SerializesModels<span>;</span><span>use</span> Illuminate\Contracts\Broadcasting\ShouldBroadcast<span>;</span><span>class</span> BlogView <span>extends</span> Event
{
    <span>use</span> SerializesModels<span>;</span><span>/**</span><span>     * Create a new event instance.</span><span>     *</span><span>     * </span><span>@return</span><span> void</span><span>     */</span><span>public</span><span>function</span><span>__construct</span><span>(</span>Post <span>$post</span><span>)</span>
    {
        <span>$this</span>->post = <span>$post</span><span>;</span>
    }

    <span>/**</span><span>     * Get the channels the event should be broadcast on.</span><span>     *</span><span>     * </span><span>@return</span><span> array</span><span>     */</span><span>public</span><span>function</span> broadcastOn<span>()</span>
    {
        <span>return</span><span>[];</span>
    }
}</span></code>In fact, when you see this, you will find that the event class just injects a Post instance and does not contain redundant logic.
Define the listener
The event listener receives the event instance in the handle method. The event:generate command will automatically import the appropriate event class and type hint event in the handle method. Within the handle method, you can perform any required logic in response to the event. Our code is implemented as follows:
<code><span><?php</span><span>namespace</span> App\Listeners<span>;</span><span>use</span> App\Events\BlogView<span>;</span><span>use</span> Illuminate\Queue\InteractsWithQueue<span>;</span><span>use</span> Illuminate\Contracts\Queue\ShouldQueue<span>;</span><span>use</span> Illuminate\Session\Store<span>;</span><span>class</span> BlogViewListener
{
    <span>protected</span><span>$session</span><span>;</span><span>/**</span><span>     * Create the event listener.</span><span>     *</span><span>     * </span><span>@return</span><span> void</span><span>     */</span><span>public</span><span>function</span><span>__construct</span><span>(</span>Store <span>$session</span><span>)</span>
    {
        <span>$this</span>->session = <span>$session</span><span>;</span>
    }

    <span>/**</span><span>     * Handle the event.</span><span>     *</span><span>     * </span><span>@param</span><span>BlogView</span><span>  $event</span><span>     * </span><span>@return</span><span> void</span><span>     */</span><span>public</span><span>function</span> handle<span>(</span>BlogView <span>$event</span><span>)</span>
    {
        <span>$post</span> = <span>$event</span>->post<span>;</span><span>//先进行判断是否已经查看过</span><span>if</span><span>(</span>!<span>$this</span>->hasViewedBlog<span>(</span><span>$post</span><span>))</span> {
            <span>//保存到数据库</span><span>$post</span>->view_cache = <span>$post</span>->view_cache + <span>1</span><span>;</span><span>$post</span>->save<span>();</span><span>//看过之后将保存到 Session </span><span>$this</span>->storeViewedBlog<span>(</span><span>$post</span><span>);</span>
        }
    }

    <span>protected</span><span>function</span> hasViewedBlog<span>(</span><span>$post</span><span>)</span>
    {
        <span>return</span><span>array_key_exists</span><span>(</span><span>$post</span>->id<span>,</span><span>$this</span>->getViewedBlogs<span>());</span>
    }

    <span>protected</span><span>function</span> getViewedBlogs<span>()</span>
    {
        <span>return</span><span>$this</span>->session->get<span>(</span><span>'viewed_Blogs'</span><span>,</span><span>[]);</span>
    }

    <span>protected</span><span>function</span> storeViewedBlog<span>(</span><span>$post</span><span>)</span>
    {
        <span>$key</span> = <span>'viewed_Blogs.'</span>.<span>$post</span>->id<span>;</span><span>$this</span>->session->put<span>(</span><span>$key</span><span>,</span><span>time</span><span>());</span>
    }

}</span></code>Some logic has also been explained in the comments.
Trigger event
After the event and event monitoring are completed, what we have to do is to implement the entire monitoring, that is, to trigger the user to open the article event. Here we use the fire method provided by Event, as follows:
<code><span><?php</span><span>namespace</span> App\Http\Controllers<span>;</span><span>use</span> Illuminate\Http\Request<span>;</span><span>use</span> App\Post<span>;</span><span>use</span> Illuminate\Support\Facades\Event<span>;</span><span>use</span> App\Http\Requests<span>;</span><span>use</span> App\Events\BlogView<span>;</span><span>use</span> App\Http\Controllers\Controller<span>;</span><span>class</span> BlogController <span>extends</span> Controller
{

    <span>public</span><span>function</span> showPost<span>(</span><span>$slug</span><span>)</span>
    {
        <span>$post</span> = Post::whereSlug<span>(</span><span>$slug</span><span>)</span>->firstOrFail<span>();</span>
        Event::fire<span>(</span><span>new</span> BlogView<span>(</span><span>$post</span><span>));</span><span>return</span> view<span>(</span><span>'home.blog.content'</span><span>)</span>->withPost<span>(</span><span>$post</span><span>);</span>
    }

}</span></code>Now open the page and find that the `view_cache in the database has been increased by 1 normally, so the whole thing is complete.
The above introduces the simple application of Laravel 51 events and event monitoring, including development experience and mapping relationships. I hope it will be helpful to friends who are interested in PHP tutorials.

Hot AI Tools

Undresser.AI Undress
AI-powered app for creating realistic nude photos

AI Clothes Remover
Online AI tool for removing clothes from photos.

Undress AI Tool
Undress images for free

Clothoff.io
AI clothes remover

Video Face Swap
Swap faces in any video effortlessly with our completely free AI face swap tool!

Hot Article
Hot Tools

Notepad++7.3.1
Easy-to-use and free code editor

SublimeText3 Chinese version
Chinese version, very easy to use

Zend Studio 13.0.1
Powerful PHP integrated development environment

Dreamweaver CS6
Visual web development tools

SublimeText3 Mac version
God-level code editing software (SublimeText3)
Hot Topics
 1666
1666
 14
1425
52
1328
25
1273
29
1253
24
14
1425
52
1328
25
1273
29
1253
24

 How to perform real-name authentication on Jingdong Mall APP
Mar 19, 2024 pm 02:31 PM
How to perform real-name authentication on Jingdong Mall APP
Mar 19, 2024 pm 02:31 PM
How to get real-name authentication on Jingdong Mall APP? Jingdong Mall is an online shopping platform that many friends often use. Before shopping, it is best for everyone to conduct real-name authentication so that they can enjoy complete services and get a better shopping experience. The following is the real-name authentication method for JD.com, I hope it will be helpful to netizens. 1. Install and open JD.com, and then log in to your personal account; 2. Then click [My] at the bottom of the page to enter the personal center page; 3. Then click the small [Settings] icon in the upper right corner to go to the setting function interface; 4. Select [Account and Security] to go to the account settings page; 5. Finally, click the [Real-name Authentication] option to fill in the real-name information; 6. The installation system requires you to fill in your real personal information and complete the real-name authentication
 Steps and precautions for registering a Hong Kong Apple ID (enjoy the unique advantages of the Hong Kong Apple Store)
Sep 02, 2024 pm 03:47 PM
Steps and precautions for registering a Hong Kong Apple ID (enjoy the unique advantages of the Hong Kong Apple Store)
Sep 02, 2024 pm 03:47 PM
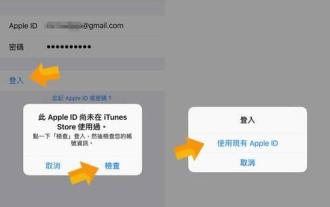
Apple's products and services have always been loved by users around the world. Registering a Hong Kong Apple ID will bring more convenience and privileges to users. Let’s take a look at the steps to register a Hong Kong Apple ID and what you need to pay attention to. How to register a Hong Kong Apple ID When using Apple devices, many applications and functions require using Apple ID to log in. If you want to download applications from Hong Kong or enjoy the preferential content of the Hong Kong AppStore, it is very necessary to register a Hong Kong Apple ID. This article will detail the steps on how to register a Hong Kong Apple ID and what you need to pay attention to. Steps: Select language and region: Find the "Settings" option on your Apple device and enter
 How to cancel the data package on China Unicom app How to cancel the data package on China Unicom
Mar 18, 2024 pm 10:10 PM
How to cancel the data package on China Unicom app How to cancel the data package on China Unicom
Mar 18, 2024 pm 10:10 PM
The China Unicom app can easily meet everyone's needs. It has various functions to solve your needs. If you want to handle various services, you can easily do it here. If you don't need it, you can unsubscribe in time here. It is effective. To avoid subsequent losses, many people sometimes feel that the data is not enough when using mobile phones, so they buy additional data packages. However, they don’t want it next month and want to unsubscribe immediately. Here, the editor explains We provide a method to unsubscribe, so that friends who need it can come and use it! In the China Unicom app, find the "My" option in the lower right corner and click on it. In the My interface, slide the My Services column and click the "I have ordered" option
 What is the full name of the app?
Aug 21, 2023 am 10:29 AM
What is the full name of the app?
Aug 21, 2023 am 10:29 AM
The full name of app is "Application", which is the abbreviation of application program. It refers to a software application developed for mobile devices. The emergence of apps provides users with a wider variety of mobile application choices, meeting various user needs in different scenarios. The app development process involves many aspects such as software design, programming, and testing. It also needs to consider issues such as device compatibility, performance optimization, and security.
 How to issue invoices with multipoint app
Mar 14, 2024 am 10:00 AM
How to issue invoices with multipoint app
Mar 14, 2024 am 10:00 AM
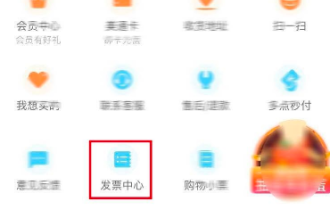
As a shopping voucher, invoices are crucial to our daily lives and work. So when we usually use Duodian app for shopping, how can we easily issue invoices in Duodian app? Below, the editor of this website will bring you a detailed step-by-step guide for opening invoices on multi-point apps. Users who want to know more must not miss it. Come and follow the text to learn more! In the [Invoice Center], click [Multi-Point Supermarket/Free Shopping], select the order that needs to be invoiced on the completed order page, click Next to fill in the [Invoice Information], [Recipient Information], and click Submit after confirming that they are correct. After a few minutes, enter the receiving mailbox, open the email, click on the electronic invoice download address, and finally download and print the electronic invoice.
 Blackmagic\'s pro-level video app lands on Android, but your phone probably can\'t run it
Jun 25, 2024 am 07:06 AM
Blackmagic\'s pro-level video app lands on Android, but your phone probably can\'t run it
Jun 25, 2024 am 07:06 AM
Blackmagic Design has finally brought its well-praised Blackmagic Camera app to Android. The professional video camera app is free to download, and it offers complete manual controls. These controls aim to make it easier for you to take pro-level cin
 This application requires Windows App Runtime
Feb 28, 2024 pm 05:37 PM
This application requires Windows App Runtime
Feb 28, 2024 pm 05:37 PM
WindowsAppRuntime or WinRT is like a toolbox created by Microsoft. It helps developers build and run applications on many devices such as computers, tablets, mobile phones, Xbox, etc. While running the application, if you receive the error message that this application requires WindowsAppRuntime, follow this post to resolve the issue. Why does this error occur? Windows App Runtime is a powerful tool that helps developers build and run applications on a variety of devices, including computers, tablets, phones, Xbox, and HoloLens. If you receive a prompt that WindowsAppRuntime is required to run
 How to implement PHP to jump to the page and carry POST data
Mar 22, 2024 am 10:42 AM
How to implement PHP to jump to the page and carry POST data
Mar 22, 2024 am 10:42 AM
PHP is a programming language widely used in website development, and page jumps and carrying POST data are common requirements in website development. This article will introduce how to implement PHP page jump and carry POST data, including specific code examples. In PHP, page jumps are generally implemented through the header function. If you need to carry POST data during the jump process, you can do it through the following steps: First, create a page containing a form, where the user fills in the information and clicks the submit button. Acti in the form
