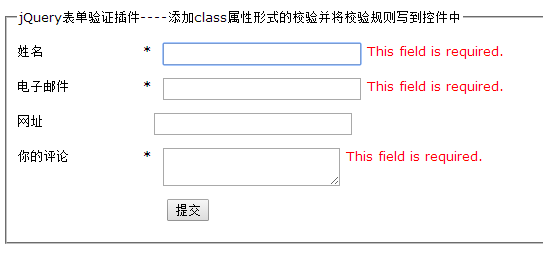
Learn more about jQuery Validate form validation_jquery
The example in this article introduces jQuery Validate form verification. It mainly uses jquery.metadata.js to write the verification rules directly in the class attribute and define error message prompts. It is shared with everyone for your reference. The specific content is as follows
1. Add another plug-in jquery.metadata.js and write the verification rules in the control.
2. The method of triggering verification needs to be rewritten.
$("#commentForm").validate({meta: "validate"});
3. The detailed code is as follows:
<html>
<head>
<meta http-equiv="Content-Type" content="text/html; charset=utf-8" />
 <title>jQuery表单验证插件----利用jquery.metadata.js将校验规则写到控件中</title>
 <script src="../../scripts/jquery-1.3.1.js" type="text/javascript"></script>
 <script src="lib/jquery.validate.js" type="text/javascript"></script>
<script src="lib/jquery.metadata.js" type="text/javascript"></script>
<style type="text/css">
* { font-family: Verdana; font-size: 96%; }
label { width: 10em; float: left; }
label.error { float: none; color: red; padding-left: .5em; vertical-align: top; }
p { clear: both; }
.submit { margin-left: 12em; }
em { font-weight: bold; padding-right: 1em; vertical-align: top; }
</style>
 <script type="text/javascript">
 $(document).ready(function(){

   $("#commentForm").validate({meta: "validate"});

 });
 </script>

</head>
<body>


 <form class="cmxform" id="commentForm" method="get" action="">
 <fieldset>
  <legend>jQuery表单验证插件----利用jquery.metadata.js将校验规则写到控件中</legend>
  <p>
   <label for="cusername">姓名</label>
   <em>*</em><input id="cusername" name="username" size="25" class="{validate:{required:true, minlength:2}}" />
  </p>
  <p>
   <label for="cemail">电子邮件</label>
   <em>*</em><input id="cemail" name="email" size="25"  class="{validate:{required:true, email:true}}" />
  </p>
  <p>
   <label for="curl">网址</label>
   <em> </em><input id="curl" name="url" size="25" value=""  class="{validate:{url:true}}" />
  </p>
  <p>
   <label for="ccomment">你的评论</label>
   <em>*</em><textarea id="ccomment" name="comment" cols="22" class="{validate:{required:true}}" ></textarea>
  </p>
  <p>
   <input class="submit" type="submit" value="提交"/>
  </p>
 </fieldset>
 </form>
</body>
</html>
Default verification rules:
- (1)required:true Required fields
- (2)remote:"check.php" Use the ajax method to call check.php to verify the input value
- (3)email:true You must enter an email in the correct format
- (4)url:true You must enter the URL in the correct format
- (5)date:true You must enter the date in the correct format. There is an error in date verification ie6, use with caution
- (6)dateISO:true You must enter the date (ISO) in the correct format, for example: 2009-06-23, 1998/01/22 Only the format is verified, not the validity
- (7)number:true You must enter a legal number (negative number, decimal)
- (8)digits:true You must enter an integer
- (9)creditcard: You must enter a legal credit card number
- (10)equalTo:"#field" The input value must be the same as #field
- <<> (11) Accept: Enter a string with a legal suffix (suffering from the suffix of the file)
- (12)maxlength:5 Enter a string with a maximum length of 5 (Chinese characters count as one character)
- (13)minlength:10 Enter a string with a minimum length of 10 (Chinese characters count as one character)
- (14)rangelength:[5,10] The input length must be a string between 5 and 10") (Chinese characters count as one character)
- (15)range:[5,10] The input value must be between 5 and 10
- (16)max:5 The input value cannot be greater than 5
- (17)min:10 The input value cannot be less than 10
messages: {
  required: "This field is required.",
  remote: "Please fix this field.",
  email: "Please enter a valid email address.",
  url: "Please enter a valid URL.",
  date: "Please enter a valid date.",
  dateISO: "Please enter a valid date (ISO).",
  dateDE: "Bitte geben Sie ein g眉ltiges Datum ein.",
  number: "Please enter a valid number.",
  numberDE: "Bitte geben Sie eine Nummer ein.",
  digits: "Please enter only digits",
  creditcard: "Please enter a valid credit card number.",
  equalTo: "Please enter the same value again.",
  accept: "Please enter a value with a valid extension.",
  maxlength: $.validator.format("Please enter no more than {0} characters."),
  minlength: $.validator.format("Please enter at least {0} characters."),
  rangelength: $.validator.format("Please enter a value between {0} and {1} characters long."),
  range: $.validator.format("Please enter a value between {0} and {1}."),
  max: $.validator.format("Please enter a value less than or equal to {0}."),
  min: $.validator.format("Please enter a value greater than or equal to {0}.")
},

To use class="{}", the package must be imported: jquery.metadata.js.
You can use the following method to modify the prompt content:
class="{required:true,minlength:5,messages:{required:'请输入内容'}}"
class="{required:true,minlength:5,equalTo:'#password'}"
<html>
<head>
<meta http-equiv="Content-Type" content="text/html; charset=utf-8" />
<title>jQuery表单验证插件----利用jquery.metadata.js将校验规则写到控件中(2)</title>
 <script src="../../scripts/jquery-1.3.1.js" type="text/javascript"></script>
 <script src="lib/jquery.validate.js" type="text/javascript"></script>
<script src="lib/jquery.metadata.js" type="text/javascript"></script>
<style type="text/css">
* { font-family: Verdana; font-size: 96%; }
label { width: 10em; float: left; }
label.error { float: none; color: red; padding-left: .5em; vertical-align: top; }
p { clear: both; }
.submit { margin-left: 12em; }
em { font-weight: bold; padding-right: 1em; vertical-align: top; }
</style>

 <script type="text/javascript">
 $(document).ready(function(){

   $("#commentForm").validate({meta: "validate"});

 });
 </script>

</head>
<body>


 <form class="cmxform" id="commentForm" method="get" action="">
 <fieldset>
  <legend>jQuery表单验证插件----利用jquery.metadata.js将校验规则写到控件中(2)</legend>
  <p>
   <label for="cusername">姓名</label>
   <em>*</em><input id="cusername" name="username" size="25" class="{validate:{required:true, minlength:2, messages:{required:'请输入姓名', minlength:'请至少输入两个字符'}}}" />
  </p>
  <p>
   <label for="cemail">电子邮件</label>
   <em>*</em><input id="cemail" name="email" size="25"  class="{validate:{required:true, email:true, messages:{required:'请输入电子邮件', email:'请检查电子邮件的格式'}}}" />
  </p>
  <p>
   <label for="curl">网址</label>
   <em> </em><input id="curl" name="url" size="25" value=""  class="{validate:{url:true, messages:{url:'请检查网址的格式'}}}" />
  </p>
  <p>
   <label for="ccomment">你的评论</label>
   <em>*</em><textarea id="ccomment" name="comment" cols="22" class="{validate:{required:true, messages:{required:'请输入您的评论'}}}" ></textarea>
  </p>
  <p>
   <input class="submit" type="submit" value="提交"/>
  </p>
 </fieldset>
 </form>
</body>
</html>
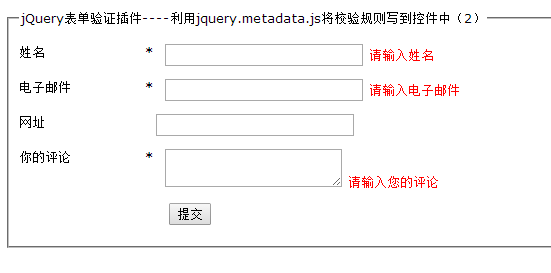
7. The effect is as follows:

The above is the entire content of this article. I hope it will be helpful for everyone to learn jQuery Validate form verification. Recently, many articles about jQuery Validate form verification have been updated. You can study them together.

Hot AI Tools

Undresser.AI Undress
AI-powered app for creating realistic nude photos

AI Clothes Remover
Online AI tool for removing clothes from photos.

Undress AI Tool
Undress images for free

Clothoff.io
AI clothes remover

Video Face Swap
Swap faces in any video effortlessly with our completely free AI face swap tool!

Hot Article

Hot Tools

Notepad++7.3.1
Easy-to-use and free code editor

SublimeText3 Chinese version
Chinese version, very easy to use

Zend Studio 13.0.1
Powerful PHP integrated development environment

Dreamweaver CS6
Visual web development tools

SublimeText3 Mac version
God-level code editing software (SublimeText3)

Hot Topics
 1664
1664
 14
14
 1423
1423
 52
52
 1317
1317
 25
25
 1268
1268
 29
29
 1243
1243
 24
24
 Detailed explanation of jQuery reference methods: Quick start guide
Feb 27, 2024 pm 06:45 PM
Detailed explanation of jQuery reference method: Quick start guide jQuery is a popular JavaScript library that is widely used in website development. It simplifies JavaScript programming and provides developers with rich functions and features. This article will introduce jQuery's reference method in detail and provide specific code examples to help readers get started quickly. Introducing jQuery First, we need to introduce the jQuery library into the HTML file. It can be introduced through a CDN link or downloaded
 How to use PUT request method in jQuery?
Feb 28, 2024 pm 03:12 PM
How to use PUT request method in jQuery? In jQuery, the method of sending a PUT request is similar to sending other types of requests, but you need to pay attention to some details and parameter settings. PUT requests are typically used to update resources, such as updating data in a database or updating files on the server. The following is a specific code example using the PUT request method in jQuery. First, make sure you include the jQuery library file, then you can send a PUT request via: $.ajax({u
 In-depth analysis: jQuery's advantages and disadvantages
Feb 27, 2024 pm 05:18 PM
jQuery is a fast, small, feature-rich JavaScript library widely used in front-end development. Since its release in 2006, jQuery has become one of the tools of choice for many developers, but in practical applications, it also has some advantages and disadvantages. This article will deeply analyze the advantages and disadvantages of jQuery and illustrate it with specific code examples. Advantages: 1. Concise syntax jQuery's syntax design is concise and clear, which can greatly improve the readability and writing efficiency of the code. for example,
 jQuery Tips: Quickly modify the text of all a tags on the page
Feb 28, 2024 pm 09:06 PM
Title: jQuery Tips: Quickly modify the text of all a tags on the page In web development, we often need to modify and operate elements on the page. When using jQuery, sometimes you need to modify the text content of all a tags in the page at once, which can save time and energy. The following will introduce how to use jQuery to quickly modify the text of all a tags on the page, and give specific code examples. First, we need to introduce the jQuery library file and ensure that the following code is introduced into the page: <
 Use jQuery to modify the text content of all a tags
Feb 28, 2024 pm 05:42 PM
Title: Use jQuery to modify the text content of all a tags. jQuery is a popular JavaScript library that is widely used to handle DOM operations. In web development, we often encounter the need to modify the text content of the link tag (a tag) on the page. This article will explain how to use jQuery to achieve this goal, and provide specific code examples. First, we need to introduce the jQuery library into the page. Add the following code in the HTML file:
 How to remove the height attribute of an element with jQuery?
Feb 28, 2024 am 08:39 AM
How to remove the height attribute of an element with jQuery? In front-end development, we often encounter the need to manipulate the height attributes of elements. Sometimes, we may need to dynamically change the height of an element, and sometimes we need to remove the height attribute of an element. This article will introduce how to use jQuery to remove the height attribute of an element and provide specific code examples. Before using jQuery to operate the height attribute, we first need to understand the height attribute in CSS. The height attribute is used to set the height of an element
 Understand the role and application scenarios of eq in jQuery
Feb 28, 2024 pm 01:15 PM
jQuery is a popular JavaScript library that is widely used to handle DOM manipulation and event handling in web pages. In jQuery, the eq() method is used to select elements at a specified index position. The specific usage and application scenarios are as follows. In jQuery, the eq() method selects the element at a specified index position. Index positions start counting from 0, i.e. the index of the first element is 0, the index of the second element is 1, and so on. The syntax of the eq() method is as follows: $("s
 How to tell if a jQuery element has a specific attribute?
Feb 29, 2024 am 09:03 AM
How to tell if a jQuery element has a specific attribute? When using jQuery to operate DOM elements, you often encounter situations where you need to determine whether an element has a specific attribute. In this case, we can easily implement this function with the help of the methods provided by jQuery. The following will introduce two commonly used methods to determine whether a jQuery element has specific attributes, and attach specific code examples. Method 1: Use the attr() method and typeof operator // to determine whether the element has a specific attribute


