

Yii uses Forms, yiiforms_PHP tutorial

Yii uses Forms, yiiforms
1. Create model
 <p>a.加入基类</p> <p>     use yii/base/Model</p> <p>b.创建类继承自基类</p> <p>c.创建所需要的变量</p> <p>e.定义规则</p> <p>f.注意里面用[]括起来</p> <p>例如:</p> <pre class="code"><?<span>php

namespace app\models;

</span><span>use</span><span> yii\base\Model;

</span><span>class</span> EntryForm <span>extends</span><span> Model
{
    </span><span>public</span> <span>$name</span><span>;
    </span><span>public</span> <span>$email</span><span>;

    </span><span>public</span> <span>function</span><span> rules()
    {
        </span><span>return</span><span> [
            [[</span>'name', 'email'], 'required'],<span>
            [</span>'email', 'email'],<span>
        ];
    }
}</span>
<p>该类继承自Yii 提供的一个基类 [[yii\base\Model]],该基类通常用来表示数据</p>
<p>补充:[[yii\base\Model]] 被用于普通模型类的父类并与数据表<strong>无关</strong>。[[yii\db\ActiveRecord]] 通常是普通模型类的父类但与数据表有关联(译注:[[yii\db\ActiveRecord]] 类其实也是继承自 [[yii\base\Model]],增加了数据库处理)。</p>
<p><code>EntryForm</code> 类包含 <code>name</code> 和 <code>email</code> 两个公共成员,用来储存用户输入的数据。它还包含一个名为 <code>rules()</code> 的方法,用来返回数据验证规则的集合。上面声明的验证规则表示:
<ul>
<li><code>name</code> 和 <code>email</code> 值都是必须的
<li><code>email</code> 的值必须满足email规则验证</li></ul>
<p>如果你有一个处理用户提交数据的 <code>EntryForm</code> 对象,你可以调用它的 [[yii\base\Model::validate()|validate()]] 方法触发数据验证。如果有数据验证失败,将把 [[yii\base\Model::hasErrors|hasErrors]] 属性设为 ture,想要知道具体发生什么错误就调用 [[yii\base\Model::getErrors|getErrors]]。</p>
<pre class="code"><?<span>php
</span><span>$model</span> = <span>new</span><span> EntryForm();
</span><span>$model</span>->name = 'Qiang'<span>;
</span><span>$model</span>->email = 'bad'<span>;
</span><span>if</span> (<span>$model</span>-><span>validate()) {
    </span><span>//</span><span> 验证成功!</span>
} <span>else</span><span> {
    </span><span>//</span><span> 失败!
    // 使用 $model->getErrors() 获取错误详情</span>
}2. Create operation
<p>下面你得在 <code>site</code> 控制器中创建一个 <code>entry</code> 操作用于新建的模型。操作的创建和使用已经在说一声你好小节中解释了。</p>
<pre class="code"><?<span>php

namespace app\controllers;

</span><span>use</span><span> Yii;
</span><span>use</span><span> yii\web\Controller;
</span><span>use</span><span> app\models\EntryForm;

</span><span>class</span> SiteController <span>extends</span><span> Controller
{
    </span><span>//</span><span> ...其它代码...</span>

    <span>public</span> <span>function</span><span> actionEntry()
    {
        </span><span>$model</span> = <span>new</span><span> EntryForm;

        </span><span>if</span> (<span>$model</span>->load(Yii::<span>$app</span>->request->post()) && <span>$model</span>-><span>validate()) {
            </span><span>//</span><span> 验证 $model 收到的数据

            // 做些有意义的事 ...</span>

            <span>return</span> <span>$this</span>->render('entry-confirm', ['model' => <span>$model</span><span>]);
        } </span><span>else</span><span> {
            </span><span>//</span><span> 无论是初始化显示还是数据验证错误</span>
            <span>return</span> <span>$this</span>->render('entry', ['model' => <span>$model</span><span>]);
        }
    }
}</span>This operation first creates a EntryForm object. Then try to collect user-submitted data from $_POST, which is collected by Yii's [[yiiwebRequest::post()]] method. If the model is successfully populated with data (that is, the user has submitted the HTML form), the operation will call [[yiibaseModel::validate()|validate()]] to ensure that the user submitted valid data.
<p>补充:表达式 <code>Yii::$app</code> 代表应用实例,它是一个全局可访问的单例。同时它也是一个服务定位器,能提供<code>request</code>,<code>response</code>,<code>db</code> 等等特定功能的组件。在上面的代码里就是使用 <code>request</code> 组件来访问应用实例收到的 <code>$_POST</code> 数据。</p>
After the user submits the form, the operation will render a view named entry-confirm to confirm the data entered by the user. If the form is submitted without filling it out, or the data contains errors (Translator: such as email format is incorrect), the entry view will render the output, along with the form and the details of the validation error.
<p>注意:在这个简单例子里我们只是呈现了有效数据的确认页面。实践中你应该考虑使用 [[yii\web\Controller::refresh()|refresh()]] 或 [[yii\web\Controller::redirect()|redirect()]] 去避免表单重复提交问题。</p>
<p> </p>
3. Create a view
<p>最后创建两个视图文件 <code>entry-confirm</code> 和 <code>entry</code>。他们会被刚才创建的 <code>entry</code> 操作渲染。
<p><code>entry-confirm</code> 视图简单地显示提交的 name 和 email 数据。视图文件保存在 <code>views/site/entry-confirm.php</code>。</p>
<pre class="code"><?<span>php
</span><span>use</span><span> yii\helpers\Html;
</span>?>
<p>You have entered the following information:</p>

<ul>
    <li><label>Name</label>: <?= Html::encode(<span>$model</span>->name) ?></li>
    <li><label>Email</label>: <?= Html::encode(<span>$model</span>->email) ?></li>
</ul>
<p><code>entry</code> 视图显示一个 HTML 表单。视图文件保存在 <code>views/site/entry.php</code></p>
<pre class="code"><?<span>php
</span><span>use</span><span> yii\helpers\Html;
</span><span>use</span><span> yii\widgets\ActiveForm;
</span>?>
<?php <span>$form</span> = ActiveForm::begin(); ?>

    <?= <span>$form</span>->field(<span>$model</span>, 'name') ?>

    <?= <span>$form</span>->field(<span>$model</span>, 'email') ?>

    <div <span>class</span>="form-group">
        <?= Html::submitButton('Submit', ['class' => 'btn btn-primary']) ?>
    </div>

<?php ActiveForm::<span>end</span>(); ?><p>视图使用了一个功能强大的小部件 [[yii\widgets\ActiveForm|ActiveForm]] 去生成 HTML 表单。其中的 <code>begin()</code> 和 <code>end()</code> 分别用来渲染表单的开始和关闭标签。在这两个方法之间使用了 [[yii\widgets\ActiveForm::field()|field()]] 方法去创建输入框。第一个输入框用于 “name”,第二个输入框用于 “email”。之后使用 [[yii\helpers\Html::submitButton()]] 方法生成提交按钮。</p> <pre class="code"><span>use</span><span> yii\helpers\Html; </span><span>use</span> yii\wigets\ActiveForm;
Remember to use widgets, you need to introduce these two

Hot AI Tools

Undresser.AI Undress
AI-powered app for creating realistic nude photos

AI Clothes Remover
Online AI tool for removing clothes from photos.

Undress AI Tool
Undress images for free

Clothoff.io
AI clothes remover

Video Face Swap
Swap faces in any video effortlessly with our completely free AI face swap tool!

Hot Article
Hot Tools

Notepad++7.3.1
Easy-to-use and free code editor

SublimeText3 Chinese version
Chinese version, very easy to use

Zend Studio 13.0.1
Powerful PHP integrated development environment

Dreamweaver CS6
Visual web development tools

SublimeText3 Mac version
God-level code editing software (SublimeText3)
Hot Topics


 The world's most powerful open source MoE model is here, with Chinese capabilities comparable to GPT-4, and the price is only nearly one percent of GPT-4-Turbo
May 07, 2024 pm 04:13 PM
The world's most powerful open source MoE model is here, with Chinese capabilities comparable to GPT-4, and the price is only nearly one percent of GPT-4-Turbo
May 07, 2024 pm 04:13 PM
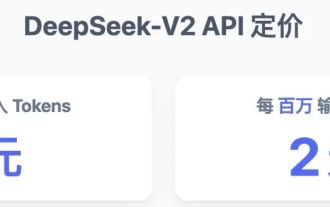
Imagine an artificial intelligence model that not only has the ability to surpass traditional computing, but also achieves more efficient performance at a lower cost. This is not science fiction, DeepSeek-V2[1], the world’s most powerful open source MoE model is here. DeepSeek-V2 is a powerful mixture of experts (MoE) language model with the characteristics of economical training and efficient inference. It consists of 236B parameters, 21B of which are used to activate each marker. Compared with DeepSeek67B, DeepSeek-V2 has stronger performance, while saving 42.5% of training costs, reducing KV cache by 93.3%, and increasing the maximum generation throughput to 5.76 times. DeepSeek is a company exploring general artificial intelligence
 AI subverts mathematical research! Fields Medal winner and Chinese-American mathematician led 11 top-ranked papers | Liked by Terence Tao
Apr 09, 2024 am 11:52 AM
AI subverts mathematical research! Fields Medal winner and Chinese-American mathematician led 11 top-ranked papers | Liked by Terence Tao
Apr 09, 2024 am 11:52 AM
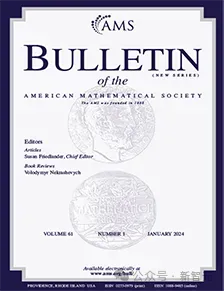
AI is indeed changing mathematics. Recently, Tao Zhexuan, who has been paying close attention to this issue, forwarded the latest issue of "Bulletin of the American Mathematical Society" (Bulletin of the American Mathematical Society). Focusing on the topic "Will machines change mathematics?", many mathematicians expressed their opinions. The whole process was full of sparks, hardcore and exciting. The author has a strong lineup, including Fields Medal winner Akshay Venkatesh, Chinese mathematician Zheng Lejun, NYU computer scientist Ernest Davis and many other well-known scholars in the industry. The world of AI has changed dramatically. You know, many of these articles were submitted a year ago.
 Google is ecstatic: JAX performance surpasses Pytorch and TensorFlow! It may become the fastest choice for GPU inference training
Apr 01, 2024 pm 07:46 PM
Google is ecstatic: JAX performance surpasses Pytorch and TensorFlow! It may become the fastest choice for GPU inference training
Apr 01, 2024 pm 07:46 PM
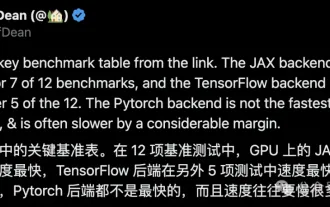
The performance of JAX, promoted by Google, has surpassed that of Pytorch and TensorFlow in recent benchmark tests, ranking first in 7 indicators. And the test was not done on the TPU with the best JAX performance. Although among developers, Pytorch is still more popular than Tensorflow. But in the future, perhaps more large models will be trained and run based on the JAX platform. Models Recently, the Keras team benchmarked three backends (TensorFlow, JAX, PyTorch) with the native PyTorch implementation and Keras2 with TensorFlow. First, they select a set of mainstream
 Hello, electric Atlas! Boston Dynamics robot comes back to life, 180-degree weird moves scare Musk
Apr 18, 2024 pm 07:58 PM
Hello, electric Atlas! Boston Dynamics robot comes back to life, 180-degree weird moves scare Musk
Apr 18, 2024 pm 07:58 PM
Boston Dynamics Atlas officially enters the era of electric robots! Yesterday, the hydraulic Atlas just "tearfully" withdrew from the stage of history. Today, Boston Dynamics announced that the electric Atlas is on the job. It seems that in the field of commercial humanoid robots, Boston Dynamics is determined to compete with Tesla. After the new video was released, it had already been viewed by more than one million people in just ten hours. The old people leave and new roles appear. This is a historical necessity. There is no doubt that this year is the explosive year of humanoid robots. Netizens commented: The advancement of robots has made this year's opening ceremony look like a human, and the degree of freedom is far greater than that of humans. But is this really not a horror movie? At the beginning of the video, Atlas is lying calmly on the ground, seemingly on his back. What follows is jaw-dropping
 KAN, which replaces MLP, has been extended to convolution by open source projects
Jun 01, 2024 pm 10:03 PM
KAN, which replaces MLP, has been extended to convolution by open source projects
Jun 01, 2024 pm 10:03 PM
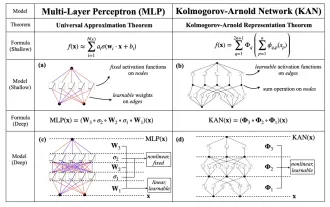
Earlier this month, researchers from MIT and other institutions proposed a very promising alternative to MLP - KAN. KAN outperforms MLP in terms of accuracy and interpretability. And it can outperform MLP running with a larger number of parameters with a very small number of parameters. For example, the authors stated that they used KAN to reproduce DeepMind's results with a smaller network and a higher degree of automation. Specifically, DeepMind's MLP has about 300,000 parameters, while KAN only has about 200 parameters. KAN has a strong mathematical foundation like MLP. MLP is based on the universal approximation theorem, while KAN is based on the Kolmogorov-Arnold representation theorem. As shown in the figure below, KAN has
 How to use Baidu Netdisk app
Mar 27, 2024 pm 06:46 PM
How to use Baidu Netdisk app
Mar 27, 2024 pm 06:46 PM
Cloud storage has become an indispensable part of our daily life and work nowadays. As one of the leading cloud storage services in China, Baidu Netdisk has won the favor of a large number of users with its powerful storage functions, efficient transmission speed and convenient operation experience. And whether you want to back up important files, share information, watch videos online, or listen to music, Baidu Cloud Disk can meet your needs. However, many users may not understand the specific use method of Baidu Netdisk app, so this tutorial will introduce in detail how to use Baidu Netdisk app. Users who are still confused can follow this article to learn more. ! How to use Baidu Cloud Network Disk: 1. Installation First, when downloading and installing Baidu Cloud software, please select the custom installation option.
 How to use NetEase Mailbox Master
Mar 27, 2024 pm 05:32 PM
How to use NetEase Mailbox Master
Mar 27, 2024 pm 05:32 PM
NetEase Mailbox, as an email address widely used by Chinese netizens, has always won the trust of users with its stable and efficient services. NetEase Mailbox Master is an email software specially created for mobile phone users. It greatly simplifies the process of sending and receiving emails and makes our email processing more convenient. So how to use NetEase Mailbox Master, and what specific functions it has. Below, the editor of this site will give you a detailed introduction, hoping to help you! First, you can search and download the NetEase Mailbox Master app in the mobile app store. Search for "NetEase Mailbox Master" in App Store or Baidu Mobile Assistant, and then follow the prompts to install it. After the download and installation is completed, we open the NetEase email account and log in. The login interface is as shown below
 BTCC tutorial: How to bind and use MetaMask wallet on BTCC exchange?
Apr 26, 2024 am 09:40 AM
BTCC tutorial: How to bind and use MetaMask wallet on BTCC exchange?
Apr 26, 2024 am 09:40 AM
MetaMask (also called Little Fox Wallet in Chinese) is a free and well-received encryption wallet software. Currently, BTCC supports binding to the MetaMask wallet. After binding, you can use the MetaMask wallet to quickly log in, store value, buy coins, etc., and you can also get 20 USDT trial bonus for the first time binding. In the BTCCMetaMask wallet tutorial, we will introduce in detail how to register and use MetaMask, and how to bind and use the Little Fox wallet in BTCC. What is MetaMask wallet? With over 30 million users, MetaMask Little Fox Wallet is one of the most popular cryptocurrency wallets today. It is free to use and can be installed on the network as an extension
